Solokha on the head with your own hands: pattern and production
Solokha is a women's hair accessory in the form of a headband. Inside the headband there is a wire that maintains the shape of the hairstyle. With its help you can quickly style your hair. To create a hairstyle, you just need to twist the edges of the straw. The accessory for women is presented in a wide range and style: for everyday occasions, for work, for evening events.
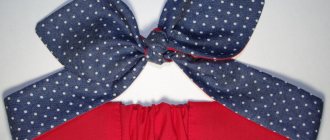
Stylish headband
Solokha is a universal accessory that is suitable for women with different haircuts. It is suitable for any look, helps to emphasize individuality and make the look stylish. From the ends of the decorative headdress you can weave bows, knots, and also complement your hairstyle with various invisible pins, hairpins, and clips.
Solokha accessory for women
Fabric headbands
When choosing the type of headband, you need to take into account the color, structure, length of the curls, and hair style. It is important that the headband matches the image.
Stylist's recommendations:
- loose hair - the fabric is pulled under the hair, it is better to tie the ends in front;
- collected in a bun - the bandage is put on top of the hairstyle;
- for long curls, use a wide strand; for medium or short curls, use a narrow one;
- bangs – can be left loose or hidden under a bandage, you need to take into account the height of the forehead;
- curls – broadband options are suitable;
- You cannot wear an accessory that matches your hair; it should be matched to the color of clothes, shoes, belts, jewelry, etc.
Headband Design Tips:
- the longer the solokh, the greater the field for the manifestation of imagination. The ends can be tied into a knot, decorated with a bow, twisted around the headband like a turban, left hanging at the sides, pinned with an original clip;
- for everyday style - active girls will want headbands with wires that fit well on the head;
- with bows or flowers - for sundresses, retro or for special occasions;
- with lace or colorful decor - for a vintage look or evening dresses, especially with straps;
- knitted - under any insulated clothing;
- bright animalistic, floral, abstract or geometric print - will organically fit into casual, boho, street or ethnic style;
- elastic or knitted products - look good under summer outfits, sportswear, jeans, shorts, skirts, flat shoes;
- two- or one-color - for office style or classic. One shade is selected to match the main color of the outfit, the second - with an emphasis on jewelry, bag, eyes, etc. A good example is large or small peas.
Historical reference
Solokha is one of the types of headband. The accessory got its name from the heroine of N.V. Gogol’s work “Evenings on a Farm near Dikanka” - Solokha, who was famous for her bad character and hung out with devils. The main character wore an unusual headdress - she folded an ordinary scarf several times and tied it around her head, leaving small ponytails on top.
Such accessories were most popular in the middle of the last century. This can be seen if you look at old pin-up photographs, where all the famous models pose in a stylish solokh. However, in later years, the unusual headband was widely used by many fashionistas. In the 21st century, the accessory has again become popular; many world stars wear it to various events and ceremonies.
The original headband on pin-up models
Important! Today, straw can be purchased in many stores, but you can also sew it yourself, based on your taste preferences.
You might be interested in what can be made from velvet: cutting rules
Denim headband
An integral attribute of everyday street style is denim clothing. It is even worn at business meetings, ceremonial or public events. The denim headband can be combined with jackets, shirts, dresses, overalls, shorts or shoes made of similar fabric.
Any color from white, light blue to classic blue. Stylish chic - decor with embroidery, fringe, massive metal elements or stones. Looks trendy with ripped jeans.
To sew a headband, you need to choose a certain type of denim. Chambry, stretch, summer are suitable. From lightweight material, you can sew a straw with an elastic band or wire for better fixation on the head. The choice depends on the hair and application.
What is needed for work
Before work, it is necessary to prepare auxiliary equipment;
- a piece of fabric up to 90 cm long and up to 15 cm wide (the exact dimensions depend on the volume of the head). If the bandage is double-sided, you will have to take two pieces of fabric up to 7 cm wide and up to 90 cm long;
- scissors;
- strong threads, needles;
- a piece of wire up to 170 cm long, its diameter should be within 2 mm;
- cardboard (for creating samples);
- a simple pencil;
- measuring tape.
Sewing materials
Important! To decorate a fabric headband, you need to prepare beads, rhinestones, seed beads, and sequins.
What to make a beautiful headband from
[ads-mob-2] [ads-pc-2] The idea of supporting her hair with a scarf folded into a straight linen belongs to the heroine of the film “Evenings on a Farm near Dikanka”. Hence the name of the Solokh bandage. Following fashion trends, designers brought the idea to perfection. The collections feature headbands that can be sewn onto the head.
To make solokha, different cuts and types of fabric are used:
- openwork, knitted, cotton, silk, velvet, satin, chiffon, denim;
- thin summer or thick warm, knitted or crocheted;
- seamless or assembled from parts;
- straight stripes or with ears, replacing earmuffs for cold weather;
- narrow or wide canvases.
Fashionable Headbands Print:
- single-color or two-color pattern for a classic or office style;
- with a floral, geometric, striped or other bright pattern, which is selected for an evening or daytime look.
Creative decoration of headbands that can be sewn:
- rhinestones, metal or wooden baubles, shells, sparkling crystals, sequins;
- trimmed with beads, large stones, beads, buttons;
- they make elements from foamiran (plastic material), lace braid, felt, polymer clay;
- complemented with fur, feathers, brooch, kanzashi (Japanese-style bows), etc.
What tools and materials do you need to prepare to sew a solokh headband:
- cutting scissors;
- threads, needle with a large eye;
- wire with a diameter of up to 2 mm, length 170 cm;
- a piece of fabric up to 12-14 cm wide, horizontally up to 90 cm;
- cardboard or whatman paper to make patterns;
- rubber;
- chalk and pencil;
- ruler.
Many homebodies who do needlework are proficient in various techniques of knitting from yarn, weaving from fabric strips or ropes. These are Japanese kumihimo or mosaic techniques. Different versions of the models are shown in the photo.
Suitable for whom and for what occasions?
Due to the abundance of types, solokha can be worn under any clothes and for any events:
- parties;
- Job;
- walks around the city;
- summer holidays in hot countries.
Women's headbands for summer
The accessory looks appropriate on women with any hairstyle: both long and straight hair and cascading haircuts. Using an elastic band or wire, you can create voluminous hairstyles that are suitable for any event.
Important! The product is also used for newborn girls.
Solokha is a stylish head accessory that gained popularity back in the last century. You can sew the product yourself. To work, you only need fabric, a little wire or elastic and decorative elements. It will only take 30-50 minutes to make a stylish headband.
How to sew a solokha (bandage) on a child’s head
Even a beginner can easily handle making the product. The process itself does not require professional cutting and sewing skills. The main thing is to perform the actions correctly and accurately, following the step-by-step instructions.
Master class on how to sew a wide Solokh-style headband for a girl:
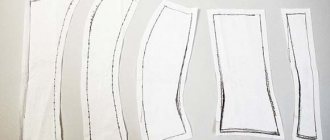
- You need to start with a pattern, using a ruler to measure the fabric base.
- Cut two identical strips for the bandage - width 14 cm, length 38 cm.
- Make a blank for the tips from cardboard - rounded or sharp.
- Place the strips of fabric right sides facing each other.
- Adapt the pattern to the corners of the canvases, trace with chalk.
- Sew the bandage elements around the perimeter without touching the bottom.
- Make the second part in the same way.
- The last element is the middle strip with an elastic band, the width is unchanged, the length is 20 cm.
- Fold the fabric face down and sew along the edge.
- Carefully turn out all three parts and iron them.
- Take a piece of wide elastic band, approximately 10-12 cm.
- Insert into the middle short piece.
- On a long strip, bend the edge by 0.5-1 cm.
- Overlapping, place the parts with an elastic band on one end and baste.
- Carefully stitch the top of the bandage.
- Repeat the same steps on the other side.
- Tie the ends nicely.
Models with wire are recommended for children over 5 years of age and adults.
How to tie a solokh headband on loose hair?
It would seem that there are few options? But small nuances allow you to create completely different hairstyles! It is important how to tie the solokh bandage - how close to the forehead.
Along the hairline (covering it) it makes sense to tie a wide “solokha”. In this case, it is good if the styling has volume - for example, the hair is curled from the roots. Long and thick hair, on the contrary, can be straightened.
A short haircut needs to be given volume using a hair dryer, comb and styling products - the finished styling may vary depending on your haircut. A very short haircut can be fixed “on end” at the back of the head!
The second option is to tie a solokha, stepping back from the hairline by about one or two centimeters. This is how headbands imitate headbands are worn.
Many interesting options appear if you tie the “solokha” with a large indentation - almost in the middle of the crown. The facial strands can be curled into curls or made into a wide “wave”.
If you have bangs, then in any case you need to leave them on the front part. Even “school” bangs look good with this type of headband, but asymmetrically cut bangs are also interesting (or even bangs can be combed slightly obliquely).
And “solokha” is just a lifesaver for girls who are at the stage of growing bangs and want to somehow hide the growing strands and open their forehead!
Fabric turban master class
To work you will need:
- Light fabric - width from 14 to 18 cm, length - 70-75 cm (2 strips). You can simply cut a long scarf.
- Centimeter.
- Threads to match the color of the fabric.
- Pins, scissors.
- Beads or rhinestones (optional).
- Thin wire 0.3 or 0.5 mm. (Needed for the turban to keep its shape).
We measure the head. The bandage should be no smaller, but slightly larger in size than the head. We fold both strips lengthwise and stitch the edges of both, leaving a 4-5 cm section unstitched - this is necessary for turning it inside out. We also stitch the transverse ends. Turn it inside out. It turned out to be two “pipes”. Bend the ends of the wire (make a loop at both ends). Place the wire into one of the pipes, inserting it into the sharp corner of the “pipe” and sewing it with thread. Sew open areas with a blind stitch. Next, we lay out both “pipes” on the table. Red “pipe” on top.
Pass one “pipe” into the other, as in the photo. We thread the red part into the burgundy one. Pull out the burgundy piece so that both “pipes” are connected together. Manually secure the joints of the parts with invisible stitches.
Can be decorated with beads or beads
Series of messages “Sewing”:
Part 1 - SEW A FRENCH KERCHIEF Part 2 - French headscarf! Methods of tying, pattern + master class... Part 37 - WALKING THROUGH THE HANDCRAFTS RUBRICS FOR THE CURIOUS AND SKILLED Part 38 - Sewing an elegant beret Part 39 - Stylish DIY headband Part 40 - Scarf with an elastic band Part 41 - Original headdress made of triangular fabric ... Part 46 - MASTER CLASS: BOOTS FOR BABIES Part 47 - SEWING SKIRTS: LARGE COLLECTION OF PATTERNS! Part 48 - HOW TO COMPETENTLY AND CORRECTLY SEW AN ELASTIC BAND INTO CLOTHES: 4 WAYS
How to tie Solokha
You can tie it in different ways, but most often the bandage is used as a headband, twisting two protruding tails above the forehead. You just need to twist the ends, you won’t need to fold scarves ten times, and they are no longer in fashion. Thanks to the wire, the bandage and its ends can be directed anywhere so as not to look funny and ridiculous. The brightest and boldest image is when the ends stick up, but they can also be folded to the sides. The bow is placed both on the side and in the center or below.
The headband is convenient to use; it can also be wound around the ponytail. Solokha is worn with either loose or gathered hair.
Solokha is even tied on the hand instead of a bracelet, complementing a beach or romantic look.
Pin-up headband
This is a whole retro trend from the middle of the last century, which is otherwise called rockabilly. To match the style of those years, the girl needs to create a complete poster image:
- Solokh headband to match the outfit;
- close-fitting styles of baby-doll dresses in flashy colors with turn-down collars;
- curls or high bouffant on the head;
- bright makeup + accessories.
A pin-up headband is suitable not only for a themed party, but also for any street-style. The execution instruction is practically no different from the basic one:
- Fold the piece of fabric in half, right sides facing each other.
- Make a pattern with curly ends for the bow.
- Cut out strips.
- Sew along the perimeter with a slight retreat, leaving one edge free.
- Turn the part inside out, straighten the ends, iron it with an iron.
- Use a blind stitch to cover the open area.
- The pin-up headband is decorated with a bow at the front.
Another option to quickly build a rockabilly headband:
- Take a large scarf in bright colors.
- Remember how to make a regular bandana.
- Carry out similar actions only in reverse.
- To do this, fold the scarf in half, turning the sharp corner inward to create a wide strip.
- Place the base under the hairstyle on your head, the ends should be on top.
- Use sharp corners to create a large pin-up bow at the front or side.
Product with elastic band
As you know, when you are in a hurry to get somewhere or try to look perfect, incidents and missteps begin to happen. That’s why it’s impossible to tie the straw at such moments as it should. Sometimes the bow is too big, sometimes it’s too small, sometimes it doesn’t tie at all.
Article on the topic: Knitting for newborns: cap and hat pattern
In order to prevent stress and prevent such minor failures, you can take care of yourself in advance and sew a straw with an elastic band. Such a headband will be easy and quick to put on and will not require constant painstaking tying.
The algorithm for making a solokha with an elastic band is also as simple as possible:
- We select the front fabric of the solokha.
- Prepare a rubber band or elastic band. To do this, the head circumference is measured. The length of the elastic should be one centimeter shorter than the circumference of the head.
- We cut out the details of the ribbon, knot and ears from the front fabric.
- We sew together the parts of the ribbon and thread an elastic band through it.
- At the last stage, we sew the ribbon and elastic band together and sew on the knot and ears made separately.
A stylish accessory for dynamic fashionistas is ready.