Flip-top gloves, or mitts as they are also called, knitted with knitting needles from warm yarn, will always look fashionable. Their popularity lies in their high level of comfort. Initially, this style was invented for market sellers who found it inconvenient to work with gloves, and without them it was very cold.
Workers found a way out of the situation by cutting off the ends of standard gloves. But the fingertips still remained cold. Therefore, it was decided to create an additional convertible top, which allows you not only to confidently count money and take various goods, but also protect your palm from the cold.
Not only market sellers liked the ability to quickly free their fingers. Nowadays, flip-top gloves can be found not only among adults, but also among children. In this case, such a model can be connected independently.
Where to start knitting gloves with opening fingers?
First of all, to make transformable gloves with your own hands, you need to collect all the tools for the job. Experienced and novice needlewomen will find the following useful when doing needlework:
- Knitting needles in the amount of 5 units;
- Yarn – 1-2 skeins of 140 g each (acrylic, acrylic with wool). You can take skeins of different colors;
- Needle . It is necessary in order to bring all the elements together.
Attention ! The size of the knitting needles should correspond to the thickness of the yarn. For the winter period, denser yarn is used, which means the knitting needle size will be from 4 to 4.5 mm. The product for the spring-autumn period will be made from a thin thread. This means that 2.5 mm knitting needles will be useful in your work.
For ease of use, the folding top of the transforming mittens can be fixed. To do this, a small button is sewn on the back of the hand. And on the convertible top there is a loop.
Some craftswomen knit a fixing elastic band separately. It looks like a thinly knitted flap, which will be sewn on both sides and will act as a retainer for the convertible top.
General job description
The flip-top gloves will consist of three parts: a back and front base, a flip-up top and five fingers. Work begins with creating the foundation. Then they move on to knitting the fingers and creating a convertible top.
On a note ! The technology of knitting convertible gloves is not as complicated as it seems at first. The only important thing is to monitor the knitting density. In this case, all the parts will be symmetrical and fit together well.
The convertible top must be tied as tightly as possible. It is important that it fits well to your fingers, which will provide warmth in cold weather.
Gloves can be plain or patterned. Both options can be additionally decorated with buttons or sequins. When creating a model for a child, it is important to pay due attention to the elastic band. It must fit tightly around the wrist, otherwise the child may lose the gloves.
Main stages of work
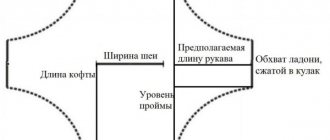
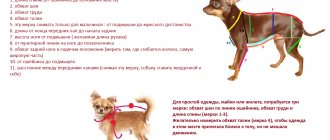
Determining the size:
- We trace our hand on a piece of paper;
- We measure the circumference of the wrist - usually 15.5-18 cm. We will count on an average of 17 cm;
- We measure the circumference at the widest point of the arm. We will count on an average of 18 cm;
- We measure the distance from the beginning of the thumb to the base of the hand - usually 6-8 cm;
- We fix the number from the beginning of the little finger to the base of the hand - 9-10 cm;
- Measurements from the base of the thumb to the base of the hand are approximately 10 cm.
- Based on these measurements, we form a control sample in which 2 loops should be 1 cm.
Important ! All measurements must be taken with the hand relaxed. It is important to record the numbers with a small margin of 0.5 cm so that it does not become tight.
For beginning needlewomen who are knitting gloves with cut-off knitting needles for the first time, it is better to knit with light threads. On dark yarn, the knit and purl stitches are difficult to see, so you can get confused.
Let's start knitting gloves with open fingers
- We cast on 36 loops and divide them equally into 4 knitting needles;
- We knit in the round with an elastic band (1 knit, 1 purl);
- Use a marker to mark the beginning of the row. We knit an elastic band 5-6 cm wide. You can have more if you want to make the cuffs long;
- As soon as the cuff is completed, we begin to knit with facial loops. On each knitting needle you need to add one loop;
- So we knit three rows;
- Then we form a wedge for the thumb. If we knit gloves for the right hand, then at the beginning of the first knitting needle we make a yarn over, for the left hand - at the end of the fourth knitting needle we make a yarn over.
- We knit three rows in stockinette stitch;
- On the fourth row, add a loop, knit three loops and make another loop;
- We knit the remaining three rows in satin stitch;
- In the next row we form a yarn over, knit 5 loops, add a loop;
- We knit three rows in satin stitch. We start a row with a yarn over, form 7 knit stitches and then yarn over again;
- We form three rows of satin stitch;
- Using the same pattern, we knit further and form a wedge for the thumb to the end;
- Slip 11 stitches onto a pin or knitting needle. We distribute them in half;
- We begin to decrease the loops (we knit together the last loops from the quadruple and the first knitting needles) until the wedge goes away. It is necessary to reach the level of the little finger.
You should know! Here you can switch to a different color, thus visually marking the area where the folding hood is formed. In the case of plain gloves, you can simply leave a marker or pin.
Finger formation stage
- There are 40 stitches on the knitting needles in total. We knit the loops on the first knitting needle. On the next one - only the first 6. Slip off 4 loops from the second and 6 loops from the third onto a pin. We collect three air loops. Thus the little finger was formed;
- We knit three rows in a circle;
- We distribute the remaining loops among the pins. We remove 4 loops on 1 pin, 11 loops on another and another 6 on the third (for the ring, middle and index fingers, respectively);
- We distribute the remaining 11 onto 3 knitting needles and add four more air loops to them. We knit the index finger in a circle, approximately 2-3 cm. At the end we knit a row with an elastic band and close the loops;
- We tie a thread from the side of the palm. Remove the loops from the pin and add 3 more air loops. Distribute the loops and knit similarly to the index finger;
- We proceed in a similar way with the ring and little fingers.
We knit the folding top of transformable gloves
- Turn the glove over with the back side and cast on about 25 loops at the marked place;
- We form an edge loop, turn the glove over (upside down) and knit purl rows;
- We put two knitting needles together and form another 25 loops;
- There will be 51 loops in total. We knit the loops formed from the glove using stockinette stitch, the rest using an elastic band;
Important ! To ensure a neat edge of the elastic, you need to turn over all the loops in the first row of elastic before knitting.
- So we knit 5 rows and begin to decrease, gradually knitting two loops together in each row.
- We connect the folding part together.
Knitting the thumb
- We tie the thread and form 6 loops;
- We remove the remaining loops from the pins and distribute the loops onto the knitting needles;
- We knit several rows along the length of the thumb;
- At the end of the loop we gradually remove and tighten the edge.
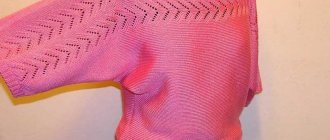
Gloves (mittens) with a folding top can be an original and useful gift for a loved one. This accessory will appeal to all ages. The product is much warmer than the classic version of gloves and will protect your hands even on the coldest day.
FOLDING TOP MITTENS
The top of these mittens comes off to expose your fingers. Convenient and practical.
Size
S/M (M/L)
Finished Product Measurements
Length 25.5 (26.5) cm
Width 9 (10) cm
Materials
Yarn Lion Brand Heartland, Isle Royale (100% acrylic) 235 m / 140 g - 1 (1) skein
Double-edged needles 4 mm and 4.5 mm
Markers
Loop holders
tapestry needle
1 meter of fine yarn in a contrasting color
Knitting density
18 stitches = 10 cm in stockinette stitch in circular rows using large needles. Tie a test pattern
Patterns used
Elastic band 1 x 1 in circular rows (there should be an even number of loops)
Round 1: *k1, p1; repeat from * to the end of the round.
For the rib pattern, repeat Round 1.
Note:
The mittens are knitted in one piece in circular rows on double-pointed needles.
The cuff is knitted with an elastic band, the rest of the mitten is knitted in stockinette stitch in circular rows (knit stitches each circular row). A contrasting thread of yarn is needed to mark the position of the flap. The thumb and the folding part on the mitten are knitted after the main part is knitted.
Description
Right mitten
Cuff
Using smaller needles, cast on 32 (34) sts. Distribute the stitches on 4 knitting needles (for a smaller size of mittens - 8 loops on each knitting needle, for a larger size of mittens - 8 loops on two knitting needles and another 9 loops on two knitting needles). Place a marker at the beginning of the round and complete the round. Be careful not to twist the loops.
Knit with an elastic band 1 x 1 7.5 cm or the required length of the cuff.
Change to a larger needle size and continue knitting in 1cm stockinette stitch.
Round 1: K15 (16), knit across front and back from next stitch, knit to end.
Round 2: K15 (16), place marker, k3, place marker, knit to end.
Round 3: knit to the first marker, re-slip the marker, knit the next two stitches behind the front and behind the back wall, k1, re-slip the marker, knit to the end – 5 stitches between the markers.
Round 4: Knit all stitches.
Round 5: knit to the first marker, slip the marker, knit the front and back wall of the next stitch, knit up to two stitches before the next marker, knit the front and back wall of the next stitch, k1, slip the marker, knit to end.
Round 6: Knit all stitches.
Repeat rounds 5 and 6 until there are 13 stitches between markers.
Next round: knit to first marker, slip marker, k1, slip next 11 stitches onto stitch holder, k1, slip marker, knit to end.
Work 32 (34) stitches evenly, without adding in stockinette stitch, in circular rows until you reach 16.5 (17.5) cm from the beginning or the required length for your hand.
Next Round (flap marker): Place the working thread and the contrasting thread together and knit 16 (17) stitches together with two threads, cut the contrasting thread, leaving the end of the yarn, then knit the working thread to the end of the round.
Continue knitting in stockinette stitch 2.5cm, then ribbing 1 x 1 2.5cm.
Close the loops according to the elastic pattern.
Folding part
Using large needles, cast on 16 (17) stitches, then cast on 16 (17) stitches and knit them along the mitten - 32 (34) stitches.
Distribute the stitches on 4 needles, place a marker and close the circular row.
Next round: 16 (17) knits, then rib 1 x 1 to the end of the round.
Repeat the last circular row until you have knitted 2.5 cm from the cast-on row.
Next, continue knitting in stockinette stitch 1 cm.
Top shaping (both sizes)
Round 1: K2tog, k14, k2tog, k14 – 30 (32) stitches.
Rounds 2, 4, 6, 8: Knit all stitches.
Round 3: *k3, k2tog; repeat from * to the end of the round.
Round 5: *k2, k2tog; repeat from * to the end of the round.
Round 7: *k1, k2tog; repeat from * to the end of the round.
Round 9: K2tog to end of round – 6 (8) stitches remaining.
Cut the yarn, leaving a long end. Pull the end of the yarn through the remaining loops and pull them together, tying a knot. Fasten off the free end of the yarn.
Thumb
Return the stitches from the stitch holder to work, distributing them on three double-pointed knitting needles as follows: 6 x 5 loops on two knitting needles and 1 loop on the third knitting needle.
With the third knitting needle, evenly pick up and knit 4 loops along the edge, place a marker and close the circular row - 15 loops.
Work these 5 (6.5) cm thumb stitches evenly in stockinette stitch in circular rows.
Next Round: knit 2 together until the last stitch, knit the last stitch – 8 stitches remain.
Cut the yarn, leaving a long end. Pull this end through the remaining loops and pull them off, tie a knot and secure the loose end of the yarn.
Left mitten
Knit in the same way as the right mitten up to the folding marker
Next Round: Using working yarn, knit 16 (17) stitches, then fold the working yarn and the contrasting yarn together and knit together with two threads in knit stitches until the end of the round. Cut the contrasting strand of yarn, leaving a free end.
Continue knitting the left mitten in the same way as the right one.
Assembly
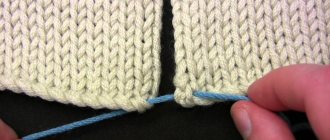
Carefully remove the contrasting strand of yarn.
Fasten off the loose ends of the yarn. print