Order in thoughts, work and things is a normal and necessary character trait of a modern person in the current difficult conditions of life in society. And therefore, many strive to ensure that things are in proper order and in their place. Clothes should hang in the wardrobe, and shoes should be on the shelf. This also applies to other, smaller things: cosmetics, stationery and other things. An accessory called an organizer was invented specifically for storing them. It is noteworthy that making it from fabric or other, denser material is not difficult even for novice craftswomen. This article will tell you how to sew a hanging organizer for things with your own hands and what main types of storage containers exist.
What is an organizer and why is it needed?
An organizer is a special stand with compartments (box, drawer), which, as you can guess from the name, is designed for storing small items (cosmetics, office supplies, etc.). It helps not only to put things in a pile, but to correctly distribute them by purpose and color. Organizers have become very popular recently due to their widespread use in the West. Today, a variety of models are produced for pens and pencils, tools, and underwear.
Office supplies and other small items fit well in wooden organizers
The organizer itself is a container with cells for convenient storage and optimization of free space. It can be flat and small, or it can be large and roomy. If you plan to purchase, you should find out its features or make such a chest yourself. A homemade organizer looks stylish and fits into the overall interior of the room.
Great solution for the hallway
Main types of organizers
There are several main types of organizers:
- wall (boards or other shelves);
- tabletop (stands with compartments);
- “drawer” type (dividers inside regular dresser drawers).
There are a huge number of models made of wood, plastic, acrylic or even metal on the organizer market. Not all of them may be suitable for a particular person, since his shelves may be too narrow and his table may be small. If you make the devices yourself, you won’t have to guess about the sizes.
You might be interested in this: The procedure for sewing a skirt with an elastic band yourself according to the instructions
Important! It is also noteworthy that these interior items can be made from almost any material at hand.
Using clothespins to store headphones
How to sew a travel organizer for cosmetics from fabric
Organizers for cosmetics are made mainly from textiles. Literally any fabric will do, but it is better to choose a dense and strong material that is not afraid of moisture, stretching and holds its shape well under the weight of the entire women's set of tubes and bottles.
The most suitable for going out is a case. It allows you to save space not only at home, but also in your handbag. To put it simply, a case is an ordinary fabric pocket with a clasp that has many pockets. It is convenient to fold and unfold it back. You can also secure it with a lace or ribbon.
Textile compact organizer
Sewing such a device is very simple, since it is made from a single piece of fabric, processed along the edges and containing many pockets for pencils, mascara and lipstick. Another option is a box. It can tidy up your workplace and can be stored anywhere.
DIY stationery organizer
You can store the stationery in ordinary glass jars. It is advisable to choose jars of the same size for this work.
Work process
Materials for work:
- Banks;
- Light acrylic paint;
- Pencil, brush, markers, tape.
You can color the jars using any means (paints, varnishes, felt-tip pens).
Before work, you need to pour a little PVA into the paint so that it adheres well to the glass. You can also store some makeup products or brushes.
How to make a fabric organizer
You can quickly make an original and beautiful organizer with your own hands from a simple piece of fabric. It is especially suitable for hairpins, tools, underwear or cosmetics. You will need:
- a piece of dense material;
- cardboard;
- threads;
- needle or sewing machine;
- ruler.
Convenient storage of cosmetics
Step-by-step instructions are as follows:
- A rectangle is cut out of fabric. Its size depends on the desired size of the organizer;
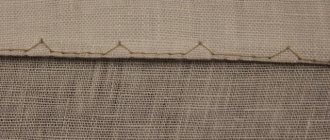
- the edges of the cut are sewn on a machine;
- a loop is sewn on, with which it will be attached to a wall or cabinet;
- Rectangles for future pockets are made from the same fabric. You can make them in different sizes and degrees of depth;
- determine the location of parts;
- Sew the pockets to the fabric using a needle or machine.
Important! If you wish, you can decorate the device. Children can also happily help with this, because they always want to demonstrate their creative talents.
Accessory for crib
DIY laundry organizer
Materials for work:
- Regular box;
- Wallpaper of any colors;
- Wallpaper glue;
- Brush;
- Large ruler;
- Pencil;
- Stationery knife;
- Stapler scrapings.
Draw a line along the bottom of the box, all around the perimeter. Using a knife, cut the box along the line. Cover it with wallpaper. Make a bottom out of cardboard and cover it with wallpaper.
For seamstresses and craftswomen
To make partitions, you need to decide what size the compartments for storing things will be, based on this, make partitions from cardboard that are equal to the length and width of the product. They can also be covered with wallpaper. Insert the partitions into the box and secure with a stapler. You can store clothes.
Car organizer made from jeans
This device is characterized by increased reliability and simplicity, because it is made of dense and strong denim fabric. You can buy a special piece for this, but it would be much more practical to make a product from old pants. In this case, you can use not only back pockets, but also belt loops, which will serve as fastening elements for round objects.
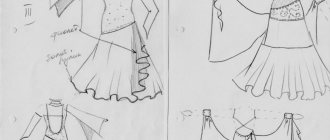
You might be interested in this: Beautiful patterns for wrap skirts: sew it yourself
Seat back option
There are many options for making a device made from pants. You can leave the back part to the knees, and cut off the remaining legs and sew them in the form of additional pockets. Another option involves sewing the pants into a rectangle and sewing on the compartments. In any of these cases, it is necessary to provide for mounting on the rear surface of the car seat or on its cover.
We sew an organizer for a needlewoman
An organizer for a needlewoman requires special compartments for needles, threads, scissors and other paraphernalia. Fastenings are best made from rubber bands. To work you will need:
- three pieces of felt 30 by 45 cm;
- floss melange;
- elastic band or rubber band;
- zipper for closing the organizer (30 cm);
- buttons;
- elastic cord;
- needles and scissors.
Organizer case for cosmetics made of fabric
Sewing starts from the inside. A line is marked on the cut at a distance of 2 cm from the edge for inserting a zipper on the reverse side. Elastic bands or elastic bands are sewn next to or below. Its slots can also be hidden under felt.
Next, additional pockets are made from the same fabric. They can be closed with rivets or buttons. Once you're done, you can sew the inside piece to the other piece to hide the back of the zipper and the seams. If desired, you can also decorate the organizer with embroidery, appliqués and other decorative elements.
The process of collecting containers for a needlewoman
Bag for sewing supplies
An organizer for sewing accessories is not very easy to make with your own hands, but experienced seamstresses can make it in literally a couple of hours.
Materials for work:
- Any fabric of your choice and lace;
- Zipper 60 cm;
- Lining material;
- Foam rubber;
- Threads to match the bag;
- Scissors, needles, pencil, ruler;
- Sewing machine.
To form the bottom, you can take small plates and trace them on the fabric. Cut out two parts. Then you need to cut the same part from the lining. Using a ruler, measure a 10/60 cm line on the main fabric. Add an allowance of 1 cm and trim. Do the same with the second fabric. Next, draw a 15/60 cm segment on the lining and foam rubber, and cut it out. All received parts must be stitched.
Original laundry storage
Sew the bottom and main part of the bag together. Secure with pins and sew the entire resulting structure, then lay parallel lines at a distance of 1 cm on the bottom part.
Secure part of the zipper to the lid of the product with pins. Sew at a distance of 1 cm from the edge. Make lace along the edge of the product and sew on a handle.
You might be interested in Several patterns of toy animals made from fabrics
Also, a sewing organizer can be made from ordinary fabric and padding polyester.
Headphone organizer
Headphones can also be cleverly folded into the organizer. You can make it yourself from a variety of objects and materials:
- ordinary wooden clothespins;
- paper and old bank cards;
- felt and other fabric;
- oilcloth, leather or its substitute.
The easiest way is to use two wooden clothespins. They are opened, painted and decorated as desired and glued to each other on different sides. You can easily wrap the wires around clothespins and secure their ends.
Pattern in the form of a paw
A plastic card cut out in the shape of a fish skeleton also makes a good organizer. It contains two clips along the edges to secure the headphones. You can make a device according to the example in the picture.
Important! The felt or leather product usually looks like a stuffed toy or pillow with clasps for wires. You can do it according to schemes that are found in abundance on the Internet.
You might be interested in this: The procedure for sewing backpacks from old jeans on your own
Organizer in the shape of a fish
Organizer for the artist
Materials:
- Fabrics of different colors;
- Cardboard;
- Office paper;
- Seal;
- Felt fabric;
- Rubber;
- Magnetic button;
- PVA glue.
First you need to cut out the parts from cardboard and paper.
Glue the cardboard onto the seal and cover it with fabric.
For decoration, you can use different pictures to suit your taste. Transfer them to felt. Iron the picture for a few minutes until it is well absorbed into the fabric.
You may be interested in Using a hidden inner seam with a needle by hand
Sew it on the machine with tight seams. The cover is ready. Make loops inside for storing brushes and other materials.
Wall pocket
Another type of organizer is a simple pocket-bag that is mounted on the wall. Its advantage is that it can be made from almost anything that comes to hand. The production itself will take no more than half an hour.
It also has disadvantages. It is not divided into compartments, as a result of which things will be mixed in it. An ideal hanging pocket is suitable for similar items: spools of thread, balls, small toys, tools.
Simple pocket
Let's try to overcome chaos or organizer with our own hands
Article navigation:
- Mini excursion into the history of needlework
- Why do you need a craft organizer?
- Stages of creating an organizer
- Let's sum it up
Mini excursion into the history of needlework
Photo source: www.mamadaika.ru
Handicraft appeared many hundreds of years ago, and if you look into the distant past, you can see how handicraft was passed down from generation to generation to girls of all ages, as a dowry. After all, since ancient times it was believed that needlewomen create family amulets that can protect their home from damage and the evil eye. Handicrafts played a huge role in a girl’s life.
The result of handicraft could protect the entire village from natural disasters: from flooding or from drought. And the goddess Makosh always patronized them. Over time, needlework grew into production and women's needlework schools began to be created at monasteries. There, the girls studied elements such as knitting, embroidering various images and landscapes on canvas. Where did they put all their supplies? Of course, in the organizer.
By the way, great tips for decorating your home with your own hands are in this article.
Why do you need a craft organizer?
Photo source: karat773.ru
Are you wondering what an organizer is? Why do we need it? And the answer is very simple. A handicraft organizer is a special device in the form of a handbag so that you can put various handicraft supplies. After all, you yourself know how often it happens that in the process of creating some masterpiece, all the needlework supplies are in disarray and sometimes it’s difficult to find anything you need.
But our revolutionary solution is a DIY craft organizer. You can always find everything you need at hand, because a DIY organizer is a small handbag with many pockets. In each of which you can place everything you need. After all, not only a small spool of thread can fit there, but also a huge piece of fabric that you need for further work.
But as it turns out, organizers are different. Let's look at one example - this is an organizer in the shape of a turtle. A very creative invention, learn more about the master class on how to create it. In order for us to get a full-fledged turtle, we need a pattern of parts to create the turtle, various pieces of fabric painted in different colors.
These elements will be used for the turtle’s body and shell. To decorate everything from the inside, we need felt. How about without threads, several spools of different threads. Let's take small beads as the turtle's eyes. Next are the buttons: a few large and a few small ones will be enough. Next, we will need an elastic band in the form of a cord, a couple of pieces of padding polyester, a sheet of cardboard, and of course a tube of glue, preferably Moment glue.
Stages of creating an organizer
Photo source: www.liveinternet.ru
Let's look at the stages of creation
- The body of the turtle is made in the usual way, all parts, including parts of the head, are sewn along the edges if they are folded together.
- Next, we turn the resulting layouts inside out to hide the seams and fill them with padding polyester. This is how the elements of the head and torso are formed.
- The next step is to give the turtle vision. Sew beads in the shape of eyes to the head.
- Next we will design the body. We put the parts for the body together, and between them we put a fabric tail. Sew these parts completely along the edge and make a cut on the back, and then turn the body inside out and fill it with padding polyester. Next, we sew up the cut and coat the seam with superglue.
- Next, we will connect the parts of the turtle’s body, sewing the head to the body, and tuck the edges.
- The fabric on the paws must be folded in a secret way, and then sewn to the body.
- For the shell, we cut out two parts somewhere, then put them in pairs, as if facing each other. On top of each pair we will put a small layer of padding polyester, and then we will place hexagons of cardboard on top.
- We sew the armor parts along the edges, but do not forget to leave one side open. As always, we turn the part right side out, insert a piece of cardboard and carefully, so that it is not visible, sew it up.
- We look at the fabric hexagon and place a cardboard hexagon in its very center. Using a running stitch, we sew the fabric along the edges and tighten it, after such procedures the cardboard hexagon will be fixed. After this, it is necessary that the hexagons are connected to each other - so we sew and stitch along the edge to the very top edge. But you must remember that when sewing you must put a sheet of padding polyester between the parts.
- Using a sewing machine we sew everything together in a circle.
- Now we need to connect the shell and body for the children's turtle organizer. We take the upper part of the armor sheet and carefully sew it to the body. We will place an elastic loop between the shell and the body.
- Next, we will make a part intended for the lower armor part. All you need for decoration is one fabric hexagon and one cardboard hexagon. In order for the piece to be stable, we will sew a button to the very bottom.
- Now we will attach one of the most basic tools for needlework - scissors. Let's place them on the bottom of the shell. Sew one button into the ring of scissors and throw the elastic through them. This way we will have a convenient holder. But in order to protect yourself, you need to cover the blades with a pocket. Sew a felt pocket onto the scissors. The pocket is sewn along the very edge to make it convenient to take out these scissors later.
- Now there is an important point left. Where to place the spool of thread. The best place is the organizer turtle's tummy. To do this, fold a piece of felt in half and sew it on. Next, near the foot, you can choose any back one, sew on a button, and on the opposite leg, sew on an elastic loop. We thread this elastic through the spool and fasten it with a button. The reel is now securely fastened.
- Sew a button under the tummy right on the sides.
- And the final touch to our masterpiece: we fasten the elastic loops from the upper shell to the buttons from the lower shell.
Photo source: www.liveinternet.ru
And now our wonderful turtle organizer is ready. All that remains is to take a photo as a souvenir with such a wonderful product.
However, you can create not only a creative organizer in the shape of a turtle, but also an ordinary-looking handbag with pockets in which you can safely put everything you need. And for this you need only eight fabric blanks. Four rectangular blanks measuring twenty-six by two and four rectangles measuring only seven by two. This way you get four for the inner and outer parts of the organizer.
Let's prepare blanks, preferably double ones for a pocket with a lock. This lock will allow you to keep everything you need safe and sound.
So, we sew a zipper between the flap and the pocket. If you have very thin fabric, you should simply glue it to prevent the fabric from creasing.
Next, we sew together the finished parts and we get a small organizer bag for handicrafts.
Let's sum it up
And now, after short master classes on making organizers for handicrafts, we can sum up the results. We got two completely different, but quite interesting organizers that can be used both at home and at work. The turtle is suitable for women with a creative nature, who strive to be different from everyone else, but remain practical, because everything should be in its place. The handbag is suitable for those women who do not pay much attention to the outside, but care more about practicality, because the handbag is much more spacious than a turtle.
Video: Organizer box for needlework
DIY wall organizer made from jeans
This option is similar to the one made for a car. It uses torn or cut pockets, which are then sewn onto a piece of denim from old pants. Such a thing helps not only adults, but also children, who can not throw their toys around the room, but carefully put them in pockets. This accustoms people to cleanliness and order.
Wall denim option
Important! The fabric organizer can also be used in the bathroom. It holds shampoos, toothpaste or combs. For wet places, of course, it is preferable to use maple or leather instead of fabric, since the canvas will quickly get wet from water and steam.
Other types of needlework
You can also assemble a “storage” for your accessories from solid materials. Plastic, acrylic or wood are often used for this. These options are ideal for placing them in a cabinet, on a table or shelf. They save space and allow you to keep all the necessary items at arm's length.
All you need to make them is wooden slats or boards, plywood and nails, which can be replaced with reliable glue. Finding plastic parts is a little more difficult, but they are much easier to work with.
Flat floor (hover) for a car
Thus, it was told how to sew an organizer for storing things with your own hands (hanging and tabletop), as well as what types of these devices there are. If you wish, you can find many master classes on sewing or even knitting an organizer. Its great popularity is explained by its versatility, because the product can be used in the car, in its trunk, in the children's room and in the bathroom.
Wall Mounted Magazine Organizer
Materials for work:
- Textile;
- Wooden stick;
- Tourniquet;
- Scissors;
- Sewing machine and threads;
- Hook for the product;
- PVA glue is transparent.
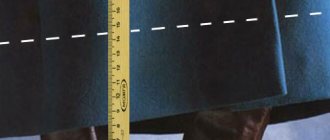
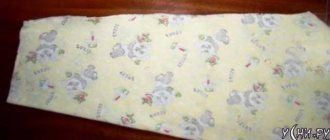
Make three pieces of fabric 50x40 cm. Fold each piece in half on the long side to make 50x20 cm pieces. Sew the long edges so that the cover is in the shape of a pipe. Turn the product inside out and iron it. Do these steps with all the blanks.
Wall mounted magazine storage
Fold one of the sleeves in half lengthwise. Place the other one on the table. Place the sleeve on top so that the fold is 10 cm from the bottom of the first sleeve. Insert pins into the blanks, and then sew all six layers of material along the edge of the sleeve.
Attention! Seams on the product should not be visible.
Take the last unsewn sleeve and place it on top of the two sewn ones. The lower parts of the blanks should be on top of each other. Secure the top of the bottom layer with pins. Sew along the edges. This time, fold the last sleeve in half, making sure that the front edge is 4 cm larger than the back one. Insert a wooden stick of the required width on top. Sew the resulting allowance around it. Pin the material with pins and stitch it, removing the stick in advance. Insert it into the resulting compartment.
You may be interested in this Instructions for sewing a baby blanket yourself
Bathroom organizer made of cardboard