Solokha on the head with your own hands: pattern and production
Solokha is a women's hair accessory in the form of a headband. Inside the headband there is a wire that maintains the shape of the hairstyle. With its help you can quickly style your hair. To create a hairstyle, you just need to twist the edges of the straw. The accessory for women is presented in a wide range and style: for everyday occasions, for work, for evening events.
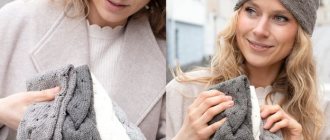
Stylish headband
Solokha is a universal accessory that is suitable for women with different haircuts. It is suitable for any look, helps to emphasize individuality and make the look stylish. From the ends of the decorative headdress you can weave bows, knots, and also complement your hairstyle with various invisible pins, hairpins, and clips.
Solokha accessory for women
What to make from
If this is a light summer or home look, then it is better to choose a headband from breathable fabric, knitwear, cotton, chiffon, cambric. A winter headband is a great option for those ladies who don’t like to wear hats but care about their health. For knitted models, it is recommended to choose wool, linen, acrylic threads and yarn. They keep warm well.
Shawls, bandanas, scarves, kerchiefs, ribbons, even denim and lace are also used.
Important! You can choose any material, the main thing is that it holds well, does not slip off the hair, but does not put pressure. The scalp should breathe and blood circulation should not be impaired.
You may be interested in: Patterns and sewing procedure for a women's belt bag
Winter headbands
Historical reference
Solokha is one of the types of headband. The accessory got its name from the heroine of N.V. Gogol’s work “Evenings on a Farm near Dikanka” - Solokha, who was famous for her bad character and hung out with devils. The main character wore an unusual headdress - she folded an ordinary scarf several times and tied it around her head, leaving small ponytails on top.
Such accessories were most popular in the middle of the last century. This can be seen if you look at old pin-up photographs, where all the famous models pose in a stylish solokh. However, in later years, the unusual headband was widely used by many fashionistas. In the 21st century, the accessory has again become popular; many world stars wear it to various events and ceremonies.
The original headband on pin-up models
Important! Today, straw can be purchased in many stores, but you can also sew it yourself, based on your taste preferences.
You might be interested in what can be made from velvet: cutting rules
Double and very warm
A very simple double headband for women, which is knitted in the shape of a tube. New model from Drops.
Prepare:
- Merino Extra Fine yarn from Drops (100% wool, 105m/50g);
- set of knitting needles No. 4.
Calculation for three head circumferences: 54/56; 56/58; 58/60 cm.
Bandage width: 10; 11.5; 13 cm. Consumption 100 g.
Density 21 p. = 10 cm.
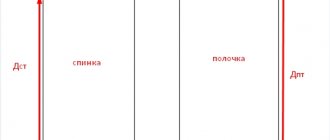
Cast on 42/48/54 stitches with knitting needles, close in a circle and knit in a hole pattern according to the pattern until the product is 49/51/53 cm long. Finish knitting in 2 rows after the holes and bind off the loops. Sew along both short sides, and then fold as shown in Figure A3, folding the ends one into the other according to Figure. A4. Sew through all four layers and turn to the other side.
You can see how to sew a bandage in the video.
What is needed for work
Before work, it is necessary to prepare auxiliary equipment;
- a piece of fabric up to 90 cm long and up to 15 cm wide (the exact dimensions depend on the volume of the head). If the bandage is double-sided, you will have to take two pieces of fabric up to 7 cm wide and up to 90 cm long;
- scissors;
- strong threads, needles;
- a piece of wire up to 170 cm long, its diameter should be within 2 mm;
- cardboard (for creating samples);
- a simple pencil;
- measuring tape.
Sewing materials
Important! To decorate a fabric headband, you need to prepare beads, rhinestones, seed beads, and sequins.
Sewing steps
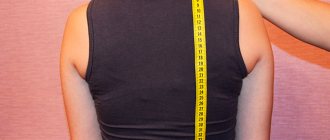
This stylish item will take very little time to make. Before starting work, you need to decide on the model and choose the appropriate fabric. Then you should measure the circumference of your head to find out the size of the product. Depending on the material and the chosen model, you need to make a pattern or draw a diagram. But in many cases this is not required.
Next, you need to cut the fabric to the desired size. It is important to allow seam allowances. Typically, a strip is cut 2 times wider than the width of the finished product. Sew it on the wrong side and turn it inside out. After this, the women's headband needs to be decorated with the selected decorative elements, and if necessary, secure the elastic band. At the last stage, we sew the ends and process the edges.
Headbands with elastic band
A scarf is considered the best option because it can be tied in different ways. But for greater convenience, it is better to sew a similar model with an elastic band. It goes well with sporty and casual clothing and is suitable for women of any age. The easiest way to make it is to fold it in half and sew a strip of fabric into which the elastic is threaded. This model looks original due to its soft folds, and it is comfortable and easy to put on. Another option is a type of scarf like a bandana. This is a wide strip of fabric, most often a single layer of thin material. At the ends it is gathered into a bun with an elastic band.
What you need to make it:
- cut a rectangle for the scarf itself measuring 25 x 45 cm;
- tuck the edges and stitch;
- prepare a second rectangle for elastic 5 x 25 cm;
- make a drawstring out of it, insert a wide elastic band 10-15 cm long;
- put the end of the scarf into the drawstring, after tucking the edges, sew;
- repeat the same on the other side.
Due to the fact that the elastic band is narrower than the product itself, it gathers in beautiful soft folds. The convenient thing is that such a scarf does not need to be tied.
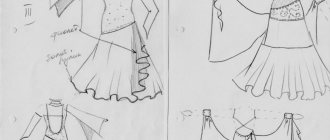
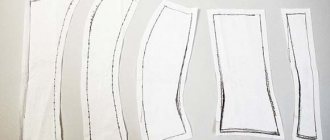
Cut out three parts
Sew two long edges on a large piece
Fold the two small pieces wrong sides together and stitch along the long sides.
Turn it inside out, iron it and turn both short sides inward by 2 cm.
Sew in the center, not reaching the edges 1.5 cm
We gather the short edges of the large part into cute folds and sew in an elastic band.
The folds on both sides should lie in the same direction
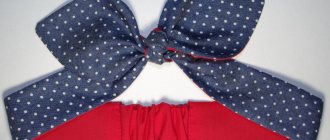
Ready product
Overlap knit
To make this you will need two pieces of knitted fabric of different colors. A pattern is not required, but when cutting you need to take into account the size of the head. For a child 3-7 years old, you need to cut two strips 15 cm wide and 47 cm long. Older girls and young women will need to increase the size. To determine the length of one part, you need to add 4 cm to the volume of your head. Sewing such an original hair decoration is very simple, and for those who do not have experience, you can use step-by-step instructions. How to make a headband for a girl from knitwear with your own hands:
- Cut out two parts.
- Fold each one in half lengthwise and stitch.
- Finish the seams and turn them inside out.
- Place the seam in the middle and iron the stripes.
- Place the pieces together crosswise in the middle.
- Bend them in half to create an overlap.
- Align all 4 edges of the strips and stitch.
This DIY headband is very easy to make and looks original. It will suit both a child and an adult woman, as it can be combined with any clothing.
Fold the two cutting pieces in half lengthwise with the wrong side inward and stitch them either by machine or by hand using a back stitch.
Turn both patterns right side out
Place both pieces on top of each other, seams facing up.
Fold the parts as shown in the photo
You will get a so-called “loop”
We put the 4 ends together, mark the volume of the head, and baste along the drawn line
If the strip is not too tight, you can grind these 4 ends and trim off the excess
The bandage is ready
With a bow for a girl
A headband for a girl will look beautiful if you decorate it with a bow. It’s not difficult to make even without a pattern. All you need is a bright fabric. It’s better to choose knitwear, then you won’t have to insert an elastic band. Sequencing:
- Cut out a rectangle whose length is slightly less than the circumference of your head. The exact size depends on how the jersey stretches; The width is determined as desired.
- The second rectangle from which the bow will be made should be the same width; its length when folded in half is approximately a third of the size of the headband.
- The parts need to be stitched along the long side from the wrong side and turned inside out.
- Sew up the ends to form a headband.
- Fold the second piece into a simple bow and attach it to the front.
- Use a small piece of the same fabric to fasten both parts.
A more complex version of this bandage is when the bow is not sewn on, but tied. To do this, you need to take a longer strip of fabric. It is better to place the bow so that it is on the side of the head.
Suitable for whom and for what occasions?
Due to the abundance of types, solokha can be worn under any clothes and for any events:
- parties;
- Job;
- walks around the city;
- summer holidays in hot countries.
Women's headbands for summer
The accessory looks appropriate on women with any hairstyle: both long and straight hair and cascading haircuts. Using an elastic band or wire, you can create voluminous hairstyles that are suitable for any event.
Important! The product is also used for newborn girls.
Solokha is a stylish head accessory that gained popularity back in the last century. You can sew the product yourself. To work, you only need fabric, a little wire or elastic and decorative elements. It will only take 30-50 minutes to make a stylish headband.
How to create a headband with felt roses
Decorative elements in the form of flowers and bows always look advantageous and add tenderness and romance to the image.
The decoration can be based on an elastic band selected in combination with the color of the future rose.
Creating a felt rosette yourself is not difficult, since the material is very pliable. The work will take literally 15-20 minutes.
You will need the following: 1 mm thick felt, scissors, elastic band, glue gun.
- The basic principle that you need to understand is that the petals are cut in a spiral. How to peel an apple in a circle without interruption. The same spiral stretch should be made from felt.
- Prepare 10x10 cm squares of felt in advance in an amount equal to the number of roses on the bandage. From this shape it is convenient to make a spiral 1 cm wide. It is cut with scissors in the shape of rose petals, in a wave-like manner.
- Start twisting the rose tightly from the center part, securing it with glue step by step. The last section of the spiral “wave” must be bent to make the base of the rose, which will be attached to the elastic band.
- The rose is ready. If necessary, the flower can be additionally decorated with beads, rhinestones and other applications.
You may be interested in this Instructions and patterns for sewing leotards for rhythmic gymnastics
Secure the roses to the ribbon with glue so as to hide the elastic seam.
This headband can be made for both girls and girls. A detailed master class on how to make roses from felt can be seen at the link
.
Felt headband
Product decoration
You can wear a simple headband, but it is better to add a couple of decorative details to make the accessory look more beautiful and interesting. This will not require much time and effort. The central part of the product must be intercepted with thread, pulled together and the ends firmly fixed from the inside out.
Sew a simple button, bead or bow onto the front part. It is better to make jewelry that will match the rest of your clothes. All parts must be well recorded.
What to wear with a headband
Children's accessories can be combined with any set of clothes. But even for little girls, it is necessary to follow the stylistic alphabet so that the image looks fashionable and charming.
- Choose a headband that matches your dress or shoes.
- If the outfit is in one of the pastel shades, a contrasting option with an emphasis on the decorative element looks beautiful.
- The printed headband echoes the color scheme of the clothes.
- A fashion accessory must match the season.
- A miniature decorated headband goes well with a laconic outfit; a too voluminous version may look out of place.
- Minimal emphasis on decoration is done if the girl is wearing clothes with variegated colors. A monochromatic bandage is ideal so as not to disrupt the integrity of the image.
- When purchasing a finished product or making an accessory with your own hands, consider the girl’s age.
- The bandage should not press or be uncomfortable for the child.
Post Views: 41,941
How to wear
The design of the headband is extremely simple; you may not even need a sewing machine to make it. And if you use knitwear, you can even do without elastic. The product itself turns out to be universal, I hope that this instruction will be useful to beginning needlewomen.
The headband can be worn as a narrow headband or spread across the entire width to completely hide the hair.
In addition, if you suddenly need to protect yourself from dust, or in a nearby store, as part of compliance with epidemiological measures, you are asked to wear a mask, then you can use this bandage by moving it from your head to the lower part of your face. Not the most correct option, but the easiest to achieve the goal.
Found a violation? Report content