Expert advice
- The yarn for this accessory should not be scratchy, as it comes into contact with the neck.
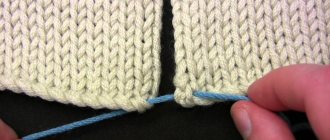
- It is most convenient to knit from the collar and end at the neckline.
- To make the shirtfront easy to put on, let’s calculate the number of loops in the neckline. To do this, let’s calculate how many of them fit into 10 cm of a sample knitted from the same wool, divide this number by 10 and multiply by the head circumference. Add 6 more loops to the result.
- You can knit on both circular and regular knitting needles.
The essence of the accessory
A shirtfront is understood as an accessory that is a removable collar, like a sweater. The product perfectly replaces a scarf. In this case, the thing covers not only the throat, but also the upper part of the body in front and behind. The wardrobe item perfectly protects from the cold.
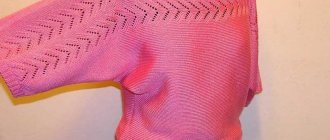
Looking at a selection of photos of a do-it-yourself shirt-front proves interest not only in the functional part of this accessory. A shirt front easily becomes a stylish, beautiful, unusual element of an image.
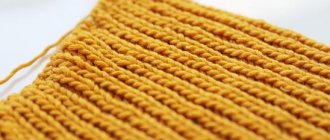
Shirt for a girl made of bulky yarn
We will knit from merino wool with needles No. 19 on a long fishing line and on a short fishing line.
Collar circumference – 60 cm.
Neckline circumference – 114 cm.
Collar length – 20 cm.
Bottom length – 30 cm.
Total length – 50 cm.
Step-by-step instruction
The product must be knitted in several stages. This division of work will help significantly simplify the process.
Bottom
- We cast on a ring of 70 sts. We mark the beginning with a pin.
- We knit 3 rows of purl. P.
- Work in stockinette stitch 23 cm.
- At the shoulders we begin to decrease: 1 p. knit 2 together; K29, 2 together; k1 st. make a mark with a pin.
- The next row is knitted in the same way, but just before the mark we knit 2 sts together, k1.
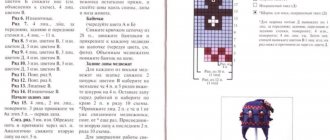
Gate
- We take needles on a short line.
- We go further without changes for six rows. There should be 38 stitches left.
- We select for ourselves the height of the gate from 12 to 20 cm.
- We work the last 3-4 rows with garter stitch and bind off the loops.
Shirt-collar for men
This model can even be worn over clothes. This accessory looks stylish and sometimes even defiant. The boundaries between snood, scarf, stole, shawl, muffler, scarf, etc. are blurring.
You can even decorate such a thing with a beautiful button, designer pin or cord.
You will need:
- acrylic thread;
- knitting needles No. 3.5;
- matching buttons.
Step-by-step instruction
- We measure the circumference of the neck and calculate the required number of loops using a sample made in English. with an elastic band.
- We cast on the counted number of stitches and knit according to the pattern.
- Fold the fabric in half and sew on the buttons, leaving 5-6 cm at the top.
Material and measurements for shirtfronts
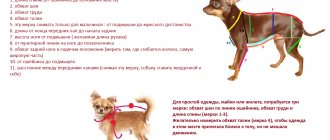
We need simple measurements:
- Neck circumference. – Measured at the base of the neck near the jugular cavity.
- Shoulder width (not for all models). – From the base of the neck to the shoulder line.
- Front length - From the neckline to the expected bottom of the product.
- Back Length – From the base of the neck to the expected bottom of the product.
- The height of the neck is from the base of the neck to the required collar height.
Advice! Some types of fleece do not fray, so there is no need to finish the edges. If your material frays, use an overlocker or a machine with an overlock stitch. You can also process the edge of the product with a narrow zigzag stitch, or with your hands - any seam “over the edge”.
Men's shirtfront with a pigtail pattern
Material:
- wool threads with a density of 110 m per 100 g - 2 skeins;
- five sets of circular needles. No. 4;
- crochet hook No. 4.
Operating procedure
We cast on 72 loops, knit a 1 by 1 elastic band 19 cm long.
We go through 4 rows of stockinette stitch. We distribute the loops along the knitting needle - shoulders, back, chest, leaving 2 knit stitches between them. Before and after these loops we add loops with a period of 1 row.
Let's start knitting the shoulder using stockinette stitch (on the first needle): k2. loops, n., 10 persons. loops, n. 2 persons P.
We start the back (on the second needle): 1 k, 20 knits. p., 1 n.
Second shoulder (on the third needle): K2. p., 1 n., 10 persons. p., 1 n., 2 persons. P.
Chest (on 4 needles): knit with a “braid” pattern:
Row 1: k1, k3. n., *1 p. p., 3rd p. from the left knitting needle we knit., throw it over 2 p., make n., 2 p. together knit.* - repeat the pattern 4 times, purl 1. p., 3 persons. p., 1 yarn over.
2nd row: 4 persons. n., *1 p. p., 3 persons. p.,* repeat 4 times, purl 1. p., 4 persons. P..
Row 3: *1 k, k4. p., 1 p. p., 3 persons. n.* repeat 4 times, purl 1. p., 4 persons. p., 1 yarn over.
Row 4: K5. n., *1 p. p., 3 persons. n. * repeat 4 times, purl 1. p., 5 persons. P..
We continue the “pigtail” pattern from ** 1st row to 4th row** in a circle to a height of 14 cm, close the shoulder and back sections.
We knit the chest part further, decreasing 1 stitch at an interval of 2 rows on both sides of the part (with two needles).
When we get to the drawing, close the loops.
It is recommended to crochet all parts along the edge using a stitch with 2 stitches.
How to sew a fleece shirt-front. Children's and adults
In this master class I will tell you how to sew a shirtfront from fleece: round in shape, with a stand-up collar, and a Velcro closure at the back.
Moreover, the shirtfront can be sewn in two versions: single-layer and with lining.
Single layer bib:
How to sew such a shirtfront from fleece - below is a master class with photos and detailed descriptions.
For sewing a shirt front with lining, watch the video tutorial. It also showed and explained everything in detail. Even a schoolgirl can do it!
And I attach ready-made shirt shirt patterns for different sizes - for children of different ages, and for adults:
Patterns in pdf format. You just need to print them on A4 sheets and glue them together.
Instructions for preparing patterns
The patterns are located on several sheets. The number of sheets depends on the size of the shirtfront. How to glue them together is intuitive. But I'll explain briefly. Dotted lines run along the edge of the sheet. Where scissors are shown, the sheet needs to be cut. And, combining the dotted lines, glue them together.
The shirt front consists of three parts:
Front - you need to cut one piece with a fold in the center of the front.
Back - you need to cut out two parts and transfer the lines indicated on the pattern to them: the fold and the middle of the back. Collar - you need to cut one part with a fold.
What you will need to sew a shirtfront:
- fleece: 30 cm - for a shirt-front of small sizes, and 40 cm - for a shirt-front of large sizes.
- threads in the color of fleece
- Wilcro tape (adhesive tape)
For a two-layer shirt front (with lining), you will also need fabric for the bottom layer - also 30-40 cm. For example, cotton chintz or calico will do. See the video for more details.
How to cut a baby bib
Fold the fleece in half, right side inward. Lay out the pattern pieces and trace. Don't forget about the direction of the shared thread! On the patterns it is indicated by arrows. It must be aligned with the direction of the grain thread on the fabric.
We apply the front part to the fold of the fleece. We also apply the collar part to the fold. Which side to apply to the fold is indicated on the patterns.
We add an allowance of 0.5 cm along all the cuts. And cut out the details of the shirtfront.
If desired, the shirtfront can be cut without shoulder seams. To do this, we combine the patterns of the front and back of the shirtfront along the shoulder lines, and cut them out in one piece, with a fold along the line of the middle front.
How to sew a baby shirt
First, we connect the front and back pieces along the shoulder seams. We combine the shoulder sections, folding the parts right sides inward. Pin or sweep away.
We sew the shoulder seams on an overlocker, or on a sewing machine with an overlock stitch or a zigzag stitch. The width of the seam allowance is 0.5 cm. Since fleece cannot be ironed, we straighten the seam with our hands.
Now the neck needs to be adjusted so that the collar can be sewn in comfortably. (Since in the areas of the shoulder seams the neckline may be uneven: the seam allowances have stretched out, the threads are sticking out). Place the neckline on the table and trim with scissors.
Neck to base:
Neck after installation:
We process the cuts of the back parts: using an overlocker or an overcast stitch on a machine (zigzag).
We put the shirtfront aside and take the collar. Fold in half along the short sides, right side inward. Sew with a straight stitch, leaving an allowance of 0.5 cm.
We turn the collar inside out, straightening the seams and corners.
We connect the collar and shirt front. We apply the edges of the collar to the fold line on the back of the shirt front, combine both cuts of the collar and neckline, pin or baste the collar.
We bend the back of the shirt-front along the fold line, wrapping the edges of the collar, and secure with pins.
Collar connected to shirt neck:
We sew the collar into the neck: using an overlocker or an overcast stitch on a machine (zigzag).
We direct the shoulder seam allowances to the back.
We straighten the edges of the back, bend the collar up.
View from the back side:
We sew the outer edge of the shirt front, starting from the edge of one back, in a circle, and ending at the edge of the back on the other side. If necessary, we also adjust the edge at the shoulder seams (as we did at the neckline).
We sew adhesive tape (Velcro) onto the back parts for fastening. The ribbon can be sewn onto the collar only, horizontally or vertically. Or sew on a longer strip of velcro tape to cover the collar and back parts. Decide which way you like best, which will be more convenient.
I also recommend sewing the side of the Velcro tape with hooks to the bottom of the fastener - the one that will not touch the neck. She scratches herself