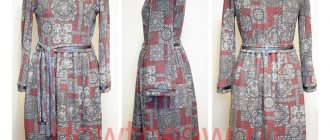
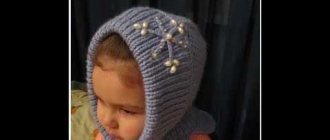
Double and very warm
A very simple double headband for women, which is knitted in the shape of a tube. New model from Drops.
Prepare:
- Merino Extra Fine yarn from Drops (100% wool, 105m/50g);
- set of knitting needles No. 4.
Calculation for three head circumferences: 54/56; 56/58; 58/60 cm.
Bandage width: 10; 11.5; 13 cm. Consumption 100 g.
Density 21 p. = 10 cm.
Cast on 42/48/54 stitches with knitting needles, close in a circle and knit in a hole pattern according to the pattern until the product is 49/51/53 cm long. Finish knitting in 2 rows after the holes and bind off the loops. Sew along both short sides, and then fold as shown in Figure A3, folding the ends one into the other according to Figure. A4. Sew through all four layers and turn to the other side.
You can see how to sew a bandage in the video.
Simple ways to tie a turban on short and long hair
The principle of forming a turban is quite simple:
- Place a piece of fabric of sufficient size on the head as required by the desired result;
- Make several turns around your head;
- Fix the structure;
- Bring beauty, hide unnecessary details.
A rosette is the simplest turban tying available to every woman. At the beginning of the last century, this method was extremely popular in Europe and post-revolutionary Russia. A rectangular fabric of sufficient length and width is folded in half, the conditional middle is located at one of the temples. The free ends are twisted into a bundle from the opposite side. The process continues until the bandage is tight enough.
Next, you can proceed to the artistic part: the tourniquet is laid around its axis, forming a rosette on the temple, the edges are tucked into any of the folds. For those with long hair, we recommend tying it up on the top of the head, closer to the forehead. The plait is not wound in a spiral, but wraps around a bun of hair draped with fabric.
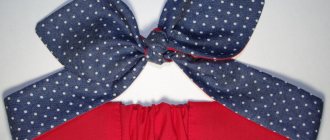
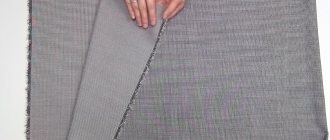
From a scarf
The instructions in the pictures will tell you how to tie the scarf correctly.
The scarf is placed on the head not in length, but in width: one edge barely covers the face, a long piece hangs behind the back. While tilting your head and holding the short edge with one hand, wrap the other around the bottom edge as far as the length allows. To achieve volume, use a long scarf. Mask the edge and move to the front: twist it around the coils with a locking knot.
The ends of the scarf of equal length are folded crosswise at the junction of the back of the head and neck or tied in a knot, then brought up and another knot is made above the forehead. If there is enough fabric, repeat the manipulation, tucking in the ends.
From stole
Its impressive size allows you to beautifully tie a stole on your head in different ways. The most popular are all kinds of draperies, the natural volume of hair, special linings or an additional scarf under the main fabric are actively involved.
The edges of the stole gather at the hairline and twist in the direction from the forehead to the periphery. The resulting tourniquet is wrapped around the head. Masking the edges alone may not be enough for reliable fixation. If there are hidden elements, it is reasonable to strengthen the structure with hairpins and pins, hidden or decorative.
Stoles are used not only for aesthetic, but also for practical purposes. During physical activity or outdoor games, an open analogue of a turban does not allow the hair to fly away and tangle in the wind. The hair can be gathered into a ponytail, braided, or left loose; the edges of the stole are laid underneath, crossing on the forehead and back of the head. Such a frivolous option allows you not to mask the remaining fabric, but to tie it with a knot or bow in an arbitrary place.
From a scarf
The technique of tying scarves in the manner of a turban is characterized by a distinctive feature: you have to deal with a triangle. The square scarf is folded diagonally, the long sides are folded in the direction from the back of the head to the crown, overlapping, forming an angle with the apex in the center of the forehead. Then they are wound back, crossed with tension, returned to the top and tied with a double knot, using the third corner of the folded scarf or leaving the crown open. The edges are tucked under.
According to another method, the top of the triangle is involved in the creation of the turban from the first steps. It is pulled from the neck to the forehead and secured with a tight, but not too massive knot from the two remaining corners. The edges are wrapped around the head and tied with a knot, which is hidden in the folds.
Choose a colorful or plain scarf depending on the main color scheme of the ensemble. It is important that it is large enough - at least one and a half meters on each side. Experience shows that owners of luxurious hair are not always able to get by with an ordinary scarf.
Turkish version
The construction of a turban in Turkey has been elevated to the level of an art. It is here that all sorts of hidden elements are most widespread:
- Overhead pads that visually increase the volume of the hairstyle;
- Fixing pads;
- Invisibility pins;
- Pins;
and decorative:
- Brooches;
- Tiaras;
- Pendants.
Despite its modest charm, Turkish technologies are perhaps the most intricate, so let’s take a closer look at them.
A bandana can take on the role of a fixing bandage. If it is made in a suitable color scheme, it is not necessary to cover it completely; a small strip will complement the main accessory favorably.
Modern pads are equipped with elastic bands for convenience; they are recommended for those who are just starting to master the technique. The elastic of the lining catches on the bandana knot, so place it where you would like to add fluff.
Place a scarf folded diagonally over your head, as if backwards: so that the top of the triangle hangs over your face. Wrap the long edges, crossing with tension above the forehead and at the back of the head as many times as the length allows, tie the last overlap in a knot. If the knot is in the front, straighten it so that it does not form an unnecessary protrusion.
Wrap the resulting turns of fabric with the hanging edge, carefully tucking in any excess.
The layering of fabric looks very impressive. Place a scarf, stole or large scarf folded in half on the top of your head so that the hanging edges are the same length. Bring them behind your back, cross them at the back of your head and lay them one by one so that each new layer does not completely cover the previous one, secure with invisible hairpins. The decoration will give the image a complete look.
With tourniquets
Such a detail of the turban as plaits deserves special consideration. They can be used to wrap your head as a decoration and at the same time securely fasten the turban. Fashionistas of all times and peoples have invented a countless number of ways to lay plaits. For example, braid long halves of a scarf, scarf or stole into a braid and attach with a pin.
A “basket” of strands or a large knot twisted like a “snail” on the top of the head or at the temple looks no less impressive.
The strands hold the turban tightly, but constantly tend to unravel, for this reason they are usually fastened with a pin from the wrong side.
From a scarf
It is possible to build a turban even from a small headscarf. Place it on your head so that the widest side covers the back of your head, and the corner is in front.
You need to cross the ends with your forehead and tie them in a knot. Use the corner adjacent to the forehead to mask the knot, carefully tucking in the ends.
African turban
An African turban emphasizes a proud posture, giving an original, exotic and modern look at the same time. An African turban suits both dark-skinned girls and Scandinavian fashionistas. Its secret is extremely simple: numerous layers of fabric in the area of the crown and back of the head form a majestic position of the head.
The following will help you achieve the desired effect:
- own long or thick hair, collected in a bun;
- a very large scarf or a pair, or even three stoles;
- Volume-increasing linings.
At home, such a headdress is indispensable: it pleases the eye with bright colors, receives the rays of the equatorial sun, and baskets of food and weighty jugs of water are placed on it.
Wrap the cloth around your head, starting from the back of your head. Cross the edges at the back and front, gradually moving towards the crown. Or try another method: twist them into one bundle and lay them in the desired direction, hiding the edges. If the result is not voluminous enough, take the next scarf.
It makes sense to secure such a massive structure with pins and hairpins. Don’t be afraid of variegation or an abundance of decorative elements: the laws of the genre approve.
From a towel
A towel turban has a very difficult task: to wet washed hair without ruining the hairstyle, so it should be tied according to all the rules. You have to take into account the size and material of the towel; its length and width should be enough to completely cover the top of your head and stay on your head. A terry towel is suitable for smooth hair; for curly hair, a microfiber cloth is preferable. It is recommended to separate wavy strands and lightly beat them if you want to maintain curls. To straighten your hair when drying, comb it with a wide-toothed comb.
Bend forward and wrap your hair with a towel in the direction from the back of your head to your forehead, twist the edges into a loose rope, straighten and throw it back. The edges of the tourniquet can be slipped under a towel or secured with any hairpin.
The textile industry offers a ready-made solution: a towel shaped like a turban with an elastic band. https://www.youtube.com/watch?v=JJQ2uWRDCL8
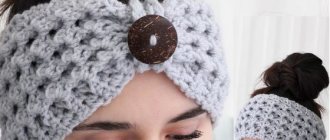
In lavender color
Stylish and feminine headband for girls
The simple pattern used for the knitted headband, designed by the Drops group, looks great. For spring or autumn, this is an excellent choice for women of any age. And even a novice craftsman can knit it with his own hands, because a detailed description of the work is included.
For head volume: 54/56; 56/58; 58/60 cm Prepare:
- 100 g of Eskimo yarn from Drops from pure wool with characteristics in 50 grams 50 meters;
- sp. No. 7
Calculation for density: 12 pets. front surface = 10 cm
Description with a step-by-step pattern for knitting a headband:
- Cast on 22 stitches with knitting needles. and knit 14-15-16 cm according to pattern No. 1. Stop working on the wrong side.
- Continue along cx. No. 2 – only 1 rapport high. There are 10 loops left.
- Then you need to connect the crossing along cx. No. 3, and then go to cx. No. 4 and perform 1 rapport in height. After knitting it will become 22 stitches again.
- Complete the bandage according to cx. #1: Sew the back seam.
Knitting pattern for the Warm lavender headband
Wide winter headband
A bright accent for a good mood
The following pattern: let's look at how to knit a spectacular wide headband, decorated with braids, on knitting needles. The length of the product is 48 cm, width 12 cm. As you knit, try on the headband and adjust the size. The model is knitted from 100 g of Andes yarn from Drops from 65% wool 35% alpaca, 100 grams 96 meters, knitting needles No. 6. Calculation for density 13p. = 10cm
How to knit a headband:
- Cast on 30 stitches and make a two-by-two ribbed pattern (2 knits, 2 purls) 12 cm.
- Then redistribute the loops: k2, p2, k2, A1 – 2 times, p2, k2, p2, k2.
- Knit until the length of the headband blank is approximately 36cm long (you should knit the entire repeat in the diagram), finish with an elastic band, just like at the beginning of the work. The total length should be 48 cm or your size. Connect along the edge.
A simple description of a headband for a beginner
A simple model for beginners
Headbands are the best choice for a beginner to learn the skill. Here you don’t have to knit the parts according to a complex pattern; we knit a simple strip – which is easier to find! And the pattern suitable for beginners is just knit and purl. For a knitted strip, prepare 100 g of Eskimo Drops threads made of 100% wool, 50 g, 50 metres, knitting needles No. 9. We will knit with knitting needles in a completely simple pattern - with a regular elastic band. Density: 8.5p.=10cm. Operating procedure:
- For the model in the photo on the right, take the thread in two folds and cast on 42 stitches. The work will be done in the transverse direction. First r. – persons. n., second r. - purl P.
- We change the knitting to an elastic band 1 to 2 (1 knit, 2 purl) and knit in a height of 13 cm. At the end of knitting we knit one r. inside out p., and another row - faces. P.
- Sew along the side.
Knit the version shown in the left photo in exactly the same way, but the pattern will be different - 2 x 2 rib (2 knits, 2 purls). The rest of the details in the description are exactly the same.
Watch the video master class from Alina Kostenkova, where she shows how to knit a double headband with an invisible seam.
LiveInternetLiveInternet
Shawls and scarves serve as excellent protection for hair from sun rays, cold and wind.
In addition, a scarf can perfectly complement any look, since the choice of textures, fabrics, colors and patterns is almost limitless.
This issue is especially relevant in cool weather, when you don’t want to languish your hair under a tight hat or a fixed hood. You can also tie a scarf in the summer and protect your hair from the scorching bright sun.
Remember that tying scarves on your head takes some skill and experience, so don't be discouraged if you don't get it right the first time. In this post you will learn about 4 stylish and trendy ways to tie a scarf on your head, and video instructions from the blog of the online store freepeople.com will help you understand the details.
Try using several methods of tying a scarf, this will help you choose the method that suits you.
Turban
A turban will draw attention to your face and eyes and add oriental charm to your look.
How to tie a turban? 1. Take a sufficiently wide and long scarf, fold it so that you get a long scarf. Place the scarf behind your head as shown in photo 1. 2. Raise the ends up to your forehead (they should be the same length) and cross them twice over each other. The turban will look more original if the “center” is made not exactly in the middle, but a little to the left or right, whichever suits you best. 3. Lower the corners of the scarf behind your head and cross them again at the back of your head. Then go back to your forehead, tie a knot, and tuck the ends under the scarf on top.
Twisted turban
A twisted turban is a two-in-one solution. Hairstyle and headdress! It will suit girls with long hair.
How to tie a twisted turban? 1. Divide your hair into two parts. Then take the scarf and mentally divide it in half: starting from the center of the scarf, wrap one half around the left section of your hair and the other around the right section. You will get two bundles. 2. Raise them to your forehead and throw them over each other, cross them at the back of your head, and raise them again to your forehead. The amount of crossing depends on the length of the hair and the scarf. 3. Tie the ends of the scarf into a knot at the back of the head and straighten the resulting structure.
Turban made of two scarves
The two-color turban is the most voluminous option of the three. Two scarves with the same pattern, but in different colors, look very good in it.
How to tie a turban from two scarves? 1. Take two scarves and tie them into one long scarf (try to make a small knot). Place the middle of the scarf behind your head, lift the ends to your forehead and throw them over each other. 2. Gradually wrap your head, moving from the forehead to the crown and crossing the ends on the forehead and behind the head. 3. When small ends of the scarf remain, tie them in the front into a double knot. Hide the ends by tucking them under the resulting turban.
Bandage
A simple and quick, yet stylish way to tie a scarf. It is suitable for girls who prefer convenience and lead an active lifestyle.
How to tie a headband? 1. Take a scarf, fold it several times to get a strip of fabric of the required width. 2. Place the middle on your forehead and wrap it around your head. 3. At the back of your head, simply tie the ends of the scarf into a knot. The bandage is ready! source
*** A scarf, which is needed strictly for decorative or fashionable purposes, can be tied in any way; you just need to use the most fashionable and suitable tone of fabric in order to look successful and attractive.
What can you use to tie your head? It could be: a scarf, shawl, bandana, stole, headscarf. Naturally, each type of accessory can be either winter or summer - it depends on the thickness of the fabric, its composition, density and even color. For example, traditionally summer accessories are light, they do not absorb heat and seem cooler. Choose a headscarf or scarf so that it is in harmony with your natural color type, matches your clothes and other accessories, and also so that it ties well (is not too slippery).
Here's another tutorial to help you:
In principle, any high-quality handkerchief or scarf can be worn both around the neck and on the head, but it’s still worth getting a few original things that you will use only in a certain way.
Good luck!
See also:
How to choose and what to wear with a turban/turban
4 ideas on how to beautifully tie a scarf on your head
How to tie a scarf on your head - 3 options
Striped jacquard pattern
An interesting headband made using the jacquard technique from two types of yarn: Fabel from Drops with characteristics of 205 meters in 50 g, 50 g in black and Delight from the same manufacturer (175 meters in 50 g) in lilac color. Take circular knitting needles No. 2.5 on a 40cm fishing line. Density: 26p.=10cm. The description is presented for head volume: 54-56 and 58-60 cm.
Description of work:
- You need to knit in the round. Cast on 120/135 stitches and knit 4 circular rows. p., 1 r. - purl p. and 1 r. – facial p.
- Next, go to pattern M1 (8 or 9 jacquard repeats, depending on size). For sizes 54-56, knit 1 rapport in height along cx. M1 and go to cx. M3. For size 58-60, knit 1 rapport in height and then continue according to pattern M2, then according to cx. M3.
- Then knit 1 circular r. Fabel yarn and add 1 p. (=136 p.)
- For both sizes: continue according to pattern M4 - 1 repeat. Then knit 4 p. elastic band 1 by 1 (Fabel). Finish 1 p. – persons. and finish the job. Fold the bandage in half and reinforce the end.
Stripe Ice Princess
A voluminous pattern with braids will decorate any product.
To make this model of stripes for women, you will need Andes yarn made of wool and alpaca, 100 grams of 97 meters and sp. No. 6. See the pattern diagram below. Density 13p.=10cm. Make a set of 19 loops + 1 edge. and knit the pattern according to the diagram. Try on the headband according to your head size.
Braid headband pattern
DIY turban
Sewing a turban with your own hands is quite simple. To do this, you need to prepare all the necessary tools and material in advance. But the most important thing for a beginning needlewoman is to find a suitable master class on how to pattern a women’s turban from the chosen fabric. There are many methods for making this headdress. In order to sew a turban with your own hands, you need patterns and diagrams of the headdress you like.
Traditional square turban
An interesting and at the same time simple headdress can be sewn from knitwear or similar fabric. There is nothing complicated in making such an accessory - you need to sew two seams on the back side of the product. For such a turban, an ordinary knitted scarf or strip of fabric is suitable.
To get started you will need the following:
- A strip of knitted fabric approximately one and a half head circumference long.
- The threads are the same color as the material.
- Brooch or other decoration.
Manufacturing is carried out in the following sequence:
- The prepared material is twisted in half. The result should be a circle equal to the circumference of the head.
- The front of the headdress will be where the ends overlap each other.
- The remaining loose ends are folded back and attached to the back of the hat.
- A brooch or other decoration is attached to the front center.
- Trying on a turban
You might be interested in everything about women's sewing measurements: a detailed plate
Additional Information! When adjusting the size, it is worth remembering that after washing a knitted item may shrink a little.
Traditional voluminous turban
A more complex, but at the same time more voluminous eastern hat. A brooch is also suitable for decorating it.
For manufacturing you will need the following materials:
- A piece of elastic fabric measuring 30-35 cm.
- Threads in the color of the selected material.
- Sewing machine.
- Brooch or other decoration.
Traditional voluminous turban
The production of this item of clothing is carried out in a strict sequence:
- First of all, you will need a pattern - a strip of fabric measuring 30x60 cm.
- Patterns are applied to the workpiece and outlined with chalk.
- The fabric strip is folded in half.
- The upper two corners are rounded, and the cut areas are processed.
- The top and side edges are sewn together. The lower part remains free.
- A gather is formed at the front. This can be done either by folding or tying with threads. It will be easier and more correct to create a voluminous product by gradually pulling the material from the back of the headdress and creating folds from it at the front.
- For decoration, a brooch is attached and the finished product is tried on.
Simple twisted turban headband
This accessory will come in handy when it’s too early to put on a warm hat, but it’s already getting cold outside. The easiest way would be to tie a turban headband. Using knitting needles, a circle of fabric is made to fit the size of the head. At the front it is slightly pulled together with some decoration or a velvet ribbon.
DIY turban headband
You can also choose a more complicated method. Then the work of sewing a turban will be done in stages:
- Take a strip of fabric measuring 140x23 cm.
- If fraying fabric is used, it is tucked around the entire perimeter by 1 cm.
- The turban blank is wrapped around the head so that the ends of the fabric are in front.
- The strip is wrapped several times to cover the forehead and sides of the face. At the front, the edges of the material are formed into a knot, and the remaining ends are tucked to the sides under the turban.
Thus, the result is an almost real oriental headdress, only with an open crown.
Towel turban
This product can hardly be called a full-fledged headdress - it is convenient to use for drying hair and cosmetic procedures. You can simply wrap a terry towel according to a simplified pattern or sew a turban from it for the bathroom.
Towel winding diagram
This home accessory can be useful both for drying hair and when applying various creams and masks to the skin of the face. The turban will reliably protect hair during cosmetic procedures.
You might be interested in Interesting patterns for men's bow ties
To sew it, you can take a beautiful, but unnecessary towel. Next, using the pattern diagram, two blanks are cut out.
Cutting diagram
Important! If the hair is very long, then the sizes can be slightly increased.
The resulting parts are sewn together along the top using a sewing machine or by hand. It is advisable to sew a loop on the back side of the accessory, and a button on the front side so that it is convenient to fix them together.
Shawl turban
An ordinary scarf can also be turned into an exotic headdress with simple manipulations. The scarf should be draped over your head so that its ends hang over your forehead. Then they are twisted, thrown back and tied into a knot.
Shawl turban
Additional Information! To keep the tied scarf securely, you can wear a light hat underneath it.
Knitted turban with brooch
Using this method, you can sew a formal headdress that can be worn with a suit or dress for a festive event. To sew the product, it is recommended to use bulky knitted fabric measuring 120x60 cm. Sewing is done step by step:
- The material blank is folded in half. At the top the edges are slightly rounded.
- The side and top parts are stitched on a sewing machine and slightly pulled together to form neat folds. When sweeping, the front part should be inside.
- The product is turned inside out and put on a mannequin or something similar to it, for example a three-liter jar.
- The knitwear is slightly pulled together on both sides, joined in the middle and secured with stitches.
- The fabric below is slightly draped, pulled together and also fixed.
- The remaining ends are trimmed.
- At the end of the work, a brooch is attached to the front. It is desirable that it be the same shade as the material of the headdress.
Knitted turban with brooch
How to sew a turban with a bow for a girl
A turban for a child will be a wonderful addition to a morning party in the garden or a full-fledged accessory that babies and girls in school can wear.
Turban with bow for girls
The easiest way to make such a headdress is to twist it from a piece of long material. But it is better to make a hat with good knot fixation. Sewing a children's turban is not much different from making a knitted turban, except that for a child it is better to choose velor or pleated fabric. When determining the size of the product, it is better to make it larger so that the turban can be worn on a hat. Instead of a brooch, a bow will look natural on a children's accessory. It can be made from the same material as the headdress itself or another, but with the condition that the colors match.
Turban for a schoolgirl
Thus, it does not require much skill to know how to sew a turban with your own hands - you only need a pattern, material for sewing a headdress, and you can start creating this colorful piece of clothing.
Women's headband made from woven braids
One of the issues of the Knitted Piggy Bank magazine published an unusual headband for spring or summer, knitted from simple long strips of three colors, intertwined like a regular braid. Since the work is simple, you can tie several headbands for different outfits.
Tie three strips of different colors and braid them
Knitting a headband does not require a pattern. Tie 3 strips of different colors with a 1*1 elastic band and braid them like a braid. Finally, connect by color. To determine the length, after knitting 40 cm, cut three strips, braid them and measure on the head. If the length is not enough, continue knitting to the required volume.
Women's headband with overlapping knitting needles
To make a knitted bandage you will need: 50 g. Andes yarn 65% wool, 35% alpaca, 100 grams 96 meters; knitting needles number 7
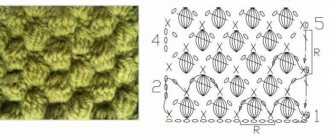
Small pearl pattern is a good choice for knitting headbands
Knitting pattern for pearl pattern: Row 1: * K1, P1. * 2nd row: on faces. knit purl, over purl. – persons. p. Density: 12p.=10cm
Description of knitting headband:
- Start by casting on 16 stitches. and continue knitting 20cm with a pearl pattern.
- Divide the stitches into two parts and continue knitting each one separately: the first 8 stitches. 9 cm long, finishing purlwise. R. Cut off the tip.
- Then knit a 9 cm strip from the other 8 stitches.
- Make an overlap and then knit all the loops at the same time until the total length becomes 50cm. Close the stitch and connect the beginning and end of the work.
Video master class on making a women's headband with an overlap with another pattern from Elvira Vafina's channel.
You can watch another pattern of stripes with a cross, but already made in garter stitch, in the video master class from the Country of Knitting channel.
Fashionable turban headband knitted quickly and easily - Master class
Simple and easy
If we are talking about knitting headbands, then we definitely need to talk about options in the form of a turban. Women love this model. And, of course, there are styles of knitted headbands on knitting needles. Knitting a turban headband is very simple. Below is a master class that you can follow visually. You can change the pattern if you want to knit a wider strip. Choose any yarn that is available. Mine was of medium thickness. Leftovers, which every knitter has in abundance, can be used. I cast on 26 stitches and knitted them with an elastic band 2 by 2. Having knitted 20-22 cm, I divided the loops into two parts of 13 stitches. I knitted each part separately with a length of 6 cm. I made an overlap and finished knitting all stitches together to 20-22 cm. Connect the beginning and end of the bandage.
Original turban headbands for women knitted
This turban headband is knitted in a different way. Prepare yarn with characteristics of 125 meters in 50 grams (150 g of orange, 100 g of two shades of gray) and knitting needles number 5.
Description of knitting headband:
- Make a set of 38 stitches. orange thread and knit a strip with knit stitch (knit stitches - knit stitches, purl stitches - purl stitches) to a length of 58 cm.
- Make another set for the second strip of 38 stitches, work in stockinette stitch in stripes, changing light gray and dark gray threads every 4 rows of the same length.
- Now we bend the first strip in half, thread the second through the loop and align the ends. We connect along the back seam.
- For the shirt front, cast on 146 stitches. using circular knitting needles in orange and knit 22 cm with a 1*1 rib pattern, then change the color to dark and light gray threads, alternating them every 4 p.
Video MK - women's Solokha headband on knitting needles:
A voluminous version made from thick yarn with an English rib
Head size: 54/56 cm, width 12 cm Knitted from 100 g. Polaris yarn with knitting needles No. 12. Density: 7p. = 10cm A shower warmer 30cm long and 54cm in circumference, you will need 300g.
The set is knitted with English elastic using straight knitting needles: 1 p.: 1 st. handkerchief knitted, * 2 pets. knit together, yarn over, slip 1 stitch. like inside out * – alternate from * to *, finish 2 stitches. together and 1 p. scarf. viscous. 2p.: 1 p. handkerchief. knitting, * 1 yarn over, slip 1 stitch. as purl, knit the yarn over together and remove. loop*, alternate from * to *, at the end 1 st. handkerchief viscous. 3 rubles: 1 p. plat. c., * knit the yarn over and the removed p. together, 1 yarn over, remove 1 p. purlwise. * – alternate from * to * until 3 stitches remain. for the remainder, knit knit stitches together. Yarn over and removed p., 1st. plat. V. Alternate only 2 and 3 r.
In the round, knit an English elastic band like this: 1 p.: * yarn over, remove 1 p., purlwise, knit 1. * 2p.: * knit purl. p. together yarn over and removed p., yarn over, remove 1 st. like purl * 3rd: * Yarn over, slip 1 st as purlwise, knit knit together. Yarn over and removed st. * Repeat rows 2 and 3.
Knitting description:
- You need to cast on 10 stitches and knit a strip of 55 cm in English stitch in turning rows.
- Next, you need to twist it once and sew along the back seam.
- For the snood, cast on 38 stitches and continue using English stitch in the round until the collar is 30 cm high.
If it is more convenient for you to understand the knitting process from video lessons, then watch the master class on knitting a headband with an English elastic band. It is so fluffy and wide that it can easily replace a knitted hat with knitting needles.
Crochet turban hat
Knit from thick yarn, which contains 100 grams in 100 meters. For this yarn, take a hook with number 6. Before work, you need to take measurements: the depth of the head and the circumference of the head. For size 55-56 cm, depth is 44 cm.
The process starts from the back of the head and continues forward. It’s difficult to guess the size of a hat, so experienced knitters recommend starting with 11 stitches. The cap model in the drawing looks like an oval with a rectangular base. The expansion occurs from the back of the head to the top.
Knit five embossed stripes, making increases between them at the beginning of the hat, and decreases at the end. In the final rectangle that ends the oval, the knitting is divided into two halves and strips are knitted from each of them. The length of the stripes is equal to half the volume of the head. The stripes are wrapped around the headdress and sewn at the back of the head, to the initial rectangle, which consists of loops.
The knitting pattern is as follows:
- Knit 11 loops + 2 edge stitches.
- Work a half double crochet into the fourth loop from the hook.
- Knit with concave and convex embossed stitches 5 cm high.
- Between the embossed columns, knit with double crochets, adding one stitch in each row. Make increments only on the front side.
- The result should be five wedges separated by grooves.
- At the middle of the depth of the product, begin to make decreases in the same way as increases.
- When there are 11 loops left in the row, knit 5 cm with a relief elastic band, divide the knitting into two halves.
- From each part, tie strips 5 cm wide, equal to half the circumference of the head.
- Wrap the strips around the product, sew the edges, and tie the sides of the product with thread.
- Decorate the central place of the turban with a beautiful brooch.
The peculiarity of a crocheted turban is the presence of segments that are separated by relief stripes. The product looks original, and this is the effect that craftswomen try to achieve when making a turban with their own hands. On thematic forums dedicated to knitting, you can be inspired by numerous photos of oriental headdresses knitted and crocheted.
A turban perfectly complements any look, adding zest to it. For knitting, you can use any yarn, playing with the number of folds and the type of pattern. The product that is based on a relief elastic band looks most harmonious.
Knitted set “Ice crystals” – new model
An original voluminous knitted set of a headband and a collar for a woman. Accessories made from large threads are now in fashion. And the braided pattern looks great. Made from Polaris pure wool yarn measuring 36 meters per 100 grams using size 10 knitting needles. Prepare 100 grams. for a bandage and 300 gr. on the clamp.
Density: 7p.=10cm Dimensions of the clamp: 31 by 67 cm.
Braided pattern when knitting in the round: 1st row: * knit the 2nd stitch first. on the knitting needle behind the back wall, the first stitch should remain on the knitting needle at this moment, then knit the 1st stitch. and reshoot both at once *; 2p.: 1 knit., *2nd pet. knit knit., 1st is on sp., then knit 1st knit. p. and re-shoot both *
Braided pattern in straight and transverse rows: 1st stitch: * 2nd stitch. knit purl (1st on the needle), knit 1st purl. and reshoot*; 2nd p.: * Complete the 2nd p. twisted (1st remains), knit 1st. *
How to knit stripes and snoods with a braided pattern:
- For the snood, cast on 37 sts, join into a circle and purl 1 row. p. and 1 row of faces. p., evenly adding 10 p. (= 47 p.).
- Then knit a braided pattern 30 cm high. In the last r. reduce the number of pets. for 10, finish 1 p. purl P.
- Cast on 9 sts on the strip and knit with a 51 cm braid. Close the loops and sew the first and last p.
White stripe on the head for spring
Used 50 gr. Merino Extra Fine yarn from pure wool, with characteristics 50 gr. at 105 metres.
For size: 56/58 cm. Height 10 cm. Density: 21p.=10cm.
Scheme and description of knitting a headband on knitting needles:
- Cast on 30 stitches. + 2 chrome. and knit 1 p. purl p., then complete the pattern according to the diagram (in the second row you will end up with 30 stitches + 6 unknitted stitches (black squares). In the third row, knit all the loops (= 36 stitches) Having finished pattern 1, go to pattern 2 in length 26 cm.
- How to knit an overlap: first 18 stitches. transfer to auxiliary sp. and knit the other 18 sts, then the first 18 sts with auxiliary stitches. sp.
- Continue along cx. 2 until the strip is 48/49 cm.
- Finish according to cx. 3, in the end there will be 30 stitches left on the needles.
- At the end, knit 1 row - knit. p., make a seam.
See a selection of crochet stripes here