Measurements
Measurements to be taken from the figure:
| Measure | Designation | Example | |
| Back length to waist | Dst | 41 cm | |
| Front length to waist | DPT | 44 cm | |
| Chest height | Vg | 24 cm | |
| Center of the chest | Tsg | 17 cm | |
| Shoulder length | Dpl | 12 cm | |
| Bust | Og | 92 cm | |
| Waist circumference | From | 74 cm | |
| Neck circumference | Osh | 38 cm | |
| Chest Width | Shg | 31 cm | |
| Back width | Shs | 34 cm |
LiveInternetLiveInternet
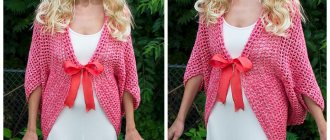
The perfect DIY pattern
This publication is probably the most valuable! I have been asked more than once how to create a pattern, but you can’t tell me in a few words! I’m sharing the secret of how you can create a pattern according to your own measurements so that the dress fits you perfectly! No complex calculations or formulas are needed, just tracing paper, a measuring tape, a ruler and a pencil! I'll show you a pattern for a cut-off, fitted dress. Any skirt you want will do. Measurements in cm: Sg - Half chest circumference 43 St - Half waist circumference 35 Sa - Half hip circumference Shg - Bust width 31 tuck opening 9 Shp - Shoulder width 12.5 Dtp - Front length to waist 41.5 Vg - Bust height 24.5 Vpkp — Front length, in other words, from the highest point of the chest to the point of the shoulder along the oblique 22 Cg — center of the chest 18.5 Wb — barrel height 18.5 Dts — Length of the back to the waist 42 Vpx — Length of the back along the oblique from shoulder to waist 43 Shs — back width 37 How to take measurements can be easily found in a search engine. If necessary, I will make a separate MK. This one won't fit. I will tell everything as simply as possible so that everyone can understand. Construction of the shelf Draw a perpendicular line from the edge of the tracing paper.
Measure 6.5 cm to the side (for the neck)
And down 8 cm. These are standard lengths.
We draw the neck.
We measure 9 cm - this is our measurement of the tuck solution (chest).
We measure the length of the front, in this case 41.5 cm
Draw the waist line.
We put the barrel line up. It should intersect with the chest line.
We plot the half chest circumference in half 21.5 cm on the drawing.
We set aside the measurement for chest height 24.5 cm, from the shoulder at the base of the neck to the highest point of the chest, it should intersect with the measurement at the center of the chest. The center of the chest is the distance between the highest points of the chest.
Here is the measurement for the center of the chest.
Set aside the measurement for chest height again: 24.5 cm
The result was a tuck solution.
Set aside the measurement Shp - shoulder width 12.5 cm
We set aside the Vpx measurement - from the chest to the shoulder 22 cm, it should intersect with the point of the shoulder.
We draw a line.
We set aside the measurement Shh - the width of the chest divided by two, minus the undercut in the drawing - 16 cm.
We connect the shoulder point - Шг - and the side, we get an armhole.
We set aside 1.5 cm on both sides - our fitting.
We draw a groove.
We fit another 2 cm on the side.
Building the back Set aside 6.5 and 2.5 cm.
We mark the back length 42 cm and Vpks - length from the middle of the waist to the shoulder 43 cm.
We mark our shoulder 12.5 cm.
Height of the barrel is 18.5 cm and Half chest divided by two is 21.5 cm.
We mark the measurement, back width 37 cm /2 = 18.5 cm +0.5 cm I decided to make an increase.
The tuck on the dress is done like this. Mark 4 cm from the neck to the shoulder and draw a line to the waist.
Here is this line for the required length of the dart. Almost to the armhole.
We measure 1.5 cm to the sides and draw a dart. We also trim 2 cm from the barrel.
We cut it out and this is what we get.
Fold and close the breast solution. The dart increases.
Add a bust dart to the side. We draw, in this case 6 cm from the armhole.
Don't cut all the way through. Turn it away. And roughly divide it in half.
So we have a pattern for a dress. When I sew the dress, I’ll show you how it turned out! This will be a lace dress. Try it and write what you get! Thank you for your attention and good luck with your pattern making!
Shared by MK - Tatyana Orlova.
Construction of the bodice
Net
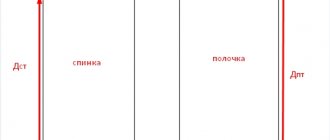
The middle of the back, the vertical line on the left, is equal to the measurement Back length to waist - Dst (in my example 41 cm).
The middle of the shelf, vertical on the right, is equal to the length of the shelf to the waist DPT (44 cm).
Back width = Chest circumference / 4 - 1 cm, in my case 92/4 - 1 = 22 cm.
Shelf width = Bust circumference / 4 + 1 cm, 92/4 + 1 = 24 cm.
Neck
Neck close to the neck:
Back neckline depth = Neck circumference / 16;
Width of back and shelf necks = Neck circumference / 6;
Shelf neck depth = neck width + 2 cm.
My example: back neck: depth 38/16 = 2.38 cm; width 38/6 = 6.3 cm. Shelf neck: 6.3 and 8.3 cm.
Shoulders
On the shoulder line, use a protractor to mark an angle of 18 degrees for the back and 26 degrees for the front, then use a ruler to draw the shoulder lines.
Bottom of armhole
Low point of armhole: Length of back to waist / 2 + 1. Set aside from waistline.
41/2 + 1 = 21.5 cm
Reference point for constructing the armhole
B1 = Back length to waist minus back length to armhole (previous figure) minus back neck depth divided by 3 and add 1.
B1 = (41 - 21.5 - 2.3) / 3 + 1 = 6.7 cm.
Set aside from the middle of the back Back width / 2, 34/2 = 17 cm
From the middle of the front set aside chest width / 2, 31/2 = 15.5 cm
Armhole
Bust dart
We find the center of the dart by setting aside the Bust Height (24 cm) from the top of the construction, and half of the Bust Center to the left (17/2 = 8.5 cm).
Draw the first dart line from the middle of the shoulder to the chest height mark. Draw the second line from the bottom point to the shoulder line, retreating the amount of the tuck opening on the shoulder line.
The dart opening is equal to 1/20 of the bust circumference.
tuck solution = 92/20 = 4.6 cm
The second dart line should be the same length as the first. In order for the shoulder line to align when closing the dart, the remainder of the shoulder in relation to the second side of the dart must be drawn at an angle of 72 degrees.
We move the reference point of the armhole to the opened solution.
Redrawing the armhole
Back dart
The dart on the back is located in the middle of the shoulder line and forms an angle of 90 degrees with it.
Dart opening = +/- 1 cm, dart length = +/- 7 cm.
It should be noted that shoulder darts on the back are rarely used in small sizes, but they cannot be avoided in large sizes, as well as for products made from thick, heavy fabrics (jackets and coats). If the work uses soft, easily draped or stretchable fabric, then shoulder darts are not made on the back.
Increases in looseness of fit for the basic dress pattern
Before you start building the base, you need to know that the measurements in the pattern are not laid out “clean”, but with increases. What are these meanings? The increase is a value that determines the freedom of fit of the product. Here we will take increases designed for maximum fit, that is, for a dress.
Increases in calculations are indicated with the prefix - P. In my construction, the following types of increases will appear:
- PG - increase in chest - 3 cm.
- Fri - increase in waist - 1 cm.
- Pb - increase in hip circumference - 0 cm.
- Pspr - increase in armhole freedom - 2.5 cm.
- Pore - increase in sleeve girth - 4 cm.
- Pshs - increase in back width - 1 cm.
- Pshg - increase in neck width - 1 cm.
In the figure you can clearly see how the increase in Pspr determines the level of fit of the sleeve along the armhole. Depending on the value of the increase that you choose when constructing, it will depend on which sleeve you get in the finished product.