How to sew a corset with your own hands - from pattern to sewing
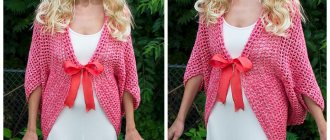
Of course, the corset is the main part of the wedding dress.
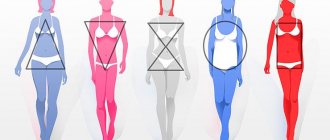
It still remains stylish and irreplaceable for emphasizing the beauty of the bride’s figure. It can be decorated with embroidery, rhinestones, pearls, feathers, bows, which will make the dress more original and special. That is why when sewing a wedding dress, one of the key points is how to sew a corset with your own hands. This is, of course, not an easy task that requires thorough preparation. When modeling an outfit, take into account such nuances as the purpose of the bodice, material, and body type. Also note that the basic bodice patterns are equally suitable for an evening dress, a wedding dress or a casual dress. It all depends on the decor and fabric.
Let's look at the main types of corsets.
Decorative
This look is intended for girls with a figure that does not require adjustment. It is often also called a corsage. Therefore, such a corset is classified as ordinary clothing. Perfect for brides with an ideal figure and pregnant women.
Slimming
Designed to correct the figure (change the shape): lifting the chest, shaping the waistline, supporting the back. With such a corset, the bride is more graceful and elegant.
For sewing, they mainly use thick fabric (can be cotton) for the lining, then the top fabric (main) is sewn from the same fabric or from any material you like, for example, satin, guipure, lace. The advantage of the density of the fabric is that it will not give the product a wrinkled appearance and unnecessary folds. If the corset is decorative, you can use silk.
The fittings include the following corset fastening elements:
- locks;
- eyelets;
- lacing ties;
- hooks;
- buttons;
- whalebone for a slimming corset;
- spiral bones for curved seams;
- steel bones for straight seams. It is better not to use cheap plastic bones, as they bend and curl.
Lacing is done either at the front or at the back, or both at once. For slimming corsets, it is good because you can adjust the tightening force, adjusting the corset to the desired size, regardless of whether you gain weight over time or lose weight. The main thing is to know when to stop and not to overdo it when tightening the corset.
It is better to buy bones already having the pattern in hand and, of course, knowing the length of the corset. Reducing a bone on your own can cause some trouble. Please note that the bone should be 2 cm shorter than the seam of the corset, so it will not be noticeable and will not tear the fabric.
You will also need these tools:
- ruler;
- fabric hole punch;
- disappearing marker for pattern modeling;
- strips of cellophane;
- scissors;
- hammer for fastening eyelets;
- sewing machine;
- rotary knife;
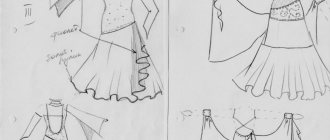
Select a template
Having decided on the style, purpose of the corset (shaping, decorative), its appearance (modern, retro or even business style), the shape of the bust, length, etc., try to sew it from cheap fabric as a model.
The advantage of the template is that it can be adjusted at different stages of sewing. This will be more difficult to do with the clean version. Also keep in mind that sewing a corset takes quite a lot of time and the rough version will shorten it, especially if you are sewing it for the first time.
Patterns and fabric
The most important thing when sewing a corset is choosing and drawing up a pattern. First, decide what shape you want: how much the corset should tighten the waist and whether it should at all; what shape is the top (more like the top of a dress or like a bra); in a modern style or the same as they were worn in past centuries.
Here we do not describe the construction of a pattern for a corset.
Having made the patterns (if you are using them for the first time, and generally sewing a corset for the first time), do not be lazy to sew a trial version of the corset from the cheapest fabric. At this step, you can accurately adjust the patterns to suit your figure and correct any shortcomings. Insert boning into key seams to evaluate how well the corset fits.
Choose the main fabric for the corset so that it is not too delicate, but rather tightly woven. Ideally, use a special lining fabric - coutil (cotton for corsets). But any non-stretch cotton fabric will do, the thicker the better.
Taking measurements
Whatever pattern you choose for a corset, dress, skirt or other type of clothing, it should match your body type and fit only your body size. This is the main rule.
To take measurements, measure:
- chest girth;
- waist circumference (in the place where you want to make it);
- hip circumference (along the line of protruding bones);
- also measure the distances: waist line - point under the chest, waist line - bottom along the side seam, waist line - bottom of the abdomen.
Constructing a pattern using a dummy method
Now the tattooing method is gaining popularity. Let's stop there.
To make a pattern, prepare a mannequin, a disappearing felt-tip pen and strips of cellophane 20 cm wide and 40-45 cm long. The number of strips depends on the planned number of parts.
- Drawing a corset. Tie the laces on the mannequin (you can use elastic bands) horizontally along the chest line, under the chest and at the waist, as well as on the stomach (12-13 cm from the waist line).
- Using a dry erase marker, draw lines along the tied laces, then remove them.
- Mark the side seams and the center of the front and back.
- Mark the raised seams of the corset.
- Take a strip of cellophane and place it on the center front of the mannequin. Draw the lines of the first part (from the fold to the relief) with a pen.
- Attach and translate the side and back pieces.
- Remove the parts and check them for evenness of the relief line.
- Add seam allowances.
Sequence of pattern construction
The corset pattern begins with measuring the volume of the model. This will require a centimeter. When measuring, the tape should not press the body too much, but should not hang loosely.
Important! Volumes must be measured over underwear or a top. In this case, the chest will be at the required level.
Before you start creating a pattern, you need to decide on the style of the bodice. This will help you find out whether to leave the measurements as they were or whether you can reduce the product in some places. This is usually done at the waist line.
To create a corset pattern you need to measure:
- breast volume;
- volume under the bust;
- Waist;
- hip volume;
- distance from waist to chest;
- distance from the waist to the end of the abdomen;
- deflection of the back of the product;
- tightening
The top will fit perfectly if you take your measurements correctly.
Constructing a pattern using a dummy method
The cut of corsets using the fake method differs in the method of constructing clothing. In this case, the entire process takes place on a mannequin. This is how the master perceives new clothes in a three-dimensional form.
The design is created using graph paper or fabric. The parts of the product are fastened together with pins.
Attention! The layout method allows you to avoid errors when cutting the product. An inexperienced master will be able to feel the proportions of the human body.
Instructions for the dummy method:
- The mannequin must be drawn with a marker for opening on the chest, stomach and waist. For convenience, elastic bands are tied and lines are drawn along them, which are removed after application.
- The lines of bends, seams and passing bones are drawn with a marker.
- The mannequin is wrapped with film or tracing paper, on which the necessary details are drawn.
- The pattern is transferred to graph paper. At this stage, you can make adjustments.
- Transferring the pattern onto the fabric. Sewing the bodice parts.
Important! If there is no mannequin, then you can apply the fabric or film on the person, leaving an allowance for the seams.
Calculation method for creating a pattern
When sewing a corsage using the calculated method, the pattern is drawn on graph paper using a pencil and ruler. Each individual part of the product is applied to paper and cut out after inspection. The paper parts of the bodice are attached to the fabric with needles. The fabric is cut out using paper designs.
The finished parts are sewn together using a basting stitch. After trying on the product, you can sew it on a sewing machine.
Attention! A corset for a girl should not emphasize the waist.
How to take measurements for making a slimming corset
Making a slimming corset for an individual figure begins with taking measurements from this very figure. Detailed instructions for those who want to order an individual model, as well as for all those who would be interested. What you will need to take measurements:
1. Soft sewing centimeter. 2. Ruler. 3. Ribbon, string or rope to tie at the waist. 4. List of measurements (template attached). 5. Handle.
It is better to take measurements in underwear or thin, tight-fitting clothing.
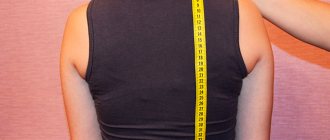
I recommend that you do not take measurements yourself, but ask someone to help. It is advisable that the assistant have experience in this matter. But if there are no assistants, use a tall mirror, and the photos clearly show where and how the measuring tape should be located.
Chest circumference. It is removed tightly around the body along the most protruding points of the chest. When doing this, wear a tight, supportive bra, especially if you have large breasts.
If the breasts are small and the corset is planned to have a push-up effect, the thickness of the bra should be appropriate.
Circumference under the bust. Removed tightly around the torso at the base of the chest.
Find the waist line. The waist in a corset is not always the narrowest part of the body. The fact is that physiologically the place between the pelvic bone and the last rib lends itself to tightening. In this case, when wearing a corset, you can breathe easily and there is no discomfort.
Feel for this place and tie a ribbon at this level. You need to tie it tightly, the ribbon will always try to slide up.
In the top photo you can see that the usual waist level is located 4 centimeters above the tape. However, the tightening in this place will be precisely on the ribs.
Waist circumference. We take measurements before eating, not after!