A detailed pattern with dimensions for sewing a comfortable and beautiful shopping bag from fabric will help you make an original accessory with your own hands. Step-by-step instructions for work will simplify the task as much as possible.
Tools and materials
These eco-bags can be made from different materials. The choice of fabric depends on the purpose of the product. In summer, it is better to use natural varieties, such as linen or cotton. A shopper made of synthetic fabric will be universal, and laminated models are comfortable in the rain.
There are also exclusive options made from unusual materials, for example, a handbag made with your own hands from genuine leather or fur is suitable for an evening walk, party, or going out.
Suitable fabrics for sewing shopping bags with your own hands:
- laminated fabric;
- synthetics;
- jeans;
- suede leather;
- leather;
- cotton;
- linen;
- fur.
What you will need to work on a rag bag with embroidery:
- dense fabric – 1x1 m;
- lining material – 0.5-0.9 m;
- non-woven fabric – 0.85x0.2 m;
- cotton or wool floss;
- threads matching the color of the main fabric;
- hoop;
- water-soluble marker;
- needles;
- scissors;
- ruler;
- sewing machine.
You can choose various decorations for the bag. Fabric products are most often decorated with embroidery with threads, ribbons or beads. A toy keychain made of the same material will add originality to a fur bag.
A leather product can be decorated with metal clips or nameplates. There are unusual bags decorated with buttons, beads, rhinestones, bows, and elements made using the macrame technique.
How to decorate a leather bag
Any decorative elements look impressive on leather models, but the most beautiful are appliqués, which are easy to make yourself. To do this, you will need a piece of thin soft leather or suede; you can match it to the color of the accessory, or you can make the applique contrasting. You will also need sharp scissors and glue intended for leather.
A voluminous applique, such as a flower, is best done using a template. Draw petals on a sheet of cardboard to make the applique three-dimensional; you can make them of different sizes.
Transfer the pattern to a piece of leather and carefully cut it out. Now all that remains is to assemble the applique using glue. Sew a bead or a beautiful button into the center of such a flower and glue it to the bag. This way you can decorate even an old model, covering up scuffs or defects.
You can decorate a leather bag no less effectively using rivets, decorative spikes and chains. For this, ready-made ribbons with decor, which can be bought at any handicraft store, are best suited. They just need to be attached to the bag with glue and a new accessory in a fashionable rocker style is in your hands.
Good ideas on how to decorate a bag are in the photo below:
Pattern
Shoppers are designed for shopping, which determined the peculiarities of their appearance. There is no clasp, the shape is straight and roomy. In addition to small handles, there may be a long strap. Some models are equipped with a small pocket on the inside for storing small items.
The pattern for sewing a shopper bag with your own hands can be of any size. Depending on the required parameters, the consumption of materials depends. The traditional option is a large, roomy model, but not everyone will be comfortable walking with one. Therefore, you can choose different sizes and shapes.
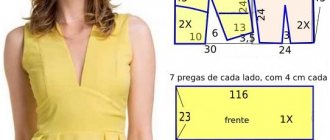
First you need to cut out the rectangular parts:
- made of thick fabric: 2 pieces. 42.5x38 cm, 2 children. 62x7 cm, 1 child. 82x5 cm;
- for lining: 2 pieces. 42.5x38 cm;
- made of fizelin: 82x5 cm.
It is important to choose the length of the handle that is comfortable for you. The shopper replaces the shopping bag, so he is often loaded with purchases.
The bag should not be too long and drag on the floor. At the same time, it is desirable to be able to hang it on your shoulder.
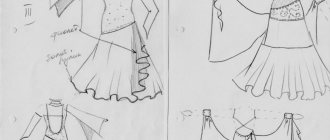
DIY pattern for a leather women's bag
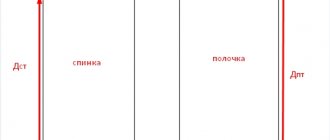
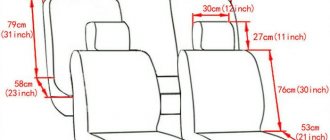
The first and most important thing is a thoughtful pattern. Determine the desired dimensions and cut out two rectangles from a piece of cardboard - the main parts. To make the accessory voluminous, you need to make the bottom and “side walls”; calculating their dimensions is simple: one length of the main part and two of its heights. You can choose any width of the side wall, but it is best to take 10-15 centimeters.
Don't forget about the handles - two strips 5-8 centimeters wide and 45 centimeters long. This is the most convenient size.
Precise adherence to all the nuances will help you sew a leather bag like a real pro. Lay out the pattern, leaving seam allowances of 1.5 centimeters, and at the top - 5 centimeters to make a beautiful lapel.
Cut out the parts using a knife and measure the parts again - they should exactly match in size. Place the main piece and the side wall piece right sides together. Its lower corners can be slightly rounded, so the seams and joints will come out better.
Since the skin cannot be swept away - there will be traces of punctures, the seams must be pre-glued. Apply a thin layer of glue to the seam allowances and stitch. The glue will allow you to make even stitches.
To make the seams more reliable, they must be tapped with a hammer. If you don’t have a rubber one, then a regular one will do, but then it’s better to do it through a piece of soft and durable fabric.
Look how original the hand-sewn leather bags look in these photos:
Step-by-step instruction
MK, how to sew a shopper bag with your own hands:
- cut out the details;
- decorate with decor;
- hem the lining and connect all the elements;
- sew handles, form the bottom, seal the top;
- cut off any protruding threads.
Uncover
Using a marker, draw rectangles on the material according to the specified dimensions. Then you need to cut them out with sharp scissors. It is not necessary to use tracing paper or paper, since the parts are simple, you can immediately build them on the fabric.
Embroidery
The easiest way to decorate a bag is to embroider a design on it using floss threads. The template can be downloaded from the Internet, printed on a printer, then cut out and transferred to fabric with a marker. It is better to draw thin elements with a gel pen.
Use a hoop to do embroidery. To do this, use a special needle and floss to follow the marked lines using simple stitches. You can complicate the decor using satin ribbons, beads or complex embroidery techniques. The main thing is that all protruding threads remain on the wrong side.
Before use, it is advisable to check whether the materials are fading. To do this, simply wash them with your hands in warm water.
It is better to arrange a small test drive in advance than to completely ruin the finished bag with faded threads.
Connecting the base with the lining
Sequencing:
- Align the rectangles of thick and lining fabrics with the wrong sides facing each other.
- Sweep away the center and perimeter. This is necessary to ensure that the elements do not move during sewing.
- Place the blanks together so that the front sides of the bag remain on the outside.
- Leave 0.5 cm from the edges and machine stitch along the sides and bottom.
- Turn it inside out, retreat another 1 cm along the edges, and machine stitch it.
- You need to stitch the corners from the bottom to form the bottom. You should get triangles with sides 6 cm.
- Fold the triangles to the bottom and sew them by hand.
We strengthen and sew the handles
Non-woven fabric is used to strengthen the upper part of the shopper and handles.
The parts for the handles need to smooth out the allowances to form the seams. It is enough to bend 0.5 cm on each side. Insert the non-woven base, sew the blanks lengthwise on both sides.
Step back 9 cm from the top edge and baste handles. Attach the reinforcing facing to the top, placing it right side to the main fabric. Sew everything to the bag using a sewing machine. It is advisable to walk where the handles are attached several times so that the finished bag can withstand a lot of weight.
Straighten the facing, fold in the seam allowance, and sew the edge to the wrong side of the bag. It is also recommended to stitch the top of the facing.
We remove everything unnecessary
At the final stage, you need to remove all basting threads. If desired, you can add hardware for decoration or to connect the top of the bag.
The main thing is not to overload the resulting product.
At the end, the shopper needs to be washed. It is best to do this by hand in warm water with a synthetic detergent. Then rinse thoroughly, wring out and hang to dry.
Depending on the fabric used, the dry bag will need to be ironed. But some materials just need to be hung evenly when drying.
You can sew an unusual, beautiful, roomy shopper bag with your own hands without any special skills. Step-by-step instructions and a ready-made pattern will help even a novice seamstress cope with this.
We sew a shopping bag from genuine thick leather without a machine or sewing skills
Today is August 30, 2021, the heat is 32 degrees, and today I will tell you how to guarantee to make a spectacular shopping bag from thick leather without having a machine and without knowing how to sew at all. I hope you enjoy it and get inspired and want to create something similar for yourself! After all, it won’t take much time, and the result will be 100% positive if you have at least a little patience, dexterity, and the ability to work in general.
I can’t even call this master class a master class, because we won’t be sewing, this is not the difficult, painstaking work of a “master”, but a pleasant, leisurely, fantasy, Saturday pastime, perhaps with a child or maybe on your own.
I’ll say right away that I prepared it specifically for complete beginners and to popularize simple leather bags, so if you’re already a little leatherworker, pass by.
Here you don’t need to buy an industrial sewing machine for leather, look for a place for it, and develop over the years the skill of an even stitch, the ability to cope with it, set it up, select threads, needles, lubricate it in the right places in time, etc. A machine for lowering the edge of the leather is also not needed, there are no professional tanner chemicals, no paints, fats, finishes, varnishes, or dressings. No waxed German threads... We will use the minimum necessary materials, both in terms of availability and price! Since the idea was that a beginner would stop using this bag and would not continue to get involved.
The most important thing is to have a good mood for work; without it, touching the leather is strictly prohibited, and of course, dense, high-quality leather.
What you will need:
- Dense, but at the same time pliable leather with a good back, the bag is unlined.
 I took Italian nubuck 210 decimeters. 1.8-2.0mm. Ordered by me in Italy directly, if anyone is interested in where exactly, please ask. I recommend taking leather no smaller than 1.6mm. soft and dense. Residents of large cities will have better luck; you can choose leather in a store right away, but you can also order it on the Internet, for example on this website. The size of the leather is at least 600*920, this is if without a pocket, if with a pocket and a bottom seal, then 600*1200. You can also make a separate bottom if the skin does not allow it from a single piece, but you will have to rive it overlapping.
 - Scissors.
- A stationery knife with additional blades, it should always be sharp.
- Holniten. approximately 100 pieces. You ask, what is this? Yes, rivets in a simple way, we will use them to assemble the bag. The price of the simplest ones starts at about 100-300 rubles, for 100 pieces including delivery, depends on the size, color and material.
- A leather punch, you can take a manual hole punch with various attachments for 500-700 rubles, but it’s harder to work with, your hand will get tired quickly! Therefore, it is better to buy one or two for a hammer, of the required diameter for rivets, and please the neighbors, it’s about 200 rubles apiece.
- I hope everyone has a hammer.
- A ruler and a square, preferably metal, since you can use them to cut with a knife.
- A press for installing accessories with suitable attachments costs about 1500-2000 rubles. But this thing is also optional, perhaps it would be more suitable for you to assemble the bag with a “belt screw” using a small screwdriver, the cost of one screw is about 8-20 rubles, plus a screwdriver. If you no longer need the press, then it’s not worth spending money on it! It will be even easier to use a screwdriver, anyone can do it, than to put pressure on the press...
- Cream wax without color for nutrition and protection against dirt and water, this is also optional. depends on the acquired skin. Perhaps you already have one of these lying around at home.
- Shiloh, optional.
- A silver gel pen for marking, but if you don’t have one, don’t worry, you can trace the pattern with a simple pen and cut it with a knife along with the remnants of the leather.
- Sheets of paper or cardboard for patterns.
Let's turn on some nice music and let's get started!
Cut and glue the pattern out of paper or whatever you have.
We lay out the leather, apply the pattern, make sure there are no defects on the bag, and trace it with a silver gel pen. I had to do this on the floor, since the skin is more than two meters square. My cutting table is only 60*200.
We cut with a knife along the ruler, cutting off the marking line, although the seams are mostly inward, it is better to do everything carefully at once :-). Then we cut it with scissors, it’s easier that way.
We cut out a pocket, I have an idea to make the top with a natural torn edge. On the right side you can see that it remains uncut.
We cut the handles along the ruler.
The width between the holes is 3cm. I wanted to make triangular tips, but you can leave them straight or semi-circular, and also hide the handles inside the bag.
The stripes are scratched with an awl, this is not at all necessary.
This is what a punch looks like with replaceable screw-in attachments for a hammer. I broke one attachment when punching this bag, it’s good that there are more.
I applied this simple cream according to the instructions.
We mark holes on the front side of the bag every 1.5 cm, retreating 0.7 cm from the edge, starting from the top.
Mark the location where the pocket and handles are attached.
The holes for the handles will be 10cm. from the edge, both 2cm and 5cm.
We punch holes on one side of the bag, then attach the other, mark and punch again. we also punch it on the pocket.
On the left is a hole puncher, it’s harder to work with.
When everything is punched, we put on our holniten, alternating faces to avoid an uneven shape of the seam, and rivet it on the press, I have a simple press, it’s quite hard to press. Once a year you can lubricate it a little.
You can use a belt screw like this, choosing the right depth.
We put rivets facing the pocket.
We punch it at the bottom and place it in the same way.
My bag specifically adds elements of antiquity, scratches, abrasions, I would like the effect of a vintage thing, as if it had just been sent to me from a garage sale in California, where it had been lying idle for the last 40 years :-).
I make all these scratches with a rough cloth; they are not deep at all and, if desired, they can be removed by re-soaking them with cream.
We rivet the pocket and handles.
We put a logo.
Ready!
If you have any questions, please ask. For example: where to put the rest of the skin... Probably give it to a tanner...
Thank you for watching! I hope my article will be useful to you. Good luck, creative inspiration and thank you for your attention!