Most often, a hidden zipper is used as a skirt fastener, but sometimes it needs to be installed in the side seam of a dress. Moreover, if on a skirt it can be almost imperceptibly “hidden” in the side seam, then when sewing a dress it is often installed not only on the side, but also on the back of the product, in the most visible place, and even up to 50 cm long. Therefore, you definitely need to learn how to sew a hidden fastener correctly and accurately, otherwise you can ruin all your work.
Let's look at what you need to consider to sew a hidden zipper on your skirt neatly and beautifully. These tips will also come in handy when installing a zipper on a dress.
This video shows how to sew a hidden zipper using a special foot.
Hidden zipper device
A hidden invisible zipper is the best fastener option in all cases where it needs to be made invisible. It is used when sewing clothes from light fabrics, such as skirts. It differs from its “visible” analogues in the location of the teeth on the reverse side of the tape. The hidden zipper is softer and more elastic.
Structurally, it consists of the following elements:
- textile tape (base) with sealed top and bottom edges;
- plastic links attached to the tape;
- slider (dog, slider) connecting and disconnecting links;
- keychain (pendant) – a part of a zipper lock that facilitates its use and fixation;
- lower and upper slider stops.
For the manufacture of hidden zippers, plastic (links, lock) is usually used; models with metal locks are less common. The most popular material for base tape is nylon, which is soft, durable, and flexible.
LiveInternetLiveInternet
The secret to a properly embroidered zipper is to follow the steps precisely and consistently. By following the general rules of the master class, you can easily learn how to sew a hidden zipper into any product.
I bring to your attention the most advantageous way to sew in a hidden zipper! Its advantages: - the zipper is sewn in the first time - distortions, creases, and sagging are excluded - ideal if you need to choose a pattern (polka dots, stripes, flowers, etc.)
The zipper is sewn into an open product, i.e. if the fastener is provided in the middle seam of the back panel, then after sewing the darts, relief, shaped lines, their VTO, first sew in the zipper, and only then sew the side seams. If the fastener is planned on the side, then first sew the zipper into the left side seam, and then sew the right one.
Now let's move on to processing the node. 1. Iron the zipper without steam
2. We make markings - where the stitching seam for the zipper will end and the stitching seam for the back panel will begin. To do this, you need to open the zipper all the way and measure the length of the section from the top edge of the zipper down, not reaching the slider by 1 cm
3. Set aside this value from the upper cut of the product and place point M (mark)
4. We glue the shared edge so that it overlaps the zipper stitching line by 0.2 cm towards the allowance and below M by 1 cm. It is very important not to tighten the edge of the product. To do this, it is better to place only the tip of the iron on the edge, allowing it to sit naturally directly in front of the iron
5. We make a notch and glue it in the same way on the other side + I’ll make a digression and show you how to do it. You can’t! — Place the measured edge 11 on the intended line.
and place the iron on top (flat)
-What we got: the edge tightened the product (see point 4)
Why did this happen? The shared edge shrinks during the gluing process. Consequently, if we drive it (the edge) into a framework *from start to finish*, then it (the edge) rejects us. 6. We cut from Lt (waist line) to Ln (bottom line), and if necessary, sweep it 0.3 cm towards the product. This is a preliminary basting for those who find it more convenient to sew without pins. 7. Now attention: We baste the line for sewing in the zipper on the machine with a long relaxed stitch from Lt to M (if desired, you can baste thickly by hand). We stop, twist the plates to the previous level of thread tension and reduce the stitch length to the working one (i.e. first unscrewed, then we twisted it into place). From M down we make a tack (on bartacks I advise you to reduce the stitch length for strength) and then sew the seam down to Ln. The line runs strictly along the intended line.
8. Iron: - on the edge on both sides
- iron it slightly
9. Overcast
10. Iron again: - on the edge
- First, iron only the nose of the iron into the split seam, then place the cardboard tightly in the joint to the seam and iron from Ln to M. The zipper stitching line is only slightly ironed! (I call it - lightly powder) * little secret - there are fabrics that are afraid of steam, i.e. shrink (not to be confused with shrinkage) and then it is necessary to moisten the seam, but not the entire seam, but only the split. This is where a brush will come to our aid, which will delicately moisturize only in the right place.
- iron it out (I remind you - from Ln to M) and stand it up (the cardboards are strictly end-to-end, otherwise we will get lasses on the front side) At this point, the preparatory process is completed and we can begin basting the zipper. To do this, first: 1. Unzip the zipper and apply it with the front side strictly to the split of the seam, placing a piece of cardboard under it, and pin it only to the seam allowance (the cardboard will help you not to catch the product itself with a pin)
2. We baste the seam *backwards the needle* (please don’t be lazy, otherwise the zipper, since it is stiffer than the product, during normal basting during stitching it will simply slide down and there will be distortions and creases on the front side) from Lt to a level below M by 0.5 – 1cm
You can also baste the zipper immediately after pinning it on the machine, but this requires certain skills
3. Close the zipper and pin it on the other side, pressing it in the center (along the split line), so that the teeth come as close as possible to the split seam
4. Baste
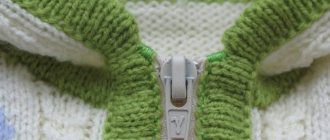
5. Remove the machine basting and finish basting the upper section 6. Unfasten the zipper and bring the slider to the wrong side. All kinds of paws and devices are used for stitching. For example, I will show you some options in pictures.
The main principle of sewing in a zipper is as follows: - slightly (you will feel how exactly it is) bend the edge of the tape on which the teeth are located and lay a stitch as close as possible to the links from Lt to M. At point M we make a tack or
or
— we lay the second line from Lt to M (changing the groove in the foot or the foot itself (from left-handed to right-handed)
We make sure that both the fabric and the zipper tape are positioned exclusively evenly on the surface - without distortions or creases.
This is what our stitch looks like from the wrong side
stitching line
and from the front side
- take out the basting
We move on to the important stage - fastening the zipper, for this we pass the slider to the front side and with a neat soft movement fasten the zipper from the front side - without jerking, otherwise in the M area the links will shift and an unpleasant incident will occur at the most inopportune moment (the zipper will come apart when worn ) Now, if you wish (I don’t do this), you can iron the place where the zipper is sewn in, but be sure to use cardboard so that the allowances are not imprinted with lasses on the front side of the product
DONE And now the most important thing - the process of attaching the zipper assembly will take you much less time than reading my meticulous MK. A small addition - on the wrong side in the M area you can make a stop-fix, that is, run a thread around the teeth of the zipper while it is fastened. This is so that the slider does not drop low and does not allow the product to become loose at point M, in other words, not to tear the product.
I bring to your attention the most advantageous way..
Selection criteria and types of hidden zippers
When purchasing a hidden zipper, you need to keep in mind that they all differ in several ways.
When choosing the right option, you should rely on the following criteria:
| Criterion | Description |
| Zipper length | Selected depending on the desired length of the fastener. There is a simple rule: the length of the zipper should be 2 cm longer than the length of the cut into which it will be sewn. The smallest length for a hidden zipper is 12 cm, the longest is not limited: there are also zippers of 1.5 m. If the zipper is needed there is no length, it is allowed to use an additional bracket that replaces the lower clamp. The staple is installed on the zipper in the selected location, after which the rest of it is cut off. |
| Link type | According to this parameter, lightning is divided into: · spiral (twisted). The links are formed from fishing line that is twisted into a spiral, flattened and secured to the braid. Spiral links give the zipper flexibility; they are more durable and resistant to bending, but they fail faster as the fastening gradually peels off and the spiral moves away from the base. Another drawback is the fear of high temperatures: if carelessly ironed with a hot iron, the spiral can melt and become deformed; · tractor (traditional). In such a zipper, each link is a U-shaped tiny part, independently attached to a nylon tape. This type of zipper has less flexibility, but the loss of one link does not affect the functionality of the fastener. If the damaged area is located below, then it can be repaired by installing an additional fastener. |
| Link size | Usually indicated by a number corresponding to the width of the locking strip in millimeters in a closed fastener. The higher this parameter, the more reliable the adhesion of the links, the greater the load the lightning can withstand. The choice of the optimal option depends on the thickness of the fabric on which the snake will be installed: the thinner it is, the smaller the size of the links should be. |
| Slider view | The main differences between zipper sliders are the locking mechanism. Based on this feature, lightning locks are divided into: · haberdashery (indicated by the abbreviation N/L) – do not have a locking mechanism. While the zipper is new, it is kept closed solely by friction, but later, as the teeth wear out, its behavior becomes unpredictable; · semi-automatic (P/L) – due to the presence of a special spike, they fix the clasp in the fastened state when the lock tongue is lowered down; · automatic machines (A/L) – capable of locking the lock not only at the top, but also in any other position. For a skirt, using a haberdashery lock, which can spontaneously open at any time, is undesirable. At the same time, the capabilities of the automatic lock are unlikely to be fully used. The best option is a semi-automatic. Also, when purchasing, you should pay attention to the lock pendant, which can have different configurations and sizes. A prerequisite: it must be strong enough, of a comfortable shape, hold well in the lock's shackle, and be easy to turn up and down. |
| Tape density | This parameter is measured in g/m2. The higher the density, the more reliable and durable the zipper. At the same time, high density makes the fastener too rigid, which is undesirable for clothes made of delicate fabrics. |
| Lightning color | The invisible zipper should have a color that is closest to the color of the product into which it will be sewn, or if there are 2-3 or more colors, match one of them. A twisted zipper provides more options in choosing colors, since the plastic line from which its teeth are created can be given almost any shade. |
| Zipper quality | A poor-quality clasp can ruin an otherwise ideal item and the mood of its owner. To prevent this from happening, when purchasing you need to make sure that: · the slider moves smoothly, without jerking, does not jam and does not leave open areas; · the lock is securely fixed in the closed state, and opens easily; · the links are located evenly, strictly at right angles to the edge of the base braid, at the same distance from each other, and are held firmly on the tape; · the tape is uniform in color, thickness and density, has neat, carefully sealed edges; · the links, when fastened, form an even strip running strictly in the middle of the base tape; · the zipper is absolutely smooth, has no sharp elements that could cause injury, and does not bend in “waves.” The following functions are not needed in a skirt zipper: · the presence of water-repellent impregnation, thanks to which the zipper fabric does not allow moisture to pass through; · detachable zipper – completely divided into 2 halves; · reverse – zippers with reverse are 2-sided, that is, the slider can be moved to the wrong side; · double slider – the presence of 2 sliders makes it possible to open the zipper from both the top and bottom. |
| Manufacturer | A low-quality zipper, even if it has successfully passed testing, may, after working for some time, begin to jam, unzip without permission, lose its “teeth” or even fail due to a rupture of the base tape or a broken slider. To avoid such a situation, it is advisable to purchase Japanese zippers (with YKK marking on the tongue) or Swiss (RIRI). They are considered leaders in the production of fasteners of this type; they will cost more, but will last much longer than the cheap Chinese counterpart. Alyzip , which produces zippers of all types, has proven itself well |
Variety of lightning
There are a huge number of lightning bolts. Their variations depend on color, size, quality, purpose, material, and so on. The slider or dog is selected taking into account the selected zipper. The most common type is the universal slider, as it fits both twisted and tractor zippers, connecting links and spirals. Also popular are separately wide tractor runners that can grip the links more firmly. There are also spiral, hidden, molded and other zippers.
You may be interested in this: Simple patterns for sewing jeans yourself
The corresponding dogs approach them. The differences between these types of runners are in width and soles. Although all zippers look almost the same, they have many differences in the link linking technique and their quality.
Courses from Galina Balanovskaya on sewing skirts and sewing in zippers
Materials and tools
The hidden zipper should be sewn onto the skirt correctly.
To do this, in addition to the zipper itself, you will need to prepare tools and materials that will help with the work and make it possible to complete it as carefully as possible:
- special foot for a sewing machine;
- threads to baste the zipper and then sew it in;
- scissors;
- tailor's chalk and ruler, with which you can mark the position of the zipper;
- centimeter tape - to take all necessary measurements;
- single sided adhesive tape.
The use of adhesive tape is mandatory if the zipper is sewn into a knitted product, into a piece cut with a bias cut, or used on very thin fabric, since it will prevent it from stretching and will help sew the zipper evenly, without distortions.
In the absence of adhesive tape, the material will inevitably be pulled by the foot, and then shrink, forming unsightly folds and a zipper. The second function of adhesive tape is to prevent the edges of the fabric from fraying.
Without paw
You can sew a hidden fastener without a special foot. To do this, use a regular foot. The instructions are:
- Mark with chalk the places where the fastener is planned and glue them with strips of non-woven fabric, which are fixed with an iron and processed with an overlocker;
- Change the length of the fastener from the very top and not reaching five centimeters to the end of the fastener. Mark the beginning and end on the front side with chalk. The marks must match and be level;
- Unfasten the zipper and secure it with pins: attach the “face” of the right side of the fastener to the “face” on the right, and attach the left part to the “face” of the left edge of the fabric;
- Sew a part with a hand stitch, and then place it under the machine and stitch there using a regular foot;
- It is necessary to ensure that the machine needle drops a millimeter from the teeth, since this is what allows the process to be completed without the use of special equipment;
- Sew a hidden snake from start to finish.
You might be interested in Interesting dress patterns A silhouette: how to sew it yourself
Clasp processing
What is special about the concealed zipper foot?
You can only sew a hidden zipper to a skirt using a special foot.
How to sew a hidden zipper to a skirt? To do this you will need a special machine foot.
There are several varieties:
| Presser foot type | Description |
| Universal double-sided | It is designed to work with regular zippers, and produces a stitch spaced 2-3 mm from the lock seam. If you want to make the seam narrower, you need to bend the edges of the links with your fingers. This will require some experience, without which the seam will be uneven. |
| Single-sided or carob | It allows you to get closer to the links, but has a significant drawback: one side of the zipper is sewn from top to bottom, and the other from bottom to top. This can cause the fabric (especially thin or knitted fabrics) to shift and cause unsightly wrinkles near the zipper. |
| "Boat" | A Chinese product of appropriate quality: according to customer reviews, it does not fulfill its functions and only complicates the work. |
| Specialized foot for sewing in a hidden zipper | It has 2 grooves on the sole, one of which is designed to fix the right side of the zipper, the other - the left. Depending on which side is sewn, one or the other groove is used. The foot itself performs all the necessary operations (fixes the zipper and bends its links), thanks to which even an inexperienced seamstress gets an even, beautiful stitch located as close as possible to the links. Today it is the best option. |
When purchasing a specialized foot, you must take into account that they may also differ:
- by material of manufacture: metal and plastic. Provided that high-quality plastic is used, they are equivalent;
- according to the method of fastening: each foot is designed to work on a specific model of sewing machine. There are also products with a universal installation mechanism.
Additional Tips
Mastering how to sew in a hidden zipper is not difficult. To ensure everything is done carefully, use a few recommendations:
- If you have no experience, it is better to first baste the snake to the fabric. Only experienced seamstresses can do without preliminary marking. If the fabric is loose, a precise alignment of the print or matching of the central seams of two parts is required, then this must be done.
- Do not skip the preliminary preparation of seam allowances - overcasting and ironing. Sections are not processed if the product has a lining.
- Be sure to double the allowances if the fabric stretches too much while sewing. Non-woven fabric will give rigidity to the allowance. The non-woven strip is cut 2-3 mm wider than the allowance.
- It is advisable to make 2 fasteners at the bottom of the sewn zipper. Then the clasp will not ride up when putting it on.
- For the same reason, experienced seamstresses edge the ends of the zipper with bias tape. It is turned inside out and sewn onto the seam allowances.
- Pay attention to how the zipper is processed in expensive products. Both the ends and the longitudinal edges of the fastener are edged in them. This indicates a high class of sewing.
- In some cases, the ends of the bias tape are secured simultaneously with a stitch that connects the longitudinal sections of the zipper with the seam allowance sections.
The slightest imperfection or inaccuracy in a self-sewn item will immediately catch your eye.
Preparing for work
You can sew a hidden zipper to the skirt to the seams of the product - side or back. If they are missing, you will need to make an incision in the tissue.
Before sewing a zipper, you must perform the following operations:
- Finish the seam (cut edges) using an overlocker.
- Iron the area of fabric on which the fastener will be sewn. If the fabric is prone to shrinkage, it is recommended to pre-wet it.
- Iron the zipper. If its base is cotton tape, then it is also recommended to first moisten (decate) it.
- In areas of future seams, glue the fabric (thin, knitted, fraying) with one-sided adhesive tape.
- If the zipper will not be inserted into a seam, then it is recommended to first glue the desired section of the fabric, and then mark and make the cut: this way it will turn out more even and neat.
It is recommended for a beginning seamstress to first stitch the zipper to the seam using a regular foot, setting the longest stitch length: this seam is needed to prevent the zipper from moving and is subsequently removed.
If the preparation is completed, a specialized foot is installed on the machine and the sewing of the zipper begins.
How to sew into a pleated skirt
To sew a fastener into a pleated skirt, you need to smooth out the seam allowances, make a bend, remove it and bend it again. Then pin the zipper to the skirt behind the folded fabric. Make seam marks and stitch between the seam and the teeth. Next, baste the fastener and stitch so that the seam is close to the teeth. Excess threads must be removed by making a transverse suture line.
You may be interested in this Step-by-step guide to sewing your own bonbon blanket
Note! When working with knitwear, you need to purchase a needle with a rounded end. You also need to pre-glue the non-woven or dublerin pad.
Sewing fittings into a pleated skirt
Algorithm for sewing in hidden zippers for different models of skirts
The advantage of a hidden zipper is that it is invisible on the fabric. Skirts with them look like a single fabric and therefore professionals often use hidden zippers in their products. Sewing technology for different models has its own characteristics that you need to know.
With belt
You can sew a hidden zipper to the skirt when the product is almost ready, the side seams are stitched and the waistband is attached. All that remains is to connect everything by sewing in a hidden zipper so that it reaches the waist. Before sewing in such a zipper, you must first secure it with pins. For stitching, thin needles are used that do not leave marks on the fabric. Seam allowances should remain minimal.
It is ideal when the edges of the allowances coincide with the edge of the zipper tape. When using a metal fastener, it is better to make a 5 mm indentation from the edge to prevent fabric from getting into the teeth. If you use a regular zipper, you need to sew on a button, but it is much more beautiful to make an invisible connection.
To sew such a zipper onto a skirt with a belt, you must perform the following steps:
- Turn the waistband inside out, making a mark, 1mm away from the seam and leaving an allowance. The distance from the edge of the part to the mark should correspond to the width of the zipper. The free end of the belt is turned up and fixed in the desired position with pins. This will make the seam less thick, allowing the zipper to be sewn evenly.
- When working, the zipper chain should be facing the seamstress, and the edges of the braid, on the contrary, should be facing away from you. Then you need to unfasten the lock and turn one half to the other side.
- Place one of the halves on the fold of the waistband area and pin it with a pin at the same level or slightly lower. Then baste it to the product. The running stitch can be made at any level. At the same time, you need to remember that such a zipper is sewn to the front side and only then turned inward.
- After finishing basting, machine sew the seam. This is done using a special foot. You should work carefully so as not to catch the lock teeth. If this happens, the seam needs to be ripped out and redone.
- Once the zipper is sewn in to waist level, turn the skirt inside out and zip it up, making sure the ends of the zipper stay flush.
- Bring the line to the end. The ends of the braid are hidden in the belt. It turns out and is carefully swept away. Then you can blindstitch part of the belt to the skirt.
Without belt
This option is considered the simplest.
It is enough to do the following:
- Sew all the details of the skirt, and make marks to baste the fastener.
- After checking that the connection is correct, iron the resulting seam inward, placing the zipper with the key fob facing down and baste one part first. Then, closing the fastener, baste the 2nd part.
- After opening the zipper, check that the connection is correct. It is first stitched across, then the seam is smoothly drawn along the left side. At the end the slider goes down. The right side is stitched in the same way.
- Hem and finish the top edge. The braid from the fastener is hidden under the hem of the belt or simply processed together with the allowances using an overlocker.
In most cases, it will be more interesting if the lightning remains invisible. A hidden zipper would be the best option.
Its sewing is carried out as follows:
- The skirt is turned right side out so that the seam is in front of the eyes. A lock is applied to it by turning the key fob towards you. The zipper opens. One side of the tape is turned to the right side, joining the seam face to face.
- The free edge of the braid should extend slightly beyond the allowance of the product, the limiter should be in line with the top seam of the product. Having pinned, baste the seam in this position. After this it will be easy to sew it on.
- Sew the second segment by turning the skirt inside out. First, it is basted, and then, after checking the correct location, it is stitched. The top pieces are sewn along the waistline when the waistband seam is made.
No seams
A product that has no seams requires special treatment. The zipper is sewn into it at the first stage of work. This is necessary so that the threads of the fabric do not twist and the material itself lies flat. A special stitch is made for this waist area. Then, in the area of the back seam, marks are placed 2-2.5 cm above the location of the fastenings of the future zipper. The seam is sewn down to them immediately. After this, the remaining parts are basted and the seams are ironed, including folding the allowances for the zipper.
It is sewn as follows:
- Place the front side to the seam so that the keychain faces down. The top rivets are located near the waist seam.
- Use pins to pin the braid to the seams, making sure that it is positioned evenly and does not move.
- The seam is made close to the beginning of the teeth, leaving a small gap so that the thread does not catch on them when machine stitching.
- Having removed the basting from sewing the seams of the skirt itself, you need to unfasten the lock and lower the slider to the end of the seam.
- The zipper is attached.
With pleats
If the skirt has bow pleats, the zipper may be hidden in one of the seams. This works if the cut consists of 2 parts. When there is only one canvas, the fastener is made from masonry, the size of which is pre-calculated. For thin and flowing fabrics, it is better to choose the option when it will be in the side or back seam of the product. The main thing is that the seam itself gets inside the fold.
Lined
The main work is carried out as usual, depending on whether the products have a seam or no seam. The lining and skirt are then folded right sides together. The lining itself moves slightly to avoid getting caught in the zipper. After this seam, the lining is stitched to the sewn fastener by basting, departing from the edge 5 mm. With the 2nd seam it is stitched completely. This method is suitable for skirts made of dense material, such as jersey or drape, where there is often a lining.
The important stages of this work are:
- Pre-treatment of the edges of the lining.
- Correct basting with a skirt.
- Using a blind stitch for basting with the product and stitching to the zipper.
In open seam
To do this, the fastener is unfastened and placed with the front side on the skirt allowances. Having basted it, you need to align the upper edges of the zipper and the seam at the waist. Both edges are basted separately, starting from the top. Using a special presser foot, the seam is laid closer to the teeth. At the end, the lower segment of the seam under the zipper is sewn down. The allowances are ironed well, and the belt is sewn on top.
In closed seam
The peculiarity of this method is that the entire product is first sewn together and only the zipper opening remains open. It is sewn on at the very end. Those who are just beginning to master the secrets of sewing need to know the rules for sewing fasteners into any product. This will make them look neat, and when closing the zipper, the fabric will not get stuck in the teeth, threatening to tear the work. It is important not only to carry out the work correctly, but also to choose a fastener in accordance with the material and style of the skirt.
Sequence of stages
The fastener must be inserted into the seam when the sections are completely open. Don't forget about allowances: 1.5 centimeters wide is enough. Before you sew in a zipper, you need to mark its line with tailor's chalk, a disappearing marker, or a pointed bar of soap. The clasp is opened and placed with the front side on the allowances of the dress along one edge of the cut. Make sure that the teeth coincide with the axis of the middle of the back if you insert an element along it.
You need to sew in the lock by turning the middle seam allowances to the wrong side and then pressing them. There is no need to iron them. Be sure to determine the distance from the edge of the braid to the middle cut of the material. It will be equal to the width of the seam allowance minus 1 centimeter.
Progress
- Use your index finger or thumb to bend the teeth so that the seam space between them and the braid becomes visible.
- Pin the upper end of the braid onto the seam allowance - you need to step back a small distance from the upper edge of the product.
- Place the lower end of the tape so that it protrudes beyond the lower level of the cut.
- Place the machine foot over the ribbon - the spiral should be under the notch, on the right side of the needle.
- Sew a lock from the top to the mark on the cut and close it.
obnov-ka.ru
The stitch is completed when the foot rests on the dog. The second side of the tape is placed with the front side on the allowance along the outer surface of the fabric of the product - along the cut on the other side. The upper end of the braid is pinned. Then the “structure” is opened again.
Progress
- Place the machine foot over the ribbon - now the spiral should be under the notch on the left side of the needle.
- Secure the tape from the top to the mark along the cut.
- Close the lock.
To properly process the open seam on the back and sew the cuts on the parts, you need to step down from the mark on the cut and unscrew the lower free end of the lock to the seam allowances. It is started as close as possible to the last stitch on the set seams. It is best if the line “overlaps” the stitching line of the lock and is on the left side, at a distance of 1 millimeter.
While working, you need to hold the end of the lock. The most convenient foot for surgery is a single-armed one. The ends of the tape are cut off and edged with fabric, and it is better to secure the ends of the stitching with a double knot for reliability. You will also need to iron the seam allowances on the finished area.
With foot
Instructions:
- We glue the zipper allowance with an adhesive base.
- We baste the cuts to the base.
- Iron them on edge. Please note that there is no need to iron the cuts.
- Unzip our hidden zipper and pin one side of it with pins. Align the top taking into account the waist allowance. We leave about 1 cm at the bottom for fastening - then the product will not wrinkle after closing the fastener with the slider.
- Sew with a basting stitch to the cut. Experienced craftswomen do without basting - they just need to pin the zipper to the base.
- We install a special foot on the machine.
- We place the horn close to the teeth, lay a line.
- Fasten the zipper.
- Pin the second side.
- We baste it and unbutton it.
- By placing your foot close to the teeth, we attach this part of the fastener.
- Iron it out - everything is ready.
How to sew a hidden zipper to a skirt
To begin with, if you have never done this operation before, then it is better to try sewing a lock on some unnecessary product or a separate fragment to gain some experience. Once you are convinced that you can do this, you can begin working with the main product.
Advice for seamstresses who do not have sufficient experience: it is easiest to sew the fastener into the back seam of the product, since if the fastener is sewn incorrectly on the side, the fabric may become skewed, and symmetry will be lost . This will not be very noticeable on the back seam , since it is more symmetrical; sewing the necessary lock there is much easier than on the side seam.
Procedure:
- Place the skirt on a flat table or other surface, turning it inside out.
- The zipper needs to be unzipped and one edge should be placed on the seam so that the jagged side lies flush against the edge of the fabric.
- Attach the lock with safety pins and baste the thread downwards.
- The next step is to attach the other side of the lock starting from the bottom (that is, first, from the place where the slider is located). Make sure there is no tension or deformation of the fabric.
- Then the zipper is sewn to the skirt, the knots are carefully tied by hand. Seam allowances must be folded back and ironed in advance. After this, fasten the zipper, while the teeth should fit closely to the edge of the fabric.
It is necessary to hide the presence of the fastener as much as possible, so sewing it on unnoticeably and carefully is a very important procedure. At the same time, the zipper should move freely , not get stuck or break due to the stitching being too close. Its length varies depending on the size and intended model.
An incorrectly sewn zipper can deform the product. In addition, if the fabric is too thin (also very elastic and thin knitwear), then the end of the fastener may stick out angularly, in this case it is preferable to sew the fastener along the middle line of the back. Therefore, learn to sharpen locks correctly.