Patch pocket - basic concepts
The pocket can be of various configurations: in the form of a circle, square, with pointed tips. It is better to take the top facing for processing as a whole piece. The following types of elements are used:
- without lining;
- with a one-piece lining;
- lined with additional fabric;
- with an inclined entrance, the upper edge of which is made with a narrow hem.
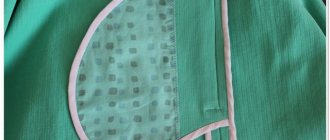
Trimming strip for neckline and armhole
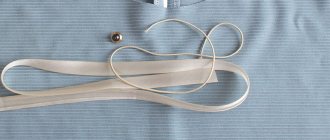
Prepare an edging strip of elastic fabric. As I already said, we will need it for edging the armhole and neck of the T-shirt. Calculate its length and width yourself, depending on your taste and the size of the dress or T-shirt.
See how a regular sewing machine and an overlocker sew knitted fabrics.
How to sew a patch pocket smoothly
Each master with experience acquires his own secrets of sewing on overlays. Let's look at the basic recommendations that will help make your work more accurate.
From the inside
Before sewing the element, it is worth ironing the hem allowances along the entry line. In the rounded areas, notches are made using scissors. To make the corner oblique, it, together with the ironed seam allowances, is folded in and fixed with an iron. The entry line is ironed twice: starting 1 cm inside the part, and then the line marked with chalk. You can simply back up the edge, turn the fabric over, stitch along the side, and trim off the excess fabric on the side. That's it, the internal work is completed and the part is ready for grinding.
To get the perfect edge, cardboard stencils are used when cutting out. With their help, you can delicately tuck the side. The workpiece is inserted under the upper cut and, tucking in the seam allowances, is ironed.
For a square frame, first fold the allowance diagonally in the corner area.
When choosing a one-piece facing for work, the piece of fabric is folded in half with the right side inward. Next, a stitch is laid, making an indentation of 1 cm from the edge. In this case, it is necessary to provide a notch in the seam measuring 3 cm. To achieve the correct shape, the allowances are cut off: for a rectangle diagonally, and for a circle, notches are made using scissors. Next, the element is turned onto the face and ironed. If a lining is used, then the parts are folded right sides together, stitched along the top edge, also leaving a recess of several centimeters. In this case, the allowances are ironed towards the lining. By bending the lining and the edge of the part along the fold line, stitch the side parts and the bottom edge.
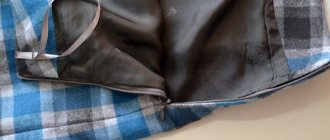
An open gap after connecting the lining and the pocket on the coat can simply be sewn up by hand or with a finishing stitch.
Outside
The patch pocket is placed on the cut in the designated place on the front side of the cut along the visible marks. To prevent it from moving during the sewing process, it can be basted or secured with pins. In this case, the pins should be perpendicular to the pocket. This will protect the element from unwanted shifts. The product is connected to the hem of the bottom of the pocket, making sure that no threads are visible from the face. The pocket is attached with one or two lines. The second line should cover the open parts of the hem.
Over time or with intense wear, the corner parts wear out and become unsightly. To strengthen them, additional decorative stitching is required, at the end of which small triangles are placed. A tight zigzag bartack at the end of the main stitch is also suitable.
The pocket – the briefcase is voluminous only on 2 or one of the sides.
Hello, dear readers of the milla-sidelnikova.com blog!
Today we will continue to learn how to make pockets - briefcases with right angles.
A pocket is a briefcase with right angles with a one-piece additional detail (fold) located only on the sides.
As you can see, such a briefcase pocket will protrude from the surface of the product only on the top and sides.
How to make a pattern for such a pocket?
Pocket – briefcase No. 1 with corners rounded at the bottom.
Pocket – briefcase No. 2 with straight corners at the bottom.
Pocket – briefcase No. 4 with zipper.
Take the pattern of a regular patch pocket (square or rectangle). We draw the outline of the pocket on the product, in the place where it is planned to make a pocket - a briefcase.
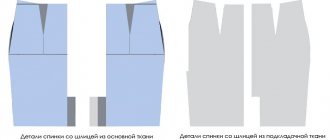
And we transfer the outline of the pocket to a new sheet of paper.
The sides of the pocket outline marked on the paper will become the outer folds of the pleats on the new pattern.
Draw two lines in the direction from each side of the pocket. The distance between the lines is the same. The two stripes formed (on each side of the pocket) are two sides of one fold. (Width of fold according to model, optional).
And now, using a new pattern, we transfer the contours of the new pocket to the fabric.
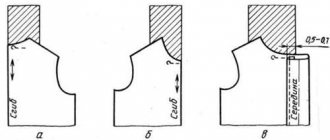
Be sure to include seam allowances.
- At the top of the pocket 2 - 5 cm;
- On the sides and bottom sides 0.7 - 1.2 cm.
You also need to transfer all the lines from the pattern to the detail of the pocket cut.
The upper side of the pocket can be processed in two ways (according to the model).
1st. Treat all four cuts against fraying,
and then fold the seam allowance along the top and topstitch.
2nd method. Treat from shedding only three sides of the part, the bottom and both sides,
and fold the top one twice and stitch it. Seam width according to model.
And then, the execution of this type of pocket - briefcase occurs in the same way, both for pockets in which the top is processed in the first and second way. We turn the seam allowances on the sides to the wrong side and iron them in this position.
Then we fold the allowance onto the fold:
- Along the outer fold line, iron the fold to the wrong side.
- Along the inner fold line in half, right side inward.
(A small diagram at the top of the picture will help you understand these “intricacies”).
Place the pocket piece with folds on the sides on the product face down.
We place the pocket “upside down” on the product and combine the bottom!!! the pocket contour line, on the pocket detail, with the line along the bottom!!! side of the pocket outline on the product. And along these two combined lines we lay a stitching line.
Further. We turn the pocket up, bending it along the line of the line we just made.
Now we align the alignment line on the pocket fold (this is the fold line on the folded allowance) with the side contour line of the pocket on the product and adjust the side of the pocket to the product with a stitch to the edge. (To make it more convenient to lay such a line, the overhanging upper part of the pocket can be moved (deformed) to the side).
The other side of the pocket is adjusted in the same way.
The bottom side of the stitched pocket - briefcase can be further strengthened (decorated) with finishing stitching.
Seam width according to model. And it seems to me that the width of such a seam should be in harmony with the width of the seam at the top of the pocket (see above in the article).
For decorative purposes or to make such a briefcase pocket even more voluminous, you can make folds in the middle of the pocket, bow or counter.
To make a bow or counter fold, the pocket pattern is expanded another required number of centimeters.
For the opposite fold, do the same.
So for the bow one.
You can read about how folds are made on a patch pocket in the article “Patch pockets with trim.” And about the folds themselves, in the articles “Bow fold”, “Counter fold”.
A pocket is a briefcase with right angles with a one-piece additional detail (fold) located only on one side.
If the fold (it is a one-piece additional part) on a pocket or briefcase is made only on one side,
then we get another type of briefcase pocket. One, protruding side of the pocket, then, on the finished product, can be held not only by a flap, but also by a button, button, strap, stapka, etc. (according to model).
The pocket is a briefcase with right angles with one separate additional detail.
Making such a pocket is very similar to making a briefcase patch pocket with rounded corners. This sewing operation is described in great detail in the article “Pocket - Briefcase (Part 1)” (the first part of this article). So there is no need to repeat everything again.
The main part of the pocket and one separate, additional strip are cut out in the same way. It, like there, has the shape of a long rectangle.
The only difference when making a briefcase pocket with right corners in this way is that in the corners the connecting part is stitched to the main part of the pocket in its own way. This is understandable, the angles are right.
In this case, the stitching is laid only to the adjacent one, perpendicular to the contour line of the pocket, end to end. At the end of the stitching, a bartack is performed. The seam allowance is then cut with scissors perpendicular to the stitching. The cut should not reach the stitch line by a couple of millimeters.
Next, the connecting part is rotated 90⁰, the contour lines on the main part of the pocket and on the placket are aligned, and a stitch is laid along them. This line starts from the point where the previous one was finished and it begins with a bartack.
The sides of the cut, as you can see, move apart.
The pocket, with a connecting strip made on it, is adjusted to the product with a stitch to the edge, after aligning the edge of the hem on the strip with the contour line of the pocket on the product. But since it is not possible to “fit” the bar in the corners of the contour on the product exactly into the contour, we lay a line, rounding it a little at turns.
The pocket is a briefcase with right angles with two separate additional parts.
I have already posted a description of this sewing operation, but only for pockets with rounded corners, in the same article “Pocket - Briefcase (Part 1)” (the second part of this article).
In the same way, on the main pattern of the patch pocket, the contours of future additional parts are drawn.
They are cut out in exactly the same way.
This is exactly how the parts are folded and ground down. Only all this is done taking into account the fact that the corners on the pocket will be straight. And then, after laying the lines, the excess seam allowances in the corners will need to be cut off with triangles.
Options for attaching the top of patch pockets - briefcases, which were discussed in today's article, to the product, can be found in this article (last section). There you can also find information about valves, which are often integral companions of pockets - briefcases.
And that's all for today! Good luck to all! Sincerely, Milla Sidelnikova!
Features of sewing patch pockets on different fabrics
There are many types of sewing parts. They depend on the product model, material and selected processing method. For example, the denser the material used, the more regulations there are for it.
Items for outerwear and suits require the use of cushioning and lining materials. In products made of light textures, such as robes, dresses, children's clothes, lining is not used. Particular attention should be paid to elements cut along an oblique thread. The facing from the inside must be duplicated with an adhesive film. In other options, it is enough to process the facing with a hem seam with a cut pre-processed on an overlocker.
The patch pocket is used for different types of products. Knowing the basic nuances, it is easy to cut and process even for a novice seamstress. We hope that the recommendations offered will help in your work.
How to tie silicone shoelaces? Different ways
How to protect shoes from salt porridge and reagents?
Flat view
In this section we will talk about flat view. Such models are found on aprons, jeans, and coats. Let's figure out how to cut out and sew a pocket with your own hands. At the end of this tutorial, we should have a pocket with a one-piece flap.
For this master class you need to prepare:
- safety pins;
- material;
- scissors;
- threads
After you have prepared everything, let's get to work.
- Cut out the main piece and pocket facing;
- Glue the valves, but remember that we will overcast one of the sections with an overlocker;
- Fold right sides together and use safety pins to pin together;
- Stitch and allow allowances at the corners of the pocket;
- Turn our product inside out, straighten the seams and iron with an iron, but remember that seam allowances need to be ironed only from the wrong side;
- Now stitch the pocket;
- After you have done all the steps, you can start attaching it to the base. Carefully place it on your clothing and pin. The stitching must be done along the edge; we do not go into the linings.
One of the secrets of joining is the cross tacks. If they are made differently, the pocket will not hold up and will come off very quickly. Tacks are best done using a zigzag seam. If you suddenly want to further change the style of your pocket, you can sew rhinestones or buttons onto it. Be aware of where your pocket is located, because if it is the back of your trousers, then sitting on buttons or rhinestones will be completely uncomfortable. Our first option is ready.
Related article: Why do you need a cork board on the wall?
Hemming a knitted T-shirt
First, fold the bottom of the T-shirt as shown in the photo and press the hem.
Since this seam is made on T-shirts using a cover stitch machine, which not everyone has, we will secure this hem using a regular straight-stitch machine. The stitching should be done on the wrong side of the T-shirt. Now you need to iron the hem using a steam iron and the T-shirt is ready.
Video showing how a household flat-stitch machine works, used specifically for sewing knitted fabrics.