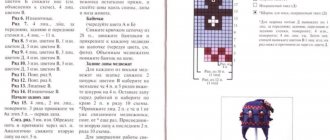
Terminology nuances
There are two types of zippers: hidden and non-hidden. The first is sewn into the side seam of the product in such a way that only the lock pawl remains visible. The non-hidden one runs through the center of the item, but it is not visible because it is covered with a special strip of fabric. This rectangular piece of material is called a valance or codpiece. There is one more detail of the trouser fly - the slope. This is also a strip of fabric, but it covers the fastener from the bottom, preventing the body from getting pinched and clothing from getting caught in the zipper teeth.
The codpiece can be set-in or one-piece. If the choice is made on the second option, then it should be laid down at the time of creating the pattern. To do this, add a rectangular piece of woven fabric to the middle seam at the front of the pants. Its length should be 19 cm, width - 5 cm. These are the standard parameters of the valance. A set-in is made from a separate piece of fabric and sewn to the fly.
During work, it is worth considering who the pants are intended for. On women's trousers, the codpiece is sewn on the right side, on men's trousers - on the left.
Hidden zipper
Unhidden
Set-in codpiece
One-piece
Materials and tools
To sew a zipper to your trousers you will need:
- sewing machine with overlock foot and regular zigzag;
- the lightning itself;
- a rectangle of fabric from which the slope will be made;
- trousers with a one-piece codpiece;
- iron;
- ruler;
- needle, thread, tailor's pins, scissors, chalk.
Many people cannot work with a thimble, but trouser fabric can be quite thick, so it is better to include it in the list of tools. You also need to take care of sufficient illumination of the workplace, because work requires utmost attention.
How to sew an overhead decorative zipper
There are very beautiful decorative zippers on sale - metal, gold, silver, on satin, velvet, denim braid, with rhinestones. These zippers are usually stitched over the seam.
You can use such decorative zippers in skirts, trousers, dresses and even over welt pockets.
They look especially impressive in the middle seam of the back of the product.
In this case, the upper ends of the decorative zipper can go into the waistband of skirts or trousers or into the edging of the neck with bias tape. We will look at a more complex method, how to sew such a zipper into a product and hide the ends of the zipper under the facing or lining.
↑ How to sew a simple zipper into a skirt: master class
↑ You will need:
— decorative zipper — needle and thread for sewing — tailor’s pins — scissors
↑ Step 1
Select a zipper and iron it with steam.
Overcast seam allowances under zipper. If the fabric is loose or elastic, the seam allowances need to be strengthened before overcasting with adhesive strips - kantenband.
Pin together the entire seam allowance, place the zipper over the seam and mark the end of the zipper exactly under the metal fastener.
↑ Step 2
Stitch the seam below the marking, above, under the zipper, baste the seam allowances, leaving a long end of the basting thread.
↑ Step 3
Press seam allowances
Pull the thread in each basting stitch and stretch the basting stitch to the width of the zipper teeth.
↑ Step 4
Place a zipper on the front side and pin it on the back.
Baste the zipper from the front side, tucking its lower ends.
It is better to tuck the ends not up to the clamp, but slightly below, leaving 5 mm for grinding.
↑ Step 5
Place the zipper foot and use it to stitch the zipper close to the teeth.
At the end of the zipper, place a stitch close to the fastener.
↑ Step 6
Place a second line along the edge of the zipper tape.
Remove basting lines.
View from the face.
View from the inside.
If the zipper is sewn into a skirt or trousers with a belt, then you need to sew the belt in the usual way, the upper ends of the zipper will go under the belt.
↑ Step 7
If the zipper is in a dress or skirt (trousers) with facings or lining, then you need to cut out the facings according to the shape of the upper cut of the product.
Glue the facings from the inside with an adhesive pad.
Stitch the facings into one whole piece, iron the seam allowances and trim them to 5-7 mm.
Overcast the bottom edge of the facings.
↑ Step 8
Place the facing on the top edge of the product from the front side, leave a protruding short edge of 1 cm behind the zipper, and pin the facing.
I have a sample, the facing is straight, in a dress it will be rounded and follow the shape of the neckline.
Instead of facings, you can sew the lining in the same way.
Turn the short end of the facing inside out, as if wrapping it around the end of the zipper.
↑ Step 9
Make markings at the same level on the turned-off ends so that the ends of the zipper are at the same height.
It is better to step back from the teeth of the zipper a couple of millimeters upward, then the facing will fit better when turning it inside out.
Stitch the facing strictly from and to the marks.
— Trim the allowances, leaving 5-7 mm from the stitching line, at the end of the stitch, trim the allowances diagonally.
↑ How to make a zipper in a fold with facing: master class
↑ Step 10
Turn the facing up, turning out the corners at the zipper.
Stitch the facing to allowances 1 mm from the seam, iron the facing.
↑ Step 11
Turn the facing to the wrong side of the product, sweep out the edge with the transition edging and iron it.
Pin the ends of the facings over the zipper.
Sew the ends of the facings to the zipper with a blind seam by hand.
Ready! It turned out neat both from the face and from the back.
↑ Svetlana Khatskevich
Author of the master class and photo: Svetlana Khatskevich Material prepared by Yulia Dekanova
Step-by-step master class on sewing in a zipper with a codpiece
Before sewing a zipper into your trousers, you should study the recommendations. For the first time, the work may seem too complicated, but in the end it will become clear that sewing in a fastener with a codpiece is considered the simplest thing, no matter whether women's, children's or men's trousers are being repaired. Before work, you should prepare the product: all darts must be stitched, pockets must be sewn.
In women's trousers
Even an inexperienced craftswoman can process a codpiece. Having learned this type of repair, you will be able to significantly save your family budget. To sew a zipper into women's trousers, you need to follow these steps:
- First of all, you should cut out the slope. It is better to take for him the same fabric from which the pants are made. To do this, draw a rectangular strip on the material with chalk, two valances wide and high along its length. The result should be an element measuring 10 x 20 cm, be sure to make the lower corners rounded. Now you need to cut it out, fold it in half inside out and overcast the edges.
- Next you will need to mark the center seam line on the front of the trousers. To do this, step back 1 cm to the left and draw a parallel line, placing it closer to the outer edge of the codpiece. Next, fold it inside out and baste.
- Under the resulting allowance, you need to place a fastener so that the edges of the teeth are visible, and secure with safety pins. Between the clamp and the top point from which the seam allowance begins, you need to leave a few mm. This way the lock will not create unnecessary folds when closed.
- Now you need to carefully place the slope. To do this, its outer long sides must coincide with the edge of the zipper. In this case, the top one should be on the waist line of the trousers. First, baste with thread, then stitch on a sewing machine.
- Fold both halves of the pants so that the lines of the middle seams in women's trousers match. Now we sew the right side of the fastener braid to the codpiece from the same edge.
- Turn the pants inside out and stitch around the edges.
- Use chalk to mark a line on the front side of the product. The valance stitching will go along it.
- Use a sewing machine to make a decorative stitch along the laid line, and secure the bottom with a zig-zag seam.
- The clasp processing is complete. All that remains is to iron the product.
The skill of creating a valance will be useful not only when sewing trousers. In exactly the same way, fasteners on jeans, shorts and some styles of skirts are processed step by step.
Cut out a slope
Cut element
Fold in half inside out
Overcast edges
Mark the middle seam line
Draw a parallel line
Fold inside out, baste
Place the slope
Sweep with threads
Stitch
Sew the right side of the clasp tape to the codpiece
Turn the pants inside out, stitch around the edges
Mark a line on the front side of the product
Make a decorative stitch on a sewing machine
Iron the product
In men's pants
On men's trousers, the codpiece will be located on the left side. A step-by-step master class will help you sew a zipper correctly. To do this you need to act step by step:
- The first step is to iron the fold. To do this, the valance allowance should be folded inside out. You don't need to do anything like that on the right half.
- Next, place the fastener with the front part facing the valance allowance of the right half of the pants, making sure that the edges match. Place the fastener stop at a distance of one centimeter from the side and bottom edge of the codpiece. Sew the zipper along the right side, stepping back three millimeters from the teeth, closer to the edge of the valance. After this, turn it right side out and fold the sewn part to the wrong side.
- Place both halves of the pants right sides together, bending over the ironed codpiece. Use tailor's pins to secure the distance from the zipper stopper to the groin. Next, machine stitch the area. Now you can turn the product right side out and try fastening and unfastening the clasp several times.
- Sew the other half of the fastener to the left side of the trousers. To do this, fold the codpiece allowances again, make a notch with scissors along the upper edge of both fabrics a few millimeters along the ironed fold. Next, you need to turn the product so that the fastener band, which has not yet been sewn, is at the top right. After this, attach it to the codpiece.
- Turn the product right side out, fold it carefully, and trace the outline of the valance with chalk. The processing of the codpiece in the trousers is completed, all that remains is to sew a straight decorative line and go along it from the bottom with a zig-zag.
You can easily replace a broken zipper if you carefully tear it off and sew a new one in the same place along the old seams. This work will take 2 times less time.
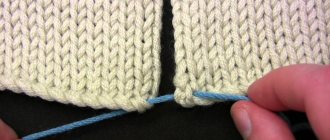
Sew both parts of the fabric together where the zipper will be
We have to do one more preparatory operation, stitching these sections together. Moreover, this stitch will have to be removed at the end of installing the zipper, so it is advisable to do it without fastening, at the maximum length and with noticeable contrasting threads.
The seam allowance must correspond to the main allowance of this side or back seam of the skirt, dress, trousers and other products (1 - 1.5 cm).
After this, press this seam slightly. By the way, allowances must be overcast before installing the zipper. And only for closed products (with lining) this operation is not necessary.
Algorithm for sewing a zipper into products tailored without a fastener
It happens that the pants are initially cut without a fastener. Sewing a zipper into them is quite simple. To do this, you must correctly complete the following steps:
- Open the center seam at the front where the fastener is planned.
- Lay out the pants on a flat surface, place the fastener on them and mark the places where it will be sewn.
- With this sewing method, the zipper will not have a valance, so you can step back about 2 cm from the mark on the right and cut off the excess fabric.
- Turn the pants inside out, position the fastener, and pin it.
- Sew on one side of the fastener. To make sure that everything is in order - the zipper is working properly and nothing is interfering with it - you must unfasten the slider several times.
- Close the fastener and sew the second band to the other half of the trousers.
- After this, all that remains is to sew the pants along the seam in the groin area and iron the finished fastener.
In order to sew a zipper into pants, no special knowledge or skills are required. Desire and a little free time are the key to success. Even a woman who has no experience in this matter can sew a zipper into trousers, as well as properly process the codpiece fastener.
Features of replacing a zipper in a leather jacket
It will not work to baste a lock on a leather jacket using a hand needle. You will need double-sided adhesive tape, which can be purchased at any hardware or hardware store. Some people suggest using glue for basting. However, this method is not very practical, because When sewing on a machine, the needle will get dirty and stick because of this glue.
The single-horn foot glides poorly on some types of natural leather and leatherette. You can solve the problem using special presser feet with Teflon or fluoroplastic coating. If there are no such tools and it is not yet possible to purchase them, then you can lubricate the product with oil or paraffin. Residues of paraffin or oil after work can be easily removed with a dry cloth.
How to sew a zipper into a jacket with a stitched collar?
Sewing a lock into outerwear that has a stand-up collar is technically slightly different. Difficulties may arise during sewing, when it is not entirely clear what thickness to choose so that the collar looks beautiful.
To ensure the work is done efficiently and correctly, use the advice of the experts:
- First, cut out the details of the stitched collar.
- Then mark the middle on the waistband, front and collar.
- The collar is hand-stitched into the neckline along the bottom edge.
- Seam allowances should be pressed twice on both sides.
- The lock is first basted and then sewn along the front edge, moving from the collar to the belt.
- The allowances are cut off, and the product itself is turned inside out and the work is corrected, removing excess threads and knots.
This method is good because it allows you to sew a zipper without ripping apart parts of the product. The zipper is much more popular than buttons, especially when it comes to outerwear. Once you learn how to change a split lock, you will forever get rid of the fear of this difficult job.