Undercut facings
Home / Service labor / Working with fabric / Sewing products / Hemming
December 20, 2011
Undercut facings are used to process armholes, necklines and other cuts in the shape of oval lines, corners, etc. (necklines, cape, bob). They are cut out after trying on the product, when the shape and size of the cutout on the part have already been specified. The direction of the grain thread in the facing and the parts must match.
Practical work:
Instruction card
Making a neckline hem
Tools and accessories: work box, product, paper, fabric. Procedure 1. Fold the product in the middle with the front side facing inward.
2. Align chest darts, shoulder seams, necklines, and pin.
3. Place a sheet of paper under the product, trace the neckline of the back and front, indicate the direction of the shoulder seam.
Preparing the neck facing pattern
a - backrests, 6 - shelves without fastening, c - shelves with fastening to the top.
4. Remove the product. Set aside on paper along the lines of the middle of the front and back 3.5 - 5.0 cm - the width of the facings of the back neck and front. Create facing lines. Cut out patterns.
Cut out facings for back neckline and front
a - facing the back, b - facing the front without a fastener, c - facing the front with a fastener to the top. Note
In products with lapels, the front facing is not cut out, only the back neck facing is cut out.
5. Fold the fabric with the right side inward along the grain thread, put facings on it as shown (position a in the figure below), pin it with pins, and trace along the contour.
6. Cut off the facing patterns, mark the shoulder allowance on the fabric (position b in the figure below).
Cutting out facings from fabric
a - chalking facings on fabric, 6 - facings with an allowance along the shoulder section, c - finished facings for a product without a fastener, d - finished facings for a product with a fastener to the top.
7. Cut out facings for the neck, front and back (position c in the picture).
Instruction card
Neck treatment
Tools and accessories: work box, product.
Work sequence
Preparing the facing for processing
1. Fold the parts of the facings with the right sides inward, align the cuts, baste and stitch (a - facing for a product without a fastener, b - facing for a product with a fastener to the top).
2. Press the seams open. Finish the inner edges of the facings with a zigzag stitch or an open hem stitch.
Neck treatment
1. Place the facing on the front side of the product with the right side, align the cuts, baste and stitch the neck facing, the shoulder seams of the product should coincide with the stitching seams of the facings (a). Note: If the product has a fastener, then first you need to stitch the ends of the facings to the edges or allowances for processing the fastener, iron the stitching seams towards the facings, and then sew along the cut of the neck (b).
2. Bend the facing seam towards the facing and stitch on the front side of the facing at a distance of 0.1 - 0.2 cm from the facing seam, make an incision in the seam in an oblique direction to the warp and weft threads, not reaching the line 0.1 - 0.2 cm .
3. Fold the facing towards the wrong side, sweep along the contour, forming an edging from the main fabric. Iron the facing on both sides. Attach the inner edges of the facing to the shoulder seams and to the center of the back using blind stitches.
Self-control
Check:
- the width of the facing along the entire cut;
- accuracy of the adjustment seam;
- neatness and evenness of the edging along the entire neckline;
- accuracy of processing of the lower edge of the facing;
- quality of wet-heat treatment of the neck.
Questions and tasks
- What methods of neck treatment are there?
- How to cut out a hem?
- How is a bias stitch cut out?
- Explain the sequence of processing the armhole with a hem.
- Make an instruction sheet for processing the neckline with an open-cut edge stitch.
“Service labor”, S.I. Stolyarova, L.V. Domnenkova
Siberian Yellow Pine: properties and processing methods
Work in a new way with the exchange Everyone in a row
How to choose living room furniture
Shopping for your home at ikea with benefits
LiveInternetLiveInternet
Quote from koko_shik
Read in full In your quotation book or community!
Processing the neckline with bias binding (bias facing)
Piggy bank - knitting and sewing!
There are several ways to finish the neckline and armholes of a dress. You can do this by “setting” the dress on a lining, processing the neckline and armholes with one-piece facings, etc. However, processing the neckline with an oblique facing is a very high-quality, simple and fast way. Our master class will help you understand this operation and master it without difficulty. Source
Processing the neckline with an oblique hem: where to start?
In order to start processing the neckline (armhole) with a facing, we should measure the length of the neckline (armhole) cutout on the finished product with a centimeter tape and cut out a facing 3 cm wide and length according to the measurement. The facing is cut at an angle of 45 degrees, stretches easily and takes on a rounded shape due to the direction of the threads.
See: How to cut a bias stitch
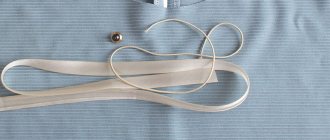
If the product has a zipper along the back, the zipper must be sewn in before you begin processing the neckline with a hem (Fig. 1). Cut the neck allowance to 0.5 cm.
Rice. 1. Bias facing and neckline product
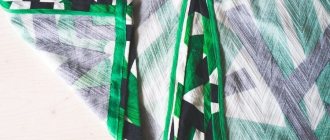
Unscrew the zipper tape as shown in Fig. 2. Place the facing on top facing the piece.
Rice. 2. Apply the facing to the product
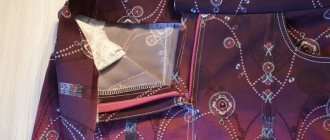
The facing should go over the zipper tape as shown in Fig. 3.
Rice. 3. Align the facing with the edge of the zipper tape
Start stitching without basting - the facing stretches slightly as you stitch. The right edge of the machine foot should follow the edge of the seam allowance (Fig. 4).
Rice. 4. Sew a bias stitch to the neckline
This is what a stitched facing looks like (Fig. 5).
Rice. 5. Stitched facing
Wrap the facing around the seam allowance, slightly pulling the facing over it (Fig. 6).
Rice. 6. Turn the bias facing to the wrong side
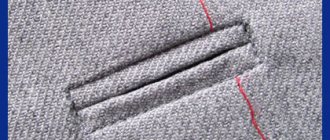
This is what the seam allowance should look like on the front side of the product (Fig. 7)
Rice. 7. Oblique facing on the front side
On the front side, sew the facing exactly along the bottom edge (Fig. 8).
Rice. 8. Bias stitching from the front side
This is what should happen as a result - the facing is stitched to the edge.
Rice. 9. Processed neckline on the front side
On the wrong side of the product, cut off the excess facing allowance close to the stitching (Fig. 10).
Rice. 10. Trim excess seam allowance from wrong side
This is what should happen as a result - the allowances are cut close to the line (Fig. 11).
Rice. 11. Oblique facing 5 mm wide
Turn the facing to the wrong side and iron it (Fig. 12).
Rice. 12. Ironing the bias stitch
Unscrew the zipper tape onto the product and sew it manually to the facing with several stitches, and also sew the facing to the shoulder seams (Fig. 13).
Rice. 13. Baste the facing with hand stitches
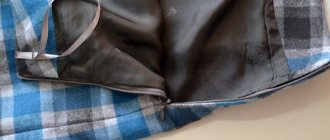
This is what the product looks like from the reverse side (Fig. 14).
Rice. 14. View of the product from the wrong side
Finished view of the product from the front side (Fig. 15).
Rice. 15. View of the product from the front side
Now you know how to easily trim the neckline and armholes with a bias stitch. This method takes very little time, and the processing itself looks neat and beautiful.
koko_shik