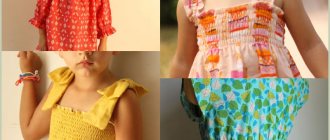
Knitted trousers for your child, a skirt for a girl, pajamas, T-shirts made of knitted fabric - very comfortable and practical clothes. Therefore, many people like to sew such knitwear products with their own hands. Unfortunately, knitted fabrics are quite difficult to sew, especially on old model sewing machines, produced back in the days when such fabrics did not exist. However, if you use some tips from our site, stretch and knitted fabrics can be sewn even on old models of sewing machines.
Another problem when sewing products from knitted fabrics can be hemming the bottom or sleeves. In factory conditions, the hem is processed with a special flat-stitch machine. There are also household models of such sewing machines, but paying 30 thousand rubles for it is not always reasonable. It is much easier to master the technique of processing a hem that imitates a flat seam using an overlocker. It is this method of hemming the bottom of knitted fabrics that will be discussed in this article.
Disconnect the serger knife
Fold the edge of the bottom of the product to a standard width, 2 - 3 cm. To make this line clearer, you can lightly iron or baste.
An important condition for performing hems on an overlocker is the ability to turn off the overlocker knife. In order to turn it off, you first need to pull the upper knife mechanism to the right, and in this position turn it up (towards you), lift it.
How to get a knitted seam on a sewing machine
Today on the Internet you can find quite a lot of secrets and tips on how to sew any product from knitwear on the most ordinary machine. Let's highlight the most important ones:
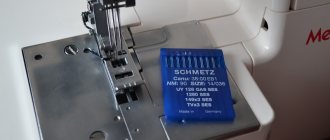
- You should choose a needle with a rounded tip so that during the work it does not pierce the fabric, but pushes it apart. This is especially true for thin knitted fabrics. As for very dense fabrics, the risk of tearing the fabric is minimized.
- You can place a sheet of paper on or under the canvas. The line is laid across the paper and then breaks off.
- To obtain a high-quality knitted seam on a sewing machine, you should use special polyester threads. Today they are quite common and are available for sale in many specialized stores.
- The conveyor helps move the top layer of the web. As a rule, such a tool is built into many modern sewing machines.
- It never hurts to practice and test your seam on a small piece of fabric to check the thread tension and stitch quality.
Types of seams made on a regular sewing machine
Double hem of the bottom of the product
Now the folded and possibly ironed or creased hem needs to be folded again, just not on the wrong side, but on the front side, as shown in this photo. If you are not experienced enough, this double hem can be slightly pressed. Just don't baste as it will be difficult to remove the threads from the overlock stitch.
Threads for the formation of high-quality knitted stitches
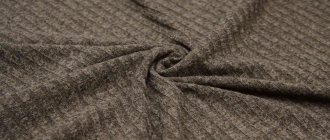
Regardless of what special equipment is used when sewing knitted fabric, special attention should be paid to threads. That is, whether it is an overlocker or a regular sewing machine, you should understand that the quality of the stitch directly depends on the thickness and strength of the threads or yarn, their elasticity and uniformity.
You might be interested in Interesting patterns for children's T-shirts for boys and girls
Threads for knitted fabrics
It is advisable to choose elastic and smooth threads for knitwear. Long-fiber polyester threads, textured nylon threads, and stringy nylon threads work well for this purpose. Stretch threads are also well suited for sewing knitted fabrics. Today, in special sewing departments there is a huge selection of appropriate material for knitwear, which is suitable for conventional sewing machines.
Polyester threads
Experts do not recommend threading the sewing machine with thick and strong threads
Processing the hem edge of a four-thread seam
Processing the hem edge of a knitted fabric product can be done in two ways, a four-thread seam or a three-thread seam. First, let's look at the first option, when both overlock needles are used.
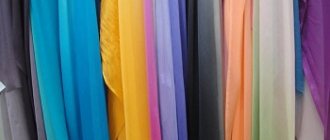
Place an overcast stitch along the double folded hem or sleeve. In my example, for clarity, a piece of knitted fabric is used, and the threads are specially chosen in a different color so that it is better to see how such a seam is formed.
This is the seam you get after ironing the hem, more like a stitched cuff. But such a seam is very stretchable and will not burst with sudden movements. Of course, this method of processing hems using an overlocker is only suitable for children’s clothing, hems for children’s trousers, girls’ skirts, pajamas, etc.
Types of hand-stitching products
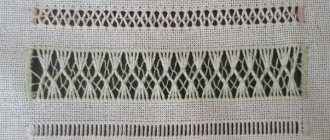
There are several types of hand overcast stitches. They are used depending on which part of the product is processed with an overlock seam manually. And also on the thickness of the fabrics and the decorativeness of the overlock stitch. How to make an overcast seam by hand and where to start can be understood if you understand the classification of seams.
Oblique overcasting or hemming is the most common type of seam used for overcasting edges and hemming items made of non-flowing fabrics. The stitches go from right to left. The length of the oblique stitch is about 3 - 5 mm, the loops are not tightened too much.
The density of the overlock seam is 3 – 4 stitches per 1 cm of fabric.
Loop overcasting - perfectly protects fabric sections from fraying. These stitches can be made with double or single thread. The technology is similar to making a bias stitch , but the needle is threaded through the loop before tightening it. The stitches go from left to right. Stitch length 4 – 6 mm.
Useful tips for shortening a skirt
If for some reason you need to shorten your skirt, proceed as follows. Put the product on yourself and for a fuller look, use any high-heeled shoes, this will allow you to evaluate the appearance yourself. Then visually imagine yourself in a new product in the mirror and at the same time make a few lines, or simply marks. Next, remove the skirt and turn it inside out. Draw a cutting line, then step back a few centimeters and draw a second line.
To avoid making a mistake with the length, fold the bottom of the skirt along the first line and pin it in place. Put it on for the second fitting and look in the mirror, while twisting in different directions and try to sit down. If everything suits you, then feel free to cut along the second line. Then hem the edge of the product.
Creating a pattern for knitwear
We discussed how to stitch knitwear on a regular machine.
You might be interested in this Step-by-step instructions for sewing a beautiful felt bag yourself
Transferring the pattern to fabric
Now let's move on to an equally important stage - creating a pattern. When cutting, you should adhere to the basic rules:
- To do this, you first need to prepare the fabric. It is worth noting that cotton fabric shrinks strongly, so before cutting it should be washed and dried, and the procedure repeated at least twice. If the edges of the fabric curl strongly, the fabric can be ironed before cutting.
- The pattern should be pinned to a highly elastic fabric, only then traced with chalk and cut out. But if the fabric is delicate, then piercing with sharp objects will not work, as the fabric can be damaged. In this case, masking tape will serve as an alternative. The pattern is placed on the fabric, secured with tape and cut out.
- It is not recommended to cut elastic fabric in two layers, as the parts may shift.
Jersey pattern
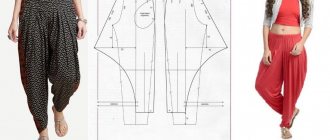
“Textilia” gives beginners a free pattern of an asymmetrical tunic dress with a round neckline. It has an extremely simple structure, construction is quick and easy. Look at the photo: based on one technique - three designs:
A huge plus of the style is that it opens up scope for modeling. You are free to make a very short blouse, lengthen it, change the hem configuration, or create a sundress. However, if the individual version is very long, it is better to abandon asymmetry. Cherry: just two pieces that are easy to cut.
Choose dense, uniform Nice, HYGGE. It’s a pleasure to deal with them: they are easy to cut and flexible; do not crumble or unravel. The design is better without prints: pastel and basic (black, gray, beige) shades, slightly textured. Download the table of measurements and build your own pattern.
Please note: there are very large increases here. Therefore, “floating” sizes are indicated. This oversize suits thin people, fat people, and even children.
How to shorten a skirt with your own hands
Depending on the skirt model:
- A-line skirt. To begin, measure from the very bottom of the skirt to the required length and make preliminary marks using chalk or soap. Preferably on both sides. Then try it on yourself and let someone else look at it. This is required so that the new product does not look too short on you. Then remove and draw a cut line, but add a couple of centimeters on the fold when sewing the bottom. Without this allowance, the new product will not only be short, but will simply be damaged. ATTENTION: In a trapezoid, the shape of the line is always rounded, so the line must be the same in shape as the previous line of the lower part. If one of the parts was long and the other short, then add exactly as many centimeters from the bottom and sides as required to make both sides even. Cut off the excess fabric and feel free to hem it on a sewing machine, but first make a test hand seam, this will allow you to more accurately see the discrepancies in the length of the sides of the skirt, and if these facts are identified, quickly eliminate them so as not to rip out the product again;
- Directly. It is easiest to shorten a straight style skirt than any other. Place on a flat surface, carefully fold the edges tightly together. We measure from the bottom to the desired length and draw a straight line. You can use a ruler for convenience. Next, take special sharp scissors and cut off the unnecessary part.
Attention! Don't forget to leave 2cm allowance for new seams to finish the bottom.
- With folds. Before you begin to shorten a pleated skirt, you need to let the product hang for a couple of days. We recommend washing new, worn items first, and only then cutting them. In a regular atelier, I iron the product along the folds with a special iron, and then shorten it. And only then the fabric is corrugated again. You can't do this at home, so do it this way. Undo the belt. Pull out the old seam threads. Remove the length from above, leaving the folds as they are. Pin and try on. Look in the mirror from the outside. Put on a blouse and jacket and look again. If everything suits you, then shoot. Place the product on a flat surface. Fold the folds in an overlay way to their original position and pin them in the second circle, only 5 cm lower, this is required so that when cutting, the folded folds do not separate. Use sharp scissors to cut off excess fabric. Make a preliminary hand seam so that each fold is in close contact with the base of the skirt. Sew along the edge using a sewing machine. Place the hemmed edge inside the waistband in its original place. Use pins and secure the starting position. Make a hand bait stitch again. Sew along the same lines on the waistband. After sewing the waistband to the skirt, remove the second bottom pins. Next, use a steam iron to iron the waistband area. This is necessary so that the product of the hemming area does not bulge and cause discomfort. Let the new product hang for one night, after which you can safely wear the item.
Reference! If you shorten this product from below, then the folds will be damaged due to the disruption of the structure.
- Pencil skirt with vent. We cut the slot. We rip the bottom and retreat up to 3 cm, but do not forget to leave 1.5 cm for the hem. The slot can be inserted higher or completely narrowed. If the product has a lining, then the skirt needs to be shortened to the new length. Check that the length of the product and the slots are the same and that the hem cut is not visible from the front side. Connect the edge of the hem and the lining to the hemmed edge of the blind seam. The lining should hang over the hidden seam. Turn the product inside out and iron it.