Models of straight skirts
Many people, when thinking about a straight skirt, imagine a gray office option that can turn an attractive look into a boring and indistinct one. Modern fashion opens up wide scope for imagination, and also allows you to combine incongruous things. Fashionable, practical and beautiful options that deserve to be included in every woman’s wardrobe:
- A straight-cut skirt tapering at the bottom is the “pencil” style beloved by all women, which suits everyone without exception. Otherwise, you should experiment with the length of the skirt and the print on the material. The classic option for this style is dense fabrics that do not stretch. Modern manufacturers offer a lot of colors that add freshness to a classic wardrobe element.
- The midi skirt is a trendy model this season, the length of which varies from the knees to the middle of the ankles. The originality of the idea is complemented by prints: women with long legs can afford a horizontal pattern on the fabric, everyone else should pay attention to vertical geometric and floral patterns.
- The front vent is a real trend among fashionistas this year, while provocative side slits are reserved for cocktail and evening dresses.
- Draperies are a spectacular and stylish option that will suit a woman of any age. They look good on summer skirts with bright patterns. Designers recommend draping the fabric from the hip line up to the center of the waist.
- A leather skirt is a chic thing that does not need additional accents. Just add a snow-white shirt and a discreet handbag to your look.
- The smell on a long straight skirt is a special chic of this season. For evening looks, dense material is used that holds its shape well. There are no restrictions for everyday outfits: any fabric can be used, including knitwear.
- A maxi skirt with a leg slit is an option that will never go out of style.
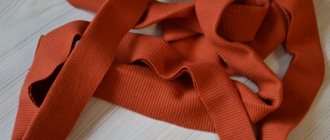
- Pleated small pleats are back in style. In combination with a straight cut skirt they give a wonderful effect.
Processing technology
The next stage in creating a straight skirt with a vent is the actual processing. There are two classic options, which differ in the presence or absence of lining.
Lined
The following instructions, which demonstrate the process of processing the vents on the skirt step by step, assume the presence of one fold in the middle seam of the back part:
- Initially, the middle seams of the skirt itself and its lining are ground down exactly to the marking of the location of the vent;
- using an iron, the allowances on the skirt are smoothed, one of which is notched;
- the middle seam of the product is marked on the slot, which helps to understand how to process the element correctly;
- an even seam allowance for the lining is ironed;
- the skirt and lining are connected to each other by the wrong sides;
- the lining is folded back, its left allowance is attached to the vent allowance;
- the angle of the allowance on the slot in the lining is notched, the upper part of the allowance is connected to the skirt;
- the right lining allowance is added to the hem allowance for the vents;
- Next, you should process the slot with a stitch until the notch at the top;
- the lining bends down;
- the top allowance is fixed with the skirt allowance;
- The lining and skirt allowances are joined with a vertical seam.
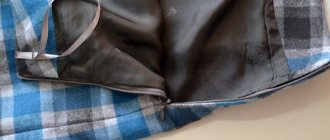
After all the procedures performed, it is recommended to lift the lining and smooth out all seams with an iron. This is necessary to give the product a beautiful appearance. In addition, there will be no feeling of discomfort while wearing it. The product with lining is ready.
Pattern
Sew the middle seams of the skirt and its lining
Smooth out the seam allowances, notch one of them
Mark the middle seam on the slot
Iron the lining seam allowance
Connect the skirt and lining with the wrong sides
Fold back the lining, stitch the left seam allowance to the seam allowance
Notch the angle of the allowance on the slot in the lining, connect the upper part of the allowance to the skirt
Fold the right lining allowance with the hem allowance for the vents
Finish the slot with a stitch until the notch at the top
Fold back the lining, connect the top allowance with the skirt allowance
Sew the lining and skirt allowances with a vertical seam
Raise the lining and press the seams with an iron.
Ready product
Unlined
This step-by-step instruction for processing vents on an unlined skirt assumes that there is one vent in the middle seam of the back of the skirt:
- when sewing such models, it is recommended to treat the vent with an adhesive gasket, especially if thin material is used;
- on one side of the skirt the vent itself is glued, and on the other - its allowance;
- seam allowances are ironed inside out;
- The two parts of the skirt are folded right sides together and stitched along the entire length of the middle seam, including the top edge of the vent.
Finally, you should smooth out the seam allowances. Do the same with the slot, but be sure to take into account the direction - to the left side of the product. All that remains is to bend the bottom.
Sew or buy
Shops and boutiques offer a wide range of products. However, many ladies continue to face the problem of choice related to their body shape. The average sizes accepted everywhere fit differently on each figure, but you always want to look good.
If you sew a skirt to order, there is a guarantee that the item will fit well. At the same time, all the little things will be taken into account, such as the shape of the pockets, vents, smell, cut, etc. An experienced craftsman will build the ideal style, after which he will model it and sew the item. The timing and quality of execution are purely individual and depend on the seamstress.
You can sew the item yourself if you have a sewing machine and an iron at your disposal. Even if you don’t have an overlocker, you can process the seams in a studio; fortunately, it costs less than sewing a custom-made skirt.
Our task
Therefore, now our task is to cut and sew the lining.
What is the lining for?
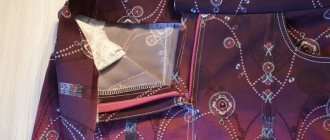
First of all, a lined skirt fits better on a person. As you know, it is most often made of satin and is sewn so that the shiny side is towards the body. This allows the product to slide and maintain the correct shape, hides seams and fabric defects, makes wearing the item more comfortable, since there are different materials, including wool (biting), and the lining also protects the item from sweat.
Another plus is that the item becomes tighter and if it is not too tight on a person, then the underwear does not stand out.
What fabrics are the lining most often made from?
- There is a lining fabric specially designed for this. It comes in three types: viscose, polyester and acetate;
- Atlas;
- Taffeta;
- Chiffon;
- Cotton;
- Satin;
- Silk.
I will tell you more about each type in the article about fabrics.
Preparing for sewing
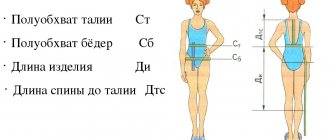
Before making a skirt pattern, you need to decide on the basic style and take measurements. These are the numerical values needed to construct the drawing. Outside help will be required, since a person is not able to take the necessary measurements of himself. Constructing a skirt pattern will require the following numbers:
- Half waist circumference (St).
- Half thigh circumference (Sb).
- Length to back waist (Lts).
- Product length (Dizd).
- Length of the skirt to the floor in front (L yu to n sp).
- Length of the skirt to the floor at the back (L yu to n w).
- Length of the skirt to the floor at the side (L yu to n sb).
To take measurements, you need to prepare a sheet of paper on which you can carry out the necessary calculations, a pencil, a meter tape and a control belt. The latter can be any lace no more than 1 cm wide and long enough to be tied around the waist.
Taking measurements
The control belt must be tied at the narrowest point. Then you need to make sure that it passes tightly over the body, but does not dig into the skin and does not tighten it. It is best to take measurements along the body, and not over clothing .
- Art. A measuring tape goes around the waist along a tied belt. The result obtained is divided by two.
- Sat - along the most convex part of the buttocks at the back and at the widest point of the thigh at the side, while in front the tape lies flat. If the figure has a convex belly, a rigid ruler is placed under it in front. The result is also divided in half.
- Dts. The tape runs from the seventh cervical vertebra along the spinal column to the control girdle. The seventh cervical vertebra is where the neck meets the back.
- Disd. This measurement is determined arbitrarily, according to the style, from the control belt.
- D u to p sp. The tape runs from the control belt along the stomach and then vertically down, without touching the leg, to the floor.
- D u to p sz - from the waist, passing along the most convex point of the buttocks, parallel to the leg and to the floor.
- D u to p sb - from the girdle through the widest point of the femur, parallel to the leg, to the floor.
In addition, you will need to know additional indicators - increases in waist and hip. These numbers are necessary because when sewing clothes, as a rule, the need to move in them is taken into account. For skirts, the increase at the waist can range from 0 to 1 cm, at the hip - from 0.5 to 3 cm.
The specific figure depends on the material from which the item will be sewn and on the size. The closer the figure is to recognized standards, the smaller the increase may be. If elastic material is chosen for clothing, the increase can also be minimal.
Creating a pattern
The best assistant in creating a straight skirt pattern for beginners is step-by-step instructions. The straight skirt pattern with a back vent and zipper is a classic style that can be transformed into a pencil skirt. The basic pattern is suitable for further shaped changes, so if you plan to sew on it, it is better to build the pattern not on paper, but on a more wear-resistant material. Some people use a laminate underlay for this. To begin with, you can use an old roll of wallpaper.
To work you will need:
- Sheet with recorded measurements, calculator, pen, pencil, eraser.
- Whatman paper or a piece of wallpaper.
- Ruler, square, long straight bar (iron threshold, etc.).
In order for the drawing to work, and to be able to cut out a real skirt from it, it is important to maintain the correctness of the lines. Perpendiculars should have an angle of 90°, etc. Advice for beginners: it is better to calculate all the given formulas step by step in advance, then the process will take less time and the likelihood of errors will be reduced .
- First step. Draw two straight lines intersecting at an angle of 90 degrees. The top is point H. From it, a distance equal to the length of the proposed product is laid upward - NT.
- Second step. From point T, move down point B. TB = 1\2 Dts - 2. Draw a perpendicular to NT from point B.
- Third step. Along the drawn perpendicular from point B to the right, place point B 1. BB 1 = Sat + Fri.
- Fourth step. A vertical is built through point B 1; at the intersection with the lower perpendicular it will give point H 1.
- Fifth step. Definition of side cut. BB 2 = (Sb + Pb) \ 2 + 0.5. If you add not 0.5, but 1, the front of the skirt will be wider. This is done when the figure has a tummy. For a figure with sharply prominent buttocks, 1 is not added, but subtracted. For a standard figure with equally convex buttocks and stomach, you need to add 0.5.
- Sixth step. Through point B 2, build a vertical - this is a side seam, which, at the intersection with the bottom line, gives point H 2.
- Seventh step. Draw a waist line. Primary calculations: D yu to p sz - Dizd = Difference; D u to p sp - Difference = Front length of product; D u to p sb - Difference = Side length of skirt; H 2 T 2 = Length of the product at the side; H 1 T 1 = Skirt front length; T, T 2, T 1, connected by one segment, represent the waist line.
- Eighth step. Determine the difference between the waist and hip. Formula: ∑ = BB 1 - (St + Pt).
Determine the amount of tuck solutions:
- Lateral = 0.5 * ∑.
- Front = 0.15 * ∑.
- Rear = 0.35 * ∑.
Dart position:
- The side dart is located on line B 2 T 2. Its length, as a rule, does not reach the hip by 2 cm.
- Front dart = 0.4 * B 1 B 2. Its length: 8-10 cm.
- Back dart = 0.4 * B 2. Its length: 12−15 cm.
The sides of the side dart are divided into two, and at the division point an external deflection of half a centimeter is made - to obtain the correct rounded side cut. The darts are laid off from the seam: the back dart is laid off from T to the right, and the front dart from T 1 to the left. The pattern is ready. To check the correctness, you need to make sure that the distance in the drawing BB 2 B 1 in total gives Sb, and the distance from T to T 1 minus all the amounts of darts - St.
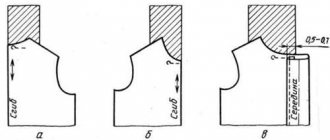
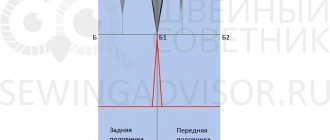
In this diagram, the back half of the skirt is located on the left, that is, it is a figure with the vertices of HTT 2 H 2. The front half is located on the right. T 2 H 2 is the side seam, and TN and T1H1 are the middle line along which both the vent and the zipper will be located. The size of the slot is determined arbitrarily, but in the classic version its length is equal to a third of the length of the skirt. The right side is 4 cm wide, and the left is 8. You need to decide on these numbers in advance in order to cut the material correctly.
Step-by-step production
The skirt can be with or without a belt. The tailoring of the skirt depends on this. In any case, you first need to build and cut the pattern, then proceed to the rest of the work.
How to cut a belt?
On the skirt you can make a belt 3-3.5 cm wide. If the measurements are taken correctly, then additional accessories will not be needed.
How to cut a belt:
- Cut a rectangle from the fabric with a length equal to OT+6 cm for the fastener and 1 cm for a loose fit. The width should be about 7 cm.
- Cut a part of the same length from adhesive non-woven fabric, the width should be 2 times smaller.
- If desired, you can add belt loops.
- Sew the finished belt to the skirt blank.
If the waistline was immediately raised under the belt, then there is no need to cut it out. Simply bend and insert the sealing strip.
How to sew a pencil skirt?
Sequencing:
- Place the pattern on the fabric and cut out 2 pieces. It should be noted that they must mirror each other, since the canvas has a front and back side.
- Baste front and back darts.
- Baste the side seams and the middle back seam.
- First cover the slot completely so that later you can correct the narrowing on the sides.
- Thread an edge strip of fabric on top with a thread to secure the waist.
- Fold the bottom and baste.
- Measure the workpiece from the wrong side to make it easier to adjust.
- The side seams should be strictly vertical.
- When the workpiece is adjusted to the figure, sew the darts and iron them towards the middle.
- Sew the central seam at the back and finish the vent.
- Sew the seams on the sides and run an iron over them.
- Go along the edges of the cut with a serger or zigzag.
- Insert the zipper, shape and, if necessary, sew on the waistband, make a hole for the button, and attach it itself.
- Hem the bottom.