Bias tape: what is it used for?
To edge the edge of the item, bias tape is used. It looks very beautiful in a deep rich tone on a light fabric.
Making a edging is much easier than sewing a facing or edging to a garment, so if you are sewing using heavy or coarse material, or transparent fabrics, then a tight facing is not suitable.
Denim edging
In this case, a strip of bias tape (preferably tulle) will look better. The edging thickens the edge of the product and can act as a spacer. The softness of bias tape allows it to be used for edging any type of material, with a variety of curved borders that are difficult to process with hemming. A strip of fabric can also be used to edge the bottom of a part, in cases where it is not allowed to process it by hemming the bottom.
Edging is used to highlight the edges of collars, sleeves and pocket edges, as well as the sides and bottom borders of jackets. Mostly bias binding is made from a material of a contrasting tone, squared or patterned. Such decoration immediately attracts attention, therefore all steps of the work must be carried out very carefully; the strip of binding must be of equal width at all intervals of the product.
Processing process
To prepare classic single tape, fold the long sections of bias tape toward the center, leaving room for the middle fold. It is necessary to iron the fabric in half lengthwise, making one edge slightly larger than the other.
You might be interested in this: Simple patterns and rules for sewing panties for children
Note! To prepare a double-fold (Italian) edging, fold the cut fabric in half lengthwise and then in thirds.
How to make bias tape from fabric
DIY bias binding is quite difficult to do.
Materials and accessories for work:
- Textile. You will need a piece of finishing material from which the strips will be cut. The width of the fabric from which the edge is cut is generally taken to be about 50 cm, with a material width of 120 cm.
- A large ruler, preferably a meter.
- Small ruler.
- Chalk or fabric pencil. There are special markers for light fabrics.
- A sheet of A4 paper and a regular notebook sheet.
- Newspaper or tracing paper. Any printed material, except office paper, as it is thick.
- Desktop.
- Sewing machine.
- Sewing threads.
- Scissors.
- Iron.
Fabric yardage
Master class on implementation
Making the cut:
- First you need to outline the knitwear for the bias tape. It is advisable to draw at an angle of 45 degrees to the grain thread. But 40 degrees is allowed. It doesn't matter.
- Now you need to mark the cuts at 45 degrees. For an angle of 45 degrees, take a regular sheet of office paper or a small notebook sheet and fold it from one corner. If the sheet of paper is smooth and not torn, then when it is folded, an angle of 45 degrees will always form.
- Next you need to draw all the corners.
- A little trick. To avoid confusion when stitching, it is recommended to draw all corners in the same direction.
- Next you need to cut strips of binding.
- The corners are connected and secured with needles.
- All seams are fastened and a piece of newspaper or tracing paper (any thin paper) is prepared.
Sleeve edging
Technology of working on the machine:
- It is necessary to place the needle at the intersection of the corners and start stitching the seam;
- The stitch length is 2-2.5 mm;
- For fastening, 2-3 stitches are enough;
- You should get an even stitch, with bartacks at the beginning and end;
- From the inside out everything is now neat. You can remove the newspaper or tracing paper;
- If there are pieces of paper left in the fasteners, carefully remove them with a needle.
The last step is to work with the iron. After work, despite the paper, the machine shrank the material a little, that is, the fabric is not even, but slightly wavy. At the end, the excess is cut off and ironed at a temperature of 120 degrees.
How to properly sew curtain tape onto tulle
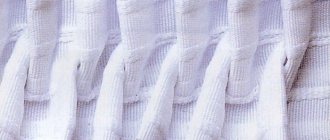
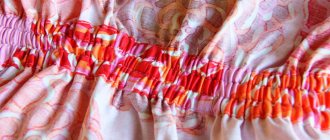
The range of curtain tapes has several options and each of them is ideal for a specific type of curtain. Various accessories differ in the same operating technology. There are harnesses running along the entire length of the accessory, which are tightened with a cord. When the braid is fixed to the canvas and tensioned, uniform folds are formed, which greatly simplifies the process of decorating windows with tulle. This is especially true for large fabric sizes. Today, fittings with indirect zigzag folds in the form of butterflies, puffs and other elements are popular.
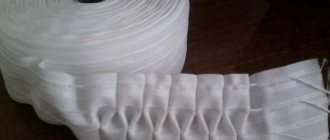
For transparent fabrics, such as tulle or organza, select transparent, narrow fittings. It comes in two types: sew-on and Velcro tape. The second type is relevant for French or Roman window drapery.
The most accessible method of fixing curtain tape to tulle is to sew it on a machine.
First, determine the assembly coefficient (AC). It usually ranges from 1.5 to 3, for example, for a curtain of 1 m, 1.5 m of tape is purchased. The fittings are sewn onto a flat fabric, so its length is determined by the formula: DK x KS + 8 cm , where DK is the length of the cornice.
Additional centimeters are needed for hemming the edges. To avoid further shrinkage, the fittings and the material itself are steamed before fixing. The braid is sewn on the front side of the tulle 1.5-1 cm below the edge without any tension on the material or threads. The ends of the tape must be tucked in, not forgetting to pull out the cords. To prevent the fittings from sliding on the base, they are pinned.
The stitched fabric with ribbon is turned inside out, ironed and the bottom edge is sewn. If the fittings are wide, a central third line is made at the end.
It is important that the seams should not touch the cords.
The free ends of the threads are tightened, creating beautiful and straight folds. The finished tulle is attached to the cornice.
How to sew bias tape along a sleeve armhole
Subsequence:
You might be interested in Interesting pants patterns: step-by-step construction instructions
Neck trim
- It is necessary to cut off the excess on the sleeve, with an overlap of 1 cm inward on the front and back.
- To process an armhole in a jacket with sleeves, you need a strip equal to the length of the armhole. For size 42, one meter will be enough. You can buy it at a fabric store, it will work well in tulle or silk, the cost is about 20 rubles*/m.
- Next, you need to smooth out the folded edge of the bias tape on one side with a hot iron.
- Place the strip of fabric with the right side on the side of the jacket, on the border of the armhole, and make a straight stitch on the overlocker, with a 1 cm indent from the edge.
- The ends of the binding fabric must be sewn on top of each other with a yarn over.
- Next, you need to bend it over the armhole allowance and sew them together, retreating from the edge of the bias tape by 0.5 mm. This stitch will be the most important, because it keeps the folded edge inside, preventing it from coming out onto the front part, so when worn, the item will look more neat.
- Make cuts on the seam allowance with scissors, every 3 cm. Cut the bias tape to the size of the seam allowance.
- Sew the edge of the bias tape and the seam allowance using a machine (you can use a zigzag stitch). Fold the edges inward and sew your own running stitch.
- Sew the folded edges of the armhole on the overlocker, remove the basting stitches, and iron with a hot iron. Work is done.
Trimming corners
Carrying out preparatory work
Before starting work, the work surface should be covered with a cloth that will prevent the curtain from sliding on the surface.
If the material chosen (organza tulle) is very thin in texture, then it is hemmed on tissue paper, which is simply torn off after finishing the work.
Before you sit down to sew at the sewing machine, you need to sew a few simple lines on a separate piece of fabric. This must be done in order to adjust the stitch length or select the appropriate thread tension. The seams should be made with an even stitch, the step length being on average 4 mm.
The first step is to process the sides of the curtain. To do this you need:
- Iron and trim the edge of the fabric evenly.
- The tulle or nylon must be placed with the wrong side up, turning it in a few centimeters. And iron the fold.
- After that, the resulting edge should be tucked another centimeter and smoothed. The end result should be a double hem.
- Fixing with pins will help prevent unnecessary slipping of the material during operation.
- The last step will be to sew the hem at a distance of 2 cm from the edge of the product.
How to finish a neckline with bias tape
Step-by-step instructions for processing the neck:
- To begin with, an oblique strip is cut to the size of the neck and approximately 4 cm wide.
- Place face to face with the beginning of the neckline. Next you need to sew a line 1 cm from the cut.
Leather edging
- Next, the most difficult stage of the work begins: it is necessary to adjust the binding slightly, so that ultimately it does not tighten the throat and does not stretch itself over time. On straight places, tighten less than on oblique ones, i.e., on curves, tighten more strongly.
- For a beginning seamstress, this is quite a difficult task, so it is advisable to pin the bias tape to the neck of the product with needles and baste it, this is necessary in order to see how the fabric lays, and if something happens, redo it. Next, the binding needs to be sewn on a machine.
- Everything must be done neatly and symmetrically. Fold the product in half and check. If the neckline is intact, then, having reached the starting point 4 cm, the stitching is interrupted and tightened using a connection.
- If the product is made correctly and symmetrically, the neck size remains the same, then cut the seam allowance to 0.4 cm.
You may be interested in Sewing ties by hand - beautiful patterns
Basting process
- Next, you need to straighten the neckline from the front part and retreat 1.3-1.5 cm from the seam connecting the binding with the neckline. The main thing is to straighten the seam perfectly so that the allowance is the same. It is recommended to trim off the excess.
- Fold the seam allowance to the edge, fold it over, closing the seam, stitch it 2 mm and baste it 2 mm. Fold the ends of the binding inward.
- After the neck is sour cream, sew a line along the front part into the seam of the binding.
- It is necessary to iron the roll (strip of fabric) carefully so as not to wrinkle it, use the tip of the iron to carefully guide the binding onto the stitching, you can pull it a little. And the seam will be almost invisible.
- Trims made of suede or leather are very popular. To process the product, you can use artificial leather or Ultrasuede suede.
How to iron correctly
- The advantages of these fabrics are that their edges do not fray, hardly wrinkle, and are easier to work with. To edge the material, you just need to fold it and that’s it.
- For example, to make a leather trim 15 mm wide, cut out a strip 4 cm wide. They are also cut along an oblique line and should overlap 5 mm diagonally.
- Next, the strips are folded in half with the wrong parts so that on the side that will be on the front part of the product there is 20 mm, and on the wrong side - 25 mm. At the end, the strip needs to be basted to the product and that’s it.
Execution diagram
Creating Product Length
Not every modern girl knows how to properly hem tulle and determine its required length. Most curtains are made in such a way that the cut of the product is trimmed with scallops or patterned lace. Sometimes tulle is complemented by laces or all kinds of weights. In this case, the length of the product is adjusted exclusively along the upper edge. It can be lengthened or shortened using a special tape and loop.
If the canvas does not have a “complex” bottom, then the product must be processed in several ways. The simplest of them can be called a simple hem, which has already been made on the side parts of the tulle. The width of the bottom hem should be slightly larger than the side trim.
Stiff fabrics require a tuck width of at least 3 cm, but light fabrics can only be tucked by 2 cm. Plastic mesh should be sewn only to a width that reaches 1 cm.
A seam called American or bias is considered to be very difficult in this process
It is worth remembering that the bottom of a product made of thin material should not be processed with a zigzag or overlock, because in this case the product will not lie too softly and smoothly.