Any needlewoman who enjoys knitting will say with confidence that you can never have too many hats. And when we see some new and unusual ornament, an original knitting pattern or a creative model, our hands are drawn to the knitting needles and yarn. If you also decide that your child urgently needs a new fashionable headdress, then we suggest you knit one. The “Owl” hat is knitted with knitting needles (a pattern with a description will be available a little later) and is knitted very quickly and easily. Even novice craftswomen can easily master this pattern and will be able to please their family and friends with new stylish winter accessories.
What you need
The first thing you need to do before starting knitting is to decide on the tools and yarn. How to knit an “Owl” hat with knitting needles and what is needed for this?
Firstly, of course, good and high-quality yarn. For any winter items, and especially for scarves and hats, it is recommended to choose thick woolen or wool blend thread. If you have thin yarn on hand, and the color is attractive and you don’t want to give it up, then simply knit the hat in two or three threads. You can also combine several types of yarn. For example, knit the main part in one color, and make the owl in a more contrasting shade.
Secondly, to knit such a hat you will need five pieces of stocking needles. You can, of course, take circular ones, but experienced knitters for hats with voluminous patterns recommend using five separate ones. In addition, we also stock up on an additional knitting needle, which we will use to remove the loops when we reach the “Owl” pattern in knitting.
We also prepare for work a measuring tape, an ordinary flat ruler, scissors, markers, a thick needle with a blunt tip for stitching and decorative elements with which you can decorate the owl. These can be buttons, beads or artificial eyes for toys, which are sold at any craft store.
How to knit a hat with ears? Schemes of hats with cat ears, owl ears and long ears
How to knit a fashionable hat with ears for a child and an adult.
The trend for 2021 is animal hats. Moreover, they do not go out of fashion, regardless of the season. In winter, these hats are made with sheepskin, in spring and autumn they are made of wool, and for summer, instead of panama hats, you can knit cute little animals or cartoon characters using cotton or bamboo yarn.
Hat with ears
The most popular models of hats are with ears. In this article we have collected the best samples and master classes for inspiration. By changing the color or composition of the yarn, you can get a new unique creation for your child.
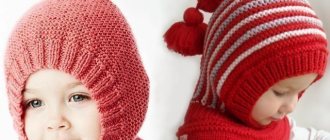
Knitting hats for girls with ears
The cat hat appeared last fall, but this spring all the streets were filled with small and large “cats.” Would you like to knit such a beauty for your girl?
Hats for girls with ears
For spring, it is better to choose wool or wool blend yarn. Select the knitting needles in such a way that the knitting is dense and knitted. With soft fluffy knitting, the “ears” will not stand up, but will hang carelessly.
There are several options for knitting a hat with ears. Simplest:
- We calculate the number of loops around the circumference of the head. We cast on and knit according to the pattern a smooth fabric of 17-18 cm (depending on the required depth of the hat);
- We close the flat fabric and sew it together to form a rectangle;
- We retreat 5 cm along the upper corners and sew the “Ears” diagonally.
There are also other variations of knitting a hat for a girl with ears.
Video: Knitted hat with ears. Knitting. Cat hat with a braid. Knitting(Hobby)
Knitting a hat for a boy using knitting needles with ears
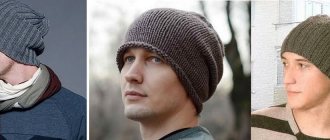
Boys loved hats with ears no less than girls. But the age category is up to 6 years. Unlike girls who wear hats with ears even at the age of 20.
Knitted hat for a boy with ears
Yarn, as in the previous case, choose wool or wool mixture. Since the beanie is playful, don't be afraid to choose bright colors.
For a boy's hat, all shades of blue and green, brown and mustard, deep red and burgundy are suitable (raspberry and pink are absolutely not suitable).
If you use gray and graphite shades, be sure to diversify them with bright, contrasting colors or embroidery.
Knitted hat for a boy with ears
For very little boys, we suggest knitting such a wonderful cat hat with ears and ties. For children under 3 years old, we would recommend giving up wool and knitting with children's acrylic yarn. Such a cap will be softer and more gentle on the body and will not cause irritation.
Video: Knitting a hat
For older children you can knit these hats
Video: Knitted hat with braids. Part 1. (Knitting. Hat with braids. Part 1
Video: Openwork hat with ears. Cat hat. Knitting
Knitted winter hat with ears, diagram
For winter hats, regardless of the child’s age, you can use acrylic, wool, half-wool and angora yarn, since a padding polyester or sheepskin lining must be inserted inside. Despite the warmth of the yarn, one gust of wind and without a warm lining will blow the hat through.
Knitted winter hat with ears
The earflap hat never goes out of fashion precisely because of its functionality. This model perfectly covers the child's head, forehead, ears and neck.
Video: Knitting. We knit a hat with earflaps. Part 1. Knitting. Knit hat with earflaps. Part 1
The cat hat can be knitted either from yarn or knitted with stock and inserted with a fleece lining.
Video: Seamless cat hat - easy! Knitting with Lyudmila Ten
Knitted hat with long ears
Schoolgirls really like long ears. This is both a stylish hat and a scarf that kids don’t like to wear. When choosing a pattern for a hat with long ears, you need to pay attention that the pattern should be dense and not stretch/shrink in length and width.
Knitted hat with long ears
An excellent pattern for knitting a hat with ears for a 2-3 year old girl. If desired, the ears can be extended to any size.
Video: KNITTING A HAT WITH EARS WITH BRAID PATTERNS! Video lesson. Knitting
Knitted hat with cat ears
Cat ears are a spring 2021 trend for girls from birth to 20 years old. Well, or while the soul feels young and perky.
Video: Knitting. Hat with ears. Hat with cat ears
Owl hat with knitted ears
Video: Owl hat. Cat hat + hat with ears. Part 1. Owl pattern. OWL hat knitted. Women's knitted hat.
Ears are, of course, in fashion now, but when everyone is wearing cat hats, how can your child stand out from the crowd? It's simple! Knit a hat with a beautiful rare pattern.
Hat with ears with knitting needles with a pattern. Pattern of a hat with ears. Pattern of a hat with ears. Pattern of a hat with ears. Designations
Please note that not all yarn lies equally evenly on the patterns.
If your choice is braids with complex patterns, and the yarn is half-wool. We suggest choosing one of the Lanagold variations from Alize. The yarn was created to knit the most gorgeous patterns from it.
And the Lanagold 800 color range is ideal for creating gradients - another fashion trend of recent seasons.
Hat with ears knitted with a pattern diagramHat with ears knitted with a pattern diagram
Video: Knitting a hat with ears on knitting needles
Knitted hat with ears and pompoms, diagram
Hat with ears and pompoms
Children's hats, complemented with pom-poms, look cute and touching. We suggest knitting you eared animals with pom-poms. If you are knitting an owl hat, make the pompoms sparse by 7-10 turns so that the pompoms imitate the ears of an owl.
Video: How to make pom-poms - 3 ways
Video: KNITTING! Knitting. Part No. 1 Children's hat
Video: Knitted hat with ears. Review, materials, knitting principle
Video: Hat with cat ears
Hat bonnet Chanterelle
Another fashion trend comes from Japan. Animal-shaped bonnets. Do you like red color, ears and foxes? Then this master class is just for you.
Video: Hood-snood “Fox” - a collar-hood in the shape of a fox with ears
How to knit a beautiful hat with knitting needles: tips and reviews
Sasha: We were born in the fall, before that I worked for many years without vacation and practically without days off. Many people complain that they don’t have time, but I have a ton of it! And I went to the craft store. My first creation was a hat with ears, which we started wearing at 3 months. They didn’t let us pass in the yard, everyone was admiring it!
Inna: I decided to earn extra money, but I didn’t quite understand how. I have been knitting for a long time, but only for my family, and they are conservative. And then a work colleague ordered her daughter a minion hat with ears.
It was such a pleasure. And when I brought it to work, orders started pouring in! Advice for young needlewomen: choose soft, thick yarn for hats. Or several thin ones.
Then the hat will be voluminous, beautiful and keep its shape.
Knitted hat with ears for newborns
Video: Knitting. Panda hat (part 1). Drawing diagram
Source: https://HeaClub.ru/kak-svyazat-shapku-s-ushami-shemy-shapok-s-ushkami-koshki-sovy-i-dlinnymi-ushami
Why knit a pattern?
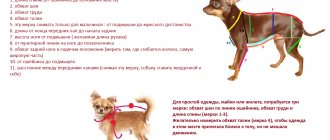
When the size indicated in the chart is not suitable for your product, it is always recommended not only to take individual measurements, but also to take a small sample. Using stockinette stitch (and the entire hat will be made using this technique), knit a pattern ten centimeters wide and five centimeters high. Then we take a flat ruler and measure vertically and horizontally. The first measurements will give you a figure - how many rows there will be in one centimeter, the second value will show how many loops there will be in one centimeter.
Knowing the circumference of your child’s head, you can easily calculate how many stitches need to be cast on the knitting needles initially and how many rows to knit in the product so that it fits.
Hat with Owl pattern
In winter, almost every person’s closet is sure to have a lot of knitted items. And there is a reason for this: such clothes are very pleasant to wear, help keep you warm and look quite beautiful.
However, knitted items are often little different from each other, and so many people are looking for ways to add some variety to their knitted wardrobe. An excellent option is a hat with an owl pattern, which not only looks stylish and original, but can also be made at home.
You just need to arm yourself with knitting needles and follow the tutorial below, and the product will definitely work out.
Necessary materials for knitting
A hat with an owl can also be crocheted, but this master class covers knitting. As for the yarn, it all depends on the preferences of the needlewoman.
If you need a hat to better hold its shape and have a very prominent pattern, you should use yarn made from acrylic, alpaca and wool, and for a softer hat it is recommended to give preference to merino and camel six threads.
So, to knit a hat you will need the following materials and tools:
- yarn (2 skeins);
- knitting needles No. 6;
- two black buttons;
- black threads.
Knitting a hat with an owl pattern
First you need to cast on 22 stitches on your knitting needle. This lesson covers knitting a small-sized children's hat, so for an adult the number of stitches will change - it all depends on the size of the head.
The cap is knitted according to the following pattern:
The shaded square in the diagram indicates the front loop, “-” the purl loop, and “+” the edge loop, that is, the outer loop.
Where two shaded squares underlined above or below are connected by the symbol “/”, you need to cross 4 loops to the right, that is, leave 2 loops on the auxiliary needle at the back of the work, knit 2 then knit 2 loops from the auxiliary needle.
Where there is a sign in the opposite direction, “”, the actions are similar, only two loops must be left on the auxiliary needle before work, and not behind it. If not 2, but 4 squares are underlined, then the number of loops involved changes accordingly from two to four.
A more detailed description of the scheme is as follows (the line number corresponds to the row number):
- facial knitting;
- facial knitting;
- edge loop, purl, 18 knit, purl, edge;
- knitting according to the pattern;
- edge, 2 purl, 4 cross to the right (put 2 knit stitches on the auxiliary needle at the back of the work, knit the next 2 knit stitches, then knit the stitches set aside on the auxiliary needle, one knit and one purl), knit, purl, knit, purl, knit, purl , knit, purl, 4 cross to the left (put 2 knit stitches on the auxiliary needle in front of the work, knit the next 2 knit stitches with one knit stitch and one purl stitch, then knit the stitches set aside on the auxiliary needle with knit stitches), 2 purl stitches, edge stitch;
 10) 12) 14) 16) edge, knit 2, purl 3, purl, knit, purl, knit, purl, knit, purl, front, purl, knit, purl 3, knit 2, edge;
- 9) 11) 13) 15) edge, 2 purl, 2 knit, front, purl, front, purl, front, purl, front, purl, front, purl, front, purl, 2 front, 2 purl, edge;
- edge, purl 2, knit 4 put on the auxiliary needle behind the work, knit the next 4, then knit the stitches set aside on the auxiliary needle, knit 4 put on the auxiliary needle in front of the work, knit the next 4, then knit the stitches set aside on the auxiliary needle knitting needle loops, purl 2, edge stitches;
- 19) 20) 21) 22) 23) 24) knitting according to the pattern;
- edge, purl 2, knit 4 put on the auxiliary needle at the back of the work, knit the next 4, then purl the loops put aside on the auxiliary needle, knit 4 put on the auxiliary needle in front of the work, purl the next 4, then knit the stitches put aside on the auxiliary needle knitting needle loops, purl 2, edge stitches;
- edge, knit 2, purl 4, knit 8, purl 4, knit 2, edge;
- edge, 2 purl, 4 knit, 8 purl, 4 knit, 2 purl, edge;
- facial knitting;
- purl knitting;
- closing loops.
Once the main part of the work is done, you need to take two buttons and sew them to the hat so that you get owl eyes. Buttons don’t have to be exactly black; here you can show your imagination.
The hat with the owl pattern is ready! This accessory will look great on a child, but for an adult girl it can become a highlight in a winter look.
Video selection on knitting hats with an owl pattern
Needlewomen who are planning to knit a hat with an owl will probably also be interested in watching a video on this topic, because, as you know, many people find it much easier to perceive information in this format. In this regard, we present a selection of video tutorials on knitting, following which the product will certainly turn out successful.
Thank you for your attention! Good luck in your work and in life!
Source: https://sdelala-sama.ru/vyazanie-spicami/3693-shapka-s-uzorom-sova.html
Description
So let's get started. We will tell you how the “Owl” hat should be knitted. The description diagram will be useful for beginners. We cast on the knitting needles 82 loops. Remember that this is an option for a head volume of 44 centimeters. You can have your own number of loops. Next we distribute it across four knitting needles. If you knit on circular knitting needles, then after knitting the first row you should close the knitting and make a circle.
The children's Owl hat, or rather, its central main part will be based on 32-33 rows. Your quantity may be slightly different, especially if the hat is knitted for an adult. But the pattern itself will consist of exactly this number of rows. If the hat is larger, then at the bottom and top of the pattern we simply knit the required number of rows in the stitch of your choice (knit stitch, garter stitch, etc.).
Rows 1-2: knit six, purl 12, knit six.
3rd – start drawing. 4 knit stitches, four purl stitches (two of them are removed on an additional needle and then knitted). Then we alternate eight loops between purl and knit. Again, four purl stitches (two of which we then knit from an additional needle) and four knit stitches.
4th – knit the purl row according to the pattern.
5th - we form the owl’s tummy, reducing the number of side loops and increasing the number of central ones. Two knit stitches, four purl stitches (using an additional knitting needle, as we described above), alternating 12 stitches, again four purl loops with additional stitches. knitting needle and two knitting needles.
6th – two knits, two purls, alternating and at the end again two purls, two knits.
7-17th - knit like the sixth row.
18th - knitted exactly the same as row 5. The only difference is that in the fifth row we knitted the first two loops from an additional knitting needle, and in the 18th row we will do the opposite.
19th – all the loops according to the drawing.
20th – four knit stitches, four purl stitches (all four on an additional needle), eight central purl stitches, four (with an additional knitting needle) and four knit stitches again.
21-29th - knit four, purl 16, knit four. This will be the owl's head.
The 30th is knitted exactly the same as the twentieth.
31-32nd – here we knit the owl’s ears. Four knit stitches, four purl stitches, eight knit stitches, four purl stitches, four knit stitches.
As a rule, if it is a small children's hat, then the entire design can easily fit on the central part. The back side is knitted in regular stockinette stitch. We hope that you will get an excellent knitted “Owl” hat. The diagram with the description was as detailed as possible, so that even beginners, working step by step, would understand everything.
Knitted children's owl hat - step-by-step description
Such an original, and at the same time beautiful and delicate children's hat will certainly be appreciated. In addition, it is warm enough that you can safely wear it in cold weather. So, let's look at how to knit an owl hat.
Knitted owl hat - description
The master class presents a hat for a girl approximately 3-6 months old. If you choose a cooler or neutral color scheme, it will work great for a boy too.
To knit an owl hat with knitting needles, we will need 2 skeins of children's acrylic yarn in beige and lilac colors (we will knit in two threads, thanks to which the hat will not only be warm, it will also keep its shape perfectly), a set of knitting needles (5 pieces, as well as knitting needles with fishing line) size 2.
How to knit an owl hat - master class
We cast on loops in a circle - 18 loops on each of the four knitting needles. The fifth loop remains free as a working one.
We begin to knit in the round in stocking stitch - with knit stitches crossed. We do not add or reduce the number of loops.
It’s good if during the knitting process you can try on a hat on your head - we knit it in height to the beginning of the crown.
For a child aged 3-6 months at this stage, the product has the following dimensions:
Next, we begin to narrow our circle - in every third row we shorten the eighth loop.
We finish knitting. The base of the hat is ready, let's move on to the ears. We pick up 10 loops from the bottom and knit 2 rows in stocking stitch without changing the number of loops. Next, in each row we knit the last two loops together until there are only 4 left on the knitting needle. The first eye is ready.
We knit exactly the same eyelet on the other side.
Now we take knitting needles with fishing line and, in a circle of the almost finished hat, we cast on loops to beautifully design the edge.
We knit 5 rows in a circle - purl, knit, purl, knit and purl again. We finish knitting.
Knitting the hat is finished. We sew it on top and move on to the decor. First of all, let's deal with the strings - we cut threads of both colors to the length we need, and pull the resulting string through the edge of the ear.
We braid the threads, tie a knot and trim the edges evenly.
We make tassels in the same way - we pull the threads into the corners on the top of the hat, tie them in a knot, and even out the edges.
Next we make the eyes. You can crochet two circles, or you can simply cut them out of felt or other dense fabric.
We make the nose in the same way - we crochet a lilac triangle or cut it out of fabric.
We embroider eyelashes on the eyes, sew on the eyes and nose, and this is where our description ends - the owl hat is ready.
Now, even in the coldest weather, your baby’s head will be warm, and you will certainly surprise your friends on walks with such a beautiful and unusual headdress. If you liked our knitted owl hat, share the master class with your friends!
Source: https://vnitkah.com/shapka-sova-spicami/
Ears and tassels
Many beginners are wondering how to knit ears for an “Owl” hat. Everything is very simple here. If you don’t have enough skills, then you don’t need to knit any elongated ears. You are making an almost square product, so when you sew the hat on top, the sharp corners-ears will form on their own.
It’s very simple to highlight the corners, showing that these are the sharp ears of an owl. We will just need to add tassels to them. To do this, take the yarn from which you knitted, or any other (you can have a contrasting color) and cut the threads about ten centimeters long. Determine the number of threads yourself. If you want bigger ears, take more threads for the tassel and vice versa.
Fold the strings in half and tie them in the central part. Then we align the ends and sew the center to the place on the corners where the tassels will be at the ear.
Hat decorations
Now a little about decorating the owl. In order to highlight the eyes, you can use any available items from the needlewoman’s kit. If the hat is for a girl, then most often beads or rhinestones are attached. If you are knitting an “Owl” hat for a boy with knitting needles, then instead of beads you can use buttons or purchased eyes for toys.
By the way, such an owl can be a decoration not only for a hat. A similar pattern can be used for knitting snoods, scarves, sweaters and jackets, cardigans and vests. You can knit with a thin thread and small knitting needles, then the owls will turn out smaller, but more graceful. Or take knitting needles 5-8 and make a voluminous owl on the chest when knitting a sweater. This is a very simple but effective pattern that you can and should experiment with.
An interesting way to knit an owl hat for a baby
An interesting and unusual way to knit an owl or eagle owl hat, as you like, for a baby
Size: head circumference - 36 cm.
Knitting needles No. 2. Threads 100% wool, 50 g – 135 m. Pattern: fluffy elastic band, stretches very well and braided patterns
Author of the master class: Irina Lyulina
At the beginning of knitting, it may seem that the cap is very small, but the finished hat stretches well and can be suitable even for a larger baby.
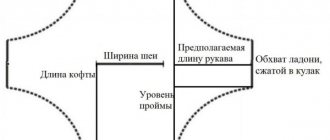
Unfolded hat:
I cast on 37 loops, plus 2 edge stitches. 1 rub . All loops are purl. 2nd row: - remove the edge, purl 2.
, - “braid of 6 loops”: remove 3 loops on an additional knitting needle before knitting, knit the next 3 loops, then knit 3 loops with knits from an additional knitting needle, - “elastic band”: p2, k2, p2, - “braid” of 9 loops": 9 knit, - "elastic": 2 p., 2 knit., 2 p.
, - “braid of 6 loops”: remove 3 loops on an additional knitting needle while working, knit the next 3 loops, then knit 3 loops with knitting needles from an additional knitting needle, -3 purl.
Row 3 according to the drawing.
4th row: - remove the edge, purl 2, - "braid of 6 loops": knit 6, - "elastic": purl 2, knit 2, purl 2, - "braid of 9 loops": remove 3 loops on an additional knitting needle before knitting , knit the next 3 loops, then knit 3 loops with an additional knitting needle, knit 3, - “elastic”: p2, knit 2, p2, - “braid of 6 loops”: knit 6, -p3.
Row 5 according to the drawing.
Row 6 , like the second. Row 7 according to the drawing. Row 8: - remove the edge, purl 2, - "braid of 6 loops": knit 6, - "elastic": purl 2, knit 2, purl 2, - "braid of 9 loops": knit 3, remove 3 loops on an additional needle at work, knit the next 3 loops, then knit 3 loops with an additional knitting needle, - “elastic”: p2, k2, p2, - “braid of 6 loops”: knit 6, -p3.
9 row according to the drawing.
Etc., repeat from the second row. It turns out that you need to braid the braids one by one: two at the edges or one in the middle.
The side parts are knitted with a “Puffy Rib” pattern.
Along the edges of the “pattern with braids” we cast on 2 loops in each edge loop to the middle of the strip. To make the “ears on the top” fluffy and stand upright, you can cast on 3 loops in each at the top of the hat, in the last 5 edge loops. Then we knit a 2×2 elastic band.
Next we knit the “Puffy Rib”: purl the loops with purls, and when knitting the knitting stitch, insert the knitting needle into the loop next to it below and pull out a new loop, discarding the top one.
To cover the baby's ears, I added 4 cm using the diagram.
I added 1 loop in each front row, and then reduced the number of loops by 1 in the same number of rows. I think that the ears could be made longer (adding and subtracting not one, but two loops). But she didn’t bandage it.
I crocheted the hat with “Crawfish step”.
I twisted the ribbons for the ties and sewed them on. I made tassels from the leftover yarn and sewed them to the “ears on the tops of my head.” They bent under the weight of the tassels and the cap began to look like an owlet. Although it is based on the so-called cat hat.
I crocheted the eyes and nose and sewed them on.
Source: https://uvrazh.ru/detskie-modeli/dlya-samyx-malenkix/interesnyiy-sposob-vyazaniya-shapki-sova-dlya-grudnichka.html