Dogs become our best friends. They love us and protect us. We, in turn, must also treat them. It is our duty to make sure that our little and sometimes big friends feel comfortable in the winter.
There are now many specialized clothing stores open for dogs. Outfits are presented for every taste and color. Some people buy clothes just to dress up, while for others it is a vital necessity. But unfortunately for owners, things for their pets often cost them a pretty penny.
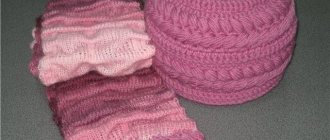
Knitting patterns for dogs, photo
In order not to spend extra money and spend your free time usefully, knit clothes for your little friends yourself. Show your imagination, add some decor and your sweater, for example, will be no worse than a store-bought one.
Knitted shoes for small dogs
Knitted shoes are light and comfortable. It does not rub or hinder your pet's movements. At the same time, it does an excellent job of keeping the dog’s paws warm. With shoes on, your pet can stand on cold ground for a long time and remain healthy.
To ensure your boots last a long time, it is recommended:
- insert insoles made of thick fabric into the shoes;
- the sole is made of waterproof thick material;
- knit the rest of the shoes in a circle with yarn in the direction from the sole upwards;
- Strengthen your socks with a leather or nylon insert to prevent your dog from tearing your shoes with his claws.
Note! Strong threads are used to knit shoes. Any knitting style is suitable.
Miniature dog breeds need extra care, especially during cold season. The above detailed information will help you learn knitting for dogs without any problems. Tips on choosing styles and selecting yarn will guide you among the many options.
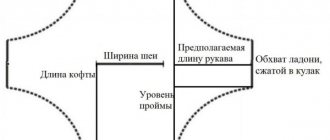
Dog measurements for knitting
In order for a suit to fit well, dogs, just like people, need to have their measurements taken. You should not mistakenly focus on the standard size indicators of a particular breed. All dogs are individual.
To take your measurements correctly, use our table.
Video: How to crochet a skirt to a jacket?
You can also read master classes on crocheting and knitting a variety of products on our portal:
- Knitting clothes for small dogs;
- Tunisian crochet;
- Crochet and knitting lessons for beginners;
- Crocheting a beret with knitting needles for beginners;
- Crochet socks.
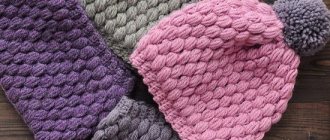
Knitting patterns for dogs
Trying with knitting needles
If you have ever held knitting needles in your hands, then knitting something for a Yorkshire Terrier will not be difficult for you. Clothes knitted with knitting needles will not hold their shape as well as crocheted ones, but they will undoubtedly be warm and will protect the dog from frost. The technique should be chosen depending on your knitting skills.
The best option for beginners would be to knit a cape in the shape of a triangle, which is perfect for a Yorkie. To do this, you only need measurements of the back, and you should start knitting from the tail, adding loops evenly.
Regardless of how the dog product is knitted, the choice of yarn remains the same. It is very important that the yarn is made from natural materials. Otherwise, it may cause discomfort to your pet.
It has also become popular to decorate dog clothes with various decorative elements, which include:
- natural or artificial fur;
- all kinds of sequins or beads;
- beads;
- elements of leather or suede, etc.
Before starting work, you need to take measurements from the dog; knitting by eye will be a very improvident decision. It is better to take measurements from the dog while standing, but it is better to measure the width of the chest when the pet is sitting. But it is worth noting that patterns for Yorkies will differ from patterns for other mini dogs. This is due to the fact that the Yorkshire Terrier's coat tends to mat under tight clothing. Therefore, allowance should be made in places where friction may occur.
We bring to your attention a master class, using an example of which you can knit a hat for your Yorkie:
- First, you need to take a head circumference measurement and decide how many loops are needed for the product. To do this, knit an example of a part and calculate how many loops there are in 1 centimeter. Based on these calculations, we begin to knit;
- Next, knit 8 rows, alternating knit and purl stitches;
- Then you need to divide the number of loops into 3 equal parts in order to close the rows on the first and third parts and continue to knit only the middle. We knit the middle only with facial loops ;
- As soon as this middle part reaches the mound, start knitting, picking up the loops on each side;
- Thus we continue to knit until the end.
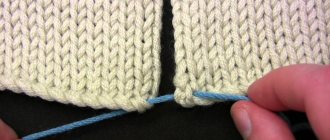
Sweater for a dog, photo
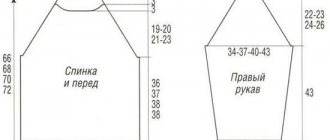
How to knit a dog sweater for beginners, diagram with detailed description and photo
For beginners, you can knit this simple dog sweater from warm melange yarn. We will take thick threads, two hundred meters in one hundred grams of yarn. You will need number four knitting needles.
Yarn for work:
First, take measurements from the dog, use the table and description given above. After this, you can start knitting the collar. Try not to make it too tight; the sweater should be easy to put on and not cause discomfort to the dog. The optimal collar width for small dogs is five centimeters. We knit it with a 1x1 or 2x2 elastic band.
We knit the main part of the sweater with a simple stockinette stitch. You can put a pattern in the form of a braid along the back. We will knit the pattern on 17 loops. At the end of the collar, you need to count this number of loops in the middle and knit the pattern according to the diagram below. If you still find patterns difficult, you can knit the entire sweater using satin stitch.
After two rows of the main fabric, we begin to add. Add two loops on each row. We add loops until the width of the fabric reaches the size of the dog in the chest circumference, plus another two centimeters for allowances. Be sure to try the sweater on your dog. To make this easier, place the stitches on circular needles. Then put it back on the stockings. Don’t be lazy to try it on again, so you don’t have to start all over again.
If everything worked out and fit, then we knit three more rows without additions.
Now you need to make slots for the paws. As shown in the photo, you need to skip the number of loops you need in size, knitting only the side parts from the holes. To do this, knit the first three centimeters, close the next six centimeters, and then knit to the second armhole. And when you get a suitable <<sleeve>>, add air loops and knit further with a single piece of fabric.
Now we need a measurement from the abdomen, length. The fabric tapers towards the bottom of the tummy, so you need to decrease two loops every six rows. Don't forget to try the product on your dog.
Having reached the required length, finish the edge with an elastic band. Six rows are enough. The armholes for the paws would also be good to tie, you can crochet them. The last stage is assembling the sweater, sewing it and trying it on the owner.
Taking measurements from a dog
Knitted clothes for dogs: patterns for beginners
Knitting a jumpsuit is not difficult, knitting for Yorkies does not take much time. But first you need to take measurements of the animal so that the clothes fit exactly and are not too big or tight. For knitting you will need the following data:
- neck girth. The measurement is taken at the widest point, loosely wrapping the measuring tape around it;
- back length. Measured from the base of the neck to the base of the tail;
- chest girth. The parameter is measured just behind the front paws at the widest point;
- waist circumference You need to measure the narrowest place on the dog's body;
- the circumference of all legs if the suit has sleeves and legs. The measurement is taken at the base of the paws.
Note! Depending on the chosen material, if necessary, add a couple of centimeters so that the suit fits and not too small.
It is important to take correct measurements so that the costume fits your dog.
Crochet pattern for dogs overalls, details
We will crochet number five. You can take the same white or milky yarn (Cinse Artico), or you can choose something brighter. You will also need a pink ribbon, about forty centimeters, and one pearl bead.
We knit according to the pattern: air loop, connecting column, single column. and a column with nak.
Before.
We start knitting the fabric from the waist line. We cast on 81 loops and close it into a ring. Next, using pattern number one, we knit seven centimeters in a circle. Next, the canvas needs to be divided into two parts. The bottom consists of 14 motifs, and the top of 12. Leave 2 motifs between them on both sides. for the armhole. We knit everything according to pattern number one.
Bottom part.
After 10 cm has been passed from the armhole, set aside 7 motifs in the center for the neckline. We knit the right and left parts separately. After 14 cm from the armhole, finish knitting. We knit the second side in the same way.
Top part.
After 10 cm has been passed from the armhole, set aside 6 motifs in the center for the neckline. After 14 cm from the armhole, finish knitting. We sew the details of the bottom and top along the shoulders. The neckline or neckline needs to be tied. To do this, in a circle, first knit 2 rows with single stitches, then 2 rows with stitches. with nak. Use scheme number two.
All that remains is to knit the sleeves and the bottom of the overalls. First we knit the sleeves for the front legs. To do this, we raise the post in the armholes. and knit in circular rows of 10 centimeters using pattern number one. Then make a 4 centimeter column with a nak. according to scheme number two.
Let's move on to the bottom. From the first row along the waist line we knit 20 centimeters according to the first pattern. Then set aside 11 mot. in the middle under the hole for putting on. We knit the left and right sides separately 7 centimeters. At the same time, we perform a decrease, 2 columns. from each side. We sew together the parts of the fabric, not forgetting to leave an opening for putting on and armholes for the paws.
Using the first pattern, we knit in the armholes for the hind legs in a circle of 7 cm. Then make a column cuff without tape. 2 cm.
According to the third pattern, we tie the bottom of the overalls. We make a bow from the ribbon and decorate it with a bead.
How to knit a jumpsuit for a Mini Yorkie dog with knitting needles for beginners
Many dog owners love to decorate their pets, which is why pet clothing is quite popular these days. Cute suits can be purchased in specialized stores.
However, if you wish, you can make them yourself. Knitted overalls for dogs of any breed are quite popular; they are not difficult to make, the main thing is to have at least basic skills.
Therefore, the question of how to knit clothes for a Yorkie is quite relevant.
Purpose of clothing for dogs
Clothes for dogs were invented for a reason. It performs certain functions:
- protection. Initially, clothing and shoes were made from special waterproof materials so that dogs could walk in wet weather. Some items have rather narrow cuffs, which reduces the risk of parasites penetrating the dog’s skin;
- support. In some cases, after surgical interventions, dogs require special support devices, so special things have been created with similar functions;
- keeping warm. Despite the presence of fur, some dogs can freeze in the cold season. For winter walks, suits with insulation are provided to protect against the cold;
- beauty. Recently, costumes for dogs have been made from different materials, they are embellished and decorated. Owners want their pet to be the most beautiful and interesting looking.
If you wish, you can even knit a set of clothes
Important! Before choosing an outfit, you should think about the end goal - what exactly the suit is for.
Taking measurements from a dog
Alaskan Klee Kai (mini husky): description of the dog breed
Knitting a jumpsuit is not difficult, knitting for Yorkies does not take much time. But first you need to take measurements of the animal so that the clothes fit exactly and are not too big or tight. For knitting you will need the following data:
- neck girth. The measurement is taken at the widest point, loosely wrapping the measuring tape around it;
- back length. Measured from the base of the neck to the base of the tail;
- chest girth. The parameter is measured just behind the front paws at the widest point;
- waist circumference You need to measure the narrowest place on the dog's body;
- the circumference of all legs if the suit has sleeves and legs. The measurement is taken at the base of the paws.
Note! Depending on the chosen material, if necessary, add a couple of centimeters so that the suit fits and not too small.
It is important to take correct measurements so that the costume fits your dog.
Jumpsuit with a hood for a Yorkie knitted: description
Mini Collie: Small Dwarf Sheltie Sheepdog
How to knit a dog jumpsuit with knitting needles for beginners? Creating beautiful clothes is not difficult, it is important to choose threads and tools. First of all, knit a sample - a small square - to calculate the number of loops and determine the knitting density. Then they begin knitting a jumpsuit for a mini Yorkie boy:
- Measuring the dog. The measurements should be written down and you will need to refer to them often.
- For the hind legs, cast on 30 loops (p) from different balls and knit 5 rows (p) with an elastic band 2×2, 12 r with the stockinette stitch and 3 r with an elastic band.
- From the inside, close 4 stitches, from the outside, 10 stitches each, so that 16 stitches remain.
- Cast on 14 stitches and connect the legs together (46 stitches in total): 6 stitches with an elastic band, 18 stitches with stockinette stitch.
- Cast on 14 sts from each edge, 74 sts in total, knit according to the pattern: 18 sts - rib stitch, 38 sts - stockinette stitch, 18 sts - rib stitch. After 6 r, switch completely to stockinette stitch (all 74 sts), knit 12 r.
- For the front paws, cast on 30 sts separately from different balls, knit as for the hind paws: 5 p for rib, 14 in stockinette stitch.
- For raglan, the parts are connected: 15 sts in front (together with the edge), 30 sts for sleeve, 44 sts for back, 30 sts for sleeve, 15 sts in front - 134 sts in total. Thread all the knitting onto 4 knitting needles.
- From the 3rd row, decreases are made: in each 2 r, 1 p is reduced (2 knit stitches together, tilted to the left) after 2 edge stitches and before 2 edge stitches (2 knit stitches together, slanted to the right) - a total of 18 r. There should be 70 sts left on the needles.
- Knit 4 more rows, decreasing only at the beginning, leaving 58 stitches. Next, 4 stitches with an elastic band, close the edges with 4 stitches, and begin to knit the hood.
- On the needles there are 50 sts, stockinette stitch, while in the center from 2 middle sts add 1 st 4 times in each 4 sts (total 58 sts). The next 10 rubles without increases. Then they make decreases: in each 2 p 7 times there are 2 loops (also in the center). There are 44 sts left, throw them onto 2 knitting needles, knit 5 r with an elastic band, bind off the loops. Sew the sleeves and add a zipper.
The jumpsuit can be knitted from any thread and any color.
It is important to take your time and count the stitches carefully.
For your information! To knit a jumpsuit for a Yorkie with knitting needles, one ball will be enough.
Crochet overalls pattern
Clothes for Spitz boy and girl: suit, overalls
A crocheted jumpsuit will be a little tighter than one knitted with knitting needles. Making it is also quite simple. Take a crochet hook No. 5 and select yarn for it. The process of knitting a suit for a Yorkie is quite simple, below are step-by-step instructions:
- Cast on 80 air loops (VP), close in a circle, knit 7 rows.
- Divide the canvas into 2 parts - 14 (bottom) and 12 (top) motifs, leaving 2 motifs for armholes between them. Knitting continues in the same pattern.
- Bottom: 10 cm from the armhole, 7 motifs are left in the central part, and the right and left sides are knitted separately. After 14 cm from the armhole, knitting is finished.
- Top: 6 motifs are left in the center 10 cm from the armhole, right and left are knitted separately, finished 14 cm from the armhole.
- The bottom and top need to be sewn along the shoulders. The neckline is tied: in a circle, first 2 rows with single crochets, then 2 rows with double crochets.
- Sleeves are knitted for the front paws. Raise the column and knit 14 cm in a circle.
- Knit the bottom part. From the first row, 20 cm are knitted along the waist, then 11 motifs are left in the center, and the sides are knitted separately 7 cm, at the same time decreasing 2 stitches on each side, sewing, leaving room for putting on and armholes. For the hind legs, the trouser legs are knitted according to the sleeve pattern.
- The bottom of the overalls is tied.
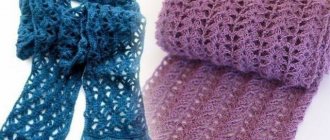
You can knit a simpler sweater
Knitted and crocheted vest
Knitting a vest for a dog is quite simple, both knitting and crocheting. The length of the dog's back is divided by 10, then transferred to the pattern and added a few centimeters to the seams.
In such clothes, it is better to fasten on the back, this will make it easier to put it on the animal.
Patterns and knitting patterns can be found online, but vests are much easier to knit than overalls and sweaters because there is no need to knit the sleeves.
Note! When knitting, it is worth considering the size of your pet’s fur so that the finished product does not interfere with it or cause discomfort.
How to train your pet to dress up
Any animal does not like having things put on it. Therefore, it is recommended to accustom children to clothing from a young age. Light clothing is put on a small puppy for a short time so that he gradually gets used to it. Quite quickly the dog will understand that he is being dressed before a walk, and if the item is comfortable and convenient, the animal will not show dissatisfaction.
It is very easy to knit clothes for your Yorkie yourself; you can find various patterns and detailed tutorials on the Internet. It doesn’t matter whether you knit a jumpsuit for a bull terrier or another dog, the main thing is to choose the right threads and tools, and during the knitting process, take your time and check everything carefully.
Source: https://gafki.ru/sobaki/vyazanie-spitsami-kombinezona-dlya-mini-yorka-malchika.html
Knitting pattern for a dog hat, details with photos
Many people think that a hat on a dog is just a whim of the owners. But there are breeds that cannot live without a hat in winter. Therefore, it will be very useful to learn how to knit a hat for your little pet.
If you decide to knit a hat yourself for your little friend, then we offer the simplest step-by-step example. You can take this hat again and decorate it however you like. The measurements on the chart are for a medium sized Yorkie. You must take your own measurements.
DIY clothes for a Yorkie: patterns, diagrams, how to sew, knit, for boys, girls
If summer clothing for dogs is mostly purely decorative, then with the onset of autumn, owners of babies, such as Yorkshire terriers, need to think about replenishing their pet’s wardrobe.
Pet supply stores and online stores offer a large assortment of clothes, but often the price tags scare you away, or you can’t find what you really want. The way out of this situation is simple - sew clothes for your Yorkie with your own hands.
To do this, you need to have basic sewing skills, a little time and the desire to dress up your pet.
How to take measurements correctly
Any pattern is based on the measurements taken. Inaccurate measurements will result in an ill-fitting item or the wrong size. The final result of the work will depend on how correctly you do this.
An important rule: all measurements are taken from the dog in a standing position!
First of all, take 3 pieces of soft, thin elastic. Tie one around the neck where the dog usually has a collar. The second elastic band goes around the chest, then around both front legs, up the sides and tied on the back. The third tag is tied at the waist - in the thinnest place in front of the hind legs. We get three main marks for further work.
Measuring the dog:
- Using the first mark we measure the circumference of the neck;
- We measure the circumference of the chest immediately behind the front legs along the widest part;
- We measure the waist using the third mark;
- the back is measured from the first mark to the beginning of the tail;
- the distance between the front and back paws (horizontal line parallel to the floor);
- for boys, measure the distance from the front paws to the genitals;
- paw circumference (front and back);
- measure along the chest the distance from the neck (first mark) to the front paw;
- the distance between the paws along the chest;
- the length of the front and rear legs (may vary depending on the product and your desire);
- back width - measure from the beginning of the right front paw to the left, across the back;
- width of the pelvis - removed similarly in the area of the third mark.
It may be useful to measure the distance from the first to the second mark, from the first to the third, from the second to the third mark. The volume of the tail can also be useful.
DIY knitted clothes
In the off-season and before the cold weather sets in, knitted items will keep your baby warm. Having knitting skills, you can easily diversify your Yorkie’s wardrobe with warm and bright sweaters, blankets, and vests.
The measurements and patterns for knitting and sewing are the same . In each individual case, you need to take into account the length and volume of your pet’s fur and add 1-2 centimeters to the measurements. Otherwise, clothing can hinder movement, wring and tangle the fur, which the Yorkshire Terrier has a lot of.
You can start knitting clothes for your Yorkie with your own hands with something simple - a sleeveless sweater, for example. Knitting pattern:
- First of all, we always knit the back - we cast on the knitting needles the estimated number of loops. For a dog with a chest volume of 38 cm, this is approximately 45-50 loops.
- We knit the initial 10 rows with an elastic band - this will be the neckline, then any knitting as desired (garter stitch, stockinette stitch, patterns) for about 50 rows.
- We finish with an elastic band at the waist for 12-15 rows. The lower part (chest) is knitted in reverse order, from the waist to the neckline.
- We cast on about 15-20 loops. We don’t make an elastic band at the waist, we start right away with the main fabric. Having knitted 24-26 rows (about 10 cm), we begin to symmetrically decrease the loops along the edges of the next 20-22 rows (7-9 cm). We finish the piece with an elastic neckline (10 rows).
- Sew the parts together, leaving slits for the front paws. If desired, you can knit the sleeves - knit two rectangles according to the paw measurements, sew them into cylinders and sew them to the sweater.
The exact number of loops and rows depends on the size of your dog and the thickness of the selected threads and knitting needles. The back can be lengthened as desired, and the bottom of a girl's sweater can also be made longer. If you want to make a collar with a turn-up, double the number of rows of elastic at the neck.
Choose threads that contain at least 40% natural wool or cotton fibers. Check the quality of the dye to avoid staining your pet's fur.
How to sew a jumpsuit
A jumpsuit is a very practical and versatile item in a dog’s wardrobe. It protects the animal from cold, wind, snow, rain, dirt and slush. Thin autumn, warm winter, decorative superhero costume - any jumpsuit is easy to put on, fits well, does not restrict movement and does not interfere during a walk or game.
Due to the physiological characteristics of dogs, clothing for boys and girls is different, so we offer both options.
Jumpsuit patterns for girls
The tummy of a Yorkie girl should be well closed, completely, almost to the tail, in order to avoid hypothermia and inflammation of the pet’s genitourinary system.
After all the measurements have been taken, we begin to build a pattern according to the template, where:
- AB is the length of the back;
- Sun half neck circumference (first mark);
- CD distance from the first mark to the front paw;
- DE half the circumference of the front paw;
- EF distance between front and hind legs;
- FG half the circumference of the hind paw;
- GK and LM length of front and hind legs;
- The I and H marks on the sleeves and back parts must match when sewing;
- Marks F, D, G, C on the chest and back must also be aligned;
- The length of the pattern piece for the lower part of the overalls (chest) should correspond to the distance from the first to the third mark.
Transfer the pattern to the fabric
Fold the fabric right side inward. We lay out the cut out paper parts of the pattern so that the sleeves are on the fold of the fabric and have only one seam (inner). We outline the pattern with chalk or special soap and cut it out, not forgetting about seam allowances - at least 0.5-1 cm. You should get 2 back parts, 2 sleeves for the front and hind legs and 1 part for the chest.
Sew the details
For convenience, make small notches in the places of marks F, D, G, C, I and H; when sewing the parts of the overalls, make sure that they match. Sleeves are sewn into the slots for the paws, the slot for the tail and the lower edge of the chest are finished with an edge stitch. We leave the longest slot on the back without sewing. A fastener is inserted into it: zipper, Velcro, ties or any other fittings.
Overalls pattern for boys
The boy's overalls differ in one, but very important detail. The part for the chest should be shorter than in a girl's overalls, maximum to the base of the hind legs. Or it is cut differently, with a special cutout in the lower abdomen. This is done so that the dog does not stain his clothes when he pees.
The pattern is built according to a template, where:
- AB back length;
- BP is half the circumference of the neck;
- DS is the distance from the first mark to the front legs;
- BV is half the circumference of the tail at the base;
- CC1 and BB1 are the full circumference of the front and rear paws;
- Segment G2 is the distance between the front and rear paws.
Features of sewing winter overalls
Both the first and second options can be made for winter. It is insulated using a fleece lining, fleece and synthetic fillers (sintepon, holofiber). The lining is cut and sewn in the same way as the main part, and then both parts are carefully sewn together from the wrong side.
You can sew the top with lining in several places (along the chest, waist or across) so that the jumpsuit fits well and does not “fidget” in different directions. In the winter version, the sleeves, neckline and tail cutout must be placed on soft elastic cuffs so that they fit more closely to the animal’s body.
The item can be decorated with fur, buttons, rhinestones and appliqués. Make sure that the animal cannot reach the decorative elements, bite off and swallow them.
Knitting raglan for dogs, diagram with description
The simplest raglan diagram for clarity.
We will knit the sweater from the neckline. We cast on loops, the number of which corresponds to your measurements of neck volume. There are 64 stitches cast on in this tutorial. Divide them into four spokes. Knit the neckline with an elastic band two by two 15, and in order to get a lapel about 20 rows.
Let's go directly to the raglan. To get raglan in the future, divide your number of loops by three. They need to be distributed into loops for the back, front and legs. If you divide 64 by three, you get about 22 loops.
Since the back is wider, we will leave 25 stitches for it, 19 for the chest, ten for each leg, 20 in total. Then it is convenient to use special markers for knitting to delimit the details.
For sleeves, you need to calculate the number of loops based on the girth of the paws. For now we put these loops on another knitting needle. Then we continue to work in circles. On the knitting needle you are working with, cast on five to ten stitches so that the sleeve is not too tight. Close the circle and knit further.
We need to knit two hearts on the back. Where the pattern will be located and its size, choose at your discretion. The pattern is knitted according to the pattern.
After you complete the pattern, knit further in the round. The length of your sweater will depend on your dog's measurements, but remember that the back is always longer than the front. Once you have decided on the length, start knitting the elastic two by two. So we knit about seven rows and close the loops on the stomach, leaving the back.
Transfer all the loops to one knitting needle and continue working alternating faces. and purl rows. At the same time we make a decrease. We knit three loops together both at the beginning and at the end of the rows. You will get a smooth narrowing.
Only the sleeves remained. We remember those five or ten loops that are needed so that the sleeve is not tight and is free. Thread them onto knitting needles. Knit in a circle with a two-by-two elastic band to the length you need.
Let's start with the hook
There are many techniques for crocheting. Let's look at two of them:
- Moroccan technology;
The use of this technique provides such advantages as the tightness of the knitted clothing and retention of shape for a long time. Typically, sleeveless vests, blankets and capes are knitted using this technique, which turn out very beautiful.
- Freeform knitting technique.
In this technique, first, a full-size pattern is drawn up and only then the elements of the future clothing are knitted. As a result, all elements are connected to each other using a thread or hook. The freeform knitting technique will take a little more time, but it will be worth it. Clothes made using this technique are absolutely original and unique.
Related article: Do-it-yourself clothes for Baby Bon with knitting needles with photos and videos
But what to do with the fact that crocheted dog clothes are not warm? This problem can also be solved, and there are several options for getting out of this situation:
- You can use a lining that is sewn from the inside out. It is important to note that this option will significantly complicate the washing process. However, if your pet also has other clothes, this will not be a problem;
- The second option is to decorate products with ornaments that can be embroidered on the finished item or knitted - this will help retain heat.
Knitting a costume for dogs in detail with a description
Such a simple suit in appearance and execution will look very beautiful and bright on your pet.
Having reached the armpits of the front legs, change the knitting needles to circular ones.
Having closed the loops, do not cut the thread.
How to crochet a dog blanket?
Crochet clothes for small dogs are quite varied. Next, let's look at another type of blanket outfit. A blanket is a kind of small cape for the beauty and warmth of pets. It warms the back of the animal and at the same time gives the dog a slightly aristocratic look. You can knit a blanket in the form of a regular scarf or according to the pattern provided below. How to crochet a dog blanket?
To knit this outfit you will need:
- Yarn of orange or some other color
- Green threads
- Hook-knitting needle No. 9.
Crochet dog blanket
Step by step process:
- You need to crochet 55 stitches. Afterwards, five knit stitches and five purl stitches are knitted alternately.
- Sixteen centimeters are knitted this way. Then they begin to decrease one STB every three.
- Knit 2 times 4 rows Purl. loops. After 4 rows of Knits.
- Then the blanket is formed by decreasing the columns to obtain a rounded bottom of the product.
- And so little by little the columns are closed and reduced to nothing.
- Then the front parts of the blanket are knitted in the same pattern. Either decreasing or adding columns to decorate the bottom, armholes for sleeves and collars.
- When the product is ready, all that remains is to sew the side parts of the blanket.
To make the outfit look more festive, the edges are tied with green yarn. And buttons are sewn on the front so that the blanket sits securely on the dog and does not fall off.
Dog blanket pattern:
Dog blanket