We must pay tribute to fur products, because they do not lose their relevance from year to year. This is not surprising, because fur can not only look stylish, but also retains heat well. And preserving heat in our latitudes is especially important.
Fur products can be found in the wardrobe of almost every woman. Perhaps the love for fur products dates back to ancient times.
Since ancient times, male hunters went hunting and brought animal skins to their women. Nowadays, a mink hat and other animal products are a luxury item due to its high price.
But don’t despair, because it’s possible to sew a fur hat with your own hands. All that is required is your desire.
If you learn how to sew fur products, you will not only be able to save your savings, but also replenish them by selling your products to your friends.
In the article below we will tell you in detail how to work with fur.
Fleece hat pattern
When sewing various models, a basic fleece hat pattern is used. It is adjusted based on your own measurements.
To determine your size, you need to take two measurements: the first is the circumference of the head, the second is the depth of the hat. How to correctly take head measurements is shown in the photo below.
The main part is one-piece, or is divided into an upper part - the crown and a lower part, which covers the ears.
By the way, there are models with elongated “ears” that turn into ties, and there are others without them at all. In this case, this part of the pattern is simply removed.
Rectangle fabric beanie
Now that you know how to take measurements and make a pattern, we’ll get to the point: the tailoring itself.
- Take a piece of fabric 55 cm high and OG wide (head circumference).
- Fold the front side inward. Matching the edges.
- We fasten with needles. Leave a small hole unattached (mark the boundaries with a pencil).
- We put a line where we connected with pins.
- The result is a pipe (conditionally).
- Combine one upper corner with the opposite one. The second one is exactly the same. There were 4 layers in total.
- We remove the second and third layers inside the structure. Connect the bottom layer with the top one. We pin it with pins.
- We lay a line along this place. But start stitching about 3 fingers away from the edge.
- But we don’t complete the stitching, but straighten the second and third layers and align the edges. We flash them the same way.
- We finish the line where we started.
- We look for a hole and turn the structure inside out. We straighten the cap.
- All that remains is to sew up this hole. We straighten the cap.
The Beanie hat is ready, wear it with pleasure. This model is quite simple, easy to sew.
How to sew a fleece hat with elongated ears
This master class will show in detail the steps of sewing a fleece hat.
- Lengthen the “ears”, divide the patterns in half.
- The outer part is cut in separate parts, according to a template, and the lining is one-piece.
- Fold the triangles in pairs and sew one side. Then fold them together and sew the top edge with one line. The result is a hemisphere - the upper part of the headdress.
- Sew the back seam at the bottom part, connect it to the hemisphere - the outer half is ready.
- It is easier to assemble the lining, since it is one-piece - sew the triangles and the back seam with a machine stitch.
- Place the outer and inner parts facing each other and sew, leaving an opening for turning inside out.
- Turn the product inside out, stitch along the bottom edge, and sew on Velcro.
We sew a warm fleece hat in 30 minutes
The cold season has already arrived and that means it's time to warm up! Today there will be a very simple lesson that is perfect for those who are just starting to sew. We will make a cute and cozy hat from thick fleece. The hat will be double, so it will be really warm. Of course, she is unlikely to be able to take care of her master’s ears in the Siberian winter, but for autumn and not very cold winters - just right! The decor for the hat will be a print made and applied by sublimation. This is a very interesting printing method, differing in many ways from the usual thermal transfer, both in appearance and in performance characteristics. You can read more about this on my blog, but here I will only say that this pattern is very stable and can easily withstand machine washes, which makes it extremely versatile for its use in creativity, especially in the decoration of clothing and accessories.
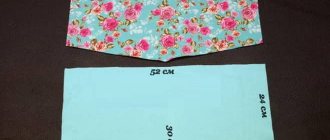
Let's get back to our hat! We will need a piece of fleece approximately 1 m by 35 cm, this is with a small margin, a print picture and a printed pattern. It is designed for an adult, but you can reduce it a little, by 4-6 cm in width and 2-3 cm in height, and you will get a children's version.
Here's a pattern:
You need to cut out 4 identical parts. Two on the outside and two on the inside. If you sew from fleece in different colors, the hat will be double-sided.
Let's take one of the parts and transfer a sublimation image onto it; this will be the front side of the cap. Image transfer is carried out using a regular household iron; the technology differs little from thermal transfer, but there are still a couple of nuances. Detailed instructions for transferring sublimation prints are on the blog.
Only paint is transferred to fleece, without film, so the elasticity of the material is not impaired.
Let's start sewing. First, we sew darts on all 4 parts:
Now let's make the side seams. We put the parts face to face and sew them together, pin them together, or, like me, with tailor’s clips (a very convenient thing).
Sections can be trimmed and overcast. Fleece does not fray, so this is optional.
We do the same with the remaining parts:
Now, with the front sides facing each other, we put the parts into one another and cut off the perimeter again:
Sew, not forgetting to leave a small hole for turning:
Turn the cap inside out and sew up the hole with a blind stitch:
We carefully straighten everything, steam it, and fold the lapel. All is ready!
Happy creativity!
Children's hat with decorative ears and muzzle
It’s not at all difficult to sew a cheerful children’s hat. The most important thing is to make sure that the circumference of the baby’s head and the pattern match. This pattern is suitable for a child with a head circumference of 48 - 50 cm.
Algorithm of actions
- Cut out the necessary parts, adding 1 - 1.5 cm for allowances. If you are planning a double hat, then cut out an additional lining. The lining for a fleece hat can be knitted or made of basic material.
- Cut out the ears; they consist of four parts.
- Make an applique for the muzzle. The nose is sewn on by hand or with a frequent zigzag. Eyes and antennae - embroider with hand stitches.
- Sew the ears, turn them inside out and attach them to the gap marked with the letters AC, approximately in the middle of the segment.
- Connect the darts, first the frontal and occipital, marked with the letters D and G. Next, using a common line, sew the dart with the ears. Assemble the lining in the same way.
- Prepare the ties: cut strips approximately 1 cm wide. Since fleece does not fray, the edges do not need to be processed. Sew them on with a few stitches.
- Assembling the hat. Place the outer and lining halves facing each other and pin together with needles. Go through machine stitching. Leave a hole on the back side, approximately 5–6 cm long, for turning inside out.
- Turn the product inside out and sew the hole inconspicuously by hand.
This fleece hat looks very good when paired with a scarf and mittens. How to sew mittens is described in the article: Fleece mittens - quickly and easily with your own hands.
The hats presented below are made according to the same principle. Only the frontal-occipital dart is closed, and the top is stitched in a straight line.
Step-by-step sewing of a hat
And now the fun part, we’re sewing a hat.
- Now you need to stitch along the darts.
- Fold them in half. It is important that the stitch ends at the point marked with chalk.
- We hide the tail from the overlog inside using a needle with a large eye and cut off the end. We do the same with the second side.
- Now you need to iron the edges.
- We smooth the seam in different directions (one allowance in one direction, the other in the other).
- The same goes for the grooves (one to the left, the other to the right).
- On the one hand, it is necessary to transfer the marks to the front side.
- Fold the hat in half, straighten the seam allowances in different directions, combine and pin with a needle.
- We do the same work with the slices: combine and chop.
- We will sew the line, focusing on the side marks. In order for the marks not to move, but to turn out symmetrically, they can be captured in this place with 1-2 stitches.
- We start the line on the overlog from this mark. When we reach a place where there are many layers and grooves, we need to manually turn the wheel. Just be careful not to break the needle.
- We hide the tails inside the line. Iron it well and turn the hat inside out.
- Straighten everything, iron it and make a lapel.
The knitted hat is ready. It is recommended to carry out wet-heat treatment so that it does not lose its shape.
Fleece beret
A warm beret is perfect for both little girls and women. For kids, a model that covers the ears is more desirable.
The pattern is constructed as follows:
The lower element is taken from the main template, and the upper one is a circle with a diameter of 35 - 40 cm. The lining is ordinary - one-piece.
Sequencing
- Connect the back seam at the rim.
- Gather the edge of the circle or fold it into folds. They are evenly distributed, bringing the circumference of the circle to the size of the head circumference.
- Sew the circle to the rim.
- Sew the lining and insert it into the upper part. Stitch, turn inside out, and decorate with fabric flowers if desired.
Knitted fleece hat
An ordinary knitted hat may not be warm enough, but this situation can be easily corrected by making a warm lining.
How to sew fleece into a hat
- Draw a chalk outline around the headdress that needs to be insulated. The direction of the grain thread must be observed - the material must stretch in breadth. This is necessary so that the product can be worn freely.
- Make darts at the top of the head, about 10 cm long, and about 3 cm at the base. Sew the edges with a zigzag or overlock.
- Close the darts and finish the bottom edge. But this is optional: since fleece does not fray, it is not necessary to process it.
- Connect the hat with the lining. Hem the bottom using hand stitches.
Constructing a pattern for a double-sided knitted hat.
To create a hat pattern we will need measurements:
- headdress depth
- head circumference
Draw a rectangle whose height is equal to half the depth of the headdress. If you want to wear a hat with a lapel, then add the size of the lapel to the height.
The width is equal to half the circumference of the head. The knitwear that I bought stretches well, so there is no need to add extra weight for a loose fit. But if you are sewing from thicker fabric, then add 1-2 cm to the width.
Round the top corners of the rectangle.
Fleece balaclava
The balaclava perfectly protects the face from the cold piercing wind. Another undeniable plus is that it is easy to sew yourself.
The size of the window on the template is adjustable as desired, depending on which part of the face should be open.
- Fold the material in half, trace the pattern, then cut out the elements, not forgetting the allowances.
- To process the window, a piece of fabric is cut out that is larger than the future hole. Pin it to the front side.
- Sew along the outline from the wrong side.
- Cut a hole close to the seam, approximately 2 - 3 mm.
- Turn the square through the hole to the wrong side and pin it together with pins. Sew, retreating 5-7 mm from the edge.
- Further sewing is carried out according to the principle described above.
- Process the bottom cut by folding the edge, then stitch with a zigzag.
Double-sided knitted snood
We cut out the following pattern from fabric - 2 pieces (see photo, this pattern is suitable for children of approximately 1-3 years of age, patterns of other sizes are lower in the article). The size of the pattern may vary depending on the knitwear itself: if the fabric stretches well, then you can make the pattern a little smaller.
Knitted snood pattern
From the wrong side we sew both sides together at the top and bottom.
We sew a knitted snood
Turn it right side out and iron it.
We sew a knitted snood
Now we sew the snood on the side (in a ring) from the wrong side, leaving about 4-5 cm, so that later through this hole we can turn the snood onto the front side.
We sew a knitted snood
Turn it inside out.
We sew a knitted snood
Hand stitch the opening using a blind stitch. It turns out this is a double-sided knitted snood.
Double-sided knitted snood
Winter fleece hat
In order to get a particularly warm headdress, a layer of insulation is inserted between the outer and inner layers.
Attention: when using insulation, the parts increase additionally on all sides by 1 - 1.5 cm. Otherwise, the hat will turn out to be small.
The ear areas are reinforced with a piece of jacket fabric, this will prevent blowing.
This manipulation is carried out as follows:
- Cut two circles from a piece of raincoat fabric, about 7 cm in diameter.
- Place the circle to the ear area between the layers of the cap and secure them with running stitches.
- Sew in circles.
An interesting video will show you how to sew a men's hat with your own hands.
DIY fur hat
A common hat model for women is the pillbox hat. It is suitable for absolutely any woman and goes well with a coat or fur coat.
In order to sew such a hat you need fur, threads, lining, threads and needles and, of course, a sewing machine.The most important thing is to choose its height. This hat visually increases the size of your head.
The DIY fur hat pattern consists of two elements. Circle and rectangle. In order to accurately draw patterns, you need to measure the size of your head; we recommend using a meter.
Choose the height according to your personal feelings and estimates. As you might have guessed, you should end up with a rectangle whose sides should be equal to the height of the hat.
To make a circle, use the resulting rectangle. Patterns are made on paper.