This style elegantly emphasizes the hips and creates a light and active hemline. It is always relevant , regardless of the time of year, age, or the fullness of the female figure, and has long become a classic for all types of female silhouettes.
A godet skirt is a skirt style where the upper part has a tight-fitting silhouette and the lower part has a flared silhouette. This option most favorably emphasizes the female silhouette and at the same time provides sufficient freedom of movement even when walking quickly. The cut of the skirt consists of 4 or more wedges.
The parts of the skirt can be one-piece (the wedges are cut out together with fragments of the skirt itself from one piece of fabric), or the wedges are sewn into the seams or into the slits at the bottom of the product. Those with narrow hips can afford a mini skirt. For a better fit of the skirt with a corpulent female figure, it is desirable to increase the number of wedges.
The length of a year skirt, the number of details and the degree of flaring can vary depending on height and fullness, advantageously emphasizing the features of a woman’s figure.
The easiest and fastest way to sew a godet skirt with your own hands is a skirt consisting of six wedges.
Taking measurements
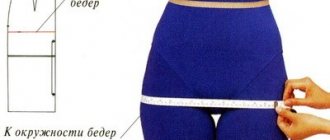
The first step in sewing any product is taking measurements. You will need to measure your waist, hips and determine the length of the product.
The next measurement is the circumference of the hips , taking into account the protrusion of the abdomen. To define it, tie a ribbon or thick elastic band at the waist. Under it, at the level of the navel, insert a regular long ruler pointing downwards. Measure the waist circumference along the tape and the hip circumference along the protruding places of the buttocks and in front, taking a ruler (measurement taking into account the abdomen).
Divide the resulting values in half and write them down as half-waist circumference (Wt) and half-hip circumference (Sb). the desired length of the skirt in front, from the braid at the waist down with a centimeter or a long ruler (DlIzd).
The basis for constructing a pattern for a godet style skirt will be a wedge. Make the necessary calculations using the following formulas:
- The size of the upper part of the wedge along the waist line: (St + Fri) / 6;
- The width of the wedge along the hip line: (Sb + Pb) / 6.
Letters and numbers in formulas:
- St – waist semi-circumference;
- Fri – waist increase 0.5 cm;
- Sb – hip semicircle;
- Pb – increase in hips 0.5 cm;
- 6 is a number that determines the number of skirt wedges.
How much fabric do you need to take to sew a skirt?
After we already know the pattern, we need to decide on the amount of material needed so that we can understand how to sew a year skirt with minimal costs. So, for example, for a product with a width of 140 cm, you need to take 130 cm of consumables, since the model allows you to narrow the product and use segments to create wedges. This skirt is a real find for any fashionista. This way you will get a completely new wardrobe item while saving money.
If your situation is the following:
- There is a directional pattern or pile (the parts cannot be moved).
- The width of the fabric in the roll is smaller.
- The size of your pattern exceeds the dimensions of the intended model.
- You have made the extension of the lower wedges too large.
- You modified your pattern - you drew more wedges on the front than expected.
For these cases, you will have the following fabric consumption: two lengths of the product + 6 cm for seam allowances. The layout of the parts on the fabric will occur differently: all patterns will be arranged in two layers - two parts will be on the bottom, and all the rest will be on top of them. This is the only way you can maintain the style of your skirt.
Constructing a pattern drawing
To create a pattern, take thick paper (whatman paper, the reverse side of leftover wallpaper will do), a pen or pencil, a flexible measuring tape, a wooden or rigid plastic ruler 30 cm long, a long ruler or meter, and a compass.
Step-by-step instruction:
- Draw a vertical line on the paper, which will be the middle of the wedge. Place a T mark at the top of the line. Perpendicular to the midline from point T to the left and right, set aside the value calculated by the first formula (1) and mark point T2 on the left and point T1 on the right.
- When creating a pattern for a part, you will need such an indicator as hip height (HH) - a measurement from the waist line to the hip line. This is on average from 18 to 20 cm, depending on height (for a height of 158 cm, choose a VB of 18 cm, for a height of 176 cm, choose a VB of 20 cm). Along the center line down from mark T, set aside the value of the height of the hips VB, put a mark B, through which draw a horizontal line. From mark B in both directions, set aside the value calculated by the second formula (2) and mark B2 on the left and B1 on the right.
- The next step from point T down a vertical line is to set aside the length of the product DlIzd. At this point H, draw a horizontal line defining the bottom of the product, which is parallel to the lines of the waist and hips.
- Marks T1 and B1, marked on the right side, are connected with a line and extended further until they intersect with the bottom line. Draw the same beam through marks T and B2, located to the left of the vertical axis. Check the length of the segments along the bottom line from point H to the intersections with the left and right rays. They must be equal. If these segments are different, this means that the marks placed along the waist and hip lines were not marked correctly enough and the location of the marks already made must be corrected.
- From points T and T1 along the side lines of the wedge, measure the length of the product DlIzd - marks on the right H2 and marks on the left H3. Using a slightly convex arc, connect the marked marks through point H and draw a rounded trajectory for the bottom of the wedge.
- From mark T down along the central axis, measure 2-3 mm and mark point T3. Connect points T1, T2 and T3 along a smooth path and draw a rounded waist line.
- It is also necessary to very slightly round off the segments T1 - B1 and T2 - B2, located on the side boundaries of the part, stepping back 1-2 mm from the middle of the segments to the side directed from the center of the part, and draw smooth arcs.
- Now you need to choose the level of increase in the lower part of the skirt.
- When forming the line of the godet, it is necessary to take into account that the flaring of the godet should begin below the most voluminous part of the figure (measurement of hip circumference). If the extension of the godet is performed above this point, the silhouette of the godet skirt itself will be lost.
- From marks B2 and B1 along the side lines of the wedge, set aside from 10 to 30 cm downwards - segments to the places where the year begins to increase (G and G1). Through the addition points G and G1, draw a horizontal line perpendicular to the central axis.
- The flaring of the year can be of any volume. To do this, take a ruler or compass. Measure the size of the segment from the point of addition G1 to the bottom point of the product H2, located on the right side line of the part. Imitating a compass with the center of the circle at the point of expansion G1, draw an arc with a radius equal to the size of the segment G1-H2 from mark H2 to the right. On the left, draw the same arc with the center of the circle at point G from mark H3 to the left. On both sides of the part, the increase in volume should be the same. To do this, from marks H2 and H3, set aside segments of the same length, which determine the volume of expansion of the year. The longer these segments, the greater the increase in year will be. Mark the places where these segments intersect with the smooth lines of the arcs. Connect the resulting points in a straight line with the expansion points on the lateral lines of the wedge G and G1.
- In the places where the addition of year G and G1 begins, the resulting angles must be rounded with smooth lines.
Floor-length skirt - pattern:
- Set aside 30 cm from the hip line (depending on the model).
- We draw horizontal lines from the intended point.
- We divide the front and back parts of the skirt in half, and again draw horizontal lines along the entire fabric.
- We transfer the darts of the product along the intended lines. We ended up with 4 wedges, 2 of which are on the front of the skirt and the remaining 2 on the back.
- We set aside 20 cm along the lower edge of each wedge on the right and left of the material, thereby forming the flare of our future outfit.
- Draw out and slightly round the bottom of the wedges.
- We take each wedge of the product from the pattern separately onto tracing paper.
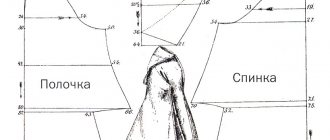
In our pattern we received the following details:
- The front part is 1 element with a fold.
- The middle part of the back panel consists of 2 elements.
- The side part of the rear panel consists of 2 elements.
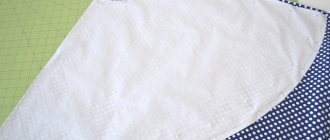
Important! To correctly and economically cut a godet skirt according to the pattern, you need to fold the fabric in half, ensuring that the edges meet inside the panel. The front part of the product will be located along the fold.
Who is the model suitable for?
The godet skirt suits almost any woman. And for women with full hips, this model is just a godsend. The top emphasizes the figure without excess volume, and the flared bottom balances the silhouette, making it visually slimmer and elongated.
It should be taken into account that for obese women the maxi length is recommended and when choosing fabric you should avoid materials with glitter or large floral prints.
What to combine with
Godet models have proven themselves perfectly in office style clothing in combination with classic blouses, turtlenecks and jackets. In a casual style, a godet skirt can be combined with knitted tops, jumpers, and knitted cardigans. This model fits perfectly into the style of rockers in combination with a leather biker jacket. The upper part of the ensemble should not be too overloaded with finishing elements.
One indispensable condition necessary to create a harmonious image is that a year skirt, regardless of the length, requires shoes with heels, from medium to high. Otherwise, all her charm may be nullified.
For evening dresses, the floor-length godet style will be the most suitable option to emphasize the femininity gifted by nature. Evening models with a small train look elegant. Evening styles go well with strapless tops or corsets. In this case, the ensemble should be complemented with a fur or silk cape, stola, and a long flared cloak.
Cutting an eight-piece skirt
If you have already downloaded the eight-piece pattern, then you already know that it consists of only two parts: the wedge and the belt. It is clear that we will cut eight wedges, and the belt consists of four parts.
At the same time, the belt for the eight-piece can be cut into a rectangle, as in a straight skirt. The advantage of this pattern is its curve, which exactly follows the curves of the body and the top of the skirt. A rectangle will be easier to process. Choose your own processing.
To pattern an eight-piece skirt, like all other godet skirts of this type, you need to buy soft, elastic, well-draped fabrics. In terms of fit to the figure, such models are very similar to bias skirts.
The pattern is made without seam allowances; we cut them narrow, no more than the width of the sewing machine foot.
Features of wedge construction
In order to create a simple pattern for a year skirt, you do not need special skills or equipment.
Measurements
must be taken:
- Waist circumference - measured at the narrowest point of the body.
- Hip circumference - along the protruding parts of the hips.
- Hip height is the distance from the waist to the hip. It is more convenient to tie a thread around the waist and hips and measure the distance between them.
- The length of the product is from the waist to the expected hem.
- Height - at what distance from the hip the flare begins.
- The width of the skirt at the hem.
Godet skirt pattern 6 wedges
Now we will sew a 100 cm long godet skirt. For this we took 2 meters of fabric. But first we need to carve out:
- 1 part - 2 pcs.
- Part 2 – 2 pcs.
- 3rd part - 2 pcs.
- 4 part - 2 pcs.
The very first detail will be the belt for our future skirt - the width of the belt is equal to the length of the waist + 3 cm for the zipper. The width of the belt, taking into account all the allowances, is 7 cm, and when finished it will be 3.5 cm.
Technique for sewing a godet skirt with 6 wedges:
- We sweep and grind all the wedges of the product along the longitudinal edges, with the exception of the central seam on the back of the panel.
- We process seam allowances using an overlocker.
- We sew a hidden zipper into the back section of the skirt.
- We tuck and then sew the bottom of our skirt on a sewing machine. To do this, you can use the manual method of laying a blind stitch or finishing the edge with a zigzag stitch.
Important! The last option is only suitable for non-flowing fabric.
- We sew the skirt belt with a non-woven layer onto the upper part of the product (waist line).
- Sew a loop on the zipper allowance.
- Parallel to the eyelets, sew on a decorative button to match the product, and then manually close the top seam allowance.
Important! The pattern of a godet skirt for obese women is made according to the master class described above, only without a belt - the upper edge of the product is processed with a non-woven strip on the inside, and the edge is processed using an overlock method.
Cutting a year skirt for a girl
We are cutting two central and four side parts of the skirt panels. When cutting from fabrics without lint and pattern, the parts can be laid as they are shown in the pattern - back and forth. This will save fabric.
The pattern of a skirt for a girl was made with an increase of 1.5 cm to the sections, 2.5 cm was added to the top section, and 2 cm to the bottom.
When sewing on an overlocker, the pattern cuts should be reduced to the stitch width of your equipment. When using a regular sewing machine, allowances can also be reduced to 1 cm. You do these operations yourself.
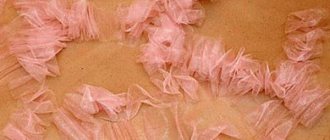
A girl's godet skirt can be trimmed at the bottom with fringe, summer or braid. It is allowed to attach ribbons to panels, as well as embroidery and placement of other decorative elements.