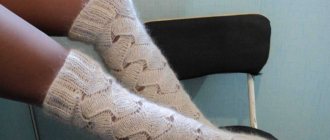
To add details with national flavor to your wardrobe, we advise all craftswomen to knit a hat with knitting needles. This hat is not like the models we are used to due to its unusual cylindrical shape and flat top.
If you add a winter pattern to the hat, then you get an almost designer headdress that you won’t find in a regular store. The exclusivity of this product is worth a lot.
Therefore, everyone who wants to have an extraordinary hat can follow our master class to gain new experience in knitting.
Let's look at the description of working on a women's winter hat with knitting needles
To knit a hat for women you will need:
- 100 g soft blue and 100 g light gray acrylic wool yarn;
- knitting needles No. 6;
- set of double needles No. 6;
- thick needle and safety pins;
- waste thread in a contrasting color.
Patterns shown in the photo and which will be used in the work:
- Knit stitch (circular knitting): knit all stitches.
- Purl stitch: front rows? purl loops, purl loops? facial
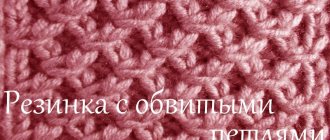
- “Braids”: according to the diagram, which shows only the front rows; knit in purl rows according to the pattern.
- We use yarn in 5 folds? 3 threads of light gray and 2 light blue. The knitting density is calculated as follows: multiply the number of loops of the braid pattern by the number of rows, knit a fragment of 10 by 10 cm, knit loops in the same way.
If everything is clear with the description and materials, then you can move on to the step-by-step guide on how to make a Kubanka hat with your own hands.
First we need to knit the crown of our future hat. The diagram of this part of the product is as follows:
- Using a waste thread of a contrasting color, we put 31 stitches on the knitting needles and knit 1-2 rows in stockinette stitch.
- Next, we knit with yarn in 5 folds, as indicated in the description, leaving 80-90 cm at the beginning of knitting so that at the end of the work a seam can be made.
- Starting row? edge loop, 7 purl, 2 knit, 2 purl, 18 knit, edge loop.
Then knit according to the pattern, starting from row 1. The total length of the part is 118 cm. There is no need to cut the working thread.
We unravel the initial rows made with waste yarn and sew the crown piece into a ring using a knitted stitch “loop to loop”, left at the beginning of knitting with a tail of yarn.
Let's move on to knitting with patterns for the crown of the headdress:
- Along the upper edge of the crown, we cast on 60 loops on stocking needles, knitting 1 loop from each braid. Distribute 15 stitches on each needle and knit 3 rows in stockinette stitch.
- In the 4th row do we perform decreases? * Knit 3 stitches, knit 2 stitches together ** from * to ** repeat until the end of the row. We knit rows 5 and 6 without decreasing.
- Row 7? knit * 3 knit stitches, knit 2 knit stitches together ** from * to ** repeat until the end of the row. We knit rows 8 and 9 without decreasing.
- Row 10? knit * 1 knit stitch, knit 2 knit stitches together ** from * to ** repeat until the end of the row. On the remaining 10 loops, knit 2 more rows without decreasing.
- We cut the working thread, leaving 8-10 cm at the end. We remove the open loops on it and pull it tightly. Carefully fasten the thread to the wrong side of the product.
This is interesting: How to make a paper basket with your own hands
Let’s look at the creation of the “Snowflake” pattern, popular among needlewomen.
We suggest you decorate your hat with a three-dimensional “Snowflake” pattern. In this headdress, any woman will feel like a real Kuban Snow Maiden. The diagram can be seen in the photo below.
We knit a decorative pattern:
Rows 1-14? * knit 1 purl loop, repeat, 1 purl **, from * to ** repeat 5 more times.
Row 15? * we knit 1 purl loop, perform rapport, but instead of 2 loops knitted together with a tilt to the right, knit: 2 purl, then 1 purl**, from * to ** repeat 5 more times.
16-33 row? * 1 purl, repeat, 2 purl **, from * repeat 5 more times.
Row 34? Purl all the loops (do not perform 2 loops, knit together in the center of the snowflake). You should have 138 stitches on your knitting needles.
Row 35? We knit all the loops purlwise.
Row 35-36? We knit all the loops with facial stitches. As a result, you may end up with a very unusual women's winter hat. The finished sample can be seen at the end of the master class.
Video master classes on the topic of the article
To fully understand our lesson, we suggest you watch videos in which more experienced needlewomen show the complete process of knitting a hat. Good luck and inspiration in your creativity!
Neskuchny site
Learning to knit a “kubanka” hat
Knitted (knitted or crocheted) hats are cute, comfortable and inexpensive, so they are very popular.
Unfortunately, there are cases when common models of hats do not suit a particular appearance due to the shape of the face or head.
Usually the owners of such “complex” faces and heads are aware of their peculiarities and conclude with despair: “Knitted hats don’t suit me.”
There is only one answer to such a categorical conclusion: you simply have not yet found your style that will suit you.
The “kubanka” hat (or “tablet”) is one of those hats that transforms even those on whom other models of hats sometimes don’t “fit” very well. Is it possible to knit such a hat with knitting needles?
You need two numbers of knitting needles: 2.5 (for the elastic) and 3.5 (for the main fabric).
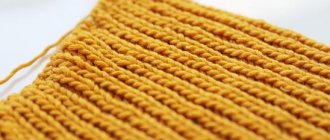
Starting to knit a hat: garter stitch, rib stitch, garter stitch, stockinette stitch.
Next, we switch to knitting needles No. 3.5 and regular stockinette stitch (knit rows - all knit stitches, purl rows - purl stitches).
At the required height we form a “roller”, which allows the cap to maintain its shape . It is made using purl stitch and its height is about 3 centimeters. After this, we knit the crown as follows: two rows of the front stitch (the first row is the front loops, the second is the purl stitches).
This is interesting: What is eyebrow micropigmentation?
Of course, if you knit a hat from thinner or thicker threads, with different knitting needles and in a different size, you will have to make your own calculations and clarify the number of loops to cast on and the features of knitting the crown. However, we hope we were able to explain the basic principles.
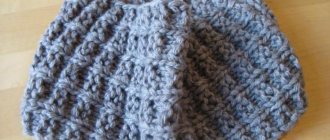
Double hat-cup “Cinnamon”
- CUBE HAT “CINNAMON”
- with inner knitted cap-lining
- Required:
- Yarn Trinity "Alice". Composition: 50% wool, 50% acrylic. Thread thickness: 300 m x 100 g. Color: “Chocolate (0410)”. For knitting in two threads, consumption: main (upper) cap - 110 g + inner cap-lining in one thread - 50 g.
- Yarn for the inner cap-lining Semenovskaya “Souffle”. Composition: 100% acrylic. Thread thickness: 292 m x 100 g. Color: to choose from. Consumption: 50 g.
- Circular knitting needles No. 3.5 and 3.0
- Hook No. 2.75
- Fishing line (crossbar with 1 vein) length. OK. 60 cm
- Supermoment glue
- Fixer for textile cords – 1 pc.
- Scissors
- Needle
Knitting patterns
Facial surface: in faces. R. – face p., in purl. R. – p.p.
Purl stitch: in knit stitch. R. – purl, in purl. r – persons. P.
Basic pattern: “horizontal rib”: alternating blocks of stockinette stitch and purl stitch
Double hollow elastic band: * faces.p. knit knit, p. remove, thread at work*. Repeat from * to * in each row.
Hook. Conventions.
VP - air p.
Connection art. = half double crochet
- RLS - single crochet
- Description of work
- Using a crochet yarn of the main color in two threads, pick up a chain of 6 VPs, close it in a circle and knit the bottom of the cap RLS according to pattern No. 1 until the diameter reaches 18 cm.
- Scheme No. 1 “Bottom of the cap”
- Knit the next row in a crawfish step.
Next row, knit sc behind the back wall of the loop of the previous row, at the same time knit a fishing line. Secure the required circumference of the fishing line with glue.
- Rows 1-6: purl stitch
- Rows 7-12: stockinette stitch
- Repeat alternating stripes of purl and stockinette stitch only 3 times from the beginning of knitting = 36 rows
- Rows 37-42: purl stitch
- Next, continue knitting the bottom elastic band with a double hollow elastic band.
After 4 cm of the height of the double hollow elastic band, close all the stitches at the same time using a “machine” method.
Technique for closing a paragraph in video MK
- Inner cap-lining
- If desired, you can knit in the round or in rotating rows
in persons r.: chrome, *5 persons, 2 vm. purl*, chrome
in purl r.: chrome, *4 persons, 2 vm. purl*, chrome
When knitting in a circle, respectively, all rows are knitted. p., decrease - p.p.
continue knitting with a similar step of decreases.
In the last two rows, knit the entire row *2 p.vm. according to the pattern of the current row*, pull the remaining 6-8 stitches on the knitting needles with a working thread and secure along the wrong side of the inner cap.
This is interesting: Which sneakers are best for running?
Assembly
When knitting in rotating rows: sew the inner cap-lining with a vertical knitted seam along the back side, separately sew the main outer cap in the same way.
Step-by-step instructions for crocheting a kubanka
Beginners always make their first models according to the instructions. Materials and descriptions are collected very clearly and accurately for each model. The shape of the kubanka is very similar to a barrel.
It has practically two parts:
- The first is an elastic band and a base (equal in diameter).
- The second flat cap is the crown of the cap. This shape is obtained due to the sharp decrease in loops along the top of the head. A flat crown and a very sharp transition from the base make this model stand out from numerous hats.
- The most interesting thing is that you can knit it from the top to the top. You can even knit two elements separately (top crown and base) and simply sew them together.
Important! The sharp transition and border between the crown and the base of the hat makes single crochets knitted behind the back wall or the last row of the bottom to make a “crawfish step” .
How to make the first loops on a hook? For newbies:
Set of crochet loops
How to crochet?
First crochet chain
Popcorn pattern
This Kubanka can compete for the title of the best model of this category on the social network. The highlight of the lovely raised pattern is the popcorn pattern.
Very common for blankets and scarves with sweaters . Due to the height of each grain of the pattern, knitting is quick.
To work you will need:
- yarn 150 m/100 g thick;
- hook No. 5.
Scheme 1 for Kubanka
The model consists of a bottom and a crown; work begins from the crown . Let's look at the stages of work step by step. A flat bottom is made according to the diagram. Everything is very simple, the rows with additions are visible.
The whole pattern consists of circles of double crochets. Each row is lifted using three air loops. The seam turns out to be invisible. For a size of 58 cm, you need to knit 18 cm in diameter of such a bottom. It turned out to be approximately 6 rows.
After completing the bottom, you need to knit one row with the “crawfish step ” pattern. This way the hat will have a nice and noticeable border.
Scheme "crawfish step"
Now move on to the crown. The crown is knitted with a popcorn pattern. The diagram below corresponds to the pattern.
Popcorn pattern diagram
The height of the crown according to the popcorn pattern should be about 12 cm. Next, there is a border again and it will help create the “crawfish step” pattern.
The model is ready. You can try it on. If desired, you can decorate the product with a spectacular brooch.
Volumetric pattern
A lovely model with a pattern across the canvas makes the model more feminine, and delicate colors add to its charm. This model is suitable for both girls and fashionistas.
To work you will need:
- pink yarn 200 g;
- hook number 4.
The pattern for knitting the top circle can be taken from the previous model or knitted a little more difficult (pattern below).
Scheme for the “bottom” of the Kubanka
The fabric of the cap is made almost entirely with single crochets. Knitting them is simple and you can quickly get a new hat. First you need to knit the bottom of the hat. We knit according to the given pattern from the center.
For a size of 58 cm, you need to knit a diameter of 18 cm according to the pattern. Then switch to rows without additions or decreases - this is the crown of the hat. It accounts for approximately 12 cm, but you can add it at your discretion. In order for the product to be closer to the head, you need to make two rows in the lower third of the crown with decreases of 8 loops.
Designations: sbn (single crochet), 2 ch. (2 air loops).
For the finished product, you need to make three rows with cones on top using the following technology:
- two air loops for lifting;
- half double crochet over the next stitch of the bottom row;
- *two air loops;
- tie a lush column of 7 loops into the gap between the lifting loops and the half double crochet;
- half double crochet through two loops (into the third). Repeat from * (with a slight difference, the lush columns will now not be in the gap, but around the half double crochet).
Star pattern
An elegant hat for more mature women. It looks very neat and it is very difficult to distinguish it from a factory product. Unless there is a label. The combination of dark gray and white yarn emphasizes the important elements of the Kubanka hat - its sides and lovely “stars”.
Gray and white kubanka with a star pattern
To work you will need:
- white and gray yarn;
- hook number 6.
Scheme 3 for Kubanka
The hat is knitted according to the patterns from the top of the head. First you need to knit the beginning of the center of the pattern. Then gradually expand. The entire fabric consists of single crochets. Knit and measure with a ruler. You should get a circle with a diameter of 18 cm.
The bottom is connected and then we move on to the crown or base of the cap. To do this, whatever circle the pattern stops on, knit without decreasing or increasing. You need to knit 14 cm. Finish the fabric. For a tighter fit, you can decrease 6 stitches twice in the last rows.
The base of the hat is ready and then you can move on to the decorations. Everything that is white on top is decoration and the “stars” are knitted separately. Then they are sewn on. The strips of white yarn are simply single crochets that go behind the stitches of the fabric.
“Stars”: knit a strip according to the pattern from the diagram; it contains lush columns, from which such attractive elements are made.
Just like the single crochets used to make the border, you need to create a pattern with lush columns along the top border of the cap. Clinging to the loops of the fabric, you need to make an even row in lush columns. The hat is ready and you can admire the finished product.
Detailed description of the Kubanka hat, knitted and crocheted
Winter hat as a fashion accessory
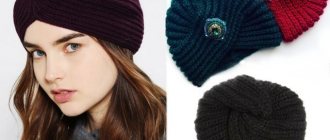
Recently, knitted hats have become not only practical things, but also acquired the full status of a fashion accessory. It is necessary to choose a headdress as carefully as choosing a dress for receiving guests. Newfangled trends indicate that hats should be bright and catchy, at the same time suitable for any type of outerwear and be quite warm.
When making or buying another winter hat, you should remember: everything is important. The color of the item, material, cut and style - every detail has its own meaning. Basically, all winter hats belong to the casual style - everyday life and everyday life . Fashion 2018 suggests adding brightness and uniqueness to headdresses.
The peak of fashion this year is urban style winter hats. They combine classic design, originality of materials used and unique decoration elements.
Kubanks knitted or crocheted will also add originality to their owners. Such hats are unique in that they look equally good on any head, completely cover the ears, forehead and back of the head, while providing excellent warmth.
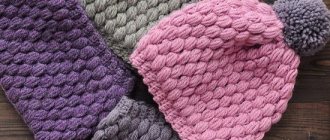
There are more voluminous models - due to additional relief (braids, aranas, diamonds). You can wear them as your imagination dictates - with a turn up or in the usual straightened form. The hats will suit any face shape and look equally good in different shades.
Kubanka will create a comfortable and stylish look, especially for those who prefer to wear natural fur coats, sheepskin coats, and classic-cut coats in winter. For such outerwear options, it is preferable to choose a dress in a restrained color, for example, gray, white or beige.
Master classes on knitting kubanok
There are accessory patterns for any type of knitting, so knitting a hat with knitting needles or crochet is up to the craftswoman to choose based on her personal skills and experience. All sorts of patterns - braids, aranas, weaves - will add originality to the product.
How to knit a tunic for a girl
Classic option for knitting needles
A great option for cold winters. At the same time, knitted kubankas can be decorated with any pattern. The fleece lining provides additional warmth to the product. For knitting you will need:
- knitting needles (choose the size of the knitting needles depending on the thickness of the yarn);
- 200 g of yarn.
What's good about this model? Yes, because you can knit a hat with knitting needles from any yarn! Of course, it is not recommended to take the thinnest one. A combination of acrylic with wool (50 to 50) or other half connections is suitable.
The indicated numbers of loops are for an adult head with a medium-sized girth. It is better to take the knitting needles that are connected with fishing line. Cast on 75 stitches on the knitting needles, then knit 4 rows in garter stitch. The next stage of knitting is to focus not on the number of rows knitted, but on the height of the product. After 4 rows of the “shawl”, knit 17 centimeters with the front fabric.
The hat keeps its even shape thanks to a kind of roller. To knit it, you need to knit 5 rows (about 3 cm) in stockinette stitch. To prevent the product from getting pulled together in this place in the future, it is better to fasten the roller immediately: when switching to knitting with the front fabric, knit a loop on the knitting needle and a loop from the 1st row together.
The next step will be knitting the top of the hat - the crown. Knit 2 rows in satin stitch, then start decreasing. Experienced knitters recommend making the top of the kubanka from 5 wedges. From the total number of loops, subtract 2 edge loops, subtract 10 - the number of wedges multiplied by 2. Divide the resulting number in half, if there are any extra loops left, add them to the edge. Having made all the necessary calculations, proceed to decreases:
- Knit 3 loops together. The beginning of the 1st deduction row will have the following pattern: edge, 7 knit, together with the front 3 loops, 11 knit - so 4 times in a row, 3 knit, 7 knit with the edge;
- Reduce the front rows, knit the purl rows with purl loops. In this way, decrease in each row until the end of the wedge loops;
- Gather the loops with a crochet hook, pull the thread through them and carefully fasten to prevent the product from unraveling.
After this, start sewing the headdress. Depending on the choice of threads, you can make a hat for both cool weather and severe frosts by choosing thick wool or acrylic yarn.
Crochet lapel
For a kubanka, a lapel crocheted with lush columns is best suited. The lapel will be voluminous and airy and will retain heat. Adjust the size of the lapel depending on the size of the hat. The sequence of actions is as follows:
- Attach the thread from the wrong side, knitting it into a single crochet loop;
- knit 3 air loops - for lifting;
- count 3 loops from the hook and double crochet into the 3rd loop;
- knit 2 air loops again;
- make 3 yarn overs and pull the resulting volumetric column into the resulting loop;
- pull the knitted stitch into the 3rd loop of the product.
Master class on crocheting bear toys for beginners
Continue knitting according to the pattern, focusing on the required thickness. When working properly, the lush columns should be strictly on top of each other.
Two-tone headdress
Kubankas look advantageous when combining two or more colors. When working with this product, you should remember that purl stitch is knitting the front rows with purl stitches and vice versa. Knit stitch (knit stitch, circular knitting) - stitches are knitted with knit stitches. To work you need to take:
- 100 g of yarn in two colors (for example, blue and gray);
- knitting needles size 6;
- stocking needles of the same size;
- safety pins;
- thick needle;
- waste (auxiliary) thread of bright color.
It is advisable to use yarn in several folds . The gray thread is in three folds, and the blue thread is in two. Knitting the product begins with the crown of the future kubanka.
The main part of the product is knitted according to the following pattern: first, cast on 31 stitches on the knitting needles with waste thread, then knit 2 rows with the front fabric.
The next stage is to knit 80 cm with a two-color thread in five folds so that at the end of the work you can make another seam.
In this case, the initial row is one edge loop, then seven purl, two knit, two purl again, eighteen knit, finish with an edge loop.
The first rows made from the auxiliary thread must be unraveled and the crown piece must be sewn into a ring using the yarn left at the beginning of knitting using a knitted stitch (loop to loop). When the crown is ready, you can start knitting the top of the kubanka. To do this, cast on 60 stitches along the upper edge of the crown on stocking needles. From each loop you need to tie a pigtail . After that, scatter 15 stitches on each knitting needle and knit 3 rows with the front fabric.
Preparing for work
Before knitting a hat for a girl, you should choose the right yarn and tools, and also decide on the size. Correct calculations will help you create a headdress that will suit the owner.
Tools and materials
knit a kubanka hat with knitting needles only from fairly thick threads; this must be taken into account when purchasing. Thinner yarn will not be able to hold its shape. You can also achieve the desired density by knitting with threads in several layers.
The headdress should be knitted on knitting needles of a suitable size. The final choice of tool depends on the chosen model: if the product is knitted continuously, then you should take circular or stocking needles; a cap with a back seam can be made on regular straight lines.
The optimal thickness of knitting needles and hook is usually indicated on the labels for skeins of yarn
Taking measurements
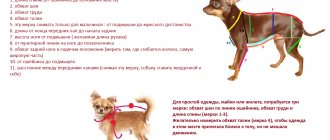
Handmade knitted hats are always unique. Each product is knitted to an individual size, which differs from standard measurements. Even a slight difference in height and width can make a simple women's hat unwearable. That is why it is important to calculate the parameters of the future Kubanka before starting work:
- length of the side;
- crown height;
- bottom diameter.
The first measurement is easy to find out by stretching a measuring tape around your head. It is advisable to subtract 1-2 cm from the resulting figure, since women's hats knitted with knitting needles tend to stretch a little. A deliberate slight reduction in size allows the headgear to fit snugly to the head and provide reliable protection from cold air.
The height of the crown is calculated step by step. First, measure from ear to ear through the crown. The result obtained is divided in half and 3 cm is added - this is the planting depth. To make the cuban of optimal height, subtract 7 cm from the resulting figure.
To calculate the diameter of the bottom, you will have to remember metamathematical techniques. The previously measured head circumference is divided by 3.14 (Pi) and subtracted 1.5 cm - the result will correspond to the correct size.
The photo shows how to correctly measure head circumference
Test sample and calculations
Another important step before starting work on a knitted product is to create a small control fragment of the fabric. Knit a test piece, adhering to the pattern and description that were chosen for creating a cup hat with knitting needles.
The sides of the sample should be about 10 cm. Apply a ruler to the square and find out how many loops there are per 1 cm in width and height. Once you know the knitting density, you can calculate the number of loops in the cast-on row.
The test fragment must have a size of at least 10x10 cm
Knitted Kubanka hat: a product for women with diagrams, photos and video in photos
Knitted kubanka hat: a product for women with diagrams, photos and videos in photographs.
One of the most feminine models of hats is the Kubanka. Our fashion is changing rapidly, but there are things that are timeless. In this article we will reveal all the secrets and tell you the secrets of how to properly knit a hat with knitting needles to add femininity and elegance to the image.
Let's start simple
First, let's decide on the knitting technique:
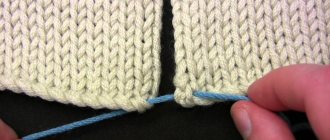
Let's get started. Use the yarn like this: 3 threads are pale blue, and 2 threads are white. We start our product from the height of the cap (crown). Using contrasting yarn, cast on 31 stitches and knit two rows in stockinette stitch. Now join the yarn and knit in 5 folds (3+2), do not forget to leave 80-90 mm for the seam at the beginning.
First row - knit an edge loop, then purl 7, knit 2, purl 2, knit 18 (+ edge loop). Repeat this pattern for 118 mm, no need to cut the yarn. When the fabric is ready, unravel the very first rows, which are knitted using a contrasting thread, and sew the piece into a ring (it is best to choose a knitted stitch for this product).
Crown of the headdress
After the crown, we move on to knitting the crown of the headdress. Along the upper edge of the knitted part, cast on 60 loops on the knitting needles and knit 1 loop from each braid. Now distribute 15 stitches onto each needle. Knit three rows in stockinette stitch.
On the fourth row, begin to smoothly decrease, knit 3 stitches, knit 2 stitches together and repeat until the end of the row. Do rows 5 and 6 without decreasing. Knit the 7th row as follows: knit 3, knit 2 stitches together and knit until the end of the row.
Knit rows 8 and 9 without decreasing.
Knit row 10 like this: 1 knit stitch, 2 knit stitches, knit until the end of the row. On the loops that remain (there should be 10), knit 2 rows without decreasing. Cut the thread and leave 9 cm. Now remove the remaining open loops and sew. Fasten and cut.
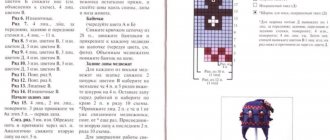
To make the hat seem more voluminous and textured, we suggest you decorate it with a pattern. We will show 2 patterns, you can choose any one you like.
Light snowflake
From rows 1 to 14 - knit 1 purl loop, then repeat (pattern attached) and again 1 purl stitch, repeat this five times. Row 15 - knit 1 purl loop, repeat, instead of 2 loops knitted one and tilted to the right side, knit 2 purl, 1 purl and repeat 5 times. Rows 16-33 - purl 1, repeat, purl 2 and repeat 5 times.
Row 34 - purl all the stitches, you should have 138 stitches. Rows 35-36 – knit.
Sloping stripes
For this pattern, you need to cast on a number of loops that are a multiple of 6 (+ 2 for edge stitches).
Row 1 - Purl 1, then cross 2 stitches to the right, cross 2 stitches to the left and repeat another purl. Row 2 - knit 1, purl 4 and knit 1 again.
3rd row - using a cross to the right, knit 2 loops, cross the next two loops to the left, then 1 purl, 2 loops cross to the left, 1 purl, then another purl.
Row 4 - knit 1 *, knit 1, purl 4, knit 1 * knit 1 and purl 4.
Row 5 - knit 1 knit stitch, then cross 2 stitches to the left, purl 1*, purl 1, cross 2 stitches to the right, cross 2 left, 1 purl * 1 purl. Row 6 - knit 1, knit 1*, knit 1, purl 4, knit 1*, knit 1, purl 3.
7th row - knit 2 loops with a cross to the left, then 1 purl* 1 purl, 2 loops cross to the right, 2 loops cross to the left, 1 purl* 1 purl, 2 loops cross to the right.
Row 8 - purl 2, knit 1, *knit 1, purl 4, knit 1*, knit 1 and purl 2.
Row 9 - knit 1 knit, 1 purl * 1 purl, cross two loops to the right, and then 2 to the left, 1 purl *, 1 purl, cross 2 loops to the right and complete row 1 knit. Row 10 - purl 3, knit 1*, knit 1, purl 4, knit 1* knit 1, purl 1.
Row 11 - knit 1 purl*, 1 purl, cross 2 loops to the right, cross 2 loops to the left, then make 1 purl*, 1 purl, cross 2 loops to the right, cross 2 loops to the left. Row 12 - purl 4, knit 1* then knit 1, purl 4, knit 1* knit 1.
The pattern is visible in the photo:
Next, if one fragment is not enough, repeat the entire scheme the first time. A wonderful attribute for women is ready!
Video on the topic of the article
Thematic selection of video lessons with descriptions:
You may also like
Beaded bag: master class with photo diagrams and video
18.05.2018
Anastasia Prozheva
Let's start embroidering with beads: what do you need to know?
Source: https://dtk-m.ru/stati/shapka-kubanka-spicami-izdelie-dlya-zhenshhin-so-sxemami-foto-i-video-v-foto/
Simple knitting pattern for a hat
This is the most optimal option for crocheting a Kubanka hat, as it is simple and can be learned very quickly. For this headdress you need approximately 100 grams of yarn and a hook number 4. The main size range for such hats is from 55 to 58.
Before looking at diagrams on how to crochet a kubanka, you need to remember that such a hat is created from a bottom and a crown. A good kubanka requires a large pattern and the use of not very thick yarn.
The crochet pattern for the hat is as follows:
- Knitting begins from the bottom, the length of the product is 18 centimeters in 6 rows;
- Do one row without a yarn over, the next row with a fluffy yarn over, then with a yarn over and repeat the process again;
- Repeat row with double crochet;
- Then knit without it, then change the combination;
- Two double crochets and one double crochet go to the end of the row;
- Next, five double crochets and one double crochet are performed, repeating until the end of the row;
- The following rows are performed in the same manner with the finale in the form of the so-called “crawfish step”.
After you have knitted the bottom, you need to start knitting the crown. The length of this part is about 12 centimeters. For it, you must first knit a lush stitch and double crochet, and then a single crochet row will follow. Then you knit two single crochet stitches and one knit stitch.
All this should be done until the required dimensions are achieved. The length may vary depending on the customer's wishes.
Kubanka hat knitted with patterns detailed description
A handmade hat is a great opportunity to make a fashionable and unusual item yourself . It happens that you couldn’t find the right model in the store, then the ability to knit, sew and create beautiful products helps a lot.
It’s just wonderful when you have a favorite hobby, but if knitting, in addition to joy, also brings great benefits - doubly good!
The women's kubanochka hat, or as it is also called, papakha, or Cossack hat, is a model that has not lost popularity for decades.
You can sew this headdress from natural or faux fur, or you can knit it with knitting needles, or crochet it, and even without knitting needles at all - from fashionable plush thick yarn with ready-made loops.
There are a lot of patterns for this hat. For example, a Kuban hat, knitted with a pattern with oblique loops, looks very good.
Fortunately , now you don’t have to dig through magazines to find the right knitting pattern and pattern for yourself; you just need to go online and choose from a large number of options what will look amazing on you. In our article we will examine the topic of how to knit an interesting, fashionable and original women's hat with knitting needles with your own hands.
Cuban hat
The hats are knitted like this:
-tie 3 ch. First knit 8 tbsp. without a crochet. Depending on the thickness of the hook and yarn, there can be 6 or 7 of them.
-if the bottom is flat, knit in the round with increases: in the first row - two stitches in each loop of the previous row, in the second row - in every second, in the third - in every third and so on until the diameter is approximately 18cm. The circumference of this circle will be the size of the head. The required size is determined by the formula 2″pi″R (pi = 3.14, R is the radius of the bottom).
- then the hat is knitted downwards without increases of about 14 cm (determined individually. In order for the hat to fit snugly to the head, we make decreases in the last third of the fabric: evenly 8 loops in every second row 2 times.
The cones on the fabric are knitted like this: two v.p. lifting, half double crochet in the next. loop of the bottom row, * two air loops. Then into the gap formed between the two air.
Using lifting loops and a half double crochet, knit a lush column of five to seven loops; Skip two loops of the previous row and work a half double crochet into the third. Repeat from *.
Only now we knit a lush double crochet simply by wrapping it around the half double crochet we just knitted.
We knit the next row with single crochets (in each arch of two chain stitches that precede the fluffy stitch - three single crochets.) The second and third rows are also knitted with single crochets. Then there are bumps again.
If we knit the hat in the form of a cap, the diameter of the bottom will be approximately 11cm. Then we alternate alternately 1 row with an increase, one without an increase. But in any case, you need to try on the hat every time. There are only fundamental formulas, and each new product will make its own adjustments.
Interesting model? Share it with others:
Source: https://miryk.ru/vyazanie-zhenskie-modeli/golovnye-ubory-palantin-perchatki-noski/shapochka-kubanka.html
Hat - Kubanka
They asked me to knit a kubanka hat as a gift for March 8th. I like this particular shape, the color of the thread was also chosen together with the future owner of the hat. We will need: - NAKO ARCTIC yarn (40% wool, 60% acrylic, 100g/100m) - 2 skeins of gray and one skein of purple colors
- hook 5
We knit the bottom of the hat. Knit in a spiral, start with 3 air loops closed in a ring, six s/bn from the ring, then knit 2 s/bn from each s/bn - we get 12. Then we will evenly add 6 loops on each circle (circle rule ). My head circumference is 54 cm.
This means the diameter of the bottom should be 17 cm. This can be calculated using the formula for the circumference, which is equal to the product of Pi and the diameter. Accordingly, we find the diameter by dividing the circle by Pi. 54/3.14 = 17.2 cm. I advise you to divide by 3.14, and not approximately by three.
Otherwise, the cap may turn out to be wide.
With the bottom diameter I needed, the number of loops reached 78.
Now you need to make a rib so that you can continue knitting the hat down. I did this using a raised “concave” column. The hook is behind the work. The loop clings to the jumper between the posts (see.
photo), and then knitted with regular s/bn. In places where there were increases (where I previously knitted 2 chain stitches from one loop), I made one chain stitch between each chain stitch, otherwise the bottom would tighten and go in waves.