Preparing to knit a hat
If you want to start creating a winter hat, then you first need to select yarn and knitting needles. Yarn can be different: wool, half-wool, acrylic. As a rule, the best option is a mixed yarn: acrylic and wool.
After selecting the yarn, you need to learn how to knit a hat; patterns for such knitting are in the magazines “Verena” and “Sabrina”. Knitting needles can be wooden, steel, aluminum. For a beginner, it is most convenient to knit with steel knitting needles; they have no roughness, they do not bend or break.
Types of loops when knitting
When knitting hats, different types of loops are used. The most important of them are the front ones, that is, when the knitting needle is hooked under the front part of the loop and the thread is pulled through it. When knitting a purl stitch, the needle pries up the back piece to pull the thread through.
Actually, knitting consists of alternating knit and purl stitches. The most popular type of knitting, ribbed, involves alternating knit and purl stitches in one row. That is, this is one purl and one knit, then repeat. Two knits and two purls, three knits and three purls, and so on can alternate. If you are interested in how to finish a hat with knitting needles, there are diagrams in magazines.
Another common type of knitting is knit stitch, on one side only knit stitches are knitted. But the front surface differs in that the fabric may turn out uneven.
The so-called “garter stitch” is very popular, which usually guarantees an even knitted fabric. With this type of knitting, knit and purl stitches alternate in different rows. That is, one row is knitted with knit stitches, the other row with purl stitches, and so on constantly. This look is suitable not only for hats, but also for sweaters, vests, and scarves.
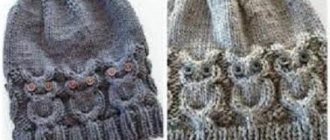
You can also knit a hat with braids; in this case, the rows of elastic cross regularly, and a beautiful pattern is obtained.
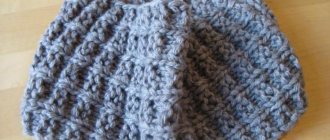
The simplest option for finishing the simplest model
For the most common model, I usually use the elementary principle of forming a part. You can finish the crown this way:
- Elementary - this is knitting the fabric of the product with an elastic band, 2 knits and 2 purls.
- Approaching the top, I begin to make cuts. First I purl 2 stitches together.
- Then I start knitting 2 loops together, 1 purl + 1 knit.
- When there are approximately 10-6 elements left, I close the row.
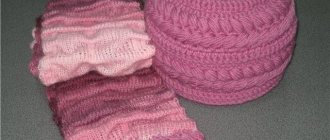
The stitching process creates an open ring of small diameter. Using this circle it is easy to sew on a pompom or other decorative elements. Can be left without decoration.
Knitting pattern
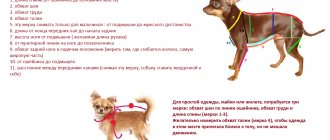
Before knitting a hat, the patterns for which are simple, you must first take measurements. This will be the volume of the head and its height from the ear to the top. We then knit a sample using the same yarn that will be used to create the main piece. It is small, measuring about ten by ten centimeters. Then the sample must be washed in warm water.
Then it is dried under natural conditions, and on its basis the loops are calculated to start knitting. You can now calculate exactly how many loops you will need to start working.
Knitting a hat on two knitting needles: a set of loops
To create a hat using two knitting needles you will need very little time. In addition, the product you create will be unique and exactly the right size for you or the person you are knitting for.
To make such a hat, you must find only one hundred grams of yarn, matching the needle number, a plastic needle with a wide eye (such a needle is usually sold complete with knitting needles).
After knitting the sample, we cast on the number of loops we need and begin knitting with an elastic band two by two or three by three. This elastic band will fit your head well. It consists of a uniform alternation of knit and purl stitches.
How to knit a hat
The hat is made in stockinette stitch using knitting needles by decreasing the stitches at the crown. In a cap with equilateral wedges, decreases at the crown are usually made through the row. Each wedge is reduced by 2 loops. Such decreases are called paired.
The number of rows of decreases is equal to the number of loops in one wedge reduced by 2. For example, for a hat with four wedges on 96 loops, you need to knit 22 rows of decreases:
22 rub. = 96 p. / 4 - 2
It remains to calculate the number of rows that need to be knitted before the decreases begin. To do this, subtract the number of rows of decreases from the total number of rows of the cap.
For those who find it difficult to carry out calculations on their own, we suggest using our online calculator for calculating loops and rows for a knitted hat.
Loops on a hat with symmetrical wedges can be started in two ways:
1. Performing paired decreases on 4 or 5 loops.
2. Performing paired decreases with a central loop in the middle.
Our mini-guide will help you easily perform decreases in one and another way.
The top of the cap can be connected with any number of wedges - 2, 3, 4, 5 or 6. I will start the description with a cap, the top of which is launched by two wedges. The pattern for making decreases is very simple - the estimated number of loops in the cap is divided by 2. The number of rows of decreases is equal to the number of loops in the 1st wedge - 2.
Simple hat with two knitting needles
So, the elastic band is knitted, and we are already starting to think about how to finish knitting the hat. You can simply continue knitting with stockinette stitch after an elastic band 3-4 centimeters high, and eventually make a rectangle with a height of twelve to fifteen centimeters, and then pull the edge of the fabric together with thread. Then you just have to connect the sides of the rectangle with a needle. It must be connected with a kettel seam. The finished product can be washed, dried and steamed with an iron. And now it’s clear how to knit a simple hat.
Knitted hat for baby
The baby's hat is knitted using stockinette stitch. The simple model ends with a crown closed by four wedges. The decreases are made on three loops with a central loop in the form of a decorative braid.
Hat size: for head circumference – 35 cm. Hat height: 17 cm.
Materials:
- Yarn Valeria di Roma “Merino Top” - 60% merino wool, 40% acrylic (125 m - 100 g) - 1 skein.
- Stocking needles – No. 5.5 mm.
Knitting density: 14 loops = 10 cm, 19 rows = 10 cm.
Scheme:
- Garter stitch – row 1 – purl stitches, row 2 – knit stitches.
- Knit stitch – all rows of knit stitches.
- Decrease loops with a decorative loop in the center. (Link).
Completing of the work:
Cast on 49 stitches on needles No. 5.5. Connect the cast-on stitches into a circle. To prevent a step from forming at the junction, you need to knit the first and last loops together with a knit stitch. There should be 48 stitches left on the needles.
Knit 5 rows in garter stitch. We start with the purl row.
To prevent a step from forming when knitting in stockinette stitch:
- in the purl row (purl stitches), remove the last loop unknitted.
- lift the broach onto the left knitting needle.
- Return the removed loop to the left needle.
- knit a loop together with a purl stitch.
Knit 12 rows using stockinette stitch.
Performing decreases:
- We determine the number of loops in one wedge N = 48p./4 = 12p.
- We determine the number of rows of decreases ( N – 2 ) = 12 – 2 = 10 rows.
1st row – * from 3 loops, knit one loop, 9 facial loops *. From * to * repeat 4 times.
Row 2 and all subsequent even rows are knitted without decreasing.
3rd row – * from 3 loops knit one loop, 7 facial loops *. From * to * repeat 4 times.
Row 5 – * from 3 loops, knit one loop, 5 knit loops *. From * to * repeat 4 times.
Row 7 – * from 3 loops, knit one loop, 3 knit loops *. From * to * repeat 4 times.
Row 9 – * from 3 loops, knit one loop, 1 knit stitch*. From * to * repeat 4 times.
Bind off the remaining stitches using a needle. Remove the ends of the yarn. Carry out wet-heat treatment.
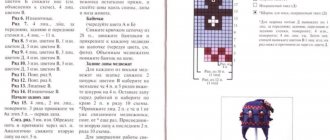
A more complex version of the hat
If you want your hat to fit better on your head, you need to start shaping it after knitting the initial rows with an elastic band. You need to know exactly how to finish the top of the hat with knitting needles.
In the last row of elastic you need to somehow mark every twelfth loop, starting from the sixth loop. You can attach colored threads to these places. Now in every second row the loops marked with such threads are knitted together with the adjacent ones together with the front one. In the end, you need to decide how to finish the hat with knitting needles. As a result, you should have ten loops left on your knitting needles; you will pull them together with thread, leaving a long end. To connect the edges, you need to insert the same thread with which you knitted the product into a needle with a thick eye, and sew them together with a quilt stitch. You cannot use sewing threads, as they will prevent the hat from stretching. Then you will learn how to finish knitting a hat.
Video lesson:
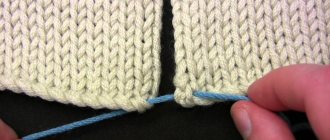
Completing loops when knitting
Let's look at the technique of closing loops on a sample knitted with a 1x1 elastic band. Closing the loops behind the front loom will allow the elastic to remain elastic and not pinch at the edge. Two loops are knitted together with a front loop behind the front wall. The resulting loop is removed from the knitting needle and put back on the left knitting needle. The entire row is knitted in this way.
This method is convenient for closing loops, for example, on the sleeves of a sweater, which end with an elastic band. The bottom of the product can be processed in the same way: two loops are constantly knitted together with a front loop. When there is only one loop left at the end, you can hide it with a hook.
In this way, it turns out to beautifully complete the work, completely preserving the properties of a knitted elastic band. This method can be suitable for any items that are finished with an elastic band. The loops close securely and cannot come loose later.
Making a pompom
Recently, hats with pompoms have come into fashion. A pom pom is an elegant solution to the question of how to finish the top of a hat with knitting needles.
To make a pompom, you will need two circles of cardboard, they are cut out with scissors. A hole is made in the middle of the circle.
The pom pom may turn out curly, and for this you are better off using yarn obtained from unraveling former knitted items. This will be a beautiful option for finishing a hat with knitting needles.
The yarn is wound onto cardboard circles (many layers need to be wound). After winding, the yarn is cut in the middle of the circle and tied to create a pompom. You also need to attach a thread 25-30 centimeters long to it. What is the easiest way to finish knitting a hat? Pompom!
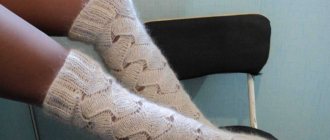
Knitting on five needles
It must be said that a hat knitted with five knitting needles will turn out more elegant than a hat knitted with two. It is perfect for lovers of seamless things. And it’s easier to knit because you don’t have to think about how to make a beautiful seam. Of course, you still have to rack your brains about how to finish the stocking cap with knitting needles. But everything will look more elegant. You also need to decide on the answer to the question of how to finish knitting a hat.
To work you will need five knitting needles with open ends. At first, everything will seem very difficult. But over time, you will start to like knitting on five needles, most likely you will start knitting absolutely everything with them.
To do everything right, you need to know not only how to start, but also how to finish a hat with knitting needles. First, we cast on forty loops on two of them, distribute them onto four knitting needles so that each has ten loops, and knit them with a fifth knitting needle. It is necessary to ensure that so-called tracks, that is, holes, do not form between the spokes.
So we knit to a height of twenty to twenty-five centimeters, and then we begin to decrease the loops. In every second row we knit two knit stitches together every ten stitches. Then ten loops remain, which we transfer to one knitting needle and tighten with thread. That's all. You can also attach a pompom on top. And then you won’t have to think about what a hat is with knitting needles or how to finish knitting it.
You can also do it on three needles, knitting rows of the fourth, but not everyone likes this pattern. If you think about how a hat is knitted with knitting needles and how to finish it, you can come to the conclusion that knitting with five knitting needles is still more convenient.
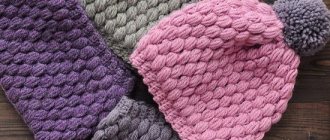
Double-sided beanie hat knitted
The author of this project is Katie Schumm from Oregon in the USA. The double-sided cap in stockinette stitch is called by the craftswoman a stellar project - a miracle from one skein. An amazingly soft and comfortable hat made of yak wool does not spoil your hair and keeps you warm in the cold.
The design, which is not difficult to execute, is carefully thought out and is ideal to be worn on both the right and left sides. A unisex hat is an ideal gift for both men and women.
The hat knitting pattern is so simple that it is suitable for beginner knitters who only know how to knit flat hats.
Hat size: 51 cm for head circumference – 56 – 58 cm.
Materials:
- Yarn Lang Yarns “Yak” – 50% yak wool, 50% – (130 m – 50 g) – 1 skein.
- Circular knitting needles – No. 5 mm.
- Stocking needles – No. 5 mm.
Knitting density: 16 loops = 10 cm, 24 rows = 10 cm.
Scheme:
- Face loops.
- Purl loops.
- Decrease 2 stitches with a slant to the right.
- Decrease 2 stitches with a slant to the left.
Completing of the work:
Using a crochet hook, cast on 80 stitches on circular needles No. 5. Connect the work so that the cast-on loops do not twist. Place a marker at the beginning of the row.
Rows 1 – 29 – *13 knit stitches, 3 purl stitches. Repeat 5 times.
Rows 30 – 50 – all knit stitches.