Where to place the bow on the dress?
A decoration made of a satin ribbon in the form of a lush knot has not lost its position for many centuries, and during this time the bow has decorated shoes, bags, skirts, gloves and even underwear. But most often it can be seen on dresses and this is not surprising, because the bow looks elegant both in everyday and evening wear.
Now beautiful bows are flashing on fashion catwalks during shows of such famous designers as Chanel, Oscar de la Renta and Vivienne Westwood. They are made from different fabrics: organza, guipure, silk and satin, but they place the part in any place you like:
- neckline;
- sleeves;
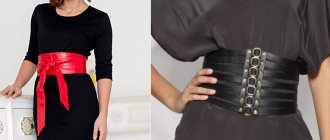
- belt line;
- dress straps;
- back;
- neck and shoulders.
The ideal place is selected based on the width of the braid. So, if it is already 5 cm, then it is placed on the shoulders and chest. Thick bows look more organic on a belt, so they decorate belts or use them as an independent decorative element. This season, designers recommend tying a bow on coats, wide shorts, long dresses and shirts. The form of dyeing can also vary from a neat butterfly to stylish asymmetry.
https://youtu.be/https://www.youtube.com/watch?v=_KBCb-Nkjo0
_
Selecting a bow
There are not just many designs for beautiful bows, but also variations in how to arrange it and what material to choose. And first you need to decide on these criteria.
Here are several decoration options for your dress:
- A bow around the neck will help hide age-related changes and outline the swan neck. Looks great with formal dresses.
- A bow on the shoulder is an extraordinary decorative element for your look. It is best to make it larger and more voluminous.
- A bow at the waist is the most versatile option, which can also be placed on the front or back. The front bow option is more suitable for young girls or young women. But remember that the location at the waist is more suitable for slender girls, as it can unattractively emphasize the folds of a full figure.
Advice! For plus size girls, the option of tying a bow above the waist is suitable. In combination with a loose-fitting dress, it will hide all imperfections and remove a couple of extra centimeters. This applies to “empire” dresses and styles in the Greek style. In addition, a belt at a high waistline will emphasize the bust.
- The bow on the hips looks very organic and emphasizes their beauty. This belt is more suitable for tall girls.
- A bow at the back will add grace to slender girls with impeccable posture. This option complements very flirtatiously dresses with an open back, where the neckline playfully ends with a bow. The front of such a dress should be closed, otherwise the bow will become an unnecessarily pretentious element.
The bow is tied on the dress using a ribbon. You can choose thick ribbons made of satin and chiffon. Bows made of satin or silk fabric look gorgeous. However, remember that they will hold their shape a little worse than dense materials. The length and width can be different, pay attention to the sash belt - it is ideal for emphasizing the waist and an extraordinary bow. If desired, the ribbon can be decorated with rhinestones, beads or sequins.
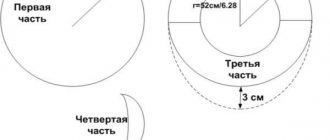
We tie a beautiful bow on a dress - step-by-step diagram
For a bow on the neck, you can even use a thin scarf or scarf. You need to wrap it completely around your neck once and then tie it using the technique you like.
Note! The fabric of the bow ribbon should match the material of your dress.
We select an option from the color palette depending on the dress; you can choose a bow to match or play with contrast. All you have to do is learn how to design it step by step, and choose the most suitable option for your image.
Bow to match the dress and in contrast
https://youtu.be/https://www.youtube.com/watch?v=gr61rsIJxrg
_
How to beautifully tie a satin ribbon bow on a dress?
Satin ribbon is sold in almost any craft store, but keep in mind that it is not suitable for a bow in which the ears must keep their shape. Most often it is used to create a beautiful and flowing decor. In addition, the edges of the fabric must be carefully burned with a match so that the ends do not fray.
The easiest way to tie a regular bow on a belt. To do this, make a knot, form two loops and cross them with each other. Then thread one of the loops into the hole formed and tighten the braid. There is another method for creating a beautiful bow with your own hands.
- Make a knot.
- Form a loop and use the second fabric to wrap and thread through the knot.
- Tighten the satin ribbon to finish the bow.
Advice! To keep the bow from wrapping and to be stronger, tie first a pioneer knot and then a classic bow.
How to tie a bow step by step
The edges of the bows do not necessarily have to be perfectly smooth, because in some cases an asymmetrical design looks very stylish.
Those who have mastered the classical technique can tie a bow with four loops. Take a long braid, make a regular bow, and from the hanging ends, form 2 more loops. Depending on the length of the ribbon, you can make a triple bow, but remember that the more petals, the more the product will sag. Therefore, try not to pile up knots.
You can make a double bow correctly using a needle and thread. Tie 2 regular bows and sew them together, you can also add corners. True, it should be admitted that the first method is much simpler, but bows made in this way can be sewn to a T-shirt, sleeves or the hem of a dress.
You don't have to tie a ribbon bow at all, you can even use a scarf. To do this, twist the fabric, wrap it around your waist several times and tie the ends.
How to sew a bow: 5 easy ways
Sewing a bow is an easy way to break up a monochrome look. A bright bow made of fabric or ribbons will add a unique twist to a formal jacket, knitted cardigan or casual blouse. Bows are often used as a decorative element in children's elegant dresses. Therefore, it is worth learning how to make this accessory yourself.
How to make a bow from a satin ribbon
The traditional and most elementary way to make a bow with your own hands is to tie a beautiful decorative ribbon crosswise, tie the knot with a couple of stitches and decorate the bow with a bead. But in fact, there are many more options for making bows, from the simplest to the intricate and spectacular.
What can you sew or make a bow from?
✽ narrow and wide satin, silk, cotton and velvet decorative ribbons;
✽lace braid, stitching;
✽ made of fabric: silk, batiste, lace, chiffon, velvet are best suited for bows;
✽cotton, linen, denim are also suitable for bows
Use beads, seed beads, rhinestones, and unusual buttons as decorative elements.
Bow made of wide decorative and lace ribbon
Lace ribbon detail approx. Place 20 cm (depending on the width of the ribbons) on the piece of decorative ribbon with the wrong side facing the front.
Fold the bow pieces in half with the lace facing in. Stitch the open edges 1 cm from the edge.
Press the seam and then press it open.
Turn the bow part right side out.
Place a basting stitch across the bow. Pull it off. Make a few turns and secure the thread.
Cover the center of the bow with a small piece of suitable fabric.
Decorative ribbon bow with satin braids
Decorative ribbon piece, approx. length. Fold 20 cm (depending on the width of the ribbons) in half with the right side inward.
Stitch the open edges 1 cm from the edge.
Press the seam and then press it open.
Turn the bow part right side out.
Place a basting stitch across the bow. Pull it off. Make a few turns and secure the thread.
Make two simple bows from satin braid. Fasten the middle with a few stitches or stitch it on a typewriter.
Place two satin ribbon bows on top of a decorative ribbon bow and sew them together.
Wrap the middle with a satin braid and sew a beautiful button or bead on top, piercing the bow right through with a needle. This way you will hold all the parts together.
Source and photo: dicaspramamae.com
DIY felt bow
Double bow made of decorative ribbon
Cut three strips from the finished tape.
Fold the two large pieces as shown in the photo.
Place basting stitches in the middle of each piece. Pull and secure the thread, thus forming bows.
Place a basting stitch in the middle of the short piece. Pull and secure the thread.
Connect all three parts of the bow as shown in the photo and sew.
The middle of the bow can be decorated with a bead or button.
Source and photo: 10marifet.org
DIY fish bow
How to sew a bow from fabric
To sew any of the bows, you will need small scraps of multi-colored fabrics.
Cut out a rectangular piece of the size you need, for example 20x10 cm with an allowance of 1 cm around the entire perimeter. The larger the part size, the larger the bow will be.
Fold the piece in half with the right sides facing in.
Stitch the piece together, leaving a small hole for turning it inside out.
Turn the bow piece right side out. Sew the open area by hand using a blind stitch.
Fold the finished bow piece like an accordion and fasten it with several stitches.
Wrap the middle with a strip cut from the same fabric or any decorative braid. If desired, you can decorate the bow with a beautiful button or bead.
Decorate the neckline with a bow
Large linen ribbon bow
You will need:
- Linen decorative tape
- Wire cutters
- Scissors for needlework
- Wire for needlework
Step 1
Roll the edge of the tape into a cylinder.
Step 2
Holding the resulting cylinder with two fingers of one hand, form a loop on one side with the other hand.
Step 3
Then form a loop of the same size on the other side.
Step 4
Repeat steps 2 and 3 until you have five loops on both sides.
Step 5
Pass the wire through the hole, as shown in the photo, and fasten it to the back of the bow.
Step 6
Cut the braid into a corner.
Step 7
Take the ribbon and thread it through the hole as shown in the photo. Secure with wire. Cut the ends of the wire.
Step 8
Align the length of the second ribbon and cut it at a corner.
Step 9
Straighten the loops and form a fluffy bow.
Source and photo: save-on-crafts.com
For details on assembling a large and fluffy bow from decorative braid, see the video MK:
Do-it-yourself half bow step by step
If you want to create something original, use the instructions and learn how to properly make a half-bow from fabric.
- Place the belt behind your back and around your waist so that the edges are again in front of you.
- Place one end of the fabric on top of the other and bring them inward in a smooth upward motion.
- Bend the top edge down along the outside and place it under the bottom sheet.
- Step back 10–15 cm from the intersection, make a fold and thread it into the knot.
By experimenting with different ribbons, belts, belts and scarves, you will diversify your wardrobe with your own hands and bring a touch of freshness and elegance to it.
Corrugated bow
Your bow will be perfect if you use a soft, slippery fabric to tie it. The belt should be of medium width and length.
Tying it is not as difficult as it seems at first glance:
- Lay out the entire length of the belt and form neat, uniform folds. To create a stylish corrugated effect, four folds will be enough.
- Wrap the fabric around your waist, holding the folds so they don't fall apart.
- Place the right tip of the accessory over the left one, and move it inward from bottom to top. Twist, trying not to deform your future masterpiece.
- Bend the end that comes out from above downwards (along the outside), and place it under the second tip, which hangs freely.
- Form a knot.
- Pull the held tip under the top tissue of the knot.
The shorter the free ends, the more pronounced the shape of the corrugated bow will be.
How to tie a bow on a belt step by step
And also needlewomen make something like a flower out of fabric.
- Make a half-bow, grab the end from the inside and slide the edge under the knot.
- Repeat the same with the second side.
The loops transform into graceful arcs with folds and will resemble a flower. To prevent the structure from falling apart, secure it with a pin.
Many girls often do not know how to tie a belt on a coat or dress with their own hands, but in fact it is much easier than it seems.
- Make a standard knot.
- Fold one of the edges of the fabric in half and wrap it around the other end.
- Slide it through the loop and tie a bow.
This method is suitable for any clothing from shorts to office blouses.
Where to tie a bow?
So, don’t give up on a cute twist that transforms any thing. Feel free to decorate cocktail and evening dresses, wedding and prom dresses, summer sundresses with it, dilute a strict office style with this accessory, repeat the color of your clothes or skillfully play with contrast.
This accessory should be in harmony with the outfit, look organic and not stray from the overall style concept.
Stylists recommend several options for using a bow. Taking note of one of them, you will attract the admiring glances of others and look stunning.
Behind
Using a bow at the back adds a romantic, bohemian touch to the look. This option is suitable for tall, slender women who love dresses with a seductive cutout at the back.
The front of the dress should be as closed as possible. An open neckline combined with a cutout on the back is bad manners; a bow will only aggravate the situation.
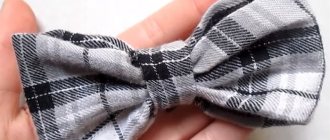
Making a two-color bow from satin ribbon
To make the bow not only beautiful, but also voluminous, arm yourself with scissors, glue and two ribbons of different colors and sizes.
- Cut a wide ribbon (measure the required length first).
- Glue its edges together to form a circle or oval.
- Do the same with the narrow braid and attach it to the wide piece.
- Cut another piece of thin ribbon and tie it around the middle of the bow.
The finished product can be sewn to a satin ribbon and tied around the dress with this improvised belt.
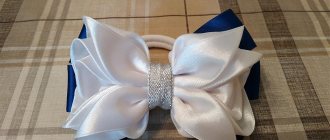
A beautiful bow for a wedding dress step by step
It is important that the ribbon for such an important event is made of high-quality fabric and matches the color of the dress. Most often it is red, beige, milky or bluish.
The bow should be tied not in the middle, but on the side.
- Prepare a wide ribbon.
- Tie it around your belt and pull the ends back.
- Cross the ends and bring them to the side.
- Tie a single knot and form a loop from the top end, and then circle it with the second edge, which should be threaded and brought out.
- Flatten the core.
A corrugated bow will look even more impressive on an evening dress, but keep in mind that it can only be tied with a long ribbon.
- Wrap a belt around your waist, place 3-4 folds on it, bring the right edge up and twist it.
- Fold it down and slide it under the overhanging edge.
- Tie a knot.
To make the bow look even more expensive, decorate it with a brooch with crystals and rhinestones. All these methods will highlight your style and help you move away from the ordinary. A beautiful bow will complement any look and give it a special touch. Knowing how to properly tie a bow on a dress with your own hands, you can elegantly decorate your outfit for an important event.