- 35838
- 13-10-2020
- Author: Mysekret Team
- 0
A helmet hat is a very practical and at the same time beautiful product, which many associate with a happy childhood. You can knit this, or a slightly more current model, with knitting needles.
This yarn product is a real salvation in the cold season for many kids who are not too worried about their health, because the helmet-hat protects not only the ears and head, but also the child’s throat precisely because it fits securely to the neck. Therefore, knitting a similar product for a boy or girl is simply necessary. And how the kids look in them is adorable!
What is a helmet?
A helmet hat is a headdress that is a combination of a hat and a collar - a shirtfront. This is a very practical model that fits tightly to the child's head, which allows you to completely cover it and the neck, as well as cover the shoulders, chest and even the back.
Among the advantages of a hat-helmet, parents note the following:
- protection from blowing - tightly covering parts of the body prevents blowing, since even with active turns of the head the hat does not fall off;
- convenience - does not restrict the child’s movements, does not close the eyes;
- ease of use - easy to put on, eliminates tying and using a scarf;
- practicality - made of soft, non-prickly and hypoallergenic materials (wool combined with acrylic, viscose.
Helmet hats are suitable for all children, without exception, from birth to primary school age. Also among the advantages of the model is the possibility of independent knitting.
Step-by-step knitting of a hat-helmet will help novice needlewomen make it for a child with their own hands, which will not only save money, but also invest a piece of soul and love that will additionally warm the baby.
Features and advantages of the model
Knitted helmets not only look interesting, but also serve as two things at once - a hat and a scarf. Made from children's winter yarn, they provide excellent protection for the child's ears and head. The lower part of the accessory covers the baby's neck and chest.
The undeniable advantage of the model is its ease of use. If you do without all sorts of fasteners when creating this wardrobe item, you won’t have to worry about putting it on. Thanks to this feature, the baby will experience virtually no inconvenience when going for a walk. Removing the headdress is just as easy.
Popular models
The popularity of the helmet hat is due to its versatility: it suits all children without exception, regardless of gender. The Internet offers many master classes on knitting a hat-helmet, differing in the complexity of execution, knitting method, size, etc.
We offer you several of the most common options for knitting a headdress, which will be suitable for beginners and experienced knitters.
Video lesson
It is always easier for beginner knitters to get used to a new type of knitting if they first watch several useful video tutorials on creating a particular model of product. In this case, we will talk about a warm and beautiful hat combined with an openwork shirtfront.
Video lesson for beginners - how to knit a hat-helmet:
Share with your friends!
- 996
- 8
- 5
- 1K
Shared
Subscribe to our Yandex.Zen channel or Yandex.Messenger
For newborns
We offer a hat-helmet knitting pattern for beginners, which is perfect for newborns. This model is suitable for children regardless of age (for girls, choose brightly colored yarn).
The headdress is designed for infants 3-6 months of age. For knitting you will need about 150 g of wool blend yarn (it is better to give preference to special children's yarn, for example, Pekhorka, Alize, etc.), buttons or other decorations - 6 pieces, as well as straight and circular knitting needles No. 4.
This model is suitable for inexperienced knitters, since the entire fabric is knitted with an elastic band (1*1, 2*2), starting from the center.
On straight knitting needles, cast on 18 stitches and knit with an elastic band (2*2) 50 rows according to the following pattern: edge, *2 p., 2 knit.*(rapport is repeated), p. Having knitted the required number of rows (50), close the loops.
Now start knitting the sides. Pick up 18 stitches along the edge of the fabric (the distribution is similar to that shown above). Knit with an elastic band, making decreases: together with the side edge loop, knit the edge loop of the center of the cap picked up on a knitting needle to the end of the fabric. Knit the second side one in the same way.
Now it’s the shirtfront’s turn: cast on 18 stitches on circular needles, pick up the rest along the bottom of the cap and knit in the round with knit 1 elastic. x 1 p. In the fifth row, add 1 more stitch to each knit stitch (elastic band becomes 2*1), then knit 4 rows and in the 5th add purl stitches (elastic band - 2*2). After 40 rows, close the fabric.
All that remains is to assemble and finish the product. To do this, cast on stitches from the face of the knitted fabric onto stocking needles, then knit 20 rows with a 1*1 elastic band in the round. Close the loops. You can sew decorative buttons on the sides, and use the remaining threads to make pompoms, tie ears, decorate with lace, etc.
You can finish the finished hat-helmet at your own discretion, as much as your imagination allows. If desired, a fleece lining can be sewn inside the product.
To knit or not to knit? That is the question.- What's more important: new gloves or dog toys?
Stationery knife: types, care, selection rules
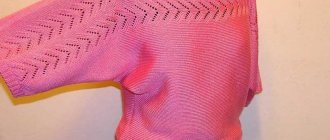
For girls
Let's look at how to knit a hat-helmet for little fashionistas. The presented photos indicate that girls' products are more elegant and can have a variety of finishes or knitted patterns (this directly depends on the imagination of the craftswoman).
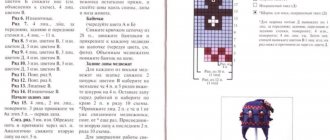
We offer a description of the process of knitting a hat for experienced needlewomen. The knitting pattern is designed for a model with a head circumference of 50-52 cm. This headdress is knitted from the neckline. On needles No. 3 (circular), cast on 110 sts, close in a circle and knit 2 rows with auxiliary yarn.
Starting from 3 p.m. use the main yarn: knit a 5-6 cm fabric with an elastic band (1*1/2*2 at your discretion), evenly adding 20 loops. Thus, by the end of knitting the fabric there should be 130 stitches. Then, on knitting needles No. 3.5, knit 5 stitches. persons.p.
- In a healthy body healthy mind. Be healthy.
Where to look for answers to questions that plague you before bed
- Natural beads for connoisseurs of quality and elegance
To form a hole, bind off 33 stitches in the middle. Next, make decreases: in each odd row 4 times 1 stitch, as a result there will be 89 stitches on the knitting needles. Then knit 60-80 rows with your own chosen pattern. A variety of braids look good on this model.
To round the hole, add 1 stitch in odd rows on both sides of the fabric. Now cast on 33 loops on the knitting needles (for the forehead area) and knit 40-60 rows in the round.
Now it’s time to form the crown: divide the fabric into 10-13 equal parts and evenly decrease 1 stitch in each on the front row. Having knitted about 6 cm in this way, pull off the remaining loops.
To knit a cape, unravel the first two rows made with an auxiliary thread. With loops gathered on the knitting needles, knit the shoulder area to a height of no more than 9 cm. Experienced knitters recommend using raglan.
The hat is almost ready: decorate the face area. Cast on loops along the edge and knit a fabric 4-5 cm high with an elastic band. Decorate the finished product as desired.
The proposed descriptions of knitting helmets are, in principle, universal. You can knit them for children regardless of gender. Experiment with patterns, colors, trims, decorations, and your child will be protected from the cold not only by the headdress, but also by the warmth of the soul you put into the creative process.
Useful tips: important for beginners
Before knitting a baby hat for your boy or girl up to a year old or older, beginning craftswomen need to take into account some nuances regarding the choice of yarn and other aspects.
Yarn selection
Depending on the time of year and ambient temperature, you need to choose the right yarn. It’s better to pick it up personally, since in this case you can touch it with your hands.
The yarn should be natural and soft, without irritating effect. In a warm room or outdoors, soft mercerized cotton, silk, soft linen, viscose or mixed options (cotton+linen, silk+viscose, cotton+silk, cotton+viscose) are suitable for hats. Cotton and linen should not “crunch” to the touch.
Artificial yarn specially created for such purposes is also suitable - tactifil and microfiber, they are even softer than natural ones. For cold weather, you need to choose wool. In this case, it is worth choosing well-processed alpaca or other soft yarn with a high wool content. It may not be 100% wool, but for the warming effect you need at least 50%.
Today on sale you can find a huge variety of different textures of yarn, which have not only a decorative function, but also massage, heat insulation, due to the air in the funnels. Textured short grass, velor, terry, etc. are suitable. Of course, it is better to choose a more pastel color, or something fresh and juicy, but not too bright.
Style
Depending on the shape of the baby's head, you can choose a style. Any model is suitable for a round face. For elongated head shapes, hats with ties under the chin are better suited.
A baby indoors or outdoors at a temperature of +22° and above does not need to cover his ears at all. On the contrary, his auditory analyzer will develop better if his ears are open.
For walks in cool and cold conditions, ears should be covered. The thickness of the baby model should also correspond to the air temperature. At temperatures below 22°, a thicker option is needed.
In virtual spaces you can choose a huge number of different models of knitted hats for a newborn.
One universal piece of advice: hats should be without rough seams, especially at the back, so as not to irritate or damage the baby’s delicate scalp.
Size
In the delivery room, each newborn baby’s head circumference is measured with a measuring tape and the mother is informed of this size. During the first time after birth, the head grows by 2 centimeters per month. Based on this, you can calculate the number of loops in 10 centimeters by knitting a sample, or use a ready-made pattern for a specific size.
The depth of the model can also be measured with a centimeter tape, or you can use a ready-made table. In any case, you can add 1-2 centimeters in volume so that the baby is definitely comfortable.
Knitting density
The density should be kept to medium. This will allow you to knit an elastic, but not loose model. Based on the thickness of the purchased yarn and its nature, you need to select suitable knitting needles. The recommended knitting needle and hook sizes are written on the yarn label.
How many loops to cast on
To calculate the number of loops, you need to knit a 10#10 cm sample and count the number of loops in it horizontally. Based on the circumference of the baby’s head, you need to multiply the number of loops of 10 cm by the circumference of the head and divide by 10 - this is the number and cast plus 2 edge ones.