Yarn calculation
In order not to buy extra yarn, you need to make a calculation. To do this, you need to knit a “sample”, thanks to which we will calculate the sweater. We put 10 loops on the knitting needles and knit 10 cm with the main pattern with which the jacket will be knitted. The result is a square - a sample with which we will calculate the necessary loops and rows. We take some of our own sweaters similar in size to the one we will knit.
Applying the “sample” to the jacket, we measure how many cubes we get. Once we know the quantity, we need to calculate how many threads are spent on the “sample”. Usually the length of the thread is indicated on the skeins; you just need to calculate it. Thus, we found out approximately how much yarn we need to buy. At first glance, this procedure will seem boring and uninteresting, but at the end of the work you will be satisfied with the result. Your product will not be small or large, it will not have to be unraveled and bandaged.
Cutting and sewing
Instructions for cutting and sewing the product:
- Fold the fabric in half, right side down.
- Attach the pattern with pins to the fold of the fabric.
- Trace the outline.
- Add seam allowances.
- Remove the pattern.
- Connect the parts with a hand seam.
- Try it on.
- Correct inaccuracies.
- Sew on a machine.
You might be interested in Sew without patterns: dress therapy with Julia
Turning
For turning you need:
- Cut out the facing from fabric or non-woven fabric.
- Move the line of the neckline of the back and front.
- Stitch the parts for facing.
- Sew edges.
- Attach the facing with pins to the neckline.
- Sew on a sewing machine.
- Iron the part.
All patterns are suitable for both adults and children. The style is distinguished by the ability to combine practicality and uniqueness in one image. When using knitwear, you can sew a coat with this type of sleeve. The magazine "Burda" presents many patterns for knitting and sewing products. If you have experience, you can even sew a children's jacket of this style.
Patterns and descriptions of knitting sleeves of the “bat” pattern
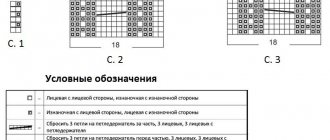
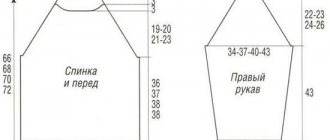
We begin work by knitting the back, as indicated in the diagram, the arrows indicate the direction of work. We cast on 95 loops on straight knitting needles, knit with an elastic band of 5 cm and another 7 cm, switching to the main knitting “tangle”, in total we get 12 cm.
After the work has reached 12 cm, we move on to knitting the batwing sleeve. To do this, on both sides we add 1 loop in every fourth row 10 times. Continuing to cast on loops, in every 2nd row, add 1 more loops 17 times. Now we cast on loops for the sleeves, make additions on both sides on the front rows, adding 2 times 2 loops, then 4 more times 3 loops and 1 time 4 loops. To make a new loop, you can use two methods. Wind the thread onto a knitting needle by taking it from a skein, or grab it and pull it from the previous row. All added loops amounted to 193.
When we have cast on a large number of stitches, the work no longer fits on the knitting needles, now we need to transfer it to larger knitting needles, for this we will take round knitting needles on a fishing line 100 cm long. We will start knitting a new row with circular knitting needles and gradually transfer all the work to them. Then, if necessary, we can again switch to straight knitting needles.
Scheme of the “Bat” sweater
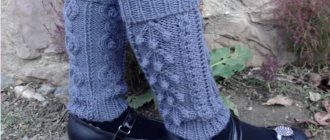
There are many variants of the wardrobe item under study, but all of them retain the main detail - the sleeves expanding from the bottom edge. They can be of different lengths, decorated with openwork, solid or with cutouts from shoulder to cuff - it all depends on the wishes of the needlewoman.
THE “BAT” SWEATSHIRT WITH KNEWS (THE DIAGRAMS DEMONSTRATE A T-SHAPED PRODUCT WITH ONE-CUT SLEEVES AND A WIDE OPENING) IS MORE OFTEN MADE IN A COMMON CANVAS IN THE BOTTOM-UP DIRECTION.
Knitting:
- You should start from the bottom edge.
- Next, adding loops and forming a sleeve (to the intended length), move towards the shoulders.
- Having knitted the entire front part, you need to leave a hole for the head, closing off the loops and restoring them in the next row.
- After this, the product is knitted in the reverse order with decreasing stitches.
The classic version of the sweater can be knitted differently by knitting the front, back and sleeves separately. This method is preferred by beginning needlewomen - it does not require special knowledge or skill. However, the scheme will not help even an experienced craftswoman if she does not have the parameters of the person for whom the thing being studied is intended.
Back
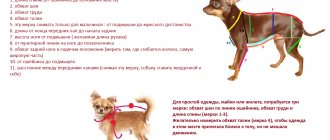
To connect this and the next part of the planned wardrobe item, the following parameters are needed:
- ½ hip or chest circumference (the largest value is taken);
- distance from bottom edge to shoulder;
- ½ the circumference of the base of the neck (you can measure your head if you want the collar to be larger).
Jacket “Bat”: diagram and description
Jacket “Bat” with knitting needles (patterns can be used either ready-made or your own - sketches, but in any case indicating the parameters taken) will not turn out beautiful and neat if you do not prepare a fragment of the selected pattern. If the craftswoman knits with stockinette stitch, she also needs a sample.
Using it you can calculate the number of loops and rows:
- A sample pattern is a square size 10x10 cm, you need to knit it using the knitting needles and yarn chosen for the idea. Otherwise, the calculation will not be accurate.
- On the finished fragment, count the number of loops and rows.
- Divide both values by 10.
- Knowing the number of loops (P) and rows (P) in 1 cm, you can convert the previously taken parameters into the required units of measurement. To do this, you need to multiply the P value by ½ the circumference of the hips (or chest) and ½ the circumference of the base of the neck. And the P value is the distance from the bottom edge to the shoulders.
- All new values will have to be rounded to the nearest whole number, based on the rules of mathematics, and indicated on the diagram for convenience.
Now you can get to work, the standard product is knitted like this:
- Cast on a number of stitches equal to ½ the circumference of your hips/chest.
- Knit without increases or decreases up to the shoulders.
- Highlight the collar loops with contrasting threads (strictly in the center).
- Close them. But don't break the thread.
THE BACK AND FRONT CAN BE KNITTED SEPARATELY. THEN NEXT YOU NEED TO MAKE A SIMILAR PART AND THEN SEW IT TO THE FIRST.
But in most cases, the base of the jacket is made of a single fabric. The second stage of this option is described in detail below.
Before
To complete the following part you need:
- Cast on the same number of stitches again in the next row - restore the closed ones, forming a hole for the head.
- Continue knitting to the bottom edge, also without making any increases or decreases.
- Close the loops, break and fasten the thread.
Currently, cropped sweaters are popular. The model under study was no exception.
To do this, you need to measure:
- ½ chest circumference through the most convex points in front and back;
- ½ waist circumference;
- the distance from the intended edge to the armpit.
An example of calculating the number of loops when knitting raglan from top to bottom.
Then make simple mathematical calculations:
- Determine the difference between the “chest” and “waist” loops.
- Divide the resulting value by 2 (the wedge must be knitted on both sides), and then by the previously determined number of rows from the bottom edge to the starting point of the armhole.
- Round to the nearest whole number.
Example: if the difference is 40 loops, and there are 25 rows in the indicated segment, then it turns out: 40 / 2 / 25 = 0.8 ~ 1. That is, approximately 1 increase in each row. But it should be done at the beginning and end of each row, preferably after and before the edge.
Knit the front of the product as follows:
- First you need to cast on a number of loops equal to ½ waist circumference.
- Knit, making 2 increases in each row. That is, you should remove the first loop, yarn over and knit a row. Before the last loop, yarn over and knit the remaining one like a purl. And so on in each next row.
- Having reached the level of the armpits, you need to knit without increases to the upper edge of the product.
- Determine the hinges for the gate and close.
Knitting bat-shaped sleeves
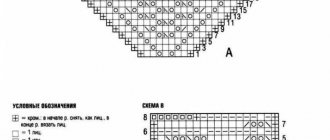
We continue to knit without adding another 14 cm (44 rows), after which we proceed to bevel the sleeves, knitting the shoulder. To make the bevel of the shoulder of the sweater even, we close on both sides in each 2nd row 5 times with 7 loops, and in each 8th row with 6 loops. To cut the neckline, you need to close off the remaining 27 loops, knitting them two at a time, until there are none left.
We knit the front part of the sweater in the same way as the back, but we make the neckline deeper and rounder. To do this, when there is a 3rd decrease in the sleeve-shoulder, you need to close 17 central loops. We finish both sides of the work separately. To make the neck round and beautiful in shape, close each 2nd row 2 times with 2 loops and 1 time with 1 loop.
Assembling a sweater
Before sewing the parts, you need to steam them well. To do this, heat the iron well so that there is a lot of steam. The product is not ironed, but steamed. You need to make sure that all edges are carefully straightened. When the individual parts have been steamed, we begin sewing the seams of the sleeve and shoulder, using a darning needle. You can stitch the edges on a sewing machine, grabbing them along the very edge. To process the collar, along the edge of the neck we cast on 84 loops on circular knitting needles, knit with an elastic band of 7-10 cm, after which we close all the loops. The elastic band looks beautiful with alternating 2 loops of front and back.
OK it's all over Now. Your dolman sleeve sweater is ready! As you can see, even beginners can knit such a product. Below are ideas for knitting sweaters and half-overs with bat-shaped sleeves. You might like them better.
Video: sweater for beginners, bat
Pattern construction options
When creating a pattern, most often the seamstress chooses one of the following methods. It is important to strictly follow the sequence of actions, since the quality and style of the future product depends on this.
You might be interested in this: The procedure for sewing a one-piece swimsuit for an overweight woman on your own
Bat pattern
How to build a classic sleeve
The classic type is a loose style without any additional darts on the chest. The product can be modeled on a standard back pattern.
Important! The exception to this method is large breasts. In this case, it is recommended to use the below method.
When constructing, the cutout is 2.5 cm deep. When constructing the pattern for the neckline, the formula R = 1/6 * Osh + 1 (Osh - neck circumference) is used.
Classic sleeve option
When creating a pattern, the seamstress must independently model the item according to the style.
Step-by-step instruction:
- Place vertically up 1 cm from the last mark on the shoulder.
- Draw a shoulder line passing through the point from step 1.
- Extend the line.
- Place the shoulder length + sleeve length measurement along the line from step 3.
- Draw the bottom line according to the measurement Wrist circumference * 1/2 + seam allowances.
- Add a raise.
- Draw a rounded bottom line, turning into a side line.
How to model a sleeve for large breasts
In some cases, a girl has a big difference between the DTS and RTA measurements, and it is recommended to adjust the shelf pattern.
Instructions:
- Take measurements: chest height, chest center.
- Determine the top point of the shoulder at the shoulder seam.
- Move 3 cm away from it to the right.
- Draw a vertical line down, the length is equal to “Chest height” - 1 cm.
- Place a measurement equal to ½ of the “Center of the Chest” horizontally to the right of the center of the shelf.
- Draw a dotted line to the bottom seam.
- Cut the diagram along the line, expand the accident according to the measurements.
Afterwards, a chest dart is formed on the shelf. It can be done either on paper or using folds and tucks.
Sleeve pattern for large breasts
How to make a sleeve pattern with a rounded shoulder
This model has a significant angle to the shoulder seam; it is looser near the armhole and looks like a seamless raglan sleeve. When creating a pattern, a basic back pattern is used.
Instructions:
- Determine the extreme point of the shoulder.
- Set aside 1 cm vertically upward from the point.
- Draw a line through the point and extend upward.
- Set aside DP+DR along this segment.
- Measure a 90 degree angle.
- Draw a line for the bottom of the sleeve equal to ½ HP + increase. The size of the increase depends on the model of the item and the type of fabric.
- Determine the bottom point of the back armhole.
- Set aside 4-10 cm vertically from this point, depending on the model.
- Draw the bottom line of the sleeve, which will go into the side line.
You may be interested in Ready-made patterns and sewing procedures for dog harnesses with your own hands
Sleeve pattern with rounded shoulder
How to make a sleeve without a side seam
The large amount of material in the armhole is the main difference of this style. This model has a seam at the waist.
Instructions:
- Determine the point of connection between the waist and side lines.
- Draw a segment at an angle of 45 degrees.
- Set aside “Shoulder Length” + “Sleeve Length”.
- Determine the extreme shoulder point.
- Draw a curved line.
- At the bottom, the sleeve width is equal to ½ HP + increase.
Additional Information! It is important to remember to allow 1.5 cm seam allowances when cutting the product.
Short sleeve
Girls do not need to hide their hands behind long sweaters. The warm season is a great occasion to sew a product that has short bat sleeves.
Short sleeve pattern
Since this style does not provide for the presence of a dart. The fabric should be dense and elastic.