Children's overalls are comfortable and beautiful clothes for little explorers! A patch pocket at the front is ideal for storing small finds, and the wide legs allow for freedom of movement. Adjustable straps will extend the life of the overalls for several seasons.
We'll show you how to create a simple pattern and sew your own baby onesie in just one evening!
Sewing baby overalls from old jeans
Now we will look in detail, using a simple model as an example, on how to sew children's overalls from your own jeans that have become unusable. It is better to start handicrafts with children's things, because their production takes little time and materials.
Prepare the following materials and tools:
- Old jeans.
- Fabric for making the upper part.
- Threads in color.
- Soap or chalk.
- Scissors for cutting.
- Centimeter tape.
- A set of needles or pins for stitching.
- Sewing machine.
- Decorations for decorating the finished jumpsuit.
- Transfer the pattern to the fabric and cut out all the details.
- Sew the elements of the front part of the overalls together, two at a time, while sewing the yoke to the very bottom.
Important! If desired, you can sew patch pockets and straps onto it, and this should be done at this stage.
- Using the same principle, sew together the elements of the back of the product.
- Connect the two halves of the overalls, stitch them along the side seams and sew them on a machine.
- Sew a stitched cuff along the bottom edge of the front edge.
- Sew the crotch seams. And to make the overalls look more impressive, try to do the stitching the same way as denim clothing manufacturers do.
- Sew all parts along the seam of the seat. Be sure to leave 10 centimeters free in front. Overcast the seam allowances, smooth them out at the back and front.
- Now move on to the details. It is better to sew them also from denim. Sew them to the back and attach them to the front with special fasteners.
- Using the prepared facing, connect the front and back pieces along the side seams. Overcast the side seams, the bottom of the facing and the edges of the fasteners.
- Sew the front edges of the fastener and also leave 10 centimeters free. Smooth out the seams.
- Using sewing needles, attach the unsewn parts, that is, the facing and straps. Using a sewing machine, sew them to the product.
- Turn the facing inside out, baste it by hand and make a finishing stitch on the machine.
All is ready!
Thanks to this detailed instruction, we learned how to sew a children's denim overalls step by step.
Important! Using the same pattern, you can sew an adult model. The only thing is that you will have to take more fabric for the overalls as a basis and buy auxiliary material for making additional elements.
Denim overalls
A comfortable and stylish overalls can be made from old jeans, adding contrasting fabric as finishing. We will show you how to preserve the original stitching as much as possible, use parts with characteristic wear and carefully handle all allowances. The inside of our overalls looks great, and thanks to the almost invisible stitching, the product has a high-quality appearance. A master class with detailed photos will show you how to sew a denim jumpsuit with your own hands.
DIY jeans overalls for a child
Little children grow very quickly, and therefore they need a large supply of clothes. Quite often, in order to save the family budget on the purchase of expensive children's clothing, many mothers try to alter some of their things for the baby. This requires minimal sewing skills and very little free time. For example, a pair of old, worn-out jeans can be used to make an excellent overall for walking in cool weather.
- old jeans;
- a small piece of cotton fabric with a marine pattern;
- felt scraps of white and red colors;
- a small piece of adhesive pad;
- 2 blue wooden buttons in the form of an anchor and a steering wheel;
- 2 blue plastic buttons for fastening the straps.
Equipment you will need:
- household sewing machine,
- iron,
- overcasting machine,
- cutting scissors,
- chalk,
- pins.
Pattern of women's overalls: tips for drawing up a drawing
248 Author of the article: Reading time: 3 min.
The jumpsuit is an element of the women's wardrobe that has experienced a revival in recent years. New interpretations of this item of clothing appear, its silhouette, fabric, and style change. Nevertheless, the model remains the same overalls that are not so difficult to sew yourself. We will tell you how to make a pattern that will help you make a new thing.
Different types of women's overalls
First you need to decide what kind of thing you want to get in the end. We will choose among the most common options for women's overalls.
Closed
The name suggests that this item of clothing covers the body as much as possible.
Indeed, it is sewn with long sleeves and trousers. This one is useful for everyday wear from autumn to spring.
Summer classic
Women's overalls for the summer are a combination of classic trousers and a bodice.
It is usually made from light, thin fabric. It fits perfectly into a variety of styles, allowing its owners to feel comfortable on a hot day.
Summer sleeveless
The next option is similar to the classic model, but leaves the shoulders and collarbones open.
This result is achieved by replacing the sleeves with thin straps, like a T-shirt.
With shorts
This outfit can become more democratic and lighter if you shorten the legs, revealing your legs.
With shorts and sleeveless
By replacing the sleeves with straps and shortening the legs as much as possible, you can get an open and cheerful beach model.
It should be taken into account that within one type there are also many different options. Thus, the sleeves may differ in length and width, and the trouser legs may differ in the way they are cut. In addition, the top can be either narrow and fitted or large and baggy.
Important! It is not necessary to look for a model that you will like completely and unconditionally. Combine different patterns, taking from each what you found interesting.
This way you can create the outfit of your dreams with your own hands. For example, if you take the design of the top from one, the shape of the legs from another, the sleeves from the third.
Making a simple pattern
Let's figure out how to make a simple pattern for women's overalls yourself.
Algorithm for performing the work.
- The simplest pattern requires that some starting points be found first. They can be patterns of different models of overalls. You can use the drawings of pants and T-shirts separately. Ready-made garments will also work. In addition, photographs from fashion magazines, imagination and common sense will come in handy.
- It is convenient to start the modeling process based on a classic bodice pattern. There are two main ways to make paper stock.
- The first option: the finished pattern is printed in full size. And then, if necessary, make adjustments from it. This is convenient for those who have a figure close to average standards.
- The second option: build a pattern yourself according to the pattern offered by professionals. By specifying the dimensions of the shoulders, chest, neck, waist, and hips, you can model a more accurate pattern.
- Then comes the selection of an option for the bottom of the overalls. These can be straight, tapered or flared pants. Print or draw the diagram you like one to one. And then combine it with the bodice blank you already have.
Important! Most likely, you will have to slightly adjust the pattern of the lower part of the outfit so that it is one piece with the upper one. To do this, the outer contour of the top of the trousers is expanded, adjusting them to the size of the bodice.
In order for the item to fit better at the waistline, a special overlap is provided. This is a distance of 2–3 cm between the lower and upper parts of the future overalls.
In this place, a decorative seam is sometimes sewn, a belt is made, or even an elastic band is inserted. You can do without the slouch, but then you need to deepen the seat height of the pants by 1–2 cm.
Important! When creating a pattern, be sure to include seam allowances of 1.5–2 cm. And in the lower part of the legs it is recommended to leave even more material, about 3–4 cm.
How to make a pattern for summer overalls with shorts
To sew overalls with shorts, you don’t have to look for the appropriate pattern. You can make it based on the pattern of a model with long legs. For example, the one whose construction was discussed above.
Simply take and reduce the size of the bottom part to 35-50 cm from the waistline, depending on preference. Don't forget to leave some space at the bottom for seam allowance! In this case it should be 2–3 cm.
How to make a denim overalls pattern
Denim overalls have remained a trendy fashion choice for many years. In general, its creation differs little from models made from other fabrics. It can also have sleeves or straps, long or short legs, and be narrow or loose.
But most often it is a jumpsuit. Having chosen the appropriate bottom option, you only need to cut out the bib and straps.
However, in the process of sewing and modeling such a thing there is a feature dictated by the specifics of denim fabric. This matter, despite its high density and even roughness, has good stretch. Those wishing to make a tight-fitting item from such fabric should take this into account. Therefore, when constructing a pattern, you need to use dimensions that are 0.5–1 cm smaller than required by standard calculations.
How to make a pattern for a jumpsuit with sleeves
You can take the same scheme with a classic bodice as a basis. You just need to add sleeves to the top of the outfit.
Work order
- Extend the contour of the back shoulder. This will give you an auxiliary line.
- From the extreme point of the shoulder, draw a beam at an angle of 15 degrees relative to the just constructed auxiliary line.
- On the beam, set aside the length of the sleeve, which can be anything in the range of 20–50 cm.
- From the resulting point, which marks the end of the sleeve, lay the perpendicular down.
- On the perpendicular, set aside a sleeve width equal to at least half the circumference of the arm above the elbow plus 7 cm.
- Draw a smooth curve connecting the side edge of the bodice and the bottom of the sleeve.
As a result, you will get a pattern with the simplest straight sleeves. Of course, its configuration can be much more complex and interesting.
Important! The sleeve can narrow or widen; have cutouts on the shoulders; and so on. Look at different models, photographs, catalogs and choose the most interesting and attractive option, in your opinion.
Useful tips
Often craftswomen who are planning to sew their own overalls have some quite natural questions. We will try to answer the most common of them.
How to model patterns for sizes 48–50
In women's magazines and stores, models up to size 48 are most often found. Larger sizes are much more difficult to find.
However - good news! — there is no fundamental difference in the process of modeling large and small things. Just use your parameters when creating a pattern. Measure your chest; waist, hip circumference; shoulder width. And be guided by the data received.
Or try to find ready-made patterns on the Internet - here you can sometimes find examples of models in sizes 52, 60 and even 64. You just need to look.
Where can I download a pattern for women's overalls for free?
In this situation, online resources such as:
- portal "Postila";
- resource for needlewomen “Burda style”;
- resource for needlewomen “Box”;
- photo hosting “Pinterest” and so on.
You can try to find interesting models by simply entering the appropriate query in the search bar.
Create something that will best suit your tastes, style and body shape!
Did you like the article? Share it What is your assessment of this material? Found a mistake? Select it and press Ctrl + Enter. We'll fix everything! Author of the article: Stylist and author Ask a question to the author
tkaner.com
How to sew overalls from old jeans for a baby
Once all the parts have been prepared, you can begin installing the product.
On the front halves, the reliefs and stitching seams of the lower parts should be processed (that is, stitched, overcast, secured with a finishing stitch and ironed).
Then the front halves need to be sewn together.
If desired, you can sew a felt applique onto the overalls, and also sew on a small chest pocket for a handkerchief.
The reliefs on the rear halves need to be processed.
Then the back halves are also sewn together.
On facings, it is necessary to glue the sections of the top and armholes (so that they do not stretch out during processing and subsequent use), overcast the central and side sections, sew down the central and side seams, iron them, overcast the bottom edge of the facing.
The details of the straps should be duplicated, hemmed, turned inside out and ironed.
The prepared front and back parts of the overalls must be sewn along the side and step sections, overcast the allowances, and ironed onto the back.
The facing of the top edge of the overalls must be pinned to the overalls, placing the straps on the back between them.
Then you should stitch along the top edge of the overalls. The seam allowances on the curves must be cut, not reaching the line, and the pins must be removed.
The facing must be turned right side out and swept out using hand stitches.
You need to machine stitch along the top edge of the overalls. After this, the marking threads should be removed.
To ensure that the facing does not turn out during use of the product, it must be sewn from the inside out with hidden stitches to the side seam allowances of the overalls.
The bottom of the trouser legs should be hemmed with a closed hem seam (folded twice and stitched).
You need to sew over the loops on the chest and sew buttons on the straps.
The finished product must be ironed.
The denim overalls are ready!
How to sew a fashionable denim overalls
Many overalls make a person look fat, but we suggest sewing your own denim overalls that will fit your figure perfectly. You don’t need any special sewing skills, just jeans, a denim shirt and a top, and your stylish look is ready for summer.
Necessary materials:
– buttons for jeans (8 pcs.);
– pins for fastening;
The first step will scare you a little, as you will have to cut the sides of your favorite jeans by approximately 12 - 15 cm.
Don't worry too much - these edges will be processed later and will look beautiful.
Next, take a denim shirt and cut off the sleeve. Lay the sleeve out on a flat surface and mark a rectangle measuring 13-16 cm in length and 6 cm in height. Cut it out. As a result, you should get two identical rectangles from the sleeve. Fold the edges under and iron well. Attach with glue to the back sides of the jeans (in the places where the cuts were previously made).
Cut two more rectangles measuring 5 cm by 9 cm from the denim shirt. Iron them carefully, fold them in half and secure them with pins. Using scissors, make four holes in one rectangle for four snap buttons. Do the same in the second rectangle. Please note that the holes should be smaller than the buttons. Glue the fabric together and round the holes with your finger (do not stretch the holes too much). Glue large rectangles to the right and left sides of the front of the jeans.
Apply the denim flap to the holes on the jeans - mark where the denim button should be. Make a small hole with scissors or the sharp end of a denim button. Align the back of the button with the front. Make sure they are level and then hit the button three times with a hammer. Do this for all the other buttons on the right and left sides.
Lay the denim shirt on a flat surface - next we will work on the back of the shirt. Take a measurement from the middle of the jeans waistband (from the left to the right slit on the jeans), add 2 cm to the measurement and then cut out a square from a denim shirt of that size.
Then fold the square in half and get a rectangle. Take a measurement from chest to chest and measure half that measurement along the top edge of the folded rectangle. Measure again and cut diagonally from the bottom left edge of the folded fabric to the top edge.
Make a similar cut for the back of the overalls. This piece will be half the length of your belt and 15 cm high. Fold this piece in half and measure 1/3 from the edge. Draw a dotted line and then cut diagonally.
From the remaining part of the shirt, cut out a pocket and four straps. The straps must be at least 8 cm wide. Next, these straps will have to be tied, so add another 6 cm to the measurements. Remember that the front straps should be shorter than the back ones.
Sew all the edges of the parts using a sewing machine (by making a two-layer seam you can extend the wear of the product). And then sew all the parts to the jeans themselves. Don't forget to sew a pocket and straps to the front.
The result is a fashionable designer jumpsuit. After sewing, wash the product in the washing machine, dry it and you can wear the jumpsuit with an off-the-shoulder top or another favorite T-shirt.
Master class on sewing overalls
So, let's learn how to sew a beautiful women's jumpsuit. At the very beginning, we had already decided on the style, color, and in our imagination we had already tried on a new, spectacular outfit. All that remains is to bring this idea to life.
When you have prepared all the necessary materials and tools for sewing, the first task is to make a pattern.
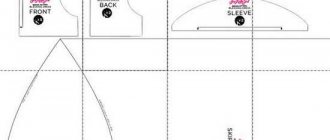
How to make a women's jumpsuit pattern
Before creating a pattern, you will need to take some measurements:
- Half neck circumference.
- Half bust.
- Half waist.
- Half hip circumference.
- Half-girth above the chest.
- Chest height.
- Armhole lip.
- Front length to waist.
- Back length to waist.
- Shoulder length.
- The length of the sleeve.
- Back width.
- Length trousers.
It is convenient to create a pattern on special paper, which is marked with a small square (tracing paper), but if this is not available, regular paper will do. Use a ruler and pencil to draw contour lines.
IMPORTANT!
80% of the final result depends on how carefully you build the pattern.
If you are an experienced craftsman, then you can choose a complex model consisting of a bodice and trousers. A beginner in sewing should pay attention to a simpler model, and only then gradually move on to a complex cut.
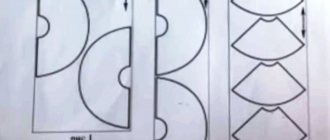
Cutting fabric for overalls
Stages of cutting work:
- To cut, you need to lay the fabric wrong side up on a flat surface; the material must first be well ironed.
- The pattern must be applied along the warp thread; if there are parts given in half, then they are applied on the fold of the fabric, resulting in a single piece.
- The paper pattern is applied to the fabric and secured with pins, and the outline is outlined with soap or chalk.
- The parts are traced exactly along the contour, the thickness of the lines should not be more than 2 mm.
- Once all the details have been applied to the fabric, you can add the required amount of seam allowance.
- Check the accuracy and presence of all the details, the direction of the pattern, the front and back sides, and you can start cutting out the elements.
IMPORTANT!
If the fabric of the future overalls has a pattern or embossing, then the pattern should always be laid out in one direction.
Step-by-step sewing instructions
- Sweep out the details of the future jumpsuit and iron it well, then proceed to the first fitting. Already at this stage it will be clear what the final result will look like.
- If necessary, make adjustments to fit the product to your figure.
- If possible, the edges of the fabric need to be processed with a special machine - an overlocker; when one is not available, this can be done manually.
- When everything is ready, you can finally sew the overalls.
- The finished product must be ironed thoroughly.
- The final stage of making the jumpsuit will be its decoration. How you decorate the product depends entirely on your imagination. You can decorate the jumpsuit with zippers, embroidery or buttons.
ATTENTION!
When using decorative elements, it is important to remember the golden rule of a sense of proportion.
Remember: the one who does nothing makes no mistakes. Even if you made some mistake, do not fall into despair, take it calmly, as a lesson for the future. Experiment, try, let your imagination flow into beautiful things, and you will always be irresistible and unique.
Although many people argue that overalls are uncomfortable and impractical, I still disagree with this. There is something attractive about this piece of women's clothing, and if so, then it should be in every woman's closet.
However, a jumpsuit is a thing that is not suitable for every figure, so some women find it quite difficult to choose one in a store. There is only one thing left to do - sew the overalls with your own hands, tailoring the product to your individual characteristics. I offer ready-made jumpsuit patterns in two sizes - 38 (M) and 40 (L). Sewing difficulty level is easy. Therefore, sewing such a thing will not be difficult even for novice craftswomen.
What you will need:
- Any light fabric to choose from: silk crepe de Chine, viscose cambric or cotton satin - 2.6 * 1.4 m,
- Non-woven formband
This is interesting: Pattern for children's home overalls with a hood (р 74-160)
How to sew a women's jumpsuit
Are women's overalls relevant today and will they be in fashion tomorrow? The unequivocal answer is “yes.” This outfit always looks feminine, elegant and elegant. Depending on the style of the jumpsuit, you can wear it to a business meeting, to the beach, to a restaurant, for a walk, and even to work.
Taking into account the individual characteristics of each figure, if the suit is perfectly fitted, it will definitely make its owner slimmer, taller and more beautiful.
There is one thing in all this: it is very difficult to choose a jumpsuit in a store so that the outfit fits perfectly in all respects, and you also like the color and the size is just right. But this problem can be solved: you can always sit down and sew a jumpsuit with your own hands.