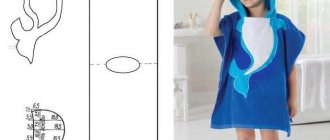
Sewing a shirt for a boy with your own hands is not that difficult; all you need to do is have a pattern and a detailed description with step-by-step photos on hand. All you have to do is stock up on fabric, and you will find everything else in this article. We have already learned how to sew the simplest things - blouses and pants, now it’s time to move on to a more complex product.
The article offers several patterns for children's shirts for different ages and sizes. Patterns also differ in the presence of short or long sleeves. However, in general they are very similar, so the sewing process is identical for everyone. In order not to duplicate the assembly description, at the very end of the article there is a detailed master class that can be applied to any of the presented patterns. Let's start with the smallest ones.
How to sew a shirt for a boy - a simple pattern of a classic model!
A classic men's shirt should be in every young gentleman's wardrobe. Sew such a shirt for your boy and he will be the most stylish among his peers! Our step-by-step instructions will help you create a shirt pattern.
Pattern modeling
To begin construction, you need to take measurements (measurements of size 36 are used in construction). See: How to take children's measurements
To create a shirt pattern for a boy, you need to take the following measurements:
- Chest circumference (OG) – 73 cm
- Neck circumference (NS) – 31.5 cm
- Shoulder length (L) – 10 cm
- Armhole depth (Gpr) 17 cm
- Armhole width (Shpr) 8.5 cm
- Shoulder circumference (OP) 24 cm
- Wrist circumference (OZ) 16 cm
- Sleeve length (DR) 52 cm
- Shirt back length (DI) 60-65 cm.
Creating a drawing grid
Draw a rectangle ABCD.
Shirt length. The lines of the rectangle AN and BH1 are equal to the length of the shirt according to measurement = 65 cm.
Boy's shirt width. AD = BC = Half chest circumference according to measurement + 4.5 cm for all sizes (increase for loose fit from Table 1): 73/2 + 4.5 = 41 cm. The amount of increase can be increased or decreased depending on the size and desired silhouette of the product.
Armhole depth. From point A downwards, set down the armhole depth measurement + 1.5 cm for loose fit from Table. 1: AG = 17 cm + 1.5 cm = 18.5 cm. From point G to the right, draw a straight line until it intersects with line BH1 - point G1 is obtained.
Shirt side line. From point G to the right, set aside ½ GG1 - point G2. From point G2 down, draw a vertical line until it intersects with the line HH1 - point H2 is obtained.
Armhole width. Armhole width = Armhole width according to measurement + 2 cm (addition for freedom of fit from Table 1): 8.5 cm + 2 cm = 10.5 cm. From point G2 to the left and right, set aside G2G3 = G2G4 = 5.25 cm ( 1/2 the width of the armhole). From points G3 and G4 upward, draw vertical lines until they intersect with line AB - points P and P1 are obtained.
Construction of the back of the shirt
Neckline. From point A to the right, set aside AA1 = 1/6 Neck circumference according to measurement + 1 cm (for all sizes) = 31.5/6 + 0.5 cm = 6.25 cm. From point A1 up, set aside A1A2 = 1.5 cm Connect point A to point A2 with a concave line.
Back shoulder line. From point P down, set aside 2 cm. From point A2 through point 2 (shoulder slope), draw a shoulder line with a length of A2P2 = 10 cm + 1.5 cm = 11.5 cm (shoulder length according to measurement + 1.5 cm for all sizes) .
Back armhole line. From point G3, dividing the angle in half, set aside 2 cm. Draw the armhole line from point P2 through the middle point PG3, point 2 to point G2.
Bottom line of the back. From point H2 up, set aside H2H3 = 2 cm. Draw a curly line for the bottom of the back along the pattern.
Back yoke. From point A, set aside 6 cm downwards. From point 6 to the right, draw a horizontal line until it intersects with the back armhole line. From the intersection point up along the armhole line, set aside 1 cm and connect point 1 with a smooth line to the yoke line. Cut the back yoke and cut it out with a fold along the middle line of the back.
Fold allowance. Along the middle line of the back, set aside 4 cm to the left and draw a fold allowance from the yoke line to the bottom of the back.
Building a shelf
Shelf neckline cutout . From point B, draw an arc with radius R = BB1 = BB2 = 1/6 Neck circumference + 1 cm (for all sizes) = 31.5/6 + 1 cm = 6.25 cm.
The slope of the shoulder of the shirt front. From point P1, set aside 2 cm downwards. Draw a shelf shoulder line from point B1 (neck) through point 2 with a length of B1P3 = 11.5 cm (shoulder length according to measurement + 1.5 cm).
Armhole line. From point G4, dividing the angle in half, set aside 2 cm. Draw the armhole line through points P3, the middle point of dividing the segment P1G4, through point 2 to point G4.
Bottom line of shirt front. From point H2, set H2H3 = 2 cm up. Draw a curved line for the bottom.
One-piece shirt placket. Along the mid-front line from points B2 and H1, add 1.5 cm to the right for the width of the strap and 3 cm for processing the strap (4.5 cm in total), draw two vertical lines parallel to the mid-front line.
Rice. 1. Pattern of a shirt for a boy - back and front
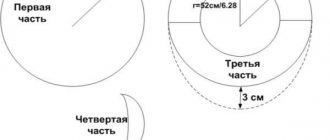
Stand collar pattern
To create a stand-up collar pattern, measure the length of the neckline according to the shirt pattern along with the placket (without allowance for processing the placket). Set aside 1/2 of the length of the measured value: AB = DC = Neck length according to the drawing (Fig. 1). The height of the rectangle AD = BC = 10.5 cm.
From point C, move 1 cm up and 0.5 cm to the right. Construct the configuration of the post and the flyaway collar as shown in Fig. 2. Cut the stand and cut it separately from the flyaway collar.
Rice. 2. Pattern of a stand-up collar for a boy’s shirt
Next, proceed to constructing the sleeve and cuff patterns
See also:
- Boy's trouser pattern
- Jacket pattern for girls
- Coat pattern for girls
- Carnival costume
Related materials:
102 comments
Drawing a pattern for a short sleeve shirt for a boy
Draw a rectangle ABCD.
The length of the sleeve
The lines of the rectangle AD and BC are equal to 16 cm (DKR by measurement).
Sleeve width
The lines of the rectangle AB and DC are equal to 30 cm (POG by measurement).
Sleeve hem
From point A we put 7 cm down and put point P (⅙ LOG by measurement + 2 cm for all sizes):
30 : 6 + 2 = 7.
From point P to the right we draw a line until it intersects with line BC, denoting the intersection point as P1.
Sleeve piping line
We divide line AB in half, denoting the division point as O.
O - high point of the sleeve.
We connect points P and O with a dotted line, divide them in half and from the division point upward at right angles to the dotted line we set aside 1.5 cm.
We connect points O and P1 with a dotted line, divide it into 4 equal parts. At right angles to the dotted line from the top division point, set aside 1 centimeter upward. From the lower division point we put 1 cm down. We draw the line of the sleeve hem through points P, 1.5, O, 1, the middle of the dotted line OP1, 1 to point P1.
Side lines
From point D to the right we set aside 2 cm. We connect points P and 2. From point C to the left we set aside 2 cm. We connect points P1 and 2.
Increase for sleeve hem
From points 2 down we put 3 cm. From points 3 to the right and left we put 1 cm. We connect all the planned points as shown in the drawing.
When cutting out a sleeve pattern on paper, the hem allowance should be checked. To do this, fold the sleeve along the fold line and, if there is excess, trim along the side lines.
This is interesting: Pattern Shirt for a boy with long arms (p 98-134)
Taking measurements
In order for the baby shirt pattern to be correct in terms of size, you need to take the baby’s measurements. To sew a shirt you need the following parameters:
- Chest circumference. The measuring tape should be positioned so that it is located in the place of the largest protrusion.
- Waist parameter. The measurement is taken at the narrowest point.
- Hip girth. Measure the fullest part of your buttocks.
- Neck. Place the measuring tape at the base of the body part.
- Back length is the distance from the 7th cervical vertebra to the waist line.
- Front Length to Waist - Place the tape from the base of the neck to the waistline across the chest.
Homemade shirt
- The depth of the armhole is from the 7th vertebra of the neck to the bottom of the shoulder blade.
- Armhole width.
- Arm length. From the end of the shoulder to the wrist with the arm bent.
- Wrist circumference.
- Shoulder width is from the end of one shoulder to the other.
- Back width. The measurement is taken along the straightened back through the center of the shoulder blades. This is a horizontal line.
Scheme of taking measurements
Note! In the process of making any thing, it is necessary to measure the growth of the baby. This technique will help you more accurately determine the size of the item.
It is necessary to write down the obtained parameters so as not to get confused in the measurements, using special notations.
Child's measurements
| Measurements from the figure | Designation in the figure | Example, height 122 | |
| Bust | Og | IN | 64 cm |
| Back width | Shs | E | 26.8 cm |
| Neck circumference | Osh | F | 29 cm |
| Back armhole height* | Vprz | K-L | 15.6 cm |
| Back length to waist | DTS | K - M | 29.4 cm |
| Arm length to wrist | dr | H - T | 44.5 cm |
* Vprz is measured from the 7th cervical vertebra to the chest girth level, this is slightly below the posterior angle of the armpit.
Tables of size characteristics for girls and boys can be found at the link.
This is interesting: Pattern Dress, blouse and trousers for girls (p 86-116)
Modeling
The pattern for a boy's shirt is prepared after the style or cut of the item has been determined. This can be not only a classic version of the product. You can create a shirt that will be worn over a T-shirt, turtleneck and worn to graduation. If necessary, you can even sew a Russian shirt that will complement the folk costume.
You may be interested in this Tips for choosing a sewing machine for all types of fabrics for home use
After this, the initial sketch is modeled, which may look something like this:
Shirt modeling example
The simplest option for creating a model for making a Russian shirt with all decorative elements.
Shirt for a boy: master class
Not many people know how to sew a children’s shirt with their own hands for beginners, the patterns of which will be completely simple:
- Choose a simple sketch. Choose quality fabrics.
- Take measurements from the child. Take into account the peculiarities of textiles.
- Make a simple pattern.
- Transfer the patterns to the fabric.
- Overcast the cuts and connect all the parts.
- Sew on the fittings.
Making a thing
This is a list of stages of work on the manufacture of this item. When designing each pattern of all components, it is worth choosing the simplest options.
Shirt pattern for boys: months, 1 year and 1.5 years
The patterns for this shirt are US sizing (see table below - US), with European sizes listed nearby. In order not to be mistaken, it is better to be guided by the sizes from the first column, which correspond not to the age, but to the height of the child, for example, the smallest size is for a height of 68 cm; in the folder with patterns this will be a file with a template for 9 months. Fabric consumption is also indicated next to each size.
Size chart for small ones
Shirt for little ones
Back view
Download shirt patterns for ages from 9 months to 2 years ⇓
This is interesting: Pattern for a children's jersey shirt (sizes 68-98 and 104-116)
Drawing a pattern for a collar for a boy's shirt
Draw a rectangle ABCD.
Collar length
The lines of the rectangle AB and DC are equal to 14.5 cm (NAS by measurement + 1 cm for all sizes):
13,5 + 1 = 14,5.
Collar width
The lines of the rectangle AD and BC are 6 cm.
Sewing line and toe
From point A to the right we set aside 4.5 cm (⅓ NOS by measurement):
13,5 : 3 = 4,5.
From point B to the left we set aside 1 cm and from the intended point downwards we set aside 1 cm. We draw a sewing line through points A, 4,5 and 1. We connect points 1 and C.
Shirt patterns for children 4 and 8 years old
This pattern is intended for older children. In addition to the size, it differs from previous models in the presence of short sleeves.
Shirt for 4 - 8 years
Necessary materials:
- 1.1 x 1.4 m cotton fabric,
- b buttons
- Gasket material.
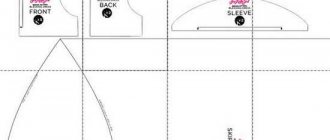
Plan for gluing parts
Download patterns for 4 - 8 years ⇓
Cutting out the details of a children's shirt
- The front consists of 2 parts: the first part (left part) - entirely, the second part (right part) - having previously laid a fold along the edge of the fastener;
- The back consists of 1 part with a fold;
- The back yoke consists of 2 folded parts;
- Sleeves - 2 parts;
- Patch pocket - 1:
- The collar consists of 2 folded parts:
- The collar stand consists of 2 parts with a fold.
How to sew a shirt for a boy: master class
Duplicate one part of the collar and its stand with adhesive spacer material.
Paper shirt details
Transfer to fabric
Sew the outer yoke to the upper section of the back, and then to the shoulder sections of the front parts; Press the seams onto the yoke. Then iron the bottom and shoulder seam allowances on the inside back yoke inside out. Place this piece inside out on the outer yoke, wrong side down, and stitch the folds along the stitching seams. Baste the open edges of the yoke parts.
Sew on the yoke
On the left side of the front of the shirt, create a patch pocket.
Next, process the edge of the clasp on the right side: iron the longitudinal section of the clasp inside out, then iron the clasp seam allowance and sew the inside fold, stitching into the edge.
Processing the edges
Finish the edge of the left side fastener: trim the seam allowance along the front edge of the left side to 7mm, iron the fastener allowance along line A inside out and baste. Sew the fold along the markings, stitching the cut of the fastener between its allowances. Press the fold towards the armhole. Place a finishing stitch along the edge of the strip at a distance of 7 mm.
Sew on the sides
Finish the side seams of the shirt.
Finish the longitudinal seams of the sleeves. Sew the sleeves into the armholes and topstitch the seams along the armholes.
We sew in the sleeves
And we make a seam on the sleeve
Treat a stand-up turn-down collar (shirt type). Finish the bottom of the garment and the sleeves with a hem seam.
Cut a strip of fabric to finish the bottom
And sew it on
Cut off the excess
Sew on the collar
Sew stitches on the left front placket and on the collar stand; Sew the buttons according to the eyelets.
Making loops
Sew on buttons
Construction of patterns
In order to sew our children's shirt, you will need to create patterns for all the elements.
Patterns:
- Back – 1 piece;
- Shoulder element – 2 parts;
- Shelf – 2 parts;
- Sleeve – 2 parts;
- Gate – 2 parts;
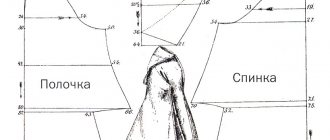
Scheme for constructing the back (bottom of the shirt)
The example shows an option for a loose shirt for a child with a wide waist. If you want to sew an elegant children's shirt to fit your figure, then the fold on the back must be removed.
Scheme for constructing a shoulder element
This detail connects the shelf and the back so that there is no seam on the shoulder.
Shelf construction diagram
Since we are sewing a shirt for a child, there is no question of a complex construction, the main thing is to maintain the dimensions, add a double strip for buttons or buttons and allowances for hems and seams.
Sleeve construction diagram
You can sew a sleeve for a children's shirt either long or short. It all depends on possibilities and desires. In our example, the shirt is light summer, so the sleeves are short.
Gate construction diagram
This collar is designed for young children, therefore, the top button at the very neck will be missing or will not be fastened. (Figure A) If there is a need to sew a more formal children's shirt and fasten the top button, then use pattern B).
This is interesting: Pattern of Shorts for girls