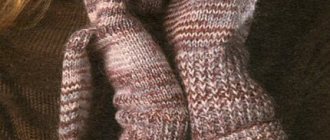
For that, to create a cap in Russian folk style, without using any specific materials, you need to treat the fabric well. Work experience is welcome. In this article you can find out how to sew a cap at home. A cap is a type of headdress. It is also one of the few types of decorations that were used exclusively in Russia.
The scale is amazing, because almost everyone wore a cap. Even class or belonging to a certain religion was not of great importance. The only exceptions are official events.
What is required to sew a cap for a Russian folk costume?
To create this wardrobe item, you need the following elements:
Main fabric. The width should be 140 cm and the length 36-40 cm. High-density cotton is perfect.
Important! It is also possible to use other materials, but then you will have to insert linings, because without it the structure will be loose.
Lining. A piece of fabric 30 by 95-145 cm will do. The best option is cotton material.
Interlining fabric needed for the visor . Plastic will do, but it must be dense; blanking the liner is also allowed.
Cutting out a cap
In order to sew the product with your own hands, you will need a pattern of a police cap. First you need to determine the size of your head. The circumference can be determined using a measuring tape.
To draw a circle on a sheet of paper or cardboard, divide the circumference by 3.14, then add 4. Get the radius of the circle. A circle and four more semicircular pieces for the quarters are cut out. The inner radius is found by subtracting eight from the outer radius. When cutting out a band, keep in mind that its volume should also be equal to this volume. It is necessary to leave 2 centimeters for allowances. You will also need a part for the visor. Make it in a semicircular shape, 3 cm wide.
Open the cap step by step
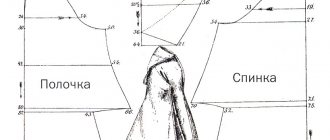
Instructions given in text form may be difficult to understand, so you can watch instructional videos. The cap pattern is below.
Stages of work
1. Fold the walls of the parts, with the front side inward. The cuts must be ground down and the resulting seams bored out. 2. Fold the bottom and sides right side inward. It is necessary to fold the slices, then find the middle lines, connect them in any convenient way.
Important! To prevent the seam from tightening, lower it. The intervals between allowances must be equal.
3. Visor. It is worth noting that both visors must be created using allowances, if we talk about the external cut. The cut located inside the parts must have an allowance of about 1 cm. The permissible error is no more than 0.25 cm. The liner is created without them, since with them the item becomes more “loose”. 4. It is necessary to bore the seams, having previously fastened the side sections of the band and its parts. All parts in this step are folded right side inward. Place the lining and band with the back side facing up, then grind off the edges. It is worth noting that the place where the visor should be should be skipped. After you have connected the parts, you need to correct the edge of the band. To do this, make another line running lengthwise. 5. Connect the pre-created band and visor together with the top part. The cuts should be evenly spaced.
This is necessary so that the finished item has a good, voluminous appearance. 6. Using a lining fabric made from cotton material, make the lining. When processing the lining of an item, it is necessary to fasten the side sections using a stitch seam.
Fashion is constantly changing.
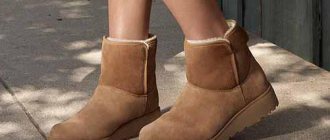
Therefore, such a headdress as a women's cap sometimes becomes popular, sometimes sent to the shelves in closets. Now is the time to wear such a headdress . Let's look at how to cut and sew it with your own hands.
Eight-piece cap (men's pattern): choose a classic
An eight-piece cap (eight-piece) is one of the most common types of men's hats. The eight-piece cap (the pattern is presented later in the article) is worn with pleasure by men of all ages. This option represents that very classic, in which both a young guy and a gray-haired old man look great.
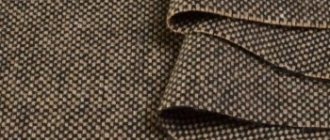
The style favorably emphasizes the color and texture of the material from which the garment is made. An eight-piece cap is made from genuine leather or leatherette, from drape or fine natural wool. Caps in plain colors, non-marking, strict shades or, conversely, with bright and expressive colors, will fit perfectly into any wardrobe. They are sewn on a twill or silk lining, using insulating padding made of padding polyester (winter version). To protect the ears and the back of the head, such an eight-piece cap can be equipped with a special visor, which is put inside in good weather, and released outside in rain or wind.
Cap pattern
Before you start creating a pattern for a women's cap, you need to prepare the material from which you will sew in the future .
Material
The main fabric will need 0.35 m with a width of 1.4 m. Cotton of the appropriate density will do. But you can choose any other suitable material.
- tweed;
- thick coat fabrics;
- artificial leather;
- Genuine Leather;
- suede leather.
NOTE! If the material you choose is too thin or loose, you will need to duplicate it with adhesive material.
Prepare the lining fabric . It will take 0.25 m with a width of 0.9–1.40 m. This can be any suitable material, but take into account its color. For the visor it is necessary to prepare dense but thin plastic; another preparation of the liner for the visor is possible.
What measurements are needed
The size of your cap is equal to the size of your head.
In order to take measurements, you need to take a regular measuring tape and wrap it around your head. This will measure the circumference.
Take the measurement at a level slightly above the eyebrows, go slightly above the line of the ears, and at the back of the head through the most protruding point . Having determined the maximum head circumference, you can decide on the size of the future product.
REFERENCE . The measuring tape should fit your head quite tightly, but should not squeeze or cause discomfort.
How to make a pattern
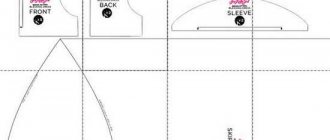
You need to cut out the following elements.
- Bottom in the amount of 1 piece.
- Front and rear walls 1 pc.
- Band in the amount of 4 pcs. There will be two main parts and two lining parts.
- Lower and upper visor 1 piece each.
Building a pattern: the beginning
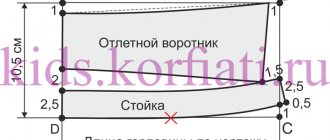
First you need to create a cap pattern. To do this, three measurements are taken: head circumference, forehead width and head length from the back of the head to the forehead. The lower part of the wedge is represented by a segment equal to 1/6 of the circumference of the head. Measure the middle of the segment, after which draw a perpendicular line, the length of which is equal to 1/2 the distance from the back of the head to the forehead. Next, a smooth line is drawn along three points, and the upper angle should be equal to 60°.
Sewing a cap
When all the parts are cut out and ironed, you can safely begin the sewing process. You should not have any difficulties if you do everything step by step, according to the given algorithm.
The basis
- The front and back pieces must be folded right sides together. The side sections must be sewn. Now the seams need to be ironed and bored. Now let's move on to the bottom and wall. They also need to be folded with the front side inward, align the cuts, as well as the middle lines, and pierce them with pins for convenience.
- Connect the parts by stitching on a typewriter. Make a slight planting from the bottom, distributing it along the entire cut line. In order to eliminate the possibility of the seam pulling, notch the allowances left for a neat seam through a certain indentation. Spread the seam and iron it.
Visor
- Now let's move on to processing the visors. They must be made without seam allowances on the outside. The insert is made without allowances on all sides. Place the liner on the back of the lower part and connect with machine stitching. Now place the top piece, right side facing up. Join with a machine stitch, moving just a little from the edge. Try to make the seams even and neat. Cut out a strip of fabric in an oblique position. Its length is 0.36 m and its width is 2.5 cm. Use it to process the outer cut with an edging seam.
- Connect the side sections of the band together with the lining and sew the seams. Now take the band and the lining, fold the top sides together and stitch the bottom edges. Just skip the area where the visor will be located. Connect the visor to the band. Place it between the main part and the lining. Carefully connect all the parts together, straightening the fabric.
Assembly
- Open the lining of the cap parts. It needs to be processed. To do this, connect the sections on the sides, use a stitch seam. Connect the lining of the walls to the lining of the bottom.
- Now you need to fold the resulting product with the lining right sides to each other and connect using a machine stitch. Don't forget to leave a small hole so that you can easily turn the product out. Now turn your hat inside out and straighten it out. Carefully hem the hole with a hidden seam, iron if necessary.
—Tags
—Categories
- Knitting (432)
- Crochet (82)
- Knitting (160)
- Knitted toys (21)
- Children's clothing (58)
- Women's clothing (212)
- Lace (4)
- Machine knitting (8)
- Men's clothing (32)
- Knitting techniques, patterns (94)
- Business ideas (1)
- Dacha (302)
- Pest Control (7)
- Water supply (3)
- Growing vegetables (71)
- Business ideas (9)
- Ideas for a summer house (32)
- Houseplants (1)
- Heating (10)
- Fruit trees and shrubs (39)
- Poultry farming, livestock farming (6)
- Beekeeping (1)
- Seedlings (22)
- Vegetable garden (70)
- Homemade products for the garden (58)
- Construction (18)
- Floriculture (16)
- Electrical (4)
- Child development (77)
- 0-2 years (30)
- 2-3 years (36)
- 3-4 years (13)
- 4-5 years (8)
- 5-6 years (9)
- 6-7 years (11)
- Children's books (1)
- For teachers and educators (14)
- Preschool education (5)
- Toys (5)
- Speech therapy (11)
- Newborns (11)
- Tips for moms (5)
- Diary on Lyra (3)
- Diary design (2)
- Health (68)
- Gymnastics (10)
- Diet, proper nutrition (11)
- Healthy lifestyle (16)
- Treatment of skin diseases (5)
- Obesity treatment (8)
- Cleansing the body (6)
- Foot care (11)
- Body care (4)
- Foreign languages (22)
- English language (18)
- Chinese (3)
- German language (1)
- French (2)
- Cooking recipes (634)
- Asian cuisine (18)
- Chicken dishes (33)
- Meat dishes (49)
- Vegetable dishes (24)
- Fish dishes (9)
- Winemaking (12)
- Main courses (125)
- Baking (107)
- Dessert, cake, ice cream (49)
- Homemade cheese (17)
- Breakfast (10)
- Preparations, preservation (68)
- Snacks (72)
- Sausages (9)
- Cooking Tricks (11)
- World cuisine (10)
- In a hurry (15)
- Salads (20)
- Tips for housewives (7)
- Sauces (10)
- Soups (19)
- Dough (18)
- Decorating dishes (3)
- Bread (19)
- Obviously incredible (3)
- Useful information (22)
- Useful sites (7)
- Useful tips (38)
- Poetry (4)
- Poems (4)
- Holidays (51)
- Video editing (2)
- Competitions (1)
- Holiday decoration (18)
- Gifts (3)
- Congratulations (7)
- Entertainment (3)
- Scenarios (3)
- Everyone dances (7)
- Photoshop (11)
- Hairstyles (7)
- Hairstyles for daughter (7)
- Hairstyles for every day (1)
- Religion (69)
- Fortune telling (15)
- Conspiracies (9)
- Prayers (21)
- Orthodoxy (7)
- Rituals (37)
- Drawing (10)
- Handicrafts (136)
- Embroidery (4)
- Decoupage (12)
- Toys (7)
- Carnival costumes (3)
- World of little dolls (15)
- Soap making (4)
- Homemade products (31)
- Country of Masters (21)
- Jewelry (3)
- Sewing (19)
- DIY (208)
- Furniture (23)
- Molds (1)
- Book binding (4)
- Repair (41)
- Homemade products (92)
- Welding (3)
- Construction (17)
- TV, films, music (22)
- Cinema (2)
- Music (13)
- Performances online (4)
- Exactly (1)
- Tourism and recreation (17)
- Travel (2)
- Fishing (3)
- Students (17)
- Ready homework assignments (1)
- Literature (1)
- Mathematics (2)
- Textbooks (5)
- Sewing (108)
- Children's clothing (21)
- Women's clothing (37)
- Simulation (2)
- Men's clothing (13)
- Sewing (60)
- Extrasensory Perception (15)
- Clairvoyance (3)
- Humor (42)
- New Russian money (8)
- from 2 to 5 (3)
Cap parts
Any cap is not just a hat. It has a special structure, and each part in it has its own name. A police cap has the following components:
- Donyshko. This part of the cap is located on top and occupies the largest part of the entire product. The bottom covers the head and is, perhaps, one of the main elements of the headdress.
- Band. Otherwise, this part can be called a cap rim. The band supports the bottom by means of the crown, which is located between the bottom and the band. Cockades are placed on the band. Historically, the cockade is a symbol of power; it is located in the middle of the band, where a person’s frontal part is located.
- Tulya. As already noted above, this is the part of the “hat” that covers the head; the crown is located between the bottom and the band. On the crown above the cockade there are also distinctive signs, most often a coat of arms.
- Quarter. The crown itself consists of quarters.
- Visor. Each cap has a visor, which has both a protective and aesthetic function. Without a visor, a cap will no longer be a cap.
- Chin strap. In modern caps, the strap is made in the form of chains or braided cords and does not serve as a holder, as was the case on real Cossack headdresses.
Pattern of a cap or cap
I have a customer who finds it very difficult to choose a hat, because his head circumference is cm and he wanted a cap or, in a modern style, a cap. Well, there is an order, I need to make a hat for a good person. I couldn’t find a good, and most importantly, the right cap pattern, so I decided to make it myself, which turned out to be not so difficult.
Let's look at the parts of the cap. It consists of a bottom, a crown, a band and a visor. I found data for a uniform cap from the late 18th century and used it in production, changing it slightly.
For a cap you need one measurement, the circumference of the head, mine is 61 cm. On paper, draw a circle with the required radius using the number PI. Divide OG plus 1 by 3.14 and by 2 - this is radius 1, the second radius is the bottom, it is in a uniform cap with a diameter of 25-27 cm. The head is large and we take a larger diameter - 27 by 2, divide = 13.5 (in the photo there is an error in the calculations )
Cut out two circles - the bottom and the circumference of the head. Fold into quarters.
We are building a crown. Draw a line through the center on both quarters. Mark the axis on a sheet of paper or fold the sheet and attach a quarter R2 to the fold - the bottom.
Now go down to the width of the desired crown. For a cap 6.5-7, for a cap 4.5-6 cm.
Draw a quarter, connect the upper corners of the quarters and extend them slightly up and down so that they intersect on the axis. Intersection point O.
From point O we find the radius R3 and R4. And we draw these two diameters from (.) O from the axis to the left and to the right. Through experience, I found out that it is better to make the crown from 4 parts. The split thread passes through the middle of the resulting part of the crown.
Here the pattern for the crown consists of 2 parts, it didn’t turn out too bad either, but it’s still better to make it out of 4 parts. I hope my cap pattern is useful to you.
Beret pattern
Patterning a beret is not a tricky business, but sewing it will require great care from you. The choice of material must also be approached with full responsibility. The beret can be sewn from leather, suede, artificial or natural, knitwear, loden, coat fabric, bouclé... I would advise you to make a trial version from an unnecessary piece of fabric before sewing in order to determine the volume and adjust the shape.
So, let's begin. The selected beret model consists of:
- beret bottom,
- beret side,
- band.
First, draw a circle with a diameter equal to 1/2 the circumference of the head. The head circumference is measured horizontally across the forehead, above the eyebrows, into the circumference of the head, closing the measuring tape at the back of the head.
Now, inside the resulting circle we draw another one, with a smaller diameter. Its diameter can be easily calculated using the school formula L = 2Pr, where L is the circumference of the head plus a small allowance for the thickness of the seams (about 1-2 cm, depending on the properties of the fabric).
Look at the picture, we have the sides of the beret, the bottom of the beret, and the band is a straight strip of fabric, folded in half (therefore its width is 5-6 cm), with a length equal to the circumference of the head plus a seam allowance.
LiveInternetLiveInternet
—Tags
—Categories
- Knitting (432)
- Crochet (82)
- Knitting (160)
- Knitted toys (21)
- Children's clothing (58)
- Women's clothing (212)
- Lace (4)
- Machine knitting (8)
- Men's clothing (32)
- Knitting techniques, patterns (94)
- Business ideas (1)
- Dacha (303)
- Pest Control (7)
- Water supply (3)
- Growing vegetables (71)
- Business ideas (9)
- Ideas for a summer house (33)
- Houseplants (1)
- Heating (10)
- Fruit trees and shrubs (39)
- Poultry farming, livestock farming (6)
- Beekeeping (1)
- Seedlings (22)
- Vegetable garden (70)
- Homemade products for the garden (58)
- Construction (18)
- Floriculture (16)
- Electrical (4)
- Child development (77)
- 0-2 years (30)
- 2-3 years (36)
- 3-4 years (13)
- 4-5 years (8)
- 5-6 years (9)
- 6-7 years (11)
- Children's books (1)
- For teachers and educators (14)
- Preschool education (5)
- Toys (5)
- Speech therapy (11)
- Newborns (11)
- Tips for moms (5)
- Diary on Lyra (3)
- Diary design (2)
- Health (66)
- Gymnastics (9)
- Diet, proper nutrition (11)
- Healthy lifestyle (16)
- Treatment of skin diseases (5)
- Obesity treatment (8)
- Cleansing the body (6)
- Foot care (10)
- Body care (4)
- Foreign languages (22)
- English language (18)
- Chinese (3)
- German language (1)
- French (2)
- Cooking recipes (629)
- Asian cuisine (18)
- Chicken dishes (33)
- Meat dishes (47)
- Vegetable dishes (24)
- Fish dishes (9)
- Winemaking (12)
- Main courses (124)
- Baking (107)
- Dessert, cake, ice cream (49)
- Homemade cheese (15)
- Breakfast (10)
- Preparations, preservation (68)
- Snacks (72)
- Sausages (7)
- Cooking Tricks (11)
- Cuisine of the world (9)
- In a hurry (15)
- Salads (20)
- Tips for housewives (7)
- Sauces (10)
- Soups (19)
- Dough (18)
- Decorating dishes (3)
- Bread (19)
- Obviously incredible (3)
- Useful information (20)
- Useful sites (5)
- Useful tips (38)
- Poetry (4)
- Poems (4)
- Holidays (51)
- Video editing (2)
- Competitions (1)
- Holiday decoration (18)
- Gifts (3)
- Congratulations (7)
- Entertainment (3)
- Scenarios (3)
- Everyone dances (7)
- Photoshop (11)
- Hairstyles (7)
- Hairstyles for daughter (7)
- Hairstyles for every day (1)
- Religion (47)
- Fortune telling (14)
- Conspiracies (6)
- Prayers (18)
- Orthodoxy (5)
- Rituals (19)
- Drawing (10)
- Handicrafts (136)
- Embroidery (4)
- Decoupage (12)
- Toys (7)
- Carnival costumes (3)
- World of little dolls (15)
- Soap making (4)
- Homemade products (31)
- Country of Masters (21)
- Jewelry (3)
- Sewing (19)
- DIY (208)
- Furniture (23)
- Molds (1)
- Book binding (4)
- Repair (41)
- Homemade products (92)
- Welding (3)
- Construction (17)
- TV, films, music (20)
- Cinema (1)
- Music (12)
- Performances online (4)
- Exactly (1)
- Tourism and recreation (18)
- Travel (3)
- Fishing (3)
- Students (17)
- Ready homework assignments (1)
- Literature (1)
- Mathematics (2)
- Textbooks (5)
- Sewing (108)
- Children's clothing (21)
- Women's clothing (37)
- Simulation (2)
- Men's clothing (13)
- Sewing (60)
- Extrasensory Perception (15)
- Clairvoyance (3)
- Humor (41)
- New Russian money (8)
- from 2 to 5 (3)
-Music
—Search by diary
—Subscription by e-mail
-Friends
— Regular readers
-Statistics
Details of the cap cut
Main fabric:
- Bottom - 1 child.
- Front wall - 1 child.
- Rear wall - 1 child.
- Okolysh - 4 children. (2 parts band and 2 parts band lining)
- Lower visor - 1 child.
- Upper visor - I child.
Lining fabric:
- Bottom - 1 child.
- Front wall - 1 child.
- Rear wall - 1 child.
Padding material
1. Fold the front and back parts of the walls with the right sides inward, and grind the side sections. The seams are ironed and unstitched (2).
2. Fold the bottom of the cap and the walls with the right sides inward, aligning the cuts and center lines of the parts; chop with pins (3, 4).
We connect the parts with machine stitching, making a small fit from the bottom (the fit is evenly distributed along the entire length of the cut).
To prevent the seam from tightening, we cut the seam allowances at equal intervals (5).
We unstitch the seam and iron it on a special block (6, 7).
3. Let's process the visor. Let us remind you that the upper and lower visors are cut out without seam allowances along the outer cut. On the internal sections of the visor parts, the seam allowances (= the sections that connect to the band) are 1 cm. The visor insert is cut out without seam allowances on all sections.
We place the liner on the wrong side of the lower visor, aligning the cuts and center lines; We connect the parts using a through machine stitch, laying it at a distance of 0.2-0.3 cm from the cuts (8). Then we place the top visor face up on top of the liner, align the cuts, the middle lines and connect the parts together along the outer cuts with a machine stitch, laying it at a distance of 0.2-0.3 cm.
We cut out a strip from the base material in the oblique direction of the warp threads, 36 cm long and 2.5 cm wide. We process the outer cut of the prepared visor with an edging seam with closed cuts (9).
4. We connect the side sections of the band and the lining of the band, unstitch the seams (10).
We fold the band and the lining of the band with the right sides inward and grind the lower sections of the part, excluding the area where the visor will be located.
We connect the visor to the band, placing it between the band and the lining of the band (11, 12).
We straighten the lower edge of the band and lay a finishing stitch along it (13).
5. We connect the prepared band with the visor and the upper part of the product with each other, evenly planting the sections of the cap wall along the entire length (planting is needed to give the upper part of the cap the required volume) (14-16).
6. Cut out the lining of the cap parts from cotton lining fabric (17).
We process the lining of the cap (18): we connect the side sections of the lining of the walls with a pressed seam. We sew the lining of the walls to the lining of the bottom, and iron the seam onto the lining of the walls.
7. Fold the product and the lining with the right sides inward and connect them with a machine stitch, leaving a small hole for turning out (19). Turn the cap right side out (20).
We bend the open section of the lining and sew it by hand with blind stitches to the seam of the band (21).