I welcome you, friends, to my resource. Today the topic of my article is “How to sew a sun skirt: step-by-step instructions with photos,” where I will tell and show you everything. And you can easily make yourself such a flared sun skirt using my step-by-step instructions with your own hands and will wear it with pleasure. And, if you need to, sew a flared skirt in two or even three suns.
For the first experiment, you should take cotton fabric without a pattern. Then you won’t have to struggle with stretching the fabric, adjusting the pattern and other nuances. Today we are just learning how to cut a circle skirt.
First, let's look at this question - how to correctly lay out the skirt pattern on the fabric. If we are sewing a skirt about 60 cm long and the width of our fabric is 140 cm or more, then the patterns should be laid out along the longitudinal line. If the length of the skirt is more than 60 cm, then it can be laid out as in Figures 1 and 2, depending on the width of the fabric.
It is possible (if the skirt is small) when a full circle is cut out at once. And the skirt comes out completely without seams. Then the pattern needs to be laid out differently.
Constructing a circle skirt pattern
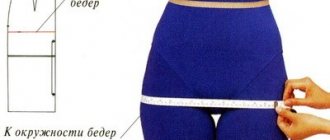
So, let's start creating a skirt pattern. The name itself suggests that the pattern of this skirt is a circle. And here it is necessary to correctly calculate the radius of the inner circle (waist line) and the radius of the outer circle (hem line of the skirt). We take only two measurements: waist circumference (WC) and product length (DI)
For example, let’s take OT = 70 cm, CI = 60 cm. For calculations, we will use the formula for circumference C = 2*n*r, where π = 3.14.
We have C = OT = 70 cm. Substitute it into the formula and calculate r - the radius of the circle.
But since not everyone is good at mathematics, I propose this method of calculating the radius: FROM: 6.28 = r. When dividing, we get r = 11.15 cm. We take approximately 11 cm. This is the radius of the inner circle. Since the length of our skirt is 60 cm, the radius of the large circle will be R = 60 + 11 = 71 cm.
So, we have all the sizes we need. You can make the pattern initially from paper, and then lay it out on fabric. I always cut out a skirt - the sun right from the fabric. To do this, depending on the width of the fabric, I fold it in half or in four.
Let's figure out how to cut a skirt from two semicircles. To create a pattern, measure along the fractional line the radius of the large circle plus allowances for the seam at the waist and the hem of the product at the bottom.
In our example, this is 71+1+3 = 75 cm (1 cm for the seam at the waist and 3 cm for the hem). This means we measure 75 cm and fold the fabric in half at this mark. Carefully align it along the edge. The point at which we folded the fabric is the center of our circles.
It is more convenient to make a pattern with an assistant who will hold the beginning of the measuring tape in the center of the circle. But if it is not there, we do it as follows.
We secure the beginning of the measuring tape with a pin in the center of the circle. We measure the small and large radii and mark with a pencil or chalk (depending on the fabric). Then we turn the measuring tape slightly relative to the center and again mark the radii. That is, from the center where we have a pin, we measure r = 11 cm, make a mark and then R = 75 cm and also make a mark. Then we turn the tape a little more around the center and make marks. And so on until we reach the edge of the fabric.
This way we drew a quarter circle. And since our fabric is folded in half, it turns out to be a semicircle. Let's cut it out. Two such semicircles will make up the sun skirt. All that remains is to sew the side seams, sew on the waistband and fold the hem.
If the skirt is small and the distance (r+R)*2 is less than or equal to the width of the fabric, then the fabric should be folded in four layers at once. Fold once along the fabric, and a second time across. Of course, measuring the required distances. And then, with the same construction, you will immediately get full sun.
How to create a flared skirt pattern. 7 skirt patterns
To bookmarks
Today I’ll tell you how to quickly and easily create a pattern for a flared skirt of varying degrees of flare. Flared skirts come in very different sizes. There are 7 types of conical skirts. 7 patterns based on the same principle.
The principle of construction is the use of the flare coefficient. The higher the k coefficient, the less voluminous the skirt will be at the bottom.
To start building, we need to take only 3 measurements.
- St = Waist circumference / divide by 2
- Skirt length
- Sat = Hip circumference / divide by 2 (remove to check the pattern)
You can build directly on fabric, or on paper, then you will be left with a pattern for a skirt of the chosen flare, and I will show you (in the next lesson) how to make culottes from it.
I described all the construction steps in detail in the images below. Do them sequentially.
Important: calculate the segment OT in the drawing (radius of the waist circumference) using the following table.
Just select the volume of the skirt you want to sew, the corresponding coefficient from the table and calculate the OT using the formula:
FROM=(St+Fri)*k,
where St is half waist circumference, Pt is the increase in freedom at the waist (from 0 to 1.5 cm), k is from the plate.
Next, the TB segment is Hip Level (usually 18-20 cm, depending on your height), or you can measure it on your figure, but this is not necessary.
Section TN - the length of the skirt from the waist to the bottom.
We draw arcs from point o, with circle radii equal to OT, OB, OH
TT1 = Half waist plus increase (0-1.5 cm)
Next, from point O we draw a straight line through point T1 and further. At all intersection points we put symbols in accordance with the figure.
Important: let’s check whether the skirt is too narrow across the hips. To do this, measure the segment BB1 and compare it with the measurement Half hip circumference (Sb) + Increase (Psb) - 1.5-2 cm.
If the half-circumference of the hips with the increase is less than or equal to the segment BB1, then that’s it, you can cut and sew.
Look what we got and what the lines on the pattern mean.
Let's cut the pattern piece in the middle (you can bend it in half and cut it), we'll get the pattern pieces for the front and back panels of the skirt.
If the half-circumference of the hips is greater than segment BB1, then move point B1 along an arc to the right by the amount of the difference and draw a straight line through it and point O until it intersects with the bottom line.
We take the excess along the TT1 waist line into the dart, or, if it is insignificant, we subject it to stitching during the sewing process.
If the excess along the waistline is more than 3 cm, choose a k that is smaller in value and therefore has a larger flare of the skirt.
In order to avoid (at least partially) strong stretching of the skirt fabric in oblique areas and its sagging, I recommend raising the waist and hem lines.
Below, in the table, I have given the values of the rise in the waistline and hemline in skirts of different volumes. Focus on them, and also take into account the length of the product and the properties of the fabric.
Be sure to hang the skirt overnight so that all the oblique sections of the skirt fabric are stretched out, and only then process the bottom of the skirt. The bottom alignment is carried out on the figure.
I hope that the lesson was useful and understandable to you.
Author of the publication
offline 16 hours
Knitting Here
0
We knit together, our hobby is the best hobby!
Comments: 57Publications: 2242Registration: 07/22/2019
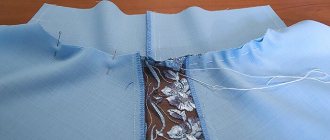
Sewing a circle skirt
We sew one side seam completely, and in the second side seam we leave the top unsewn for sewing in a zipper. We sew in a zipper. For the belt, cut a strip of fabric along the longitudinal line OT+5 cm long, 7-8 cm wide. Fold the strip in half lengthwise and sew the ends together.
Then, having previously basted one side of the belt to the skirt from the front side, we sew it on a machine. After this, carefully bend the second side of the belt inward and sew it to the waist on the wrong side. Then we sew a seam so that it goes along the seam that was used to sew the first side of the belt. Attach a clasp.
All that remains is to hem the hem. It all depends on how wide you want the hem to be. If it is narrow, about 5 mm, then there will be no special problems. Carefully baste the hem on the hem, iron it and you can stitch it by machine.
But if you want a wider hem, then after you have ironed the hem, you need to work with it some more. To ensure that the hem is hemmed neatly, you can do this in two ways. If the fabric is easy to iron, you need to iron it so that there is no wave.
If this does not help and the wave still remains, do the following. Make the largest stitch on the machine, loosen the top thread a little and sew the seam at a distance of 4-5 mm from the edge of the hem.
Then carefully pull one thread from the seam so that the edge of the hem gathers to the required length. Distribute the resulting gathers evenly and then hem the hem.
You can also gather the edge of the hem by hand by running a basting stitch along the edge of the hem instead of machine stitching. This will make it look more neat. Hemming the hem is the finishing touch to sewing a circle skirt.
Calculation of the sun skirt pattern
To perform calculations and draw a drawing, you will need only two measurements: Waist circumference and Skirt length.
As an example, take the following dimensional characteristics of a figure:
Waist circumference (FR) = 76 cm
Skirt length (Du) = 60 cm
The OT measurement is taken without any allowance for freedom of fit, since the oblique cut formed by the circle is quite elastic and stretches easily.
The radius for constructing the waist line is determined by the formula: Rt = K * measure FROM
where K is a coefficient depending on the degree of flare of the skirt. For a sun skirt it is 0.16.
RT = 0.16 * 76 cm = 12.2 cm
If you need a pattern for a sun skirt with an elastic band, then the waist circumference is increased by at least 1/4 of the OT measurements, and then it can be worn over the head: Rt = 0.16 * (OT +1/4 OT) = 0.16 * (76 cm + 19 cm) = 15.2 cm
Calculation of the radius for constructing the hem line: Rн = Rт + measure DN + 2 cm (allowance for hem at the bottom)
Rн = 12.2 cm + 60 cm + 2 cm = 74.2 cm
From point A, draw an arc with a radius Rt = 12.2 cm, we get a waist line.
Similarly, we draw another arc that determines the length of the skirt with a radius Rн = 74.2 cm, we get the bottom line.
Skirt in two suns and three suns
Sometimes the width of the circle skirt is not enough and then they sew a skirt of one and a half suns, two suns or three suns. They are all cut according to the same principle. You just need to take into account that the OT will be distributed not over one circle, but over one and a half, two or three.
If you want to get a skirt with two suns, then the radius of the small circle should be calculated using the formula C = 4*π * r. That is, to find the radius of a small circle, you need r = FROM: 12.5. We add to it the length of the product plus allowances and get a large radius R. For a skirt with two suns, you need to cut out four semicircles. And then sew them.
Sometimes it is necessary to sew a skirt with three suns. The cutting technique is the same, only the radius of the small circle is calculated using the formula C= 6* π*r. That is, r = FROM: 18.84. Otherwise, we do everything the same as when sewing a circle skirt.
Learning how to create a flared circle skirt pattern: classification
The flared skirt comes in different models with similar silhouettes:
- Sun;
- Half sun;
- ? sun;
- Bell;
- A – silhouette;
- With different numbers of wedges;
- Godet.
The differences between the styles are in the proportions and cutting technique of the material.
Such skirts are made from any type of fabric. Luxurious silk and shiny satin are perfect for evening wear. The image will be elegant and solemn. A knitted product will emphasize the softness and charm of a woman. People will feel comfortable in her company.
A denim flared skirt with decorative elements is an excellent example of business style clothing. Flared leather skirts are also trending: they successfully replace denim models. Shiny decor, metal, embroidery, and piping look modern as accessories. And also a combination of fabric and fur, jeans and lace, asymmetry.
Let's look at a guide to creating a flared skirt pattern
Sewing a flared skirt with your own hands is not difficult for a craftswoman. First, we will take measurements, carry out calculations and draw a paper pattern. According to it, the matter is cut out in an elementary way.
Taking measurements:
- Half waist circumference (SW);
- Skirt length (DU).
Draw a right angle on a piece of Whatman paper. At the intersection of its sides we put a schematic designation - the letter “A”. The location of the waist is calculated using the formula:
AT = AT 1 = SWEAT? 2 + 5 cm.
On the diagram we put aside the calculated segments and put the letter designations “T” and “T 1”.
From the conventional letters “T” and “T 1” we set aside the length of the skirt; we will call the resulting points “D” and D 1.” From the center of the corner we draw a smooth arc of the inner radius, connecting the letter designations “T” and “T 1”. The result is a waist line.
We connect the schematic letters “D” and “D 1” with an even arc of the outer radius. The result is the bottom line of the product.
In the photo it looks like this:
Important.
The flared skirt is cut on the bias. Due to the inevitable stretching of the fabric, the hem will definitely sag. Amendments to calculations and drawings will help prevent trouble.
- The amount of stretch at the waist = from 1 cm to 2.5 cm.
- The amount of sagging along the hem of the product = from 1.5 to 6 cm (or more).
This indicator depends on the density, composition and properties of matter.
Taking into account the amendments, we continue to build the pattern:
This is what the finished pattern for cutting a flared skirt looks like:
The back and front fabrics of the product are cut the same way. Based on the basic pattern, you can get single-seam, two-seam and multi-seam models.