Women's pajama pants: choosing fabric and preparing for work.
The offered model is made of natural cotton. For winter pajamas, you can take thin flannel; for autumn or spring, chintz is suitable.
When making underwear and sleepwear, use only natural fabric!
Before purchasing fabric, create a pattern in order to accurately determine the amount of fabric required. Measure the width of the legs of the front and back halves at the widest point, add them together and multiply by 2. Add another 12 cm for allowances. If the resulting figure is less than the width of the fabric, you will need to buy a piece equal to one length of the trousers plus 10 cm for the waistband and allowances, or twice as much if the width of the fabric is smaller.
For the belt you will also need an elastic band 1 cm wide and a length equal to the waist circumference minus 3 cm. To create the pattern you will need sample trousers. These can be either pajama pants or any other trousers and even shorts. The main thing is that they fit in width, and you can change the length as you wish.
When creating a pattern, keep in mind that sleepwear should always be sewn loose. Trace the sample, departing from the edge from 3 to 5 cm, depending on the model chosen for the base. If these are tight-fitting pants, step back more; if you outline pajama pants that fit you, draw an exact outline.
We will be sewing pajama pants using a French double seam, which is sometimes called a "linen" seam. The peculiarity of this seam is that it covers the sections of the fabric and completely prevents it from fraying. The French seam is used primarily on thin or sheer fabrics, but it is great for lingerie or sleepwear. If you plan to sew pajama pants from thick, warm flannel, try this stitch on a piece - it may turn out too tight. Then sew the seams in the usual way and overlock the edges with an overlocker or zigzag.
So let's get to work!
Constructing a pattern
Fold the sample in half, straightening out the crotch and center seams as much as possible. Trace the outline of the front half of the sample on paper: the curved line of the middle seam, the top and the beginning of the side seam.
Turn the trousers over to the other side, place them on another part of the sheet and draw the middle seam again, this time on the back half. It will be longer and cut more heavily inwards as shown in the pattern diagram. Make the waist line on the back part higher towards the middle by 5 cm.
Using a ruler, draw down the step lines of the legs, narrowing them slightly, as shown in the pattern diagram. Measure the required length from the waistline. Check the pattern with a centimeter. The length of the side seams of the front and back halves should match each other, as well as the length of the inseams of the front and back. The total sum of the waist widths of the front and back halves should be approximately 10-20 cm greater than the actual half-waist circumference, for subsequent cinching in the belt.
Uncover
Before cutting, the fabric must be washed and ironed. Seam allowances: 1.5 cm on the middle, side and crotch seams, 1 cm on the top and 2 cm on the bottom edge.
Option 1.
Fold the fabric in half along the grain line (edge) with right sides facing in. Cut out 1 front half and 1 back half.
Option 2.
Lay out the fabric and cut out 1 front half and 1 back half, flip the pattern over and cut out 1 front and 1 back piece again.
If the fabric has a directional pattern, all parts must be cut in the same direction of the pattern. Watch the direction of the grain thread - it should be parallel to the length of the trousers.
Also cut a 2.5cm wide strip across the entire width of the fabric for the tie belt. For the main belt, calculate the sum of the width at the waist of all 4 halves (excluding allowances). Subtract 15 cm and add 2 cm for allowances and cut a strip of this length 5 cm wide. Cut an additional piece 5 cm wide and 17 cm long.
Progress
- trouser details
- rubber
- thread, scissors, pins
Fold the back and front halves in pairs, wrong sides inward. Sew by 5 mm from the edge. Cut the allowance by 2-3 mm. Iron the seam, turn it inside out and iron again.
Sew, retreating from the edge 5-7 mm, closing the open cut of the previous seam.
Iron towards the back half. Topstitch along the right side close to the seam.
Fold each piece in half with the wrong side facing in and sew the crotch seams in the same way as the previous side seams. Don't forget to iron after each step!
Turn one pant leg right side out and insert the pant leg inside out.
Line up the middle seam and pin. Sew at a distance of 5 mm, cut off the seam allowance close to the stitching and cut in the rounded areas. Iron.
Turn the pants inside out so that the right side is now inside. Iron and topstitch 5-7 mm, covering the open edge of the previous seam.
Turn up the bottom of the legs 1 cm and iron. Fold again, iron, pin and stitch close to the fold.
Fold the large piece of the main belt and the piece 17 cm long along the short edge, right sides inward. Sew 5-7 mm, secure the thread. Leave a 1cm open section and stitch further to the end. Sew the second ends of the parts in the same way to make a ring. Don't get confused, the open area in both seams should be closer to the same edge of the waistband.
Press the seam allowances to the sides and stitch close to the seam on both sides. Fold the ring belt in half along its entire length and iron. Iron 1 cm inside the waistband from each edge.
Place the main waistband ring in front of you with the open seams facing up. Insert the top edge of the trousers into the ironed waistband to a depth of 1 cm and baste. The center of the front of the trousers should be between the seams of the waistband with open areas, and these areas themselves should be on the front side of the trousers. Sew the waistband along the bottom edge.
Insert an elastic band into one of the open seam areas in the waistband, for example using a safety pin.
Pin or baste the ends of the elastic and try on the pants to determine the length of the elastic. Sew the ends of the elastic by hand or by machine. Fully straighten the elastic band inside the waistband. Iron the belt-tie part in half along its entire length, bending each edge approximately 7 mm to the middle. Fold it in half again, covering the inside edges, and iron.
Sew along the entire length and iron. Insert the tie belt into one of the open seam sections using the same pin, pull it through the back halves in a circle to the second open section and pull it out. Straighten and tie knots at the ends.
Pajama pants with elastic are ready!
This is interesting: Pattern of pants for a boy 116-158
Constructing a trouser pattern
The pattern of trousers with elastic for women begins with the formation of a mesh. All the parts that will make up the trouser legs are built in here. Usually this process is very complicated and takes a lot of time, since all measurements need to be transferred to paper. The calculations use formulas to determine a particular grid element.
You might be interested in this All about overlock stitching on sewing machines
Net
The easiest option for creating the correct base according to the specified standards is to build a grid. The mesh is the skeleton of the future full pattern. You can build it as follows:
- Draw a horizontal line at the top of the paper, which will be defined as the waist line.
- Parallel to this line, draw another one - “thigh”. And even lower is the “seat height” parallel.
- 2 more parallels “knee” and “bottom”. All these straight lines are located at a distance determined by the measurements taken earlier.
- Intersect all parallels with a vertical line that will intersect them at right angles.
- Draw a vertical line from the waist, which determines the length of the leg from the side. Conventionally, it can be called “D₁”.
- From the waist line, lower the vertical called “D₂”, which determines the height from the waist line to the bottom.
- Set aside the vertical line of the thigh “D₃” from the parallel of the “thigh” to the “knee”, the length of which is determined by the formula “D₃” = semi-thigh circumference / 10 + 3 cm.
- Set aside a vertical line from the knee to the bottom called “D₄”.
Basic grid for a pattern
This is a general grid on which, using auxiliary verticals, you can add additional lines that define parts of the pants. This option can be used to sew panties for the summer or create a home version.
Trouser width at top
This mesh detail will help determine whether the final pant leg silhouette will be wide or narrow. You need to take tracing paper and make the following constructions:
- Extend the base vertical above the waistline.
- From the continued element, extend the parallels “D₅” and “D₆” in different directions - the half-circumferences of the hips.
- It is necessary to take into account an increase of at least 2 cm.
Determining the width of the trouser leg
The increase depends on the type of material. If the textile stretches, you can add only 0.5 cm extra.
Front half
You need to build a short line “D₇”, which is laid off from the base vertical. The parameter can be determined by the following formula “D₇” = semi-hip circumference / 10 + 1 cm. If you draw a dotted line from the main vertical “D₈”, then it can also become the width of the trouser leg.
Front half
When forming the front half, you need to make a tap to determine the fit of the product. The process is quite painstaking, but not complicated.
Rear half
From the base vertical, put a line to the left, and you will get the center line of the back half. “D₉” = A + B. The lines are determined by the following parameters:
- A = ((OB + Gain) / 4 + 1) / 4 - with bulky gluteal muscle; A = ((OB + Increase) / 4 - 1) / 4 - with the round gluteal muscle; A = (OB + Gain) / 16 - for other shapes of the buttocks.
- B = 2 - with normal forms; B = 1 - with protruding buttocks; B = 0.5 - for flat ones.
You might be interested in what things you can sew from old clothes with your own hands
Back half of trousers
Using such adjustments, you can substitute values in the first formula and get an individual version.
Finished trouser leg mesh
Next, all the deferred lines are connected to form a complete grid for all parts of the pattern. Next, the pattern of the trousers is prepared in accordance with the prepared mesh, the fabric is cut and final stitching takes place.
Modeling
This was the basis:
These are the changes I made.
Taking into account the fact that the raincoat fabric does not stretch in any way and there is insulation, albeit quite thin, I added to the base.
- I lengthened the bottom by 3 cm so that the length reaches the floor.
- It gave a good increase in the knee so that you could bend your legs freely when walking and the pants would not slide down the back of your waist.
- I ignored the darts, the belt will have an elastic band.
- The center of the back was raised a centimeter. With thick insulation, you need to raise the entire waistline.
- My total increase in hips is 6 cm.
The thicker the insulation, the greater the increase. Approximately 6-7 mm from one and a half to a quarter girth for non-stretch raincoat fabric, the rest for insulation.
I didn't take any photos of the sewing. There are pictures of the finished pants.
To take a picture of the figure, I put them on my niece, that’s why they look so loose. She is slim by modern standards, 8 centimeters smaller than me in hip size.
Free winter pants patterns
If you don’t have ready-made patterns, then I’ll show you one of the easy ways to get free life-size patterns. To get patterns for winter pants, I will use the old proven method that I talked about in this article.
For a sample, I took my husband's old jeans. Super precision and calculations are not needed here, I do everything “by eye”, then during the fitting process I make a little adjustment.
For those who don’t want to use grandma’s method, I’ll leave you with ready-made patterns for winter pants. You need to download the free pattern, print it and when cutting, make large seam allowances, approximately 1.5 - 2 cm.
Pattern of men's pants size 46-56 evro
Pattern of pants for girls 5-8 years old
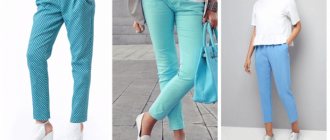
What to wear with pants with elastic (tie)
To further motivate you to sew these trousers, I want to show and tell you what you can combine them with.
The most common option is tops, T-shirts and T-shirts. The main rule is a harmonious combination of fabrics. So, if you decide to sew trousers from chiffon, then it is better to wear them in the future with a chiffon top.
Options made from denser fabrics go well with items made from light knitwear - tops, cardigans. Denim jackets and shirts will also be good company.
It is better to choose low-cut shoes - ballet flats, slippers, moccasins, sneakers, sandals and sandals.
How to sew pants, winter pants for men and children's winter pants for girls step by step
If you need to see the sewing process step by step, you can watch this master class. I sew one by one: patterns from padding polyester, then from raincoat fabric.
Everything is very simple, I only need to perform two operations on the sewing machine:
1. I connect the pants along the seat cut on the back half of the legs and the bow cut on the front.
2. I connect along a stepwise cut.
At this stage I arranged a fitting for my husband. In terms of width and volume, everything fit him, I only changed the length of the trousers. I cut off the excess along the bottom line and left 4 cm for the hem.
Important (!) I leave an allowance of 4 cm for the hem of the bottom only on the raincoat fabric; on the contrary, I cut the padding polyester 3 cm above the bottom line.
Now I connect pants made of padding polyester and raincoat fabric along the seam of the bottom of the legs. To do this, I lay them on the wrong side in the direction of each other, and each copy (insulation and cover) should lie on one side - the front or back.
3. I take each trouser leg in turn and connect it first with tailor’s pins, then using a sewing machine with a straight stitch, retreating 1 cm from the edge.
4. Then I turn the pants right side out. I fasten both layers on each trouser leg with pins and sew them with a straight stitch on the machine, retreating 1.5 cm from the edge.
Now all that remains is to sew the belt to the almost finished trousers. How I will do this, read on to my master class.
This is interesting: Pattern Fleece-lined pants
Sewing order
- I cut out trouser legs from raincoat fabric, from insulation and from lining fabric. If you are in doubt about the calculations, give larger allowances. In general, all the cuts will be closed, there is no need to overcast, so I give allowances of 1 cm everywhere, 4 cm at the bottom.
- Trying on, adjustments.
- Codpiece clasp.
- Side, crotch and middle seams on the outer trousers made of raincoat fabric.
- I connect identical parts from insulation and lining. Side, crotch and center seams on the inner pants.
- I insert one pair of pants into the other. I sew the lining to the fastener. I turn up the bottoms.
- I measure the length of the top of the pants, cut out a belt of this length plus 2 cm allowances, with a fold along the top, i.e. width 10 cm - 4 cm finished. I determine where the elastic will begin and duplicate the belt part with adhesive material before the elastic.
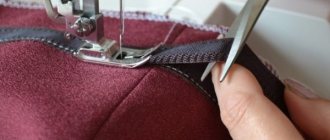
I iron the lengthwise allowances on the waistband inward. I iron the seam allowance that will be on the wrong side a mm further. The photo below shows the difference.
The seam allowance on the reverse side is ironed to a slightly smaller amount.
I stitch the edges of the belt (the edges that are short vertical, near the fastener).
I sew the elastic to the waistband. I select the length experimentally.
I cut off the belt with the pants and sew it on.
- Button fastening. Elastic at the bottom of the trousers.
I want to say that the sewing order is similar to these pants. Here is a significantly simplified version. But if there is a misunderstanding, you can go to those pants, go down to the sewing and see how to do it. Each stage is discussed in great detail there.
Fleece vest for overalls
Cut out the details of the front and back:
Fleece, if it doesn’t fray, you don’t need to process it with bias tape, I’ll be honest - I just didn’t have time to do it, so I just processed the sections with a zig-zag:
Sew on the Velcro parts:
Sew the parts of the vest along the side seams:
We sew the vest to the top of the trousers - to the raincoat fabric:
And then we sew the lining with padding polyester to the seam of the vest and trouser legs, carefully tucking in the seam allowances. You can baste first and then carefully stitch from the front side.
these wonderful insulated pants for my son in three hours. Perhaps if I had more time, I could also make a zipper in the center of the fleece vest, but that’s for next time! Sew with me, and see you soon on the blog!