The trench coat is stylish and at the same time very versatile and practical item in the wardrobe. The main distinguishing characteristics of this raincoat are the large turn-down double-breasted collar, shoulder straps, cuffs and belt. Also, this coat features two rows of buttons on both fronts. To sew a trench coat, as a rule, hard waterproof fabrics are used: cotton twill, gabardine and other fabrics with special impregnation. Made in classic colors (black, white, all shades of beige), the trench coat will look stylish for several seasons, allowing you to create many completely different looks - from elegant to sporty.
In this master class we will sew a trench coat using pattern 113 from Burda 9/2010, and in the electronic catalog on the website you can find all the patterns of raincoats and trench coats from Burda.
Find your perfect trench coat: 20 trench coat patterns
How to sew a hood with your own hands: patterns
A hood can complement not only a raincoat or coat, but also a jacket. To choose a hood for a jacket, you first need to understand what types there are. There are several types of hoods:
- low volume;
- volume;
- tight-fitting to the head;
- falling down the neck;
- There are also many models that combine several of the listed types.
The simplest version of a women's jacket with a hood is the hoodie model.
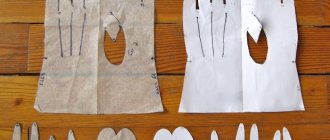
The pattern of such a jacket will include the following elements:
- back;
- shelf with a hood;
- pocket details;
- sleeve pattern.
To sew a hoodie model, you can use fleece, velsoft, footer and faux fur. You can also combine it with knitwear, which will give an imitation of hand knitting.
To determine the material consumption, you need to decide what the size of the jacket and the width of the fabric will be. For example, with a fabric width of 180 - 200 cm (footer and velsoft), you will need from 180 to 200 cm of material. The width of fleece and faux fur is 140 - 160 cm, 170 - 220 cm of material will be required. When buying fabric and making calculations, you need to add a few centimeters to align the cut, or if there is a defect.
You might be interested in this: How to make your own doll amulet from fabrics
How to sew a carnival cloak and wizard's cape for a boy?
A carnival costume of a wizard or astrologer for a boy may consist of:
- capes and hats - caps
- raincoat with hood
Wizard costume with cape.
Use a pattern like the one in the picture to make one.
Pattern for a Wizard's cloak.
IMPORTANT: You can fabric already with patterns in the form of stars and patterns or plain, and then decorate it at your discretion.
Wizard costume with cape and cap.
Fashionable women's raincoats for spring and autumn
Raincoats almost never go out of style and this season is no exception. The vast majority of fashion houses presented a wide variety of models in their ready-to-wear collections. When studying fashion trends, it is worth immediately noting that a classic raincoat is always relevant.
The trend is for loose-fitting raincoats just below the knee, which are suitable for both slender, graceful girls and ladies of elegant age with curvy figures. Double-breasted raincoats are presented in a wide range, lengths from mini and medium to long floor-length models. Elegant classic models have a very simple cut, a classic English collar with lapels or a shirt type. Almost all fashionable models of raincoats have a belt with a buckle.
Lovers of feminine romantic style also have something to choose from. Many collections feature models with a cut-off waist and a wide bottom. Length – up to or just below the knee and maxi. The color of a raincoat in modern fashion is the personal preference of every woman.
You can safely choose fabric in bright colors or printed material in the online store. For classics, it is recommended to give preference to light shades from milky to light beige and coffee. Many fashion designers presented maxi raincoats in dark colors and black.
Raincoat fabric
To choose the right fabric for a raincoat, it is important to take into account some nuances - the climatic and seasonal conditions of the region where you live, your body type and model. For classic straight or slightly flared styles, plain raincoat fabrics such as Duspo Milki, artificial or natural leather are suitable. It is better to sew a waterproof insulated raincoat from quilted wool on synthetic padding. Short raincoats for girls and young girls can be made from bright printed materials, for example, from Duspo print or print stretch faux leather.
Sewing a raincoat - stages and nuances
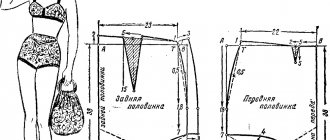
The pattern of a medium-length double-breasted raincoat with an English collar and welt pockets with flaps consists of:
- Back – 2 parts;
- Front – 2 parts;
- Sleeves – 2 parts each;
- Collar – 6 parts;
- Front trim – 2 parts;
- Collar trim – 2 parts;
- Flaps for pockets – 2 parts;
- Knee strap – 1 piece.
The photo shows a diagram for constructing a pattern, which can be adjusted according to dimensional data and individual characteristics of the figure. When preparing for work and cutting, you need to take into account that you will also need lining fabric and duplicating material for the front and collar hems. If the main fabric is soft, then you can additionally duplicate the upper part of the sleeve and back.
Stages of work:
- Machine stitch all the prefabricated parts - back, sleeves, collar;
- Sew pocket flaps into the front details;
- Sew burlap pockets from lining fabric;
- Insert burlap through the slit with the wrong side facing out and sew it in from the wrong side of the front;
- Sew, connecting the right sides of the hem to the front parts;
- Connect the shoulder seams, then the side seams;
- Sew in sleeves and collar;
- Sew lining fabric.
How to sew a raincoat, cape, and raincoat with a hood for a girl: pattern, photo
A raincoat is an indispensable item in a child’s wardrobe, especially if he is still small. A waterproof raincoat will protect you from rain and wind, and you can wear it to run to the store, clinic, or just breathe some air outside. If holding an umbrella correctly is not so easy for a child, with a raincoat everything is easier - put it on and go. There is also nothing difficult about sewing a raincoat for a girl with your own hands. Try this to experience significant savings. Children grow quickly, and there is a high chance that a store-bought cape will only last a couple of seasons.
IMPORTANT: What should a raincoat be like first? That's right, waterproof. It is important to choose the right fabric. Polyurethane-coated Oxford, membrane, Taslan or Bologna will suit you.
To sew such a beautiful and practical raincoat for a little girl, you don’t even need to create a pattern. Set aside literally an hour of time and prepare:
- piece of waterproof fabric
- chalk or soap
- tape measure
- ruler 1 m
- scissors
- needle and thread
- braid
- elastic band
- backstage
- buttons
Raincoat with hood: pattern.
- Lay the fabric out on the floor or table. You will need to draw on it and then cut out a square. To find out the size of its diagonal, use a centimeter to measure the distance from the 3rd phalanx of the middle finger of the girl’s left hand to the 3rd phalanx of the middle finger of her right hand (along the left forearm, left shoulder, back, right shoulder, right forearm).
- If you want to sew a long raincoat that covers the child’s hips, you will need to cut out a rhombus with a smaller diagonal equal to the distance indicated in the previous paragraph, and a larger one - the same value multiplied by 1.5.
- The diagonal of the square will also be needed to make a slot for the head clearly in its middle. Finish the seams along the edges: sew them or decorate them with braid.
- For the hood you will need to draw and cut out a rectangle. You will fold it in half and stitch on one side. On the other hand, fold and sew so that you can pull the ties or drawstring through the hood.
- Sew the hood to the base of the raincoat.
- To prevent the raincoat from scattering to the sides and to prevent the child from getting wet, sew buttons on the sides on one side and loops on the other to form a clasp.
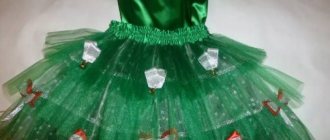
- If you want, you can sew a waterproof skirt under your raincoat. For it you will need a rectangular piece of fabric. Make a hem at the top and thread an elastic band through it; sew or trim it with braid at the bottom.
DIY raincoat with a hood for a girl.
DIY raincoat with a hood for a girl: finishing the seams.
DIY raincoat with a hood for a girl: the hood will have a drawstring.
DIY raincoat with a hood for a girl: sew buttons on the sides.
If you want, complement the raincoat with a waterproof skirt.
Waterproof suit for girls.
IMPORTANT: The advantage of such a raincoat in the form of a cape is that it is seamless. You won't have to worry about how to seal the seams or how to glue them, for example.
You can also sew a raincoat a la poncho for a girl using this pattern.
Raincoat for girls: pattern.
It's easy to sew a raincoat
A product that does not require a pattern can be made by a person without special knowledge and skills. It is a little more difficult to sew a trench coat, even if there are patterns. They can be bought or downloaded on the Internet on websites that teach sewing. A craftswoman without experience should not take on the job if the raincoat is supposed to have a lining. This can be done beautifully and efficiently by professional seamstresses. You can contact the atelier, where they will cut and sew a raincoat of the desired style according to your figure.
If you know how to use ready-made patterns or have ever done this type of needlework, then the work will be easy to complete. You can design a raincoat based on patterns for a dress, you just need to increase the increments and expand the product downwards.
They will need to be laid out on fabric folded in half in the direction of the grain, outlined and cut. There will be 2 copies of all parts, and one copy of the back, since the pattern is laid on the fold of the fabric. Now all that remains is to baste, try on and sew the product.