A cap is an important component of a baby’s first wardrobe. In addition to purely aesthetic functions, this headdress plays an important protective role. The cap protects the fontanel on the baby’s head, protecting it from temperature changes and drafts. Of course, you can buy a cap in a store. But how much more comfortable and warmer will a baby be in a hat sewn by the hands of his mother or grandmother! Making your baby's first headdress is not difficult. The pattern of a cap for a newborn is extremely simple; the sewing technology does not require deep practical skills.
Moreover, sewing can be done manually, without a sewing machine. You will learn how to make a cute cap with your own hands in this article.
Making a cap pattern with your own hands
In this section you can learn how to properly start making a cap pattern for a newborn baby, and we will start with the back of the head.
The back of a child's cap
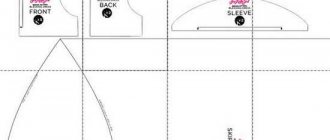
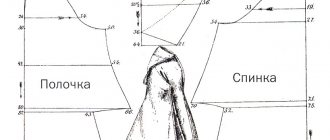
To begin, we must take a blank sheet of paper, a pen or pencil (whichever is more convenient for you). On the surface of the sheet, carefully draw a rectangle and mark it. In our case, this is ABCD (in the figure above you can see this), the vertical lines AD and BC are the same length of 12 cm (1/2 head circumference, according to the measurement + 3 cm for any size):
18:2+3=12 cm
Also in the figure we see the horizontal directions AB and DS, they also make up the width of the occipital lobe and are similarly the same, 6 cm each (x/4 head circumference according to the measurement + 1.5 cm for any size).
18:4+1.5=6 cm
Sewing line
We divide the angle ABC in half and from place B along the bisector of the angle we draw 2 cm (for any volume). We divide the BC line in the same way into two identical parts. Having done everything written above, we put 2 cm from place C to the left side (for, we repeat, any size of your baby’s head). We shorten the sewing line from place A, go through the 2nd point, the middle of BC and approach place 2 (lower).
Bottom line of the cap
From place D (our vertical line AD) we cancel 0.5 centimeters (for the purpose of absolutely all volumes). Places 0.5 and 2 (bottom) are combined together.
So, slowly but surely, we reach the next and final stage: the front part.
Front part of baby's cap
Again, take a sheet of paper and the subject of writing. We draw a rectangle ABSD, where the vertical lines AD and BC are the same, 16 cm each (the length of the occipital lobe according to the direction of sewing from place A down to the bottom of place 2), and the horizontal directions AB and CD are 9 cm (V2 head circumference according to the measurement):
18:2=9 cm
Sewing line
From our letter D to the right side, along the line DS we set aside 1 cm and from this place we move upward at a right angle to the line DS, we set aside another 1 cm (for any volumes). After that, we combine places A and 1.
Line of the front and bottom of the cap
From place C we go to the left along the line SD and set aside 1 cm.
We combine places B and 1 (on the bottom line). Place 1 (on the hem line) is combined with place 1 (along the sewing line). We hope that our article will be useful and easy to read for you. Good luck in your endeavors!
This is interesting: Pattern Summer sundress for girls (size 104-128)
Construction of a two-piece cap
The pattern of a hat for a newborn from two parts is considered the easiest to make. In addition, it gives the needlewoman the opportunity to dream up how to decorate the cap.
The pattern itself can be printed ready-made. Of course, another option is available: make the pattern yourself. Next we'll look at how to do this.
The pattern is always built from the back of the head. From the upper left corner of the drawing you need to move to the right and down respectively. From point A a value equal to a quarter of the semicircle of the head is deposited.
We get: AB = 1⁄2 OG ÷ 4 + 1.5 cm = 24 ÷ 4 + 1.5 cm = 7.5 cm AD = 1⁄2 OG ÷ 2 + 3 cm = 24 ÷ 2 + 3 cm = 15 cm.
We connect the rectangle with the vertices ABCD point by point. Along the bisector from B we set aside 2 cm, from D - 5 mm and from C - 2 cm. We combine all the points. The result was a back part folded in half.
Then you should measure the sewing line. Let's move on to the pattern of the second part. For it you need to draw a rectangle with vertices ABCD, where AB = 1⁄2 OG ÷ 2 = 24 ÷ 2 = 12 cm, AD = length of the sewing line. In this case, it is 20 cm. From point D you need to mark 1 cm up and to the right. Connect all the dots.
The seam allowances have already been included in the dimensions; there is no need to make any additional ones. The pattern for a newborn's hat is ready.
How to choose a hat size for a child
When a child is very small, he is only a few months old, it is difficult to take him to clothing stores, so you need to buy hats according to your own measurements. Determining the size of a children's headdress is quite simple. It is recommended to use a centimeter, or, as a last resort, a thread that does not stretch. The centimeter must be applied to the most convex point of the head, and placed in front above the child’s eyebrows.
Pattern of a cap for a newborn
Do not tighten the tape, and if necessary, round the result up. The number that turns out will be the size of the headdress. For example, if the measurements give a result of 42 cm, then it is better to take the size of the product 43. When purchasing, you need to focus on the age of the baby.
Use of baby fabric
In the first years of life, the baby grows very quickly, so it is not advisable to buy many hats of the same size at once. Approximately every 2 months you need to take new products. Sometimes you can buy things to grow. For babies, size 44 is suitable, in six months you can safely buy 46, and in a year from 48 and above. These are averages and may vary for different babies because each person is different.
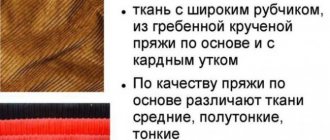
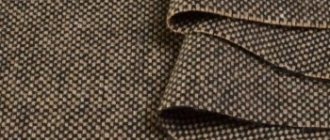
After one year, the size of the head will change, but not at a rapid rate. It is advisable to take measurements every six months and note changes. For sewing, regular knitwear is perfect, which is easy to care for. For the winter option, plush fabric is suitable, but in this case it is necessary to make a lining so that the headdress keeps its shape well.
Knitting a cap like Cinderella's
DIY slider diagram
A caring mother can sew not only a vest with her own hands. Life-size patterns for newborns will help you create such an important wardrobe item as rompers.
You can make a drawing yourself using a universal diagram. The figure shows an example of pants for a baby with a waist circumference of 52 cm. If desired, the dimensions of the product can be adjusted.
Step-by-step instruction:
- The details of the pattern are drawn on paper, after which the elements are cut out.
- The pattern pieces are pinned to the wrong side of the fabric.
- Outline the details, adding 1.5 cm to the seam allowances.
- The gusset is sewn to the parts of the front and back halves, performing a step stitch.
- Sew the side seams.
- The soles are attached to the bottom of the trouser leg. Their length is adjusted individually. If you use an overlocker, there is no need to cut off the excess parts of the “legs”.
- If it is not possible to perform a neat overlock stitch, it is better to make the seams inside out.
- The top of the panties is padded 2 cm and stitched, leaving a small hole for threading the elastic.
- Its length can be determined by adding 2 cm to the circumference of the baby’s tummy.
- The elastic is threaded through the hole, pulled through, and then its ends are secured with a tack.
Size chart for newborn hats
The size of the headdress can be found out without measurements; approximate figures are known depending on the child’s age. Since the Soviet Union, children's things have been bought this way. Size chart based on child's age:
You might be interested in Several options for sewing a fabric basket for laundry or toys
| Age (months) | Product size |
| 0 to 1 | 35 |
| 3 | 40 |
| 6 | 44 |
| 9 | 46 |
| 12 | 48 |
Using this table, you can buy hats and bonnets for children, but since there were no specific measurements, it is better to take products from stretchable fabrics. Because all babies have different head shapes. Modern doctors insist not to buy children's caps at all if the manufacturer relied on age and medical statistics when producing them. Below is how to sew a cap with your own hands.
How to take measurements correctly
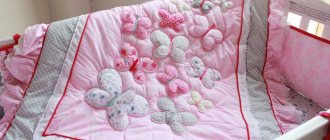
Decorations for a baby hat
beads
It is also not recommended to decorate the cap with brooches made of non-ferrous metal, because the brooch can come unfastened and prick the child. In addition, the brooch increases the weight of the finished product and makes the cap uncomfortable for the child.
Sewing is a fun hobby for newborns. Making a baby cap will help a young mother take a break from everyday worries and remember the love for her baby. The same type of industrially produced children's hats cannot be compared with hand-made caps. The main thing is that the hat fits the child in size, and is also beautiful, comfortable and practical. Then the baby will certainly rejoice at the wonderful new thing.
Product modeling
Before starting work, you must choose a cap model. A cap pattern is searched on the Internet, magazines or master classes. If imagination works well, then it is better to rely on it and make an original headdress. It can be sewn or knitted, and you can add ears or ribbons to it. You can sew a hat for a newborn with your own hands in several stages, which are presented below.
Winter plush option
Cap for a newborn: the benefits of knitting
When a baby’s cap is knitted on knitting needles, there are the following advantages of using this tool:
- the ability to knit a hat of any thickness, using both the finest threads and warm thick yarn;
- making a headdress for a newborn without a single seam;
- variety of shapes and types of products.
All kinds of threads are suitable for knitting a cap, be it cotton, linen, viscose, down, garus, iris, wool or synthetic yarn, it all depends on why the newborn is knitting a cap with knitting needles.
Types of caps for newborns
Baby hats are knitted with knitting needles for the following occasions:
- on the way out - in an elegant style;
- for night sleep;
- for walks in the cold season;
- as part of a kit, etc.
The needlewoman has the right to use all sorts of accessories to make the newborn’s hat look appropriate for the chosen type and purpose. You can decorate the cap by using:
- openwork or tight knitting;
- frills;
- ribbons;
- knitted flowers;
- ears;
- pompoms, etc.
The main requirement for a newborn's hat knitted with knitting needles is comfort. It is recommended to choose a cap style so that the newborn does not experience discomfort from seams, knots, rough textured knitting, etc.
What color to knit a cap with knitting needles
In addition to the traditionally accepted colors - pink for girls and blue for boys, it is appropriate for a newborn to knit a hat of any pleasant color - white, light green, yellow, lilac, milky and any other options, including combinations.
Regardless of the gender of the child, you can knit a set with a cap in one color, but it is permissible to combine it with stripes of a different color. There are no restrictions regarding the color scheme of children's caps, as long as the product is comfortable and fits the purpose of use.
This is interesting: Pattern Summer hat for girls
The sequence of sewing a cap from two parts
Like any work, sewing a cap begins with a pattern. You can print it using the drawings presented in this article. Cut out the necessary elements for the headdress from the fabric.
If a lace ribbon is sewn onto the face, then the side part needs to be made a little narrower.
Sew a lace ribbon to the back of the cap, making folds. The stitching of the elements is done in one plane, the edging should look up and not to the side. Lay out the components of the cap, matching the lines in the center. Next, everything needs to be secured with pins. All pieces of fabric need to be basted. This is done in two passes, starting from the middle line in both parts. There is no need to stretch the fabric too much, otherwise the edges will not be uniform.
Christening cap
Important! For beginning needlewomen, it is recommended to secure the ends of the seams with needles before starting to baste. Sew the hat using a machine stitch.
Sew the front edge of the product with a large stitch and gather it a little. This slight adjustment is necessary for the cap to fit well on the skull. Sew a lace or satin ribbon onto the front of the cap. This seam can be basted if desired. Finally, the seams must be finished using bias tape. For it you need to cut a strip 30 mm wide from a thin material, for example, cotton.
You might be interested in: Creating a pattern and sewing ball gowns with your own hands
Important! If the cap is for everyday use, then it is advisable to make the seams external. It will be much more comfortable and soft for the child to wear it.
Headdress for girls
Attach the tape along the seam. You need to trim off the excess fabric, tuck the binding near the seam allowances and sew with a basting stitch. The finished flat seam needs to be stitched. At the end of the work, trim the bottom edge of the cap with a facing and make ropes so that the cap can be tied into a knot. A thin cotton strip is suitable for this. You can sew a knitted vest to the cap and you will already have a set of clothes.
Children's hats need to be washed frequently, so when making them it is better to use natural fabrics that are easy to care for. Cotton, calico fabrics or fleece are perfect. They can be washed at temperatures up to 60 degrees and machine dried. But it is better to wash children's clothes using liquid or gentle powders. Ironing is allowed at temperatures up to 100 degrees or using a steamer.
Important! It is advisable to wash children's clothes several times a week, separately from adults.
It is not recommended to sew brooches, rhinestones or beads as decoration; they can scratch the baby’s delicate skin.
Warm hat for baby
Making children's caps yourself is very simple. This will help save the budget of a young family because in the first year the child grows quickly, which means you will have to buy hats very often. It is better to take natural fabric for work so that the child does not develop allergies. Such products can be sewn as a gift for a young mother for a discharge or christening of a child. If desired, you can decorate with different ribbons or lace.
We sew an elegant cap for a baby
Difficulty: below average
Working time: 2 hours
Materials: cotton fabric, cotton lace, machine
According to the author. In this master class I want to show you how to make a pattern yourself and sew an elegant cap decorated with lace. The thing doesn’t seem to be complicated, but it requires a certain perseverance and painstakingness. 
For work you will need: cotton fabric, lace, ready-made bias tape or a strip of the same fabric, needle, thread, sewing machine. Well, your desire and effort :) By the way, the work is not large, and if you don’t have a machine, you can sew it by hand.
To sew such a cap, it is enough to know one measurement - the circumference of the child’s head (GC). We will divide it in half and get the 1/2 OG measurement we need. In my case it is 48 cm and 24 cm respectively.
Let's create a pattern for the back of the head. To do this, draw a rectangle ABCD, where
AB = 1/2 OG: 4 + 1.5 = 24: 4 + 1.5 = 7.5 cm;
AD = 1/2 OG: 2 + 3 = 24: 2 + 3 = 15 cm.
We mark the necessary points (can be seen from the drawing) and connect them with a smooth line. We received a pattern for 1/2 of the back of the head.
Measure the length of the sewing line.
We construct a new rectangle ABCD, where
AB = 1/2 OG: 2 = 24: 2 = 12 cm;
AD = sewing line length = 20 cm (in my case).
Again we mark the necessary points (see drawing) and connect them. We get a pattern for 1/2 of the side part.
The pattern already includes seam allowances; there is no need to add any additional ones.
We cut out the parts from the fabric (while not forgetting to follow the direction of the grain thread)
If the lace near the face is wide, the side part is made a little narrower (taking into account the width of the lace).
Next, we baste the lace to the back of the head, placing folds so that the frill lies in the same plane as the cap part.
We combine the middles of the side and back parts of the cap and chop them off.
We match the details with each other. It is better to do this from the middle, first in one direction, then in the other. The ends of the parts must match (for convenience, you can pre-chip them).
We grind the parts on a machine.
Now let's sew a line and adjust the front part of the cap a little (for a better fit to the head).
Installing a zigzag stitch on the machine
and sew the lace to the front edge of the cap.
I added a pleat on the front since there were similar ones on the dress, but this is not necessary.
I cover the open sections of the seams inside the cap with bias tape - nothing should bother the baby. I cut a 3.5 cm wide strip of white cambric on the bias.
We apply the binding from the side part and stitch it.
Next, we cut off the excess fabric on the binding, fold it around the cuts and baste it to the back of the head. The result is a “flat” seam. We sew on a typewriter.
We make a line along the bottom of the back of the head and slightly tuck it in (again, for a better fit to the head)
The lower edges of the side parts can also be gathered or small folds made.
All that remains is to sew the facing - the ties to the bottom of the cap. At first I wanted to use ready-made bias tape, but then I decided to replace it with a strip of the same fabric from which the cap is made (you can do this as you wish).
The cap is ready!
Since I sewed it to go with the dress, where the lace was tied around the edge with a thin pale pink thread, I did the same on the cap. This is such a little beauty that we ended up with
I hope my master class will be useful to someone, I will be very happy about it!
Source
Video tutorials on knitting a cap for a baby
Knitted hat with ears for a newborn baby
Size 0-3 months The model has no seams, which is very important for small children. Yarn Pekhorka Australian merino (95% wool, 5% acrylic, 100 g/400 m), circular knitting needles No. 3.5 and 4.
The video should load here, please wait or refresh the page.
Knitted cap for a newborn
In this video I will show you how to knit a hat for a newborn baby. Knowing only the circumference of the head. It took 42 grams of yarn. Knitting needles 2.5 mm. and 3.5 mm.
The video should load here, please wait or refresh the page.