Trench coat, mackintosh, poncho, cape, cape - these are all variations of comfortable clothing that protects from rain and wind during the off-season. Today, raincoats with bright colors and simple textures are in fashion. They perfectly complement the image, while simultaneously fulfilling their purpose. It is important to wear long and short models, with or without a belt, with large patch pockets, a hood or as a trench coat.
You can sew yourself a classic model or a spacious oversized one from pastel-colored fabrics. Bright raincoats will definitely attract looks. Olive shades of military-style prints are at the peak of popularity.
It's easy to sew a raincoat
A product that does not require a pattern can be made by a person without special knowledge and skills. It is a little more difficult to sew a trench coat, even if there are patterns. They can be bought or downloaded on the Internet on websites that teach sewing. A craftswoman without experience should not take on the job if the raincoat is supposed to have a lining. This can be done beautifully and efficiently by professional seamstresses. You can contact the atelier, where they will cut and sew a raincoat of the desired style according to your figure.
If you know how to use ready-made patterns or have ever done this type of needlework, then the work will be easy to complete. You can design a raincoat based on patterns for a dress, you just need to increase the increments and expand the product downwards.
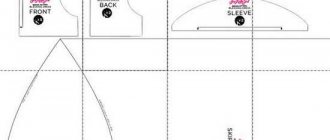
Main details:
- back;
- shelf;
- selection;
- sleeve;
- collar.
They will need to be laid out on fabric folded in half in the direction of the grain, outlined and cut. There will be 2 copies of all parts, and one copy of the back, since the pattern is laid on the fold of the fabric. Now all that remains is to baste, try on and sew the product.
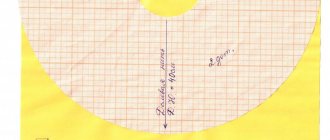
How is the pattern made?
A women's raincoat is made according to a pattern, before making which you will need to take your own measurements: shoulder width, chest volume, length of sleeves and the length of the product itself. Then, using the measurements, you should design the following details on paper:
- back – 2 pcs;
- sleeves – 2 pcs;
- front - 2 pcs;
- Collar bead – 2 pcs;
- front pick-up – 2 pcs;
- valves for pockets – 3 pcs.
The number of collar details depends on the chosen cut, and if you choose a style with a hood, then this element is usually missing.
If you have any difficulties making a pattern, there are plenty of professional video tutorials online for beginners, which show you the entire process of sewing a product step by step. A high-quality pattern is the key to a beautiful and perfectly fitting product. It is better to measure the parameters of your figure several times than to receive a product that is too large or, conversely, small.
When the pattern is completely ready, you can start sewing the raincoat, having prepared the following tools in advance: tailor's scissors, threads to match the fabric, needles, pencil or chalk for marking.
This is interesting: Pattern How to sew a raincoat with your own hands quickly and easily
Raincoat without pattern: for men, women, children
This wardrobe item can be made in a few hours. The main thing is to calculate the fabric consumption and buy it in the store. An impregnated raincoat is best suited for these purposes; it definitely won’t get wet and will reliably protect you from gusts of wind.
A simple cutting is done like this:
- Fold the fabric in half.
- Place the length of the product down towards the edge.
- Measure the circumference of the hips, divide the value in half, add 8-10 cm for a loose fit, mark the size on the fabric, so you get a rectangle - this is the back of the raincoat.
- Now you need to draw the sleeves. We set the length away from the back, taking into account the increase for the hem.
- Cut out the neck.
- Construct a hood pattern in the form of a rectangle, then round the top corner.
If you are not sure, then it is better to draw the constructions on paper or oilcloth, try them on, and then transfer them to fabric. Stitch the seams, process them, hem them. It remains to determine what to make the fasteners from. These can be ties, buttons, Velcro, buttons, a choice for every taste. A man's raincoat can be left without any additions; a children's raincoat can be decorated with a pattern of rhinestones or ready-made embroidered appliqués; a woman's raincoat can be embroidered with beads or other decorative elements.
What measurements will be required?
Required measurements:
- ОШ - neck circumference.
Measure the base of the neck.
- OG;
- FROM;
- ABOUT. If there is a belly, you need to place a magazine or ruler.
- CG;
- ShG;
- ShS;
- DTS;
- VB;
- DTS1;
- VG;
- road accident;
- Accident1;
- Chest dart solution;
- military industrial complex;
- VLOOKUP (bottom);
- ShP;
- Druk;
- OP;
- OZ.
Increases
Adjacent - semi-adjacent:
| Abbreviation | Increase | meaning |
| PDT | To the length to the waist line | cm + 40 mm (under the belt, if any) |
| POG | To chest circumference | 100-200mm |
| SWEAT | To the waistline | 80-220 mm |
| FOB | To the circumference along the hip line | 100-140 mm |
| PShS | Bring your arms together in front, measure the width of your back - width + increase | 80 mm |
| PSHG | To chest width | 60 mm |
| Shoulder | Shoulder seam | Up to 2 cm |
| Pdli | To product length | 2 cm |
| Pop | To shoulder circumference | 90-150mm |
| Pdlr | To sleeve length | Up to 2 cm |
If you are sewing a straight-cut coat, the following increases will be required:
| Abbreviation | Increase | meaning |
| PDT | To the length to the waist line | 10+ 50 mm (under the belt, if provided) |
| POG | To the circumference along the chest line | 200-300 mm |
| PShS | Back width | 80-100 mm |
| FOB | To the circumference along the hip line | 200-300 m (when sewing a trapezoid, the increase must be increased) |
| PSHG | Back width | 60-90 mm |
| Shoulder | Along the shoulder seam | Up to 3 cm |
| Pdli | By product length | Up to 2 cm |
| Pop | By shoulder circumference | 150-200 mm |
| Pdlr | On the sleeve | Up to 2 cm |
You may be interested in this Instructions for sewing a pareo with your own hands, as well as creating without sewing
Cape-cloak for mother and daughter
Modern family images are full of photos where adults and children are wearing the same clothes. If you also want such a set, then the easiest way is to sew a cape in the form of a cape.
Using the material folded diagonally, you need to build a semicircle, the diameter of which is equal to the length of your arms, measured from one wrist to the other. The neckline is cut out, a cut is made in the front, and if necessary, a hood is drawn on the remaining flap. Further steps are to sew the headband, sew it in, process the cuts, and perform hems. The girl will be delighted if her mother chooses the fabric to her taste. Whether she likes floral motifs or would like to see cartoon characters, listen to the child’s wishes.
A raincoat is a stylish and fashionable item; it is necessary in any person’s wardrobe. It does not lose its relevance in the off-season, when the jacket is not a suitable option; it can also be worn in the summer in rainy weather when the temperature drops. A child over two years of age must have a raincoat and rubber boots in their clothing set. Then the baby will not be afraid of rain and wind.
Sewing
Step 1:
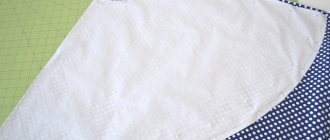
Lay out the fabric for the raincoat on a flat surface. We take something made of non-stretch fabric that fits in size and lay it flat on the fabric.
Note: the item should be fairly loose, made of non-stretch A-line fabric.
The item does not have to be as long as the planned product. We'll add the length later. We put the sleeve inside to re-shoot the sleeve armhole.
Step 2:
Determine the length of the cloak and extend the side line to this length.
We cut the fabric according to the shape of the sample, adding 3 cm on the sides and on top. (1 cm seam allowance and 2 cm for insulation).
Cut out another piece for the front of the cloak.
Step 3:
Fold one of the pieces that was cut out in Step 2 in half lengthwise.
Cut along the fold line.
Step 4:
We have already cut out the neck on the back piece. Now we need to cut out the neckline at the front. Improvise, try on different items of yours and determine which neckline is most comfortable for you. We draw a V-shaped line from the shoulder seam down about 30 cm. We make the transition to the middle cut quite smooth.
We repeat this for the other front part.
Step 5:
Now we cut out the sleeves. Fold a piece of fabric in half. We place the item of clothing chosen as a sample on the folded fabric so that the fold line of the sleeve (the longest fold line) lies on the fold of the fabric.
We trace the line of the sleeve, adding 3 cm around. Cut along the contour.
Step 6:
We cut 4 pieces of fabric of such length that it is enough from the shoulder seam to the hem plus the length of the back of the neck, and each is 12 cm wide.
Step 7:
We unfold the insulation on a flat surface and lay out all the parts on it: the back, 2 front parts, 2 front elements and 2 sleeves.
Step 8:
We trace all the details and cut them out as shown in Fig. higher.
Step 9:
Cut out the pieces from the lining fabric. We only need to cut out the back, 2 front pieces and 2 sleeves.
We lay out the insulation for the sleeves, lay the top fabric on top with the right side out. We pin it with pins.
Step 10:
We lay out the back insulation and place the top fabric on top, right side out.
We fasten the sides and shoulder parts with pins.
Pin the sleeves to the armholes and sew everything together.
Step 11:
Lay out the lining of the back piece on a flat surface, right side up. Place the two front pieces on it, right sides down.
We pin the side and shoulder seams. We fasten the sleeves into the armholes and sew the parts together using a machine.
Step 12:
We fold long strips of top fabric two at a time with right sides facing each other and sew them on one of the short sides.
We got two long strips.
We sew the insulation strips together in the same way.
Step 13:
We pin a strip of insulation to one of the top strips, right side out. Now pin this strip (right side to the right side of the main part of the cloak) along the front edge of the cloak, starting from the bottom hem up, around the back of the neck and down to the other hem.
Step 14:
After you have fastened the entire front part with the strip, we sew the fastened parts together.
Step 15:
We fold the second long strip of top fabric with the strip we sewed, right sides together.
Step 16:
We sew the strips, iron them and wrap the last strip inside the cloak.
Step 17:
We fasten the two sewn strips with pins and machine stitch along the fold (see figure above).
Step 18:
Trying on a raincoat. It should lie freely on the body and the floors of the cloak should meet without tension.