Required materials and tools
Traditionally, a women's cap is usually made of thick fabric (tweed, drape, etc.) . But a girl’s wardrobe will be perfectly complemented by, for example, satin ones. There are a variety of colors; as a rule, the cap is sewn to complement any ensemble.
Common fabrics:
- tweed;
- drape;
- cloth;
- natural and artificial suede, leather;
- matting;
- thick fleece;
- atlas;
- brocade;
- jacquard;
- velveteen;
- spandex;
- velvet.
Advice! Thin fabrics must be backed with an adhesive pad.
Tool selection:
- sewing machine, preferably with an overlock stitch;
- ideally – overlock;
- thick needle No. 100-120, since it is necessary to sew several layers of fabric;
- chalk;
- awl;
- plastic folder or cardboard for the visor;
- optional accessories.
Visor processing technologies
At most companies, gluing is done manually with a special or rubber glue, but the use of plastic with a hot-melt adhesive coating (a relatively new type of stock) can reduce labor costs.
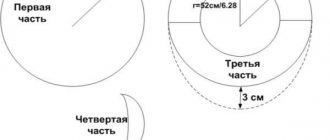
When gluing the semi-finished product, the cuts of the outer edge of the leather part and the liner are aligned, and along the inner edge of the upper and lower visors there is an allowance for stitching to the head or band (the location of the parts relative to each other is shown in diagram 01). The amount of allowance is determined depending on further technological operations. The scheme for processing the edge of a part with edging is shown in Fig. 02. The pattern for the visor liner is made without allowances; The corners of the liner can be rounded for ease of processing of the part. Ill. 04 schematically shows the proportions and location of the patterns relative to each other.
Measurements
We make the following measurements:
- Head circumference - measure the circumference at the place where the bottom of the cap will be. We leave the measuring tape, it will be useful for the next measurement.
- The height of the cap is the distance from the bottom line of the cap to its intended top.
Full felted visor: master class
Dear craftsmen, since I am often asked how I make my berets with visors, I decided to describe my manufacturing method here. This beret is good because it has a small stem that allows you to cover your ears. I will omit the initial stage of the layout; there are many master classes on this topic, and I will dwell in detail on the visor itself.
So, in addition to wool, silk and a standard template from a laminate backing, we will need another ring template, a template for the visor itself, a plastic insert for the visor and a bowl or cup of a suitable size.
First, we'll make an insert for the visor. I took a thick plastic folder and traced the visor from an old cap with a felt-tip pen, then cut it out (needs to be careful here) and rounded the corners a little so that it wasn’t so sharp. The visor template has a slightly different configuration: the radius of the part adjacent to the hole for the head is proportional to the radius of the ring template. We will stretch this part later.
In the next photo I have already laid out one side of the beret.
Next, as usual, we bend it and continue the layout. I don't go beyond the edges of the template. Only the third thin layer will come out a little, so there will be no seam at all.
Well, we have reached our bowl. What's next? And then we continue the layout directly on the bowl. It will protect our strands from tangling. Here you can put slightly thicker strands, because... We will stretch this part later. Apply a third thin layer
Next is the decor: I have a piece of silk, quite dense, does not fall well, it will fall in large waves (but that’s a completely different story, I’m thinking of writing on this topic)
How to sew a women's cap with a visor with 6 gussets?
We will sew a gavroche cap with 6 wedges . This style involves increased volume of the upper part. Such a cap will add youth, give energy, and with it temperament.
Required:
- main fabric, area 0.5 m2, you can use scraps;
- lining fabric – 0.5 m2;
- material for the visor.
Due to the general softness of the gavroche design, its visor can be made without an additional dense layer.
Constructing a pattern
The construction is similar to a regular six-piece cap, but we add 2-3 cm in the middle of the wedge to obtain the required volume of the upper part of the cap.
- Divide the volume of the head into 6 parts, this will be the width of the lower part of the wedge.
- We set the height of the cap in the center.
- We determine where you will have the widest part of the wedge, it should correspond to the end of the vertical part of the cap. That is, after this section a flat bottom of the cap will form.
- We narrow the wedge.
- The band is a double piece with a length equal to the circumference of the head, you can add 1 cm for the fit.
- We choose the width of the visor arbitrarily.
- Its smaller circumference is approximately 1/3 of the head circumference, but this is also determined individually.
The patterns are designed for a head circumference of 54-55 cm.
- wedge - 6 parts;
- visor - 2 parts;
- band - 2 parts.
Cut on fabric
Lay out the patterns on the prepared ironed fabric . It is important to place all the wedges strictly in one direction along the grain thread:
- Let's shallow it. Allowances are 0.5-1.5 cm, depending on the fabric.
- Cut it out.
- We work similarly with parts made from lining fabric. We do not sew a lining for the visor.
Sew the details
Stages of work:
- We sew wedges. It is more convenient to do this in two blanks of three wedges each, you will get two semicircles.
- Sew these semicircles together.
- At the center we cut off the corners of the wedges so that there is no thickening.
- We work similarly with wedges made of lining material.
- We turn the main piece of the cap inside out and place the lining on top of it, face up. Sew on the lining.
- We sew together the visor blanks.
- Turn it inside out.
- Set aside at a distance of 0.75 - 1 cm from the edge.
- If you insert a seal into the visor, then make its drawing 0.5 cm smaller in all dimensions if your machine cannot sew several layers of fabric. In this case, the plastic part will be inside the “pocket”.
- We mark the middle of the band and the visor.
- We put the visor between two blanks of the band.
- We combine the marks.
- We sew the band and visor.
- We trim the corners of the allowances.
- We sew the band to the crown of the cap; to do this, we sew it between the parts of the cap and the lining.
Important! There are many ways to assemble fashionable women's caps, but here is the easiest one for beginners.
- We sew a finished button onto the top, or cover a piece of cardboard with the main fabric. Be sure to secure the lining fabric with a few stitches so that it does not puff up.
- Let's try it on.
We recommend sewing your first cap from inexpensive material in order to make all the changes to the pattern and “get your hands on it.” But then, you can regularly update your wardrobe with new hats without spending a lot of money.
Visor for a knitted hat
November 14, 2020
November 14, 2020
Elena Ostinova
Womans-way
How to make a visor for a cap, hat, cap or baseball cap with your own hands from improvised materials.
In our case, the situation that forced us to take up needlework is very simple. The visor in our knitted headband simply fell apart after the next wash. Replacing it turned out to be not at all difficult. We will try to show and tell you in detail how we did it.
To begin with, we ripped up a small area on the inside of our headdress where the visor was sewn and removed from there the remains of the unusable, disintegrated backing.
We were left with an empty knitted pocket that was not filled with anything.
Next, we drew a pattern for the future part on thin paper. To make the insert symmetrical, fold the leaf in half and draw half as intended. Here you can increase or decrease the size at your discretion.
Then we cut out the folded sheet of paper along the contour
We get a paper blank.
And then, don’t be too lazy to cut out a sample version from thick cardboard, applying your paper sample. Insert the cardboard blank into the hole on our product.
Be sure to try on your headdress. If you don’t like this version of the visor, simply cut out a new one of a larger or smaller size, adjust the shape and measure until the look pleases us. Having made sure that this particular option satisfies us, we take our measurement and boldly cut out the plastic insert. We took the material for the visor from an ordinary plastic bucket.
It is most suitable in both shape and texture. We cut out our part according to the selected template. We outline the outline and boldly get down to business.
It is advisable to do this with strong scissors. Plastic is easy to cut, but if the tool is very delicate, such work is not for him.
As a result, we get such an elegantly shaped part.
We insert it inside the pocket for the visor on our headdress.
And sew it up with plain threads.
As a result, our knitted headband received a new elegant plastic part.
We have discussed in detail how and from what you can make a visor for your cap, hat, cap or baseball cap.
Of course, there is a wide range of accessories for caps and baseball caps on sale. Among this variety there are ready-made plastic visors for hats. They are made according to standards from dense material. But its shape does not necessarily suit you in size or texture. Here, you have the opportunity to select and cut out such a part individually for your product, to your taste. Such an insert can be slightly asymmetrical in shape, elongated forward or stretched in width. You can even make the blank wavy along the outer edge, which will add the effect of an openwork cap, for example, for a summer Panama hat (hat) made of thin fabric - guipure.
Our item can be easily washed, such a backing will not fall apart, will not become limp in water, or lose its shape. And most importantly, it is an absolutely creative, original approach to the task at hand. As a result, you can easily get a visor for your headdress, made with your own hands from scrap materials.
Article rating / 0
Give your rating!
comments
Name: You have not entered a name
A comment:
You have not entered text
Enter the characters from the image:
You have not entered the code
The code doesn't match
Sewing a denim baseball cap with a pattern
How to sew a baseball cap? Where can I get a pattern for a beautiful baseball cap? The popular American cap gained its popularity in Russia in the 80-90s and was a men's attribute. Probably, many remember the time when baseball caps with foam rubber on the front and mesh on the back came into fashion. By the way, I had such a baseball cap, and I was very proud of it. Such a thing determined the attitude towards fashion, as it is now customary to say “to be in trend.”
A baseball cap belongs to the sporty style; in addition, it can be combined with almost any style. A women's baseball cap can be sewn from any fabric and decorated with various decors. In this article I will tell you how to sew a baseball cap from jeans with your own hands.
To sew a baseball cap you will need: