Learn how to sew a dress with a peplum step by step: patterns
And then you can choose the most convenient pattern method, for example:
- Fold the fabric four times, place a center point in the upper left corner and draw a line for the bottom cut; then draw a line for the top cut equal to the volume of the product.
- A more complex option: having set the length, separate the lower parts along the waistline, closing the dart on the peplum. Then make flounces on the peplum, turning it to the sides of the side seam. Afterwards, construct raised seams in order to hide the darts and then construct a collar and adjust the sleeve.
- Removable basque.
How to sew a straight sheath dress with a peplum using a pattern with your own hands for beginners
Read in this manual:
- Description of a set of patterns for a dress, style and fabric.
- How to download dress patterns.
- How to cut a dress using a ready-made pattern with your own hands.
Download the pattern of a straight sheath dress with a peplum
Description of the style, a set of patterns and fabric for the dress
Sizes: 42-62 (the buyer receives ALL gradation of sizes).
Electronic dress pattern file format:
PDF in full size and without seam allowances.
By paying for the order you will receive links to dress pattern files
- A4 PDF file, adapted for printing patterns on A4 sheets of paper in any program on any device, including mobile phones.
- Multi-format PDF file for printing on sheets of any format from A0 to A4 on a printer or plotter in Adobe Reader.
Sewing difficulty level: easy, for beginners.
The model fits most body shapes and can effectively hide imperfections. The silhouette is adjacent.
It is also recommended for girls and women with different bust and hip sizes.
The pattern of the dress with a peplum is made on a base with reliefs.
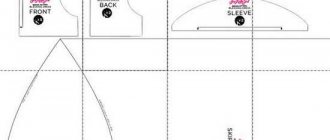
A set of patterns for making a dress with your own hands
(picture 1)
- Bodice patterns.
- Skirt patterns.
- Sleeve pattern with three length options.
- Basque pattern.
Fabric for this straight peplum sheath dress
Any fabric from the dress range is suitable for sewing, except for highly stretchable stretch and thin silk (chiffon).
Consumption depends on the size of the product, the length of the sleeve and the peplum.
This dress can use from 1.7 to 3 meters of fabric.
Therefore, it is recommended that before purchasing fabric, make all the patterns of the length you need and perform a preliminary layout.
How to download dress patterns and print them yourself
How to download an electronic dress pattern.
How to print a pattern.
How to choose a size.
Download electronic patterns for free.
Download this straight dress pattern
Making a dress with a peplum at the bottom: pattern of a romantic model
An ultra-fashionable, feminine dress with a peplum will emphasize any type of figure (except for a “pear” figure, since such a dress will make the bottom heavier) and is suitable for any height. A peplum is a wide strip of fabric sewn to the waist, sides, chest, shoulders and bottom. The peplum at the waist slims the silhouette and emphasizes the hips. If you want to add sexuality, then you should place it on the shoulders. A peplum located on the chest increases the volume of the chest. A beautiful model with a peplum at the bottom creates a romantic and playful image. It will also help to create a unique feminine peplum bow on the sides. It can be of different lengths, shapes, with folds, double, incomplete, asymmetrical and can hold shape, but this requires thick fabric or two-layer material. We suggest creating a romantic image.
From the very beginning, you need to create a drawing of the pattern for the base of the dress; to do this, take measurements. Measure:
- dress length;
- back length to waist;
- front length to waist;
- shoulder length;
- floor circumference of the neck, chest, waist, hips and above the chest;
- hip height;
- the distance between the high points of the chest.
Once you've created the base dress pattern, create a dress pattern with a peplum bottom and place it on the wrong side of the fabric and pin it together. Then add seam allowances, draw cut lines with chalk, and cut the pieces. Now sequentially grind and iron the grooves on the shelf. Carefully pin and baste the center back and side pieces. Next, pin the center back seam at the bottom. Pin the shoulder and side seams and baste. Be sure to overlock all seams and iron the shoulder and side seams, ironing the side seams in different directions. Finish the neckline and armhole. The dress with a peplum at the bottom is ready.
For petite and little girls, a dress with a peplum on the shoulders is suitable, emphasizing the breasts and making them seductive. Different types of models can reduce or enlarge large breasts, depending on the location of the peplum. For example: completely open shoulders make a woman's silhouette sexier, but reduce the size of her breasts.
In the summer, you should take a closer look at closed shoulders or with straps.
An interesting version of a dress with a peplum on one shoulder, it creates an unforgettable image. A double peplum looks impressive, especially for evening events. If you often change dresses and attend different events, a removable one is suitable for you; it can be easily fastened with buttons or hooks and thereby change the look. When choosing a dress, choose the color carefully. Black color looks seductive, emphasizing a slender silhouette and is an excellent option for any celebration if you choose the right accessory and shoes. A summer dress looks bright in green shades, as it is considered the color of harmony and joy. For young people, blue and red colors will look good; they also add volume. Don’t forget about accessories, shoes, hairstyle, makeup, manicure; if you choose everything correctly, you will create your own unique image. For overweight women, an unusual style.
A correctly selected dress with a peplum for obese women will correct your figure. The style of the dress itself, as well as wide peplums with folds and, of course, sleeves, will hide your fullness. To avoid your belly being visible, you need a dress with a peplum from the chest to the hips. If you want to hide your hips, then a dress with a peplum from the waistline and below is perfect. Dresses should only be with a wide peplum, otherwise the volume will only be emphasized. Place the peplum below or above the problem area. For a business woman, a light jacket and pumps will perfectly complement her look. For an evening look, it will be enough to wear bright jewelry and high-heeled shoes with the dress, but also do not forget about makeup and hairstyle.
Children's dress, how to choose a dress for girls.
It is important from a very early age to pay special attention to cut, color, style, pattern, combination, shoes and even accessories. After all, everything is formed from childhood. Clothing should be safe, wear-resistant, comfortable, one size or slightly larger, and of course stylish. Choosing a child's dress is an art. The dress should be attractive and loose-fitting so that the little lady can put it on and take it off independently. If the selected model has a clasp, then consider the convenience factor; it should be easy to unfasten and fasten. Make sure that the back seams on the dress are flat so that they do not irritate the skin. Every princess should be the most beautiful, so choose a beautiful and aesthetic dress.
The selected dress must be appropriate in size, seasonal and appropriate for the occasion. After all, you can choose a dress for kindergarten graduation; lace and ruffles will fit perfectly here. If it is a school graduation, then the choice expands, here you can choose the length, you can also choose a fitted or, on the contrary, loose, and decorations can be discreet or trimmed. Don't forget about your birthday, here you can choose any beautiful dress.
Dress with removable peplum. Instructions for sewing and printing patterns
Difficulty level: MEDIUM DIFFICULTY
DRESS WITH A REMOVABLE PEPEL
INSTRUCTIONS FOR PRINTING PATTERNS AND SEWING SEQUENCE
Recommendations for materials: knitted fabric and worsted dress or suit fabric, selected in a single color combination or with a pattern.
Constructive increases: to OG - up to size 52 4 cm, from 54 - 5 cm, from 60 -6 cm; k From - to 52 sizes 3.5 cm, from 54 to 58 - 4 cm, from 60 - 4.5 cm; to Ob - up to size 52 2 cm, from 54 to 58 - 3 cm, from 60 - 4 cm.
When ordering a pattern you receive 3 pdf files:
- A file with instructions for printing a pattern, containing a control square and the measurements according to which the pattern was constructed;
- File with pattern in A4 format, for printing on a regular printer
- File with a pattern on one large sheet - for printing on a plotter
Pattern sample:
* PRINTING ON A4 FORMAT PRINTER:
When printing patterns in A4 format, open Adobe Reader and check the “Actual size” checkbox (or uncheck “Fit to page size”) in the print settings.
Note the test square (or grid) on the pattern sheet. Its size is exactly 10 by 10 cm. It is needed in order to understand whether the printing scale is set correctly on your printer. Before printing the entire pattern, print out a sheet with a red square and measure it. 10cm sides? This means you can print the remaining sheets of the pattern. If the sides are more or less than 10 cm, you need to adjust the print scale of your printer. Otherwise, the pattern will not print correctly.
After printing all the pattern pages, glue them together in the order shown: the letters (A/B/C+) indicate the column, and the numbers (01/02/03+) indicate the row. The first (top left) pattern sheet will have the number A01.
*PRINTING ON A PLOTTER:
When printing a pattern on a plotter, open the pattern file in Adobe Reader (or Foxit Reader). Click on the "File" menu item, then select "Print". Select the Poster print mode under Page Sizing and Handling. Make sure the Segment Scale field is set to 100%. Check the boxes for Cutting Marks, Shortcuts, and Split Large Pages Only.
The following designations are used on the pattern:
Parts Specification
Dress
- Back – 2 parts
- Shelf – 1 piece (with fold)
- Back yoke – 1 piece (with fold)
- Shelf yoke – 1 piece (with fold)
- Sleeve – 2 parts
Basque
- Back part – 1 piece (with fold)
- Side part – 2 parts
- Front part - 2 parts
- Pocket flap – 4 parts
- Pocket facing - 2 or 4 parts
- Pocket burlap – 4 pieces
- Belt – 1 piece (with fold)
- Right side of the clasp strap – 1 piece
- Fastening part - 2 parts
- The left side of the clasp strap – 1 piece
Attention! The fastener parts can be cut out from the base material, from natural or artificial leather. You can use ready-made haberdashery solutions for fastening, which you can easily find on sale in specialized stores.
When cutting parts, you need to add seam allowances:
- dress - connecting seams - 1 cm; along the lower cut of the back and front - 4 cm, along the lower cut of the sleeve - 3 cm, along the cut of the neck there is no need to give an allowance. It will be edged:
- peplum - along the middle cut of the front part - 5-6 cm (this is the hem), along the lower cut of the front parts, back and side parts - 4 cm, along the top cut and side sections - 1 cm. Along all cuts of the pocket parts and waistband – 1 cm.
Approximate consumption of materials depending on size and height:
- main material - 0.9 - 1.1 m, with a width of at least 130 cm;
- companion material - 0.9 - 1.3 m, with a width of at least 150 cm.
To make the kit you will also need:
— about 40 cm of adhesive non-woven cushioning material - non-woven (with a width of 90 cm);
— hidden zipper 50-70 cm
- edging bias tape (braid) - about 1 m.
Schemes for laying out cutting details on materials for different sizes and heights
Attention! For economical cutting, the companion material is folded, but NOT IN HALF! This version of the sectional layout in this case is the most economical.
If you decide to cut only a peplum, then you will need about one meter of material with a width of at least 130 cm. This amount of material is enough to cut a product of any size and height.
Technological sequence of dress processing
- Baste and then stitch the darts on the front of the dress. Iron the dart allowances towards the middle.
- Duplicate the allowance for finishing the vents on the left back of the dress. Glue the adhesive edge to the vent allowance on the right side of the dress (Fig. 1).
- Overcast the middle sections of the back, the ledge of the splines, and the sections of the allowance for processing the splines.
- Baste and then stitch the darts on the back. Iron the dart allowances towards the middle.
- Finish the back slot.
Fig. 1
- Using copy stitches, mark the bottom line of the product.
- Sew up the processing allowance for the vents on the right side of the back, going around the adhesive interlining material, not reaching the hem line of the bottom 6-8 cm (Fig. 1 a).
- Fold the right and left parts of the product with their right sides inward, align the cuts of the middle seam and the top cuts of the allowances for processing the vents and stitch the back parts along the middle cuts, then down 1 cm below the top cut (ledge) of the vents, then along the top cut to the end (Fig. 1b).
- Notch the processing allowance for the slots on the right side of the backrest in the corner, not reaching 1-2 mm from the stitching.
- Press the middle seam allowances. Iron the allowance for finishing the vents on the left side of the back so that the fold of the vent is a continuation of the middle seam.
- Baste and then stitch the yoke to the shelf. Overcast the seam allowances. Press seam allowances.
- Baste and then stitch the yoke to the back. Overcast the seam allowances. Press seam allowances.
- Overcast the right side sections of the front and back. Baste and then stitch the front and back along the right side edges. Press seam allowances.
- Sew the zipper tape into the right side seam of the dress. Iron it.
- Baste and then stitch the front and back of the dress along the left side edges. Seal the cuts. Press the seam allowances to the back.
- Baste the front and back of the dress along the shoulder sections.
Attention! At this stage, you need to try on the dress and evaluate the size of the neckline. If the head passes freely, it is fashionable to continue processing; if in doubt, then you can expand the neckline due to the “droplet” cutout on the back.
Rice. 2
- Sew the front and back along the shoulder sections. Seal the cuts. Press seam allowances.
- Edge the neckline with bias tape or braid. If you decide to make a cut, then you need to make a loop from the edging braid and sew a button on the other side.
- Baste and then stitch the sleeves of the dress along the side edges. Seal the cuts. Press seam allowances.
- Baste and then sew the sleeves into the armholes. Seal the cuts.
- Finish the bottom edges of the sleeves with a hem seam with an open edge or a hem seam with a closed edge.
- Sew the bottom edge of the dress.
- Finish the corner of the vent on the left side of the dress as shown in Fig. 2c. To reduce the thickness, use scissors to cut out an allowance for processing the bottom edge of the dress, not reaching 1 cm from the seam.
- Similarly to the left side, grind the corner of the vent on the right side of the back of the dress. Attention! On the right side, it is not the transverse line that is turned, but the longitudinal line. (Fig. 3)
Fig.3
- Note the allowance for processing the splines.
- Baste and hem the seam allowance for finishing the bottom edge of the dress. Iron it.
- Mark and then sew a finishing stitch on the left side of the back of the dress from the right side at an angle of 45 degrees to the middle seam.
Attention! The presented processing option is far from the only one. The upper part of the spline can be processed as shown in Fig. 4 (on the corner), and the simplest option for processing the lower part of the slot, i.e. the right side of the backrest as shown in Fig. 5.
Rice. 4 Fig. 5
Iron the dress when it's ready!
Technological sequence for processing a removable basque
- Sew the side and side edges of the front parts of the peplum.
- Overcast the side edges of the side pieces of the peplum.
- Baste and then stitch the cut off sides of the peplum to the front pieces. Press seam allowances.
- Glue the lobe along the entrance line to the pocket. The dolevik is a rectangle measuring 17x4 cm. It is glued along the entrance line to the pocket on the wrong side of the product.
- Finish welt pockets.
Attention! When processing pockets, it is best to perform all operations in parallel on the right and left sides of the peplum to ensure symmetry.
5.1 Mark the location of the pocket(s) (Fig. 6)
Rice. 6
- Figure 6 shows the simplest option for marking lines for stitching facings for processing a welt pocket “into a frame”. The facings are ironed strictly in half and the folds are applied to the chalk lines.
6.2. Iron the facings in half. Mark on them the lines of stitching to the peplum (see Fig. 6). The length of the facings is equal to the length of the pocket entrance plus 3 cm. The width of the facings is 0.7 cm, multiplied by 4.
6.3 Duplicate the valves with adhesive gasket material. Stitch the top flaps with the bottom flaps on three sides. Turn the flaps right side out and iron.
6.4 Mark on the valve a line for attaching it to the basque.
6.3 Baste and then stitch the flap and facings to the peplum along the marked lines. Check the symmetry of the right and left pockets. Don't forget to sew a backtack at the beginning and end of the stitch.
6.4 Cut the pocket entry line as shown in the diagram (Fig. 7).
Rice. 7
- The easiest way is to make a cut from the wrong side from the middle in both directions, not reaching the ends of the lines 1-2 mm.
- Straighten the facings and flap to the front side, iron.
- Secure the facings at the ends (stitch the corners onto the facings).
- Sew the burlap pieces to the seam allowances for the facings (pages 5 and 7, fig.

Rice. 8
- Sew together the pocket burlap parts, baste the edges (pages 8, 9, fig. 8).
- Iron the pockets when finished.
- Baste and then stitch the back of the peplum to the sides along the side edges. Seal the cuts. Press seam allowances back.
- Overcast the bottom edge of the peplum.
- Mark the hem line for the bottom.
- Finish the corners of the peplum as shown in Fig. 3. Turn the corners right side out and iron them.
- Prepare the parts for the basque clasp and place the blocks on the right side of the clasp. Sew the fastener details onto the belt.
- Sew along the sides of the waistband.
- Finish the top edge of the peplum with a belt.
Iron the peplum when finished.
Your kit is ready! Wear it with pleasure! Good luck!
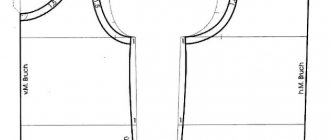
How to cut a dress with a straight silhouette using a ready-made pattern with your own hands
(Figure 2)
This model can be offered as sewing for beginners, especially if you are sewing a sleeveless dress.
How to choose the right peplum in a pattern
Before we start cutting out the dress, let's look at how to choose the right peplum.
The size is written on the recess of the peplum, but the peplum should be chosen not by size, but by the length of the stitching line of the given peplum, measured along the finished bodice.
Therefore, it is better to choose a peplum and cut it after trying it on, during which you should decide on its length.
Seam allowances for DIY patterns
- Along the reliefs, side and shoulder seams, along the front and back seams of the sleeve - 1 cm.
- The bottom of the dress skirt, the bottom of the bodice and the bottom of the sleeves are 2.5 - 3 cm.
- The neckline, sprout and armhole are cut out following the outline line of the pattern.
Recommendations for cutting for beginners
- When cutting, the fabric is folded in half face to face, the edges are parallel.
- The middle parts of the front of the bodice and skirt are laid in a half-skid on the fold of the fabric.
- The remaining parts - in the most economical way.
- After cutting, you should assemble the bodice and skirt of the product for fitting.
- During the fitting, in addition to the balance and fit of the product, we specify the waist line - it is also the line for attaching the peplum and skirt.
- The position of the waist line is very important, since by moving it, we can correct the visual perception of the figure.
- By raising the waist, we visually shorten the torso and lengthen the legs. And vice versa.
- We also adjust the shape of the neckline during fitting. Read “How to change the shape of your neck.”
- After fitting, having measured the length of the peplum stitching line, we select a notch line on the pattern that matches the length and bottom line of the peplum, at our own request.
How can you change this pattern with your own hands?
In conclusion, we will consider the changes that can be made to the patterns of this straight silhouette dress at your own discretion
Let's say you don't like it when your skirt is straight.
We narrow the dress pattern down from the level of the hips along the side sections.
You CANNOT SETTING along the reliefs and the back seam!
The optimal amount of narrowing is 2 cm on each side.
Don't forget to lengthen the side seam afterwards, otherwise the hem line won't be straight.
You should not make a vent in dresses or skirts that are tapered to the bottom - it can “break” the silhouette and spoil the impression of the product.
You can trim the neckline and, if the dress is sleeveless, then the armholes with facings (read or watch the video) or piping (watch the video master class on sewing).