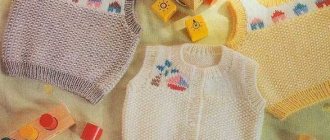
Romper and panties
Romper suits are the most important part of a child's wardrobe.
To sew summer pants, just take measurements from suit-sized rompers. The contour of the sliders is transferred to the fabric, folded in half with the wrong side up. In this case, it is important not to forget the additive for the seam allowance
Next, the front and back halves are sewn on the sides. After stitching, stitch the crotch seam
When processing, it is important to cut off excess fabric and also use a zigzag seam. If it is possible to make a neat stitch, it is better to use external seams
When the pants are ready, the upper part is folded up and stitched, leaving a hole for threading the elastic. The length of the elastic should be equal to the circumference of the baby’s tummy, from which 2 cm is subtracted. You can thread the elastic through using a pin. The ends are sewn together. You can also use ready-made patterns for children's clothing to sew unusual pants for your baby.
Size chart for newborn hats
The size of the headdress can be found out without measurements; approximate figures are known depending on the child’s age. Since the Soviet Union, children's things have been bought this way. Size chart based on child's age:
| Age (months) | Product size |
| 0 to 1 | 35 |
| 3 | 40 |
| 6 | 44 |
| 9 | 46 |
| 12 | 48 |
Using this table, you can buy hats and bonnets for children, but since there were no specific measurements, it is better to take products from stretchable fabrics. Because all babies have different head shapes. Modern doctors insist not to buy children's caps at all if the manufacturer relied on age and medical statistics when producing them. Below is how to sew a cap with your own hands.
How to take measurements correctly
Hat for a newborn girl: how to knit
This hat can be knitted for a baby from 8 to 12 months. You can choose the color as you wish, although for a child it is still customary to choose lighter colors.
Materials:
- Sock knitting needles No. 2.5
- Yarn (cotton)
- Hook
Patterns used:
- Knit stitch: knit rows are knitted with knit stitches, purl rows with purl stitches when knitting in turns, and always knit stitches when knitting in the round.
- Purl stitch: when knitting in the round, purl stitches are used.
We start knitting a hat for a girl with knitting needles from the ears. Right ear: knit 3 loops in stockinette stitch, increase one loop in every second row. We continue until there are 21 loops. We knit the left ear in the same way.
The back of the hat: cast on 14 loops, start knitting them into the loops of the right and then the left ear. The result should be 84 loops.
We knit in the round on 4 needles - 4 rows in stockinette stitch, 4 rows in purl stitch.
In the 9th row, tie the 5th and 6th loops together. And we make decreases 3 more times. In the purl row we knit 2 stitches together purlwise. every three loops. To make the bottom - faces. loops, and in each row there are 2 persons. loops together through 2 loops. We continue until there are 12 loops left.
For a beautiful edge, crochet it with single crochets. To make the ties, twist the laces of the two strands together.
Knitted pattern
The cap can also be knitted from soft yarn or cotton threads. It is better to crochet a cap, so it will turn out thinner and more delicate. You can knit it both warm and “summer”, from thin threads.
Even a novice needlewoman can cope. The simplest cap is knitted from the back of the head in the round.
Circular pattern of a knitted cap:
To begin with, a chain of 15 air loops is knitted, which is closed into a ring with a connecting post. Next, double crochets are knitted in the circle with additions in each row according to pattern No. 2. As a result, there should be 96 loops in the outer row.
Read this: DIY Indian dance costume: selecting fabric and technique
Next, the cap is also knitted in the round in accordance with pattern No. 3, approximately 10 cm. Knitting is completed according to pattern No. 1 - this is the finishing of the cap, its edges.
For example, the edges of a cap can be knitted according to the following patterns:
The last final stage is to thread the tape into the first row of trim.
A beautiful and elegant cap is obtained if you knit it with “fans”.
For such a cap you need to take cotton threads (“Children’s cotton”) and a 2.5 mm hook. Knitting also begins in the circle, that is, from the back of the cap. We collect a chain of 10-15 air loops and close it into a ring. Next, it is knitted according to the pattern with single crochets and single crochets. The lower edge, i.e. the neck line, is not knitted with rapport.
The ties are also made from satin ribbon. You can decorate your knitting by knitting the outer rows with threads of a different color.
Here are a few more similar schemes:
How to knit different models of hats for newborns
With ties
Description of knitting a hat with ties for a newborn:
- Take 50 grams of half-wool, wool or cotton yarn and knitting needles N3. You need to cast on the number of loops based on the knitting density of 28 loops in 10 centimeters horizontally and the actual girth of the head. First, an elastic band is knitted, alternating purl and knit stitches with a height of 6-8 rows. Next - knitting according to the pattern.
- The resulting canvas is divided into 6 parts. Each row cast on with knit stitches is shortened by 6 stitches - one in each part.
- We leave 3 loops on each side to form ties of the required length, but first tie the remaining 6 loops.
The video shows a method of knitting ties for a baby hat:
With ears
These are the cutest hats for creating unforgettable photos and videos for your family album. Bears, frogs, owls, hares, etc. They are knitted with decreasing stitches on both sides, forming an oval or circle.
Or the hat is knitted with ears for insulation. There are a lot of different models. The photo shows several patterns and descriptions of knitting an owlet hat:
How else can you knit a cool hat with ears for newborn babies:
Popular articles Tree of happiness from roses
With a toe
Another option is a hat with a toe. This is a classic hat model, universal for boys and girls. It is easier and simpler to knit such a hat crosswise, that is, vertically in garter stitch.
You need to make a pattern according to the size of the baby’s head, and following it, simply increase and decrease loops in each row, making the fabric zigzag, as in the photo below.
Master class on another model of a hat with a toe for a baby:
Elf cap
The Elf hat is a style that emphasizes the fragility and cuteness of the baby. It can be knitted for a baby 6 months and older.
Wool blend yarn with a thread thickness of 220m/100g 50 - 60 grams is suitable. Knitted on four needles No. 4.5 in circular rows in stockinette stitch (all stitches are knit).
Description of knitting pattern Elf:
- You need to cast on 60 stitches on the knitting needles, distributing them into 15 stitches on each knitting needle. If you wish, you can start with an elastic band of 6-8 rows 1*1, that is, 1 knit stitch, 1 purl loop.
- 24 rows are knitted in stockinette stitch: in the front row all stitches are knit, in the purl row - purl.
- Then, on each knitting needle in the next 4 rows, cut 1 loop, knitting 2 together.
- When there are 5 loops left on each knitting needle, you need to stop decreasing and simply knit another 20 rows evenly, covering them with a working thread. This will be the knot.
Master class on video:
Cap
Description of knitting a cap in the video:
A bonnet is not a very fashionable and popular style today; it is easier to crochet it. But there are lovers and connoisseurs of such classic knitting patterns for newborn babies.
These hats are knitted by creating a horizontal rectangle and joining it with a spherical back. The front corners of the rectangle are continued with ribbon ties.
Knitting pattern for a cap step by step:
With pom-poms
A hat with pompoms looks no less cute. This way you can decorate any hat.
Option for knitting a hat for a newborn:
We sew an envelope-blanket for a newborn baby with patterns
The envelope is used primarily to discharge a child from the maternity hospital. I would like to dress up this little miracle on this significant day. There are different types of envelopes: an envelope is a blanket, an envelope is a sleeping bag. With mattress inserts, with and without zippers, warm and light. It all depends on the time of year and what function they will perform in the future. Let's consider a simple but original option.
Since the child grows rapidly in the first months, the envelope is not used for long. This model involves using the product as a blanket for a child.
We select the material:
- colored cotton – 1x1 m;
- fleece – 1.1x1.1 m;
- synthetic padding filler – 1x1 m;
- plain cotton – 05x1.1 m.
Using chalk and a ruler, mark 25x25 cm squares on colored cotton.
The bottom layer is fleece, the padding is on top, and the top layer is colored cotton. Pin around the perimeter.
We sew the product along the intended squares. Align the edges.
We process the edges of the blanket. To do this, cut a strip of fabric (also called trim) 5 cm wide. Iron one side. We make a bend of 1.5 cm. The second side remains flat. From the edge of the blanket, at a distance of 2.5 cm, attach a strip with the flat side. We stitch it.
We wrap the strip of fabric over the fleece side. Sew with large stitches using a needle. The thread will be approximately 2-3 mm from the edge of the strip (view from the front). You need to stitch between the hand seam and the edge of the binding.
We do the same as steps 5 and 6 on all sides of the product. We're done with the blanket.
Since this is an envelope, it must be tied with something. You can, of course, use traditional tape, but you want originality. Let's make a bow-clasp. Let's take a piece of 26x10 cm. Fold it in half and stitch around the perimeter. We do not finish the line so that there is a small hole. We turn the product inside out through it.
Let's make a pillow. We fill the middle through the hole and stitch it.
We take a small strip of fabric, fold the edges and iron it. Let's sew.
We try the strip on the pillow. Select the volume. We stitch and dress.
We sew a ribbon. The length can be different, make it as you see fit. The width of the tape is about 10 cm. Therefore, we make a cut with a margin at the edges for turning. We bend the edge and iron it. Fold in half so that the folds match and iron again. Sew the folded sides together and stitch on the other edge.
We bend the edge to the inside and stitch it. On one side of the ribbon we sew a button, on the other we make a cut for a hole and sew it on. You can make several buttons so that you can adjust the volume.
We stretch the ribbon through the bow.
The original envelope is ready. Depending on the gender of the child, we choose the color of the bow; accordingly, the color of the trim should be the same. In our version, this is an envelope for a boy.
Cap for a newborn: the benefits of knitting
When a baby’s cap is knitted on knitting needles, there are the following advantages of using this tool:
- the ability to knit a hat of any thickness, using both the finest threads and warm thick yarn;
- making a headdress for a newborn without a single seam;
- variety of shapes and types of products.
All kinds of threads are suitable for knitting a cap, be it cotton, linen, viscose, down, garus, iris, wool or synthetic yarn, it all depends on why the newborn is knitting a cap with knitting needles.
Types of caps for newborns
Baby hats are knitted with knitting needles for the following occasions:
- on the way out - in an elegant style;
- for night sleep;
- for walks in the cold season;
- as part of a kit, etc.
The needlewoman has the right to use all sorts of accessories to make the newborn’s hat look appropriate for the chosen type and purpose. You can decorate the cap by using:
- openwork or tight knitting;
- frills;
- ribbons;
- knitted flowers;
- ears;
- pompoms, etc.
The main requirement for a newborn's hat knitted with knitting needles is comfort. It is recommended to choose a cap style so that the newborn does not experience discomfort from seams, knots, rough textured knitting, etc.
What color to knit a cap with knitting needles
In addition to the traditionally accepted colors - pink for girls and blue for boys, it is appropriate for a newborn to knit a hat of any pleasant color - white, light green, yellow, lilac, milky and any other options, including combinations.
Regardless of the gender of the child, you can knit a set with a cap in one color, but it is permissible to combine it with stripes of a different color. There are no restrictions regarding the color scheme of children's caps, as long as the product is comfortable and fits the purpose of use.
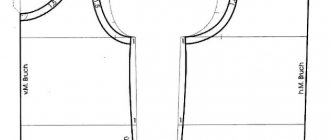
How to sew a cap with your own hands
Transfer the pattern pieces onto cotton fabric and cut out the pieces. There is no need to give allowances for the cut of this newborn cap, since they have already been taken into account when constructing the pattern drawing.
If you find it difficult to trace the contours of the parts on a light-colored fabric, you can pin together the paper pattern parts with the fabric and cut them out along the outline of the pattern.
When sewing children's clothing, the seams should be sewn on the front side so that rough joints do not cause skin irritation. Usually, the seams are closed with a backstitch, but if you have an overlocker, then a three-thread overlock stitch (on the front side) will completely replace such a seam. See Types of Machine Stitches.
The raw cut of the newborn's cap is closed with a seam in the hem, lace or crocheted. The bottom of the cap is slightly gathered and hemmed with a ribbon or a stripe that turns into a tie.
Video of a finished cap (Newsboy cap or Newsboy cap). In the description of the video there is a link to a site where the full technology for sewing this cap is given. The video is in English, but you can choose subtitles in any language.
Other articles:
DIY children's summer hat
This free master class provides a pattern for three sizes of a children's hat and a full description of how to sew a children's hat with your own hands.
Pattern of a baby vest for newborns In addition to a cap, a newborn baby will also need a baby vest. If you have a sewing machine and cotton fabric, you can try sewing it yourself.
Envelope for a newborn To make leaving the maternity hospital a more festive event, you can try sewing an envelope of an original shape instead of a blanket.
Sewing a dress with your own hands How to sew a dress with your own hands. Technology and sequence of sewing dresses for beginners.
How to make a pattern and other tips for beginners How to make a pattern, what tools are needed for this. These and many other tips for beginners.
How to hem a skirt Read this article if you don’t know how to hem a skirt, including chiffon ones. Finishing the bottom of the skirt with a hidden seam.
Layout of the cut of trousers and fabric consumption Trousers can be cut from 120-130 cm of fabric, 150 cm wide. However, for the cut of loose-fitting trousers, this norm can be exactly doubled.
How to sew a school apron As time passes and your child grows up, you will forget how to make a pattern for a cap or vest. New problems will appear, and for your grown daughter you will need to sew a school apron.
Half-sun - sewing and cutting The pattern of a bias skirt is very simple to construct, and any mother who has a sewing machine can sew it for her schoolgirl daughter with her own hands. We offer you a pattern for such a skirt and some tips on the technology of sewing a half-sun skirt.
Welt pocket - processing into a frame It is quite difficult to create a pattern for such products and it requires experience to carefully and correctly make such a product. If you are going to sew trousers with a welt pocket, then in this article you will find some useful tips.
DIY pillow letters About how to make a pattern and sew pillow letters with your own hands. An experienced technologist will share the skill of sewing a pillow with you.
How to sew a cap for a newborn: tips
Beginning needlewomen will find the following tips from experienced craftswomen useful when sewing children's clothes.
- Use durable material for the cap, because constant washing and ironing will wear out the fabric and then you will have to sew more caps. Try not to choose low-grade materials for children's clothing.
- It’s important not to choose complex patterns for sewing children’s clothes, and there’s also no need for excessively sticky decoration elements for caps. As mentioned above, hats for newborns will be subject to frequent washing and ironing, and bows and flowers may not withstand such a load. Thanks to these unnecessary details, a child may feel uncomfortable wearing such a hat.
- Little children grow quickly, so experienced mothers do not recommend sewing too many clothes for their little ones. For a normal existence, it is enough to have three or four caps. After all, after a few months, the item may not suit the child, and it will remain lying on the shelf in the wardrobe, not worn at all.
Cap made of flannel fabric
After tips and detailed instructions on sewing a children's cap, you can sew this thing for your child yourself. And it’s okay if the first time the cap turns out to be not quite perfect, next time the cap will definitely come out comfortable and beautiful.
Constructing a drawing of a cap pattern
The standard model of a hat for a child is sewn from two parts. It is very easy to do, even a person without experience can do it. The pattern of a hat for a newborn can consist of three parts or more, but the complexity of the work will increase.
Building the bottom
Length of the bottom of the product. Make a right angle where point O will be the vertex. Next, the length of the bottom of the cap is canceled, about 10 cm.
Bottom width at top. From vertex O to the right, measure 5 cm and make point O2.
Bottom width. From line O1 to the right, measure 5 cm, make point O3. Connect measurements of O2 and O3 together. Next, divide line OO2 in half and mark O4. From O2 down, count 3 cm and make O5. Make 1.5 cm from O2 along the corner and place point O6. Then connect O4, O6, O5 with a straight line.
You might be interested in: How to properly sew curtain tapes to tulle and curtains
Crochet
Construction of the main part
Make a right angle and mark the vertex M.
Base length. From the top of M, measure 16 cm down and make point M1.
Base width. From point M to the right, lay 10 cm and make point M2. Since the width of the cap at the top is 2 cm greater than at the bottom, then count 12 cm to the right from place M1 and make point M3. Now connect M2 and M3 with a line. From point M3 up, make 2 cm and add point M4. Now M4 and M1 need to be connected.
The back of a child's cap
To pattern a baby cap for newborns, you need paper and a pencil.
Product with frill
You need to carefully draw a beautiful rectangle. It can be marked as ABSD, the vertical lines AD and BC will be of equal length 15 cm (half head circumference, and an additional 2 cm):. The horizontal lines AB and DS will be the width of the occipital lobe and also of the same size, 7 cm each
The horizontal lines AB and DS will be the width of the occipital lobe and also of the same size, 7 cm.
Line of the front and bottom of the cap
From line C you need to draw a segment CD and set aside 2 cm.
Connect points B and 1 (below). Connect point 1 (on the bottom line) to the place where it will be sewn on the product. This can be seen in the figure below.
Occipital part
T-shaped cap
The headdress, which is based on a T-shape, is knitted in a continuous fabric with further assembly with seams on the front side.
Master Class:
- Knit the back and side parts with the main pattern;
- After 10-12 cm (depending on the size of the baby’s head) from the beginning of knitting, divide the resulting rectangle into three parts, close the loops on the sides;
- Continue knitting the middle part with knitting needles for the same amount (10-12cm), decreasing one loop in each even row;
- Close the remaining loops, the base of the cap is ready;
- Connect the parts with the seam facing outwards so that it is on the front side and does not cause discomfort to the baby;
- If desired, you can decorate the cap with miniature ruffles and lace.
Solid decorative elements (beads, brooches, buttons) are strictly not recommended for use on infant clothing.
Bouquet of diapers for newborns, master class
One of the attributes that will always be useful in a family with a baby is a diaper. Pampers are used to make a large number of different gifts for little suns: cakes, bouquets, strollers. Things to remember:
- Diapers are a product, an attribute of personal hygiene, so when creating your holiday gifts from them, you must perform all stages of the work with clean hands.
- Do not touch the inside of the diaper.
- All elements that will be directly in the bouquet must be disinfected.
- The finished holiday product should be packaged in transparent film.
Elements that are needed to create a bouquet of diapers:
- A pack of diapers (the more diapers you use, the more magnificent the bouquet will be). It’s better to take No. 2 right away, because children grow quickly. In order not to make a mistake when choosing a specific brand of diapers, it is advisable to ask the baby’s parents about the preferred brand and size of diapers.
- A vase, a foam ball of the required size (these materials can be purchased at a store that sells decorative elements).
- Elastic bands (it is better to choose transparent or neutral tones).
- Decorative wide ribbon with which the bouquet will be decorated.
- Wooden sticks, skewers.
- Decorative napkin with an interesting pattern.
Stages of creating a bouquet.
- Roll each diaper separately into a small roll.
- Secure each folded diaper with an elastic band. To make the elastic less noticeable, it is better to pull it not to the middle, but to the edge of the diaper.
- Insert wooden sticks into the finished rolls. Externally, this diaper resembles a flower bud.
- Next is to decorate the vase. To do this, paper is laid out inside the vase and a foam ball is placed inside. Instead of paper, baby towels, diapers, and other items of clothing are often used.
- Place the buds evenly into the ball.
- Use your imagination and decorate the bouquet with napkins and ribbons. The main task here is to cover the elastic bands that are on the diapers. The vase itself can be decorated with lace and ribbons (to attach ribbons to the vase, it is better to use double-sided tape).
- To dilute a bouquet of diapers with other color shades, you can also use vests, towels, and bibs to prepare buds. The technique for preparing buds from them is the same as for diapers.
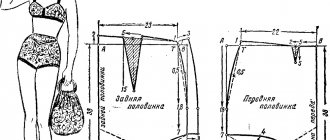
Pattern of rompers for a newborn
Romper suits are very popular clothing for toddlers. There should be a lot of them, since the baby will often burp and defecate past the diaper. You will have to constantly change his clothes. How to sew rompers for a newborn with your own hands? Very simple, and most importantly, fast:
- Fold the fabric in half with the wrong side facing out.
- Attach the finished pattern and trace it with soap.
- Attach the pattern to the fabric using tailor's pins.
- Leave seam allowances of half a centimeter.
- Cut out the pattern pieces.
- Assemble the pattern pieces and baste.
- Sew the finished product by hand or using a machine stitch.
Pay special attention to the choice of fabric. It can be cotton fabric or flannel, flannel
DIY clothes for newborns have their own tailoring features.
How to sew a cap for a newborn: instructions
Before starting the process, prepare your tools and materials. You don't need a lot of fabric for a bonnet. You can even use parts of the material from other clothes.
Caps for newborns
IMPORTANT: Only natural fiber materials should be used for the bonnet. These include chintz, cambric, flannel, children's knitted fabrics, etc. They must be of good quality, painted with safe dyes.
The process will also require:
- Material, sewing machine
- Pattern diagram, thread, matching color, scissors
- Tailor's needles, overlock.
Instructions for sewing the product:
- It is advisable to iron it before transferring the pattern to the fabric; it is good if you iron it with steam. This way, the fabric will not shrink after sewing the product.
- Now transfer the parts of the cap to the fabric. To do this, lay them out sparingly, outline them with chalk and leave seam allowances. And then cut out the details of the cap.
- Baste the side pieces to the middle of the product. To prevent the stitches from putting pressure on the child’s delicate scalp in the future, it is better to make them from the outside.
- Sew them with a regular stitch, and then sew them with an overlocker. Then remove the basting.
- All that remains is to sew the strings onto the cap and make a edging at the top and bottom of the cap. To do this, cut out the bias tapes.
- Then iron these bindings so that they have the desired shape.
- Baste the trim to the bonnet and iron it. The product is ready.
The caps can be decorated as you wish. For babies, you can use beautiful lace in the form of ruffles, ribbons and other accessories that are sold in fabric stores as decorations.
Then look at examples of such hats for children, perhaps you will like some model:
Cap Cap Cap for the girl when she is discharged
Product modeling
The most comfortable vest is the one that has a good smell and fastens on the shoulder with a button or button. Any young mother knows this. Such a product will not come untied or slip, and the baby’s chest will always be covered. This pattern of a baby vest involves a double front flap. To get a product blank, you need to indicate in the drawing the required width of the shelf and the location of the fastener, and also draw the back separately so that it is easy to cut out the parts.
Another useful point to pay attention to is closed sleeves. Here you should make a special turn of the back of the sleeve cut to the wrong side (about 5 cm), and leave the front part according to the size of the template
The only thing is to add a few centimeters to the workpiece so that the child’s hand fits completely into the sleeve. After sewing, the lapel can be turned inside out and the exit from the sleeve can be closed to hide the baby’s hands. This design of the vest will be an excellent option for an active child who flaps his arms every now and then and may accidentally scratch his face with his nails.
Decorations for a baby hat
beads
It is also not recommended to decorate the cap with brooches made of non-ferrous metal, because the brooch can come unfastened and prick the child. In addition, the brooch increases the weight of the finished product and makes the cap uncomfortable for the child.
Sewing is a fun hobby for newborns. Making a baby cap will help a young mother take a break from everyday worries and remember the love for her baby. The same type of industrially produced children's hats cannot be compared with hand-made caps. The main thing is that the hat fits the child in size, and is also beautiful, comfortable and practical. Then the baby will certainly rejoice at the wonderful new thing.
Bouquet for a newborn boy, photo
For a boy, you can make bouquets from clothes, toys, diapers. In this case, you should select things in white-blue, light green shades. One of the original gift options for a newborn boy can be a bicycle made from diapers and soft toys. To prepare such a gift you will need the following ingredients:
- soft toy (bear, bunny),
- decorative ribbons, elastic bands,
- diapers,
- diapers,
- scissors,
- rattles
The process of creating a bicycle for a newborn boy:
- You need to make two wheels from diapers. To do this, the diapers are folded in a circle and tied with rubber bands.
- After creating a circle of diapers, a small hole is made in the middle of the wheel. To prevent diapers from falling apart, the product can be tied with decorative ribbon.
- Take two rattles, wrap them in diapers, and secure with ribbons. Insert these rattles into the hole on the wheel. The wheels can be wrapped in towels to make them look more interesting and prevent them from falling apart.
- At the same time as the rattles, a diaper is inserted into one of the wheels, which will act as the basis for the steering wheel. The steering wheel itself is held on a bottle that is used to make a seat for a toy driver.
- Sliders are placed on top of the bicycle, the handlebars are made from the ends of a diaper, socks, and decorative tape.
- You can put a teddy bear on a bicycle and carefully attach it to the base of the gift.
Determining children's sizes
Before starting work, you should determine what exactly the mother is going to sew for the child.
When preparing clothes for future use, it is important to take into account that newborns grow very quickly, so there is simply no point in preparing a dozen caps and vests of the same size. Modern motherhood and diapers have been simplified, eliminating the need for parents to sew cloth diapers
For one newborn baby, 6-7 diapers, 3-4 vests and 2-3 caps of the same size will be enough.
To understand what size clothes your baby needs, you can use standard approaches to determining it. The following data is used for sewing:
- From birth to 1 month, the child's height is 50−56 cm. Chest girth is 36 cm, head girth is 33−35 cm. These measurements correspond to size 18.
- From 1 to 3 months, height is in the range of 56−62 cm, chest circumference is 40 cm, and head circumference is 35−40 cm. For these measurements, size 20 is suitable.
- 3-6 months: height 62-68 cm, chest circumference - 44 cm, head circumference - 40-42 cm. For these data, size 22 is suitable.
- From 6 to 9 months, the child grows to 68−74 cm, his chest circumference reaches 48 cm, and his head reaches 40−42 cm. Size 24.
- 12−18 months - the child reaches 74−80 cm, and his chest circumference is 52 cm. Head circumference is 44−46 cm. Size 26.
When sewing children's clothing, you should remember that measurements at each age fluctuate with a difference of several centimeters. These features depend on the weight and gender of the child. This fact should be taken into account if things are being prepared for future use.
What will be required for implementation?
The most important thing that needs to be done at the stage of preparation for the implementation of a business idea for sewing clothes for newborns is to draw up a competent business plan
It is important to understand that this is not just a solution to a standard problem, but the basis for all future activities on which the success of your enterprise will depend. If possible, contact financial and legal professionals
They will help you properly bypass bureaucratic obstacles. And a person who understands the clothing business will provide indispensable assistance and support in finding suppliers of raw materials and marketing finished goods.
Variations on the bonnet theme
A cap pattern for a newborn does not necessarily mean a cap with ties that fits close to the head. Many parents prefer to dress up their baby in knitted hats and caps. Cotton knitwear is suitable for such hats.
The pattern of such caps for babies is the simplest. You can build it like this:
- measure the circumference of the baby's head;
- measure the distance from the eyebrows through the crown to the neck;
- Divide the circumference of the head in half - this will be the width of the pattern;
- Divide the second size in half as well - this will be the height of the pattern;
- based on the data obtained, construct a rectangle, adding 1.5-2 centimeters for the freedom of fit;
- round the corners to fit the hat on the head;
- add 5-7 centimeters in length for a hem that will help adjust the size of the hat.
This cap is made from two layers of knitwear for softness. If the hat is two-layer, then the seams are hidden between the layers, and if it is single-layer, then if the baby is very tiny, then it is better to make the seams outward. And if the child already holds his head confidently enough, and his skin is already less delicate, then you can sew the hat according to all the rules - make the seams from the inside out. The pattern should be positioned so that the product stretches in width.
For a cap that will look cute on a baby, after starting to round the corners of the pattern, add an elongated tail. It allows you to adjust the size of the cap if you tie it in a knot without tightening it too much.
The cap pattern looks like this.
Line A-B shows the beginning of the straight section of the cap. When sewing a pattern, do not forget about the hem measuring 5-7 centimeters.
Knitting hats: patterns and descriptions 2021
Knit a hat for a woman, child, newborn -. Preparing yourself and your loved ones for the winter and autumn cold is very simple if you take proper care of it now. You can knit a men's hat - a helmet or a men's hat - earflaps with knitting or crochet, for girls - with cat ears, fashionable berets according to video tutorials (in Russian) for yourself, a doll, even a dog. For beginners, the article contains excellent diagrams and a description of the knitting process.
Knitted hats for babies
Knitted hat with knitting needles for a newborn baby or two-month-old baby: a hat like in the picture – a berry! The main color of the product is orange. You will need a little more green or light green for the “cutting”. To begin, dial 72 P. in orange, perform L.G. three circular R. 28 next R. knit with the “BLACKBERRY” pattern according to the pattern. After this - again L.G., where 1 R.: 5 P. orange, 1 P. - green. And so on until the end of the P., try to find green loops and place them between the removed P. from the “BLACKBERRY” pattern. In R. below - repeat the color pattern. The next two R.: 4 P. orange, 2 P. green. Next R.: 3 P. green (the last orange P. and the first green - together). There remain 3 green and 2 orange loops according to the pattern. Continue decreasing the orange color until it completely disappears from the canvas. Remove 12 P., next. R. – 6 P. knit in a circular row for another 2 centimeters. At this point, tighten the thread and put the work aside.
Knitted hat for a newborn with knitting needles with a description and diagram with your own hands. An irreplaceable item this winter! For this work we recommend using double thread. We take three colors: green, light green and gray. Gray - 72 P. - 20 R.L.G. (all I. and L.R. – L.P.). the next 20 R. - a pattern with “bumps” in a green tint. 3 R.L.G. the lightest yarn. In each 2 R. we evenly remove 8 P. In the next 2 R. - 2 P. Knit the fabric another 2 cm, after which the thread can be cut. Knitted hats and knitted items are good, but we cannot always find the exact size of the product. In this case, it’s better to crochet - there you can try on clothes while working in the process. We will not offer this option in this article, but the alternative should always be considered!
Knit a cap for a newborn - for the winter for boys
You can learn to knit a baby hat for a boy for the winter in a few hours. To do this, you need a good, understandable diagram and a clear description of the process itself. If you want, you can knit a set: a hat and scarves, booties, mittens - anything you want to dress your baby! Watch a few MK videos on knitting a cap for a newborn.
https://www.youtube.com/watch?v=l3Lun_zAmOg
And we will provide you with another model - a knitted baby hat for a newborn with funny ears - pompoms. Threads in two colors: blue and mint.
- Knit all rows with thread in two layers.
- Elastic band: 2 L.P. alternate 2 I.P.
- L.G. = L.R. – L.P., I.R. – I.P.
- Garter stitch: all L.P.
Blue tint 70 P. = 8 R. with elastic band. Alternating 2 blue R. and two mint ones - L.G. When there are 3 mint stripes - 2 R. with blue thread L.G. Fold the resulting fabric in half and make a seam from the center 8 centimeters. Fold the free sides again and sew them up. Make pompoms from blue thread.
Popular articles Mini aquariums: how to equip them and what kind of fish to get?
Elf hat: knitting for children - video instructions
Also on our website you can find articles “knitting hats for women with descriptions and patterns for free.”
Subscribe to our channel or
Follow us on social media. networks!
How to choose a hat size for a child
When a child is very small, he is only a few months old, it is difficult to take him to clothing stores, so you need to buy hats according to your own measurements. Determining the size of a children's headdress is quite simple. It is recommended to use a centimeter, or, as a last resort, a thread that does not stretch. The centimeter must be applied to the most convex point of the head, and placed in front above the child’s eyebrows.
Pattern of a cap for a newborn
Do not tighten the tape, and if necessary, round the result up. The number that turns out will be the size of the headdress. For example, if the measurements give a result of 42 cm, then it is better to take the size of the product 43. When purchasing, you need to focus on the age of the baby.
Use of baby fabric
In the first years of life, the baby grows very quickly, so it is not advisable to buy many hats of the same size at once. Approximately every 2 months you need to take new products. Sometimes you can buy things to grow. For babies, size 44 is suitable, in six months you can safely buy 46, and in a year from 48 and above. These are averages and may vary for different babies because each person is different.
After one year, the size of the head will change, but not at a rapid rate. It is advisable to take measurements every six months and note changes. For sewing, regular knitwear is perfect, which is easy to care for. For the winter option, plush fabric is suitable, but in this case it is necessary to make a lining so that the headdress keeps its shape well.
Knitting a cap like Cinderella's
Making a cap pattern with your own hands
In this section you can learn how to properly start making a cap pattern for a newborn baby, and we will start with the back of the head.
The back of a child's cap
To begin, we must take a blank sheet of paper, a pen or pencil (whichever is more convenient for you). On the surface of the sheet, carefully draw a rectangle and mark it. In our case, this is ABCD (in the figure above you can see this), the vertical lines AD and BC are the same length of 12 cm (1/2 head circumference, according to the measurement + 3 cm for any size):
18:2+3=12 cm
Also in the figure we see the horizontal directions AB and DS, they also make up the width of the occipital lobe and are similarly the same, 6 cm each (x/4 head circumference according to the measurement + 1.5 cm for any size).
18:4+1.5=6 cm
Sewing line
We divide the angle ABC in half and from place B along the bisector of the angle we draw 2 cm (for any volume). We divide the BC line in the same way into two identical parts. Having done everything written above, we put 2 cm from place C to the left side (for, we repeat, any size of your baby’s head). We shorten the sewing line from place A, go through the 2nd point, the middle of BC and approach place 2 (lower).
Bottom line of the cap
From place D (our vertical line AD) we cancel 0.5 centimeters (for the purpose of absolutely all volumes). Places 0.5 and 2 (bottom) are combined together.
So, slowly but surely, we reach the next and final stage: the front part.
Front part of baby's cap
Again, take a sheet of paper and the subject of writing. We draw a rectangle ABSD, where the vertical lines AD and BC are the same, 16 cm each (the length of the occipital lobe according to the direction of sewing from place A down to the bottom of place 2), and the horizontal directions AB and CD are 9 cm (V2 head circumference according to the measurement):
18:2=9 cm
Sewing line
From our letter D to the right side, along the line DS we set aside 1 cm and from this place we move upward at a right angle to the line DS, we set aside another 1 cm (for any volumes). After that, we combine places A and 1.
Line of the front and bottom of the cap
From place C we go to the left along the line SD and set aside 1 cm.
We combine places B and 1 (on the bottom line). Place 1 (on the hem line) is combined with place 1 (along the sewing line). We hope that our article will be useful and easy to read for you. Good luck in your endeavors!
This is interesting: Pattern Summer sundress for girls (size 104-128)
For low birth weight babies
Sometimes the baby is premature or simply underweight. Every mother who has given birth to such a child should know some of the nuances of choosing clothes for underweight children.
The requirements for clothing for small newborns are especially high, since regular-sized items will be too large for them and will cause discomfort. Things for a baby born prematurely are made exclusively from natural fabrics and do not have seams or knots in the area where the part comes into contact with the baby’s head and body. Products worn over the head are absolutely excluded.
In online stores you can find a wide range of products specially designed for this occasion. When the child reaches the sizes typical for ordinary children, you can switch to products of classic sizes.
Knitted winter hat for newborns: diagram and description
For the cold season, you can knit a warm hat for a newborn. For insulation, you can knit in two threads. The number of loops for the set is calculated individually, based on the selected yarn and the volume of the baby’s head.
Materials:
- Yarn (wool, 100g/300m) – 100g
- Knitting needles No. 5
Legend:
- IP - purl loop
- LP - facial loop
- BOB – facial, crossed from a broach.
We knit the ears first. Cast on 6 stitches and knit 3 rows of stitches.
4th row: 3 sp, 1 lpp, 3 p.
5th row: sp
6th row: 3 sp, 1 lp, 1 lp, 1 lp, 3 sp.
7th row: sp.
Row 8 and beyond: increase until there are 19 stitches.
5 rows without increments.
Knit the second ear in the same way.
We sew a warm baby vest with our own hands with patterns
Regardless of the method of making clothes for a newborn (crocheting, knitting or sewing from fabric), you need to take into account the composition of the threads.
Of course, nothing can replace, in any respect, cotton flannel or chintz (100% cotton), which are ideal fabrics for sewing clothes for newborns.
As a rule, future parents purchase fabric for diapers in advance, and from the leftovers they can sew baby vests.
Conclusion, clothes for babies need to be made from soft fabric (chintz, flannel, cambric, bumazea, madapolama), try to purchase higher quality fabrics to eliminate the possibility of irritation on the baby’s body. Choose fabrics that have less color, as dyes are dangerous for the baby.
The pattern for a baby vest for babies over two months is shown in the photo below:
Measurements used:
- product length – 30 cm;
- half neck circumference – 12 cm;
- half chest circumference – 24 cm.
If you need smaller or larger size vests, then use the original formulas presented below:
- In accordance with the long vest - 30 cm, draw a rectangle ABCD with vertical lines AD and BC. Then the lines AB and CD will be 14 cm wide. This value includes 1/2 of the half-circumference of the chest with the addition of two centimeters for a loose fit (24: 2 + 2 = 14 cm).
- We cut out the back neckline: from point B to the left along line AB we measure 4 cm (1/3 of the half-circumference of the neck), then from point B down along line BC we measure 1 cm (for all sizes) and connect the resulting two points with a slightly concave line.
- We cut out the neckline in the front: from point B down along the line BC we measure 5 cm (1/3 of the semicircle of the neck + 1 cm).
- Sleeve length: from point A, draw 10-15 cm to the left along line AB and mark point P. Then measure the length of the baby’s arm and calculate the value; if you want a closed sleeve, then add 4-5 cm. It is better to make a spacious sleeve so as not to restrict the movements of the newborn.
- Sleeve width: from point P, draw a line down parallel to the AD line, until it reaches 11 cm. From the resulting point 11, draw a horizontal line to the right until it intersects with the AD line and place point P1.
- Bottom of the sleeve: from point 11 up we measure 1 cm along the line connecting points P and 11. From point P1 to the left we measure 2 cm along the line connecting points P1 and 11. From point P1 down along the line AD we put 3 cm (point 3) . We get the bottom of the sleeve by drawing a line through the resulting three points.
- Side seam: from point D we lead to the left along the line SD and set aside 2 cm (point 2). Connect this point to point 3.
- Bottom of the product: divide the SD line into two even parts and mark a point, then measure 1 cm from point 2 up along the side seam, then connect the two points.
The last steps are to determine the type and depth of the smell, as well as what kind of clasp you will choose yourself, since it is not necessary to cut out the smell, it is done directly on the fabric.
We study the pattern of a vest for newborns 0-2 months
The pattern for a baby vest pattern for newborns from 0 to two months is shown in the photo below:
This product is cut out without seam allowances, since they all face the front side.
To sew such a vest you need: approximately 26 cm of chintz with a width of 150 cm (you can sew four vests), for decoration - 40 cm of white stitching, threads to match the color of the product, a disappearing marker, scissors, pins, overlog.
The cut details of the vest are shown in the photo below:
Sequence of work:
- Fold the original fabric in half and apply the pattern pieces along the grain thread.
- We trace the outline along the front side using a disappearing marker.
- We cut out the elements of the product without seam allowances, and secure the strips of stitching in the center of the front side with pins.
- We sew the seams in the center. Then we fold the front elements with the back along the shoulder seams and stitch them with an overlock stitch.
- Using an overlog we process the lower section of the sleeve, with one seam we process both wraps along the back and the full neckline, the lower sections of the front and back. Then we fold the vest along the side seams and sew them and the sleeve seams with a continuous stitch.
- At the last stage, iron the product with a steamer. The vest is ready!
How to knit a cap for a newborn baby
Knitted cap for a newborn
Cap for a newborn from @garagan_knit Cap size 40-42. Knitting needles 2.5. Yarn fibra natura papyrus. My density is 10*10 = 24 loops * 32 rows. Rapport 6 loops. In rows 3,5,13 and 15, twist four loops. I cast on 72 loops. Description of the cap for a newborn Rapport 6 loops*11
Read more…
Knitted cap for a newborn
Description of a cap for a newborn from @shpilinchuk_nataliya Cap for OG 36-38 cm (0-3 months) Alize cotton gold yarn (100 g/330m) – 1 skein. 2.5 spokes on a cable. Description of a cap for a newborn We dial 90 points = 1 cr. p. + 1 p. p. + 8 rap.
Read more…
Knitting a cap for a newborn baby, free description
Yarn 100% merino wool Merino Extra 125 or equivalent with parameters 50g by 125m (Lana Gatto super Soft). The gauge is 28p by 38p in stockinette stitch in a 10*10 square. Consumption 70g for exhaust gas 44-46cm. The height of the finished hat is 23cm. Knitting needles 3.5 mm.⠀ Author of the work @natasha_knits Cap for a newborn
Read more…
Knitted cap Sophia. Work by Oksana Usmanova
Hello fashionistas! The “Sophia” cap (4-6 months) is knitted together with booties (there was a master class for them earlier), without seams. Yarn: cotton with silk and acrylic, circular knitting needles No. 2, hook No. 1.7; for embroidery – 100% cotton. Newborn cap
Read more…
A CAP for a newborn baby with a beautiful pattern is knitted
Cap size for a newborn baby for 3-4 months. Author of the description @tanya_garagan_(Instagram). Yarn from Color City TET-A-TET (65% cotton – 35% acrylic, 180m/50g). Knitting needles 2.5. Report 24 loops, I have 3 reports +1 edge loop. Cap for a newborn baby, job description Dial 72 + 1 edge
Read more…
Knitted cap for a newborn baby
The size of the doll's head corresponds to the average size of a newborn's head. Knitting needles 3.0. Pekhorskaya yarn “Elegant” 100% merino wool. 100 gr – 250 meters. Calculation of the head size of a newborn. Cast on 52 loops (tail when casting on 85 cm) with white yarn
Read more…
Knitted hat (cap) for a girl. Olga's work
Hat for girls aged 1.5-3 years. Well, shall we knit? Basic patterns for knitting our hat: elastic band 1x1; “stars” - insert the knitting needle into 3 knit stitches on the left knitting needle and knit them together with the knit stitch behind the back thread; without taking off
Read more…
Knitted warm cap for a newborn baby
Warm cap for newborns from 0-3 months. Yarn SOFTY Composition: 100% micropolyester meterage: meterage: 50 gr. 115 m. knitting needles No. 5 and No. 4 (for elastic). We knit in two threads. Yarn (for the lower cap) SEKERİM BEBE Composition: 100% acrylic. footage: 100 gr. 350
Read more…
Cap with LEAVES pattern for newborn baby
The cap is ready for volume 40-42. Yarn alize cotton gold. Knitting needles 2.5. Author of the description @anya_garagan_ Description of the cap for the baby Report 12 loops. Please note that the front row has two loops together and two yarn overs, and the purl row has two loops together and a single yarn over. We knit further with knitting needles
Read more…
Knitted cap for a newborn baby
Description of the cap for a newborn from @tanya_garagan_Mini version. A cap for a newborn is knitted for a head volume of 41-43 cm. Knitting needles No. 3. The thickness of the yarn resembles BBB Full (90-100 m/50 g). I rewrote the pattern for turning rows by hand, the original pattern is presented for circular knitting. Let it be too. Calculation for spokes only for this
Read more…
Knitted lightweight cap for a newborn baby
YarnArt Jeans. Knitting needles 2.5. Size 42-44. Author of the description @tanya_garagan_ Cap for a newborn with knitting needles, job description Cast on 70 loops, knit 5 rows in garter stitch. Let's move on to the pattern. We knit to a height of 11 cm. We switch to knitting in the round. We make decreases through the row. 7 wedges. 1 row 8
Read more…
How to knit a warm cap for a newborn baby
Description of the hat from @knitting.mood For knitting you will need: Yarn: Lana Gatto super soft. Spokes: 3 and 4. On exhaust gas: 46-48. Density of knitting a hat - cap with knitting needles: 10 cm * 20 p (elastic band). Hat - knitted cap for a baby, job description Cast on with 3 knitting needles
Read more…
Knitted cap and booties for a newborn
Hello! I present my next work - a cap and booties for a newborn. I knitted it for my little grandson, but for obvious reasons, the model in the photo will not be the owner of the kit himself, but a soft toy. The set is knitted with knitting needles No.
Read more…
Cap for a newborn. Master Class!
Cap for a newborn. Acrylic 100%, knitting needles No. 2.5. We cast on 81 loops (the number should be divisible by 6 + 1 + 2 edge loops). 1st row: purl stitches. 2nd row: edge, *knit 1, knit the next 5 stitches, making 3 yarn overs after each stitch
Read more…
Knitted cap and booties. Works by Elena Zubkova
Knitted with knitting needles from yarn Yarn Art Baby and Alize soft. It took about 60-70 grams of pink and 40 grams of white. For decoration I used beads, ribbons, and lace. Main patterns: 1*1 elastic band and “Stars” pattern. We knit the “Stars” pattern with knitting needles. The star pattern with knitting needles.
Read more…
Knitted cap and booties for a newborn
I knitted the kits as a gift for two boys – twins. There is a description of knitting caps in my previous work (“Knitted cap for a newborn”), and I knitted booties with knitting needles like this: I cast on 64 stitches in total (24 stitches on the sides, 14 stitches in the middle, 2 edge stitches)
Read more…
Knitted cap - Olga's work
A cap is knitted for a newborn from baby pekhorka. I spent 100 grams of salad color and 30 grams of green for the work. Cap for 6-8 months. Description of the main pattern: 1st row: knit 3, remove 1 stitch without knitting - thread by knitting (lettuce color); 2nd row: 1 loop
Read more…
Children's cap with knitting needles - the work of Anastasia Silich
Knitted cap for a newborn baby. Knit like a regular cap: cast on 68 (2 edges, 66 for the pattern), knit with an elastic band one on one 2-2.5 centimeters. Now we knit the “wave” pattern (the number of loops is a multiple of 11): knit. rows – 2 p. together, knits.,
Read more…
Cap Pink Miracle for a newborn
The work was submitted to our competition “Hats and Sets”. Author Tanechka Shchetinina. Cap Pink Miracle for newborns aged 3-6 months. You will need; yarn ALPINA “VERA” 55% acrylic, 45% cotton 100 g. 300 m. 1 ball pink and a little white,
Read more…
Knitted cap and booties - the work of Olga Golovina
Dear knitters, I would like to present to your attention a set of booties and a cap for a newborn. For knitting I used children's acrylic. Consumption: 2 skeins of 50 g. For the cap, cast on 100 loops and knit with an elastic band 1*1 3cm. Then garter stitch (you can
Read more…
Baby hat and booties
Hello, my name is Dora. I really love different types of needlework. Knitting was my first hobby and my mother helped me take my first steps in this art. Every time I try something new: cross stitch,
Read more…
Knitted warm cap for a newborn baby
Materials for knitting a cap: 100% merino yarn 50 g. 115-125 m. (Dona) palette, knitting needles 2.5 mm and 3.5 mm, hook 2.5 mm. Knitting density: 10 cm – 20 loops, knitting needles 3.5 mm. 1 cm.
Read more…
We sew in two versions
The sewing master class includes two cap options:
- Three-piece cap;
- A cap of two parts.
First, you need to take measurements of the child’s head, regardless of the type of cap. You need to know two measurements: the half-circumference of the head and the length from the forehead to the hollow on the back of the head (this is the length of the cap).
Head circumference is measured by the protruding parts of the forehead and back of the head. This value is divided into two - the half-circumference of the head.
Read this: Boho patterns: a detailed master class for beginner needlewomen
To work you will need:
- textile;
- pattern;
- threads;
- scissors;
- pins;
- pencil or piece of soap;
- sewing machine;
- lace and trim.
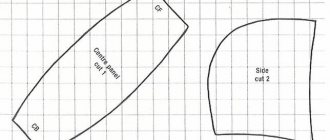
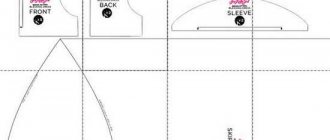
Pattern for a cap made of three parts:
You can print the pattern on a printer or carefully redraw it from the monitor by placing a sheet of paper on it.
Progress:
- Cut out the parts from the fabric. To do this, transfer the pattern details to the wrong side of the fabric with a pencil or soap. It should be noted that when sewing a cap, seam allowances are not taken into account: the parts are cut out exactly along the contours.
- We sew the side parts from the middle one, making the seams outward, that is, on the front side. This way they won't rub the baby's head. Then they can be decorated with lace. The seams can also be overlaid and folded to make them look neat.
- We process the side edges with a strip of fabric. To do this, we wrap the edge of the cap in a fairly wide strip of fabric, fold the edges of the strip and sew everything together.
- We also process the bottom edge and continue the strip in two directions as ties.
- We sew the ends of the ties several times and cut them close to the seam.
Read this: Richelieu embroidery for beginners: step by step we look at the main points
Pattern for a cap made of two parts:
Progress:
- We cut out the parts taking into account the fold line. You should end up with two parts.
- Sew the lace to the back of the head. We try to make the seam small.
- We combine the seam of the back part with the middle of the side part.
- We baste the parts to each other in a circle, and then stitch them on a typewriter.
- We slightly tuck the front edges, stitch so that the product fits well and keeps its shape, and sew on a strip of lace.
- We sew the inner seam with tape so that it does not rub against the baby’s head.
- We sew the ties along the bottom edge in the same way as we did for the three-piece cap. You can use satin ribbon.
It turns out to be a very elegant cap.
Seamless knitted cap
For newborn babies, it is fundamentally important that the clothes are seamless. This also applies to hats. Knitting seamless caps is not that difficult; there are a lot of detailed master classes on the Internet that allow you to use both a hook and knitting needles.
Traditionally, seamless hats are knitted using elastic; during the process of knitting the fabric, decreases are made on the sides.
Thanks to the decreases on both sides of the cap, protrusions are obtained that cover the child’s ears.
You can use any suitable yarn, but before knitting you should definitely make a test sample measuring 10x10 cm. The sample is necessary to calculate the loops for a specific hat size.
Step-by-step plan for knitting a seamless pattern:
- For size 0-3 months cast on 100 stitches using Yarnart jeans yarn;
- Knit one row of elastic, alternating one purl and knit stitch, leaving one edge loop;
- Distribute the loops into the front (60 loops) and back (40 loops) parts, mark with handmade markers;
- Repeat step 2, knit an elastic band 2-3 cm wide (about 8 rows5. Two rows with facial loops;
- Divide the occipital side into 3 equal parts and mark it with markers;
- Make decreases at the beginning and at the end of the row on the back of the head, at the beginning and at the end of the front;
- Repeat step 6 for approximately 4-5 cm;
- Knit increases in the middle of the back of the head;
- Knit 4 cm and repeat step 7;
- Pull the loops at the top of the head and make a knot;
- Crochet two ties and sew to the cap.
Sewing
We fold the main circle and lace face to face, and place the drawstring on top with the front side as well. We make sure that the notches on the parts match. We start sewing the parts from the notch. If the work is done on a regular sewing machine, it would not hurt to additionally process the edge with a zigzag or special triangular scissors.
We iron the stitched drawstring and the seam to the center and lay a finishing line, retreating from the edge 0.1 cm. We turn the edges of the drawstring inward by 0.5 cm, iron and attach, leaving a small hole of 1.5 cm for threading the elastic.
In order not to make a mistake with the length of the elastic, we multiply the circumference of the cap by 0.7 and add 1-2 cm for the allowance. We insert the elastic into the cap and close the seam. At the end we connect the edges of the lace. To avoid unnecessary protruding seams, it is better to do this using a hand overlay stitch. All that remains is to iron the product and try it on the owner.
So we learned how to simply, easily and quickly sew a cap for an adult. Now everything is in your hands!
LiveInternetLiveInternet
These tutorials will show you how to sew a hat from cotton T-shirt fabric.
If you have a new T-shirt lying around and don’t know what to do with it, then this option is the most suitable. If there is no T-shirt, then when choosing fabric in the store, make sure that it is completely natural. Option No. 1 - a hat with knots: 1. Prepare a T-shirt (fabric), a sewing machine, preferably an overlocker, a measuring tape, and scissors. 2. Copy and print the patterns for hats with one and/or two knots. Using a measuring tape, measure the circumference of the baby's head and, if necessary, adjust the pattern if it turns out to be too big or small. 3. Using an overlocker, connect the parts of the hat (just do not sew up the bottom edge through which the hat fits on the head). Finish the bottom edge in a circular pattern using an overlocker. Be very careful not to stretch the fabric, otherwise the edges will become wavy. If you don’t have an overlocker, you can zigzag the edges of the cap. To do this, first, stepping back from the edge 0.5 cm, lay a regular stitch, and then finish the edge with a zigzag stitch. In this case, you also need to be very careful not to stretch the edges when processing them.
4. Turn the bottom edge about 5-6 cm, pin it, and then sew it on a machine.
5. All that remains is to tie knots, with which you can adjust the size of the hat in height
Option number 2 - a simple hat:
1.
2.1 inches = 2.5 cm Fold the fabric in half. Attach a sample, outline, cut out, leaving 8mm. around the edges. Please note that the finished hat is 12.5cm in height, so the cutout is 10cm. Or we use a pattern, having decided on the dimensions (half head circumference + additional freedom).
In addition to the hat itself, we cut out a rectangular piece of fabric measuring 14x35cm. We take into account the stretch direction of the fabric. Fold the two halves of the cap together and stitch on the right side, leaving an 8mm margin. Then, fold the rectangular piece in half and stitch it.
Fold into an even narrower connected ring, straightening it to the right side. Place the ring in the cap that is still on the left side so that all the raw edges match. Pin all 3 raw edges together
Sew Turn the cap right side out and iron it with an iron and steamer.
Fold in the edges and iron again
Option No. 3 - hat with ears: 1. Pattern for a newborn. The circumference of a newborn's head is about 35-34 cm, and therefore 18-19 cm in diameter is enough for us to have a loose fit and for seam allowances. The pattern fits perfectly on A4 format. If you need a larger cap, display it on the monitor at the required scale and redraw it from above.
Pay attention to the dotted line on the pattern - this is where the fold of the fabric should go. 2. If desired, take fabrics of different textures or colors and cut out two symmetrical parts. 3. Now we need to draw small ears. To do this, we outline the pattern of the ears on the fabric folded right sides and sew the seams according to the pattern. In principle, the ears can be made conical or even long, like a hare’s. Here everything depends only on our vision of the subject - if we want a pussy, a bunny or a teddy bear, then we simply model the shape of the ears. It is not difficult.
4. Then we cut out the parts, leaving a seam allowance of about 3-5 mm. 5. Turn the ears inside out and, passing the thread along the edge, tighten them a little. 6. Now, look at the photo and sew the ears to the front side of one of the parts of the hat. 7. Sew two seams on the crown. Do not make too large seam allowances - 0.5 - 0.8 cm is quite enough. And the second part too.
9. Next, turning the seams 90 degrees, we make another smooth seam, forming a cap. 10. Turn the pieces inside out, straighten them and slightly iron the seams.
11. At the next stage, we insert the parts one into the other with their front sides. You understand the inside of the ears. All we have to do is make a seam along the edge, not forgetting to leave a technological hole for turning out about 5 cm or a little less. 12. We turn the cap inside out and sew up the technological hole by hand as discreetly as possible. The newborn hat with ears is ready. We try the product on our kitten, bunny, tiger cub or bear cub. We enjoy the result.
source: https://masterclassy.ru/shite/detskoe-shite/2887-sh...hkami-master-klass-s-foto.html
https://podarokhandmade.ru/print:page,1,41-kak-sshi...chku-dlya-novorozhdennogo.html
https://u-made.blogspot.com/2011/04/blog-post.html
Option number 4 - bee hat
Option No. 5 - double knitted hat: a quick way.
on exhaust gas 49cm the height of the cap is 20cm when finished
We take a piece of ribana along the fold and fold it in half again. Draw half of the cap - Draw the second half of the cap - Cut out. We take the cut details as they lie and make two lines - central front and back -
Now you need to turn the cap inside out. To do this, take one of its layers and turn it inside out - Carry out the third line - Steam the finished hat.
https://a2fluence.blogspot.ru/search/label/Patterns%20i%20MK?max-results=20