Knitted dress with long sleeves
To sew a dress you need to prepare:
- knitted fabric;
- trim for decoration;
- threads, sewing tools.
Description
Dress bodice pattern without darts
As a basis for modeling, we will use a basic knitwear dress pattern.
Considering that knitwear stretches easily and under the influence of the weight of the skirt the waist line can move down, we obviously raise it by 5 cm.
We reduce the depth of the armhole by raising its lower level by 2 cm. We extend the line of the side seam.
We expand the neckline on the back, drawing the desired contour at a distance of 2 cm from the original one.
On the front bodice pattern, we widen the cutout by 2 cm along the shoulder line and measure down 19 cm along the center line. Draw a straight roll-out line.
On the patterns we mark the direction of the grain thread, which should coincide with the middle lines of the front and back bodice.
We remove unnecessary lines.
We transfer the contours of the parts to a new sheet of paper.
We provide an allowance of 1 cm along the roll-out, armhole, side and shoulder seams, and 2 cm along the bottom edge.
Cut out the bodice of the dress
Fold the fabric in half with the right side inward, aligning the fold line with the direction of the grain thread. We place the front and back bodice patterns with the middle seam on the fold line.
Sleeve pattern
Let's create a basic sleeve pattern. In our model, the sleeve is made on the cuff. Accordingly, we calculate the length of the sleeve as the length of the sleeve according to the measurement (from the shoulder point to the hand) minus the width of the cuff (= 3 cm) and plus 2 cm for a loose fit.
We mark alignment marks on the sleeve cap and armhole lines. We transfer the contours of the pattern to a new sheet, draw allowances along the edging and sleeve seam of 1 cm, along the bottom edge of 1-2 cm.
Draw a perpendicular from the top of the collar to the bottom line of the sleeve. Divide the distance from it towards the front bodice to the seam into three parts. We make a cut along the line of the first third. We expand the pattern, expanding it along the lower edge by 8 cm. We remove the expanded pattern onto a new sheet or fix the expansion with tape.
If desired, the bottom of the sleeve can be made more flared. To do this, we make a larger number of vertical cuts on the pattern and evenly move the sections apart.
When constructing, do not forget to outline the direction of the shared thread. It coincides with the virtual center line of the pattern.
We need to cut out two sleeve parts from the fabric.
In addition to the details listed above for the knitted dress pattern, we also need to cut out:
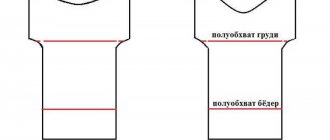
- skirt panels: two rectangles with a height equal to the length of the product from the waist line to the bottom edge plus 2 cm for the allowance along the top edge and plus another 4 cm for the allowance along the bottom edge, a width equal to the POB plus 15 cm for gathers and plus another 2 cm for side seams. The patterns must be placed on the fabric so that the grain thread is perpendicular to their height;
- cuffs: two rectangles with a height equal to 8 cm (= 3 cm x 2 + 2 cm) and a length equal to the width of the lower cut of the sleeve plus 2 cm for allowances. When cutting, the grain thread should be parallel to the length of the workpiece. The length of the decorative trim is equal to the length of the cuff blank;
- facing for rolling out the neck: a strip 5 cm wide (= 1.5 cm x 2 + 2 cm) and a length equal to the length of the neck (we measure the front and back bodice using the patterns; for stretchy fabrics it is reduced by 1-2 cm) plus 2 cm for allowances. In this case, the grain thread should be parallel to the length of the workpiece;
- nameplates: three rectangular pieces with a width equal to the width of the binding and a height equal to 14 cm (6 cm x 2 + 2 cm).
How to sew a knitted dress with sleeves
Fold the front and back bodice pieces right sides together, stitch along the side seams and along the shoulder lines. We process the seam allowances with an overlocker.
We process the neck sections with a facing.
We make vertical seams on the sleeves. Using an overlocker, we process the cuts at the allowances. We sew the sleeves into the armholes and overcast the edges.
Next, we will process the lower sections of the sleeves. We turn over one hem of the binding and iron it. We place the binding on the cuff with right sides facing each other, and sew the parts together using a machine seam. The stitching should not go beyond the cuff allowance. Next we work with the cuff and trim as one piece. Fold and stitch along the vertical edge. We turn the allowances in different directions and iron them. Bend the piece in half.
We put the cuff with the trim down on the front side of the sleeve, aligning the seams and cuts. We sew the parts together using a machine seam, and overcast the edges of the allowances.
Next, we sew the skirt panels along the vertical seams and process the cuts. At a distance of 1 cm from the top edge, sew a long stitch (= 4 mm), leaving long threads along the edges of the seam. 2 cm from this seam we make another similar one. Gather the top of the skirt evenly by pulling the ends of the threads. The circumference of the top section of the skirt should be equal to the circumference of the bottom section of the bodice. We sew together the bottom and top parts of the dress, aligning their side seams. To do this, we perform a knitted stitch, departing 2 cm from the edge. We process the sections with an overlocker.
Fold the bottom edge of the dress twice to a width of 2 cm and stitch.
Next, we will make belt loops from the tape. Without ironing it, we grind it into a ring. Iron the seam allowances. Fold the ring in half, placing the stitching seam in the center of the wrong side of the belt loop. We sew along the length with straight seams, departing from the edges by 2 mm.
Along the middle line of the belt blank, we attach the trim with straight seams, retreating 2 mm from each edge. We bend the belt blank in half along the long side with the front side inward. Sew along the end and long side. Turn the piece right side out and sew the open end together using a hand blind stitch.
Mark the position of the belt loops on the side seams and the center of the back. The top edge of the belt loops should be 4 cm above the waist line, the bottom edge 2 cm below the waist line. We sew the belt loops by hand.
The dress is ready!
Measurements for creating a pattern
To construct the drawing of this pattern, the following measurements were used: 1.POsh (half neck circumference) 2.POgI (half chest circumference above the base of the mammary glands) 3.POgII (half chest circumference at the protruding points of the mammary glands) 4.POt (half waist circumference) 5.POB ( semi-circumference of the hips) 6.ПШг (half the width of the chest) 7.Цг (center of the chest) 8.ПШс (half the width of the back) 9.Дс (back length) 10.Вг (chest height) 11.Дтп (length of the front to the waist) 12.Впк (oblique shoulder height) 13.Шп (shoulder width) 14.Du (skirt length) 15.Ор (arm circumference) 16.Оз (wrist circumference) 17.Ок (wrist circumference) 18.Др (sleeve length) . If you have any difficulties on how to take some measurements, you can see the site’s article “How to take measurements for a dress.” It shows in detail and clearly what measurements are needed to create a dress pattern, and how to correctly take these measurements. If you come across unfamiliar terms, you can find out their meaning in the article Name of cut details, terms.
Increases used to construct this pattern. In the drawings they are designated by the letter (P). The name of the corresponding measure is indicated in capital letters next to it. PG (increase to chest measurement) - 4 cm. Fri - 3cm. PB - 2cm. Pshs - 0.5 cm. Pspr - 0.5 cm. Pds - 0.5 cm. Pdpt - 0.5 cm. More details about the size of loose fit allowances, depending on the size and silhouette of the garment, can be found in the article Loose fit allowances.
Ready-made patterns for knitted dresses with sleeves
Patterns are made for several sizes:
- size 48 (OG – OT – OB): 106-90-112 cm;
- size 50 (OG – OT – OB): 110-94-116 cm;
- 52 sizes (OG – OT – OB): 114-98-120 cm;
- 54 sizes (OG – OT – OB): 118-102-124 cm;
- Size 56 (OG – OT – OB): 122-106-128 cm.
You can choose the right size by checking the measurements provided.
Dress with lantern sleeve
The model is made with a cut-off bodice and a stand-up collar, decorated with a flounce at the bottom. There is a fastener in the center of the front.
For modeling, a pattern of a straight dress with a fitted silhouette is used as a basic pattern.
We increase the length by the size of the shuttlecock, cut the pattern along the waist line. We draw a pattern line for the yoke. We measure the required sleeve length and draw a line on the pattern.
Back
On the back pattern, we remove the shoulder dart by cutting off its solution from the armhole. The waist dart on the bodice is made in the form of one fold. We divide the solution of the waist dart on the skirt in half into two folds.
Before
Cut off the yoke along the drawn line. We extend the center line of the chest dart to the yoke, and make a cut along the axis of the dart. Let's close it. Along the middle line of the shelf we lower the waist line by 1 cm. We make the waist dart on the bodice in the form of one fold. We divide the solution of the waist dart on the skirt in half into two folds. We draw a bar for the fastener.
Sleeve
We measure the height of the cuff on the flashlight sleeve pattern and cut it off. We cut the rest of the pattern into several sections and spread them to the desired width. We retake the pattern of the flared sleeve, creating a smooth edging line.
For the shuttlecock, the original rectangular patterns must first be flared on the sides and the cut lines must be marked. Cut along them and move the sections apart.
Collar
We determine the roll-out length by measuring, and create a pattern for the stand and collar.
Modeling of a dress with a lantern sleeve is completed. When cutting we need to cut:
- back - 2 parts;
- back panel of the skirt - 2 parts;
- front panel of the skirt – 1 piece with a fold;
- yoke - 2 parts;
- strips - 2 parts with a bend;
- front – 2 parts;
- sleeve – 2 parts;
- cuff - 2 parts;
- collar – 2 parts with a fold;
- stand - 2 parts with a bend;
- flounce of the front part of the skirt - 1 part with a fold;
- flounce of the back part of the skirt - 1 part with a fold.
Pattern of a summer blouse with short sleeves
If you have a ready-made pattern for a straight dress with short sleeves, then taking its upper part as a basis, you can cut a summer blouse. The main thing is to immediately decide on the shape of the sleeve, neckline, and the presence or absence of darts.
You may be interested in Review of women's clothing models for sewing yourself
Skirt sun
The blouse can be beautifully decorated with buttons or fabric flowers. Then you will get not just a summer option, but an elegant item that you can wear to a party or visit.
Stylish floor-length chiffon dress with puff sleeves
For this model of a dress with sleeves, the detail patterns are modeled on the basis of a straight dress with a fitted silhouette.
We cut the patterns along the waist line.
On the front bodice pattern, draw a line from the top of the dart to the armhole.
We close the chest dart by first cutting the pattern along the drawn line.
Close the dart at the waist in the same way.
We shorten the chest dart by moving its center by 2 cm for girls with an average breast size and by 3-4 cm for those with large breasts. We provide seam allowances.
We make the skirt pattern longer by the required amount.
From the bottom point of the dart, draw a vertical line and cut the pattern along it. Close the dart at the waist by spreading the lower sections.
Along the bottom edge we increase the flare by drawing a new side seam line.
In the area between the dart and the side seam, draw a straight line (see drawing) and cut the pattern along it. We spread the pattern to expand it into gathers.
We retake the extended pattern and provide seam allowances.
We will construct a pattern for a flashlight sleeve based on a pattern for a straight one-seam sleeve.
We measure the circumference of the wrist. We narrow the length of the lower cut of the sleeve to this size. Divide the pattern into four sections of equal width using vertical lines.
Shorten the sleeve to three-quarter length.
We cut the sleeve pattern into several parts along the width. We push apart until each cut has an additional 2-3 cm of rim for gathering.
Raise the edge by 5-7 cm, draw a new line for the edge.
We provide allowances along the vertical seam of the sleeve of 1.5-2.0 cm, on the upper cut 0.5-1.0 cm, on the bottom - 3-5 cm.
The dress pattern with a lantern sleeve is ready!
Basic pattern
When working, special precision must be observed so that the finished version fits the figure exactly.
Taking measurements
Taking the measurements necessary to properly construct the dress is the initial step.
The following parameters are required.
- First, let's determine the length of the finished dress . To do this, you will need a length from the base of the product (neck area) to the desired result . It can be anything, depending on personal preference: a little higher or to the knee, mid-calf or to the floor.
- The chest area is one of the most difficult to build. To work, you will need a half-circumference under the chest, as well as a half-circumference at protruding points.
- Neck circumference is required for the neckline cut . Here you can adjust the parameters by adding a few extra centimeters. This will help create a looser or more voluminous collar.
- The width of the shoulders will help create the exact size of the finished garment. To clarify these measurements, the length from the base of the neck to the end point . The length may vary depending on the dress model.
- In order for the product to fit correctly, a waist circumference . At this stage, extra centimeters are also added. The dress can be fitted, completely fitting, or loose-fitting.
- We must not forget about the half-girth of the hips . This indicator is measured at the most prominent points of the buttocks. Here it is also possible to adjust the size of the product using additional indicators. When adding, you should be guided by the numbers obtained from the measurements of the previous point.
- Despite the fact that the dress is made without sleeves, it is necessary to outline the location of the armhole - the opening for the arms. This will require an arm girth . To ensure that the seams do not press or rub in the armpit, you should add a few centimeters.
Making your own pattern
After specifying all the necessary parameters, you can proceed to creating a pattern. This model is basic. It can then be used to create a dress with sleeves or a fitted version.
Materials:
- ruler;
- pencil;
- cardboard;
- scissors;
- safety pins;
- fabric for sewing.
Tip : when working, it is recommended to use paper with a centimeter grid already marked. This will help you avoid mistakes when constructing.
Before modeling, you should decide on the number of parts. A sleeveless straight dress can consist of two parts - front and back, one front and two back parts .
At the initial stage, in the absence of the necessary skills and knowledge, it is recommended to use a lighter option: one shelf and one back.
Before
First we make the front part. On paper we mark the location of the shoulder width and draw an armhole from it. From the cut for the arms we lay out the final length of the product. We outline the position of the cutout and make the second shoulder from it. Next we proceed in the same way. The final stage is the bottom line.
Important: when creating a pattern, do not forget about 1-2 additional centimeters, which are spent on allowances and hemming of the bottom.
The diagram shows how to use the resulting dimensions to build a basic framework.
Back
Let's move on to building the back. We note the location of the shoulders, taking into account a possible cut on the back in the neck area. We outline the armhole and make the length. Finally, we make the bottom line.
Both patterns are carefully cut out according to the contours, and then transferred to the fabric.
Ready-made dress patterns with puff sleeves
Patterns are made for several sizes:
- size 36 (OG – OT – OB): 82-66-88 cm;
- size 38 (OG – OT – OB): 86-70-92 cm;
- size 40 (OG – OT – OB): 90-74-96 cm;
- 42 sizes (OG – OT – OB): 94-78-100 cm;
- 44 sizes (OG – OT – OB): 98-82-104 cm;
- size 46 (OG – OT – OB): 102-86-108 cm;
- size 48 (OG – OT – OB): 106-90-112 cm;
- Size 50 (OG – OT – OB): 110-94-116 cm.
You can choose the right size by checking the measurements provided.
Dress "Peasant Woman"
The simple pattern of this model without darts or fasteners is ideal for beginning seamstresses.
To sew a dress you need to prepare:
- fabric - chintz, cambric, satin - 2 m or more (depending on the length of the dress);
- narrow elastic band;
- threads, sewing tools.
Description
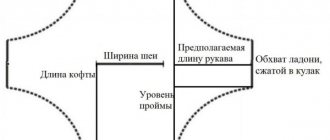
Constructing a pattern
We need measurements:
- line of blades (LL) – 16.5 cm;
- chest line (LH) – 22.5 cm;
- back waist length (DTS) – 39 cm;
- back width, 1⁄2 measurements (ШС) – 1⁄2 35 cm = 17.5 cm;
- back shoulder slope (BSS) – 36 cm;
- chest height (CH) – 24.5 cm;
- armhole width (SHR) – 9 cm;
- front waist length (accident) – 42 cm;
- front shoulder slope (FST) – 23 cm;
- side length (DB) – 1.5 cm – 20 – 1.5 cm = 18.5 cm;
- chest width 1st (1/2 measurement) (WG1) – 38:2 = 19 cm;
- chest width 2nd (1/2 measurement) – 34: 2 = 17 cm;
- dart opening level (URL) – 7.5 cm;
- center of the chest (1/2 measurement) (RC) - 19: 2 = 9.5 cm;
- neck circumference (1/2 measurement) (SS) – 30: 2 = 15 cm;
- chest circumference (1/2 measurement) (SG) – 82: 2 = 41 cm;
- shoulder length (L) – 13 cm.
The illustrations below show how to correctly take these measurements.
When modeling, we take into account the increase in loose fit of 8 cm. We distribute it on ShS and ShG1 by 1.5 cm, on ShPr - 5 cm.
In the upper right corner of the sheet, mark the point (∙) P and construct a right angle from it. Vertically down from (∙) P we put LL + 0.5 cm. Then further sequentially along the same straight line RL = 16.5 + 0.5 cm = 17 cm, LG + 0.5 cm, RG = 22.5 + 0.5 cm = 23 cm, DTS + 1 cm, RT = 39 + 1 cm = 40 cm. Through (∙) G and (∙) T we draw horizontal lines. From (∙) T we set aside TT1 = 2.5 cm. We connect (∙) L and (∙) T1 with a straight line. At its intersection with the chest line we mark (∙) G1.
From (∙) L to the left side we put aside the value LL1 = ШС + 1.5 cm = 19 cm. Draw a vertical straight line down from (∙) L1. At its intersection with the chest line we mark (∙) G2. From it we set aside the width of the armhole G2G3 = 14 cm. In the center of the segment G2G3 we mark (∙) O. We draw a vertical straight line from it to the waist line. Mark (∙) T2. From this (∙) we put up T2O3 = DB – 3.5 cm = 15 cm.
From (∙) P to the left side we put PP1 = 1/3 SN + 1.5 cm = 6.5 cm. From (∙) P1 we draw an arc with a radius of DPl + 0.5 cm = 13.5 cm. From (∙) P1 T1 we draw an arc with a radius of NPS + 1 cm = 39 + 1 cm = 40 cm. At the intersection of the arcs we mark (∙) P. We draw the segment P1P.
From (∙) Г3 to the left we construct the segment Г3Г4 = ШГ1 + 1.5 cm = 20.5 cm. From (∙) Г4 vertically upward we plot the value Г4Р2 = ВГ + 0.5 cm = 25 cm. From (∙) Р2 along vertically down we lay down the segment P2T3 = accident + 1 cm = 43 cm. Connect (∙) T2 and (∙) T3 with a straight line.
From (∙) P2 to the right side we construct a segment P2P3 = PP1 = 6.5 cm. From (∙) P3 to the right we set aside 5 cm, put (∙) P4. From it downwards we set aside the slope of the shoulder 1 cm, set (∙) P5. Draw the segment P5 P3.
From (∙) G4 to the right side we put RC = 10 cm. We connect (∙) Ts with (∙) P5. From MC we lay off CU = URV + 0.5 cm = 8 cm. With a radius equal to the difference SHG1 – SHG2 = 19 cm – 17 cm = 2 cm from (∙) Y we draw an arc. We draw the second arc from (∙) C with a radius of URV + 0.5 cm = 8 cm. At the intersection of the arcs we place (∙) U1. From (∙) C through U1 we draw a segment CR5, mark (∙) P6. We built a bust dart.
From (∙) Р6 we draw an arc with a radius ДПл – Р4Р6 – 5 cm + 0.5 cm = 4.5 cm. From (∙) Ц we draw a second arc with a radius NPP + 0.5 cm = 23.5 cm. At the intersection of the arcs we place (∙) P1. Draw the segment P1P6.
To construct control points of the armhole, from (∙) P1 to the left side we draw a straight line, from (∙) G3 we draw a vertical straight line upwards. At the intersection of these lines we put (∙) A. From (∙) G3 we measure up a third of the length of the segment G3A, and put (∙) O4. We draw the pattern line of the armhole through (∙) P1, (∙) O4, (∙) O3.
From (∙) G2 we set aside G3O4 + 1...2 cm, put (∙) O5. From it to the left we measure 1 cm, put (∙) O6. We draw the pattern line of the back armhole through (∙) P, (∙) O6, (∙) O3.
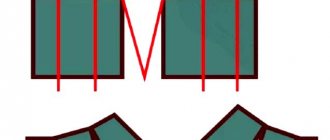
We created a pattern for the back and front of the dress. To draw the line of the lowered shoulder, we measure the distance to the new rollout. We measure the value from the 7th cervical vertebra to the required depth. For us, this size is 10 cm. From (∙) P, measure down this size, put (∙) K. From this (∙) to the left side, draw a straight line to the back armhole, put (∙) K1. Raise this (∙) along the armhole by 1-2 cm, mark (∙) K2. We draw a pattern line KK2.
From (∙) P2 we measure down 10 cm, mark (∙) K3. From it to the right side we draw a straight line to the front armhole, mark (∙) K4. Raise this (∙) by 1-2 cm, draw a pattern line to K4. We remove the lines of the chest dart.
The bodice pattern for the “Peasant Woman” dress is ready.
How to sew
We place the patterns on the fabric folded in two layers with the wrong side up. Place the center line of the pattern on the fold of the fabric. We retreat 7-8 cm from the top layer. We cut out the parts with an allowance of 1 cm, along the neck we provide an allowance of 6 cm.
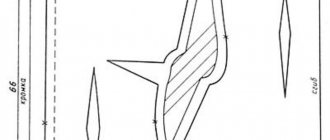
We will create the sleeve pattern directly on the fabric. To do this, we cut out two rectangular blanks of the required width and length.
We will cut a 3⁄4 sleeve. Its length is 45 cm + 2 cm (allowance along the bottom edge) + 6 cm (allowance along the top edge) = 53 cm. The width of the sleeve is calculated as the sum of the arm circumference + 3-4 cm for a loose fit + 2 cm for allowances + 30 cm for assemblies.
We fold the fabric in two layers with the right side inward. We place the pattern on the side cut of the sleeve, retreating 1 cm from the edge and 7-8 cm from the top. We mark the outline of the front armhole from (∙) O3 to the end of the front armhole. At (∙) O3 we make a notch on the material.
Turn the sleeve over to the other wrong side. We focus on the notch and place the pattern on the side cut of the sleeve at a distance of 1 cm from the edge. Draw the back armhole from (∙) O3 to the end of the back armhole.
We unfold the sleeve and draw a smooth line along the inside, connecting the extreme points of the armhole and the front. We design the lower section of the sleeve with a smooth line. We cut out the sleeve with an allowance of 6 cm along the upper edge and 2 cm along the lower edge. We cut the second sleeve in the same way.
The skirt for the “Peasant Woman” dress can be made simply straight, with frills or sun-flared.
We also determine the length according to our wishes. This dress looks great with both midi and maxi lengths. The dress cannot be made too short; it will not be harmonious for such a style.
We process the cuts of the workpieces with an overlocker. We make sleeve seams and iron the allowances.
We make two folds along the lower edge of the sleeves and stitch them.
When sewing, leave a small area open for threading the elastic.
We sew the sleeves into the armholes and iron the allowances.
We get an almost finished upper part of the dress.
On the skirt we process the allowances with an overlocker. We machine stitch along the top edge at a distance of 1 cm from the edge. Make the stitches on the line as large as possible. By pulling the threads, we gather the skirt to a width equal to the length of the lower sections of the upper part of the dress.
We machine stitch the skirt to the top of the dress, turn the allowances towards the bodice and iron them.
Turn the product inside out and fold it, aligning it along the seam at the waist.
Sew the middle seam on the back and skirt, ironing the seam allowances.
Along the rollout of the neck we make a turn of 5 mm, then another of 4 cm.
We sew along the edge of the hem, leaving an open area for threading the elastic. Then we make a second seam parallel to the first at a distance of 1.5-2.0 cm from it. Iron the seams.
If, when trying on, it turns out that the sleeves are too wide, then along their upper edge we sew two lines between the armholes of the back and front. We make the first seam slightly below the stitching, the second - slightly above the seam for the drawstring. It is important not to touch these seams.
We tighten the threads of the seams, evenly gathering the sleeve.
The described operation will prevent the wide sleeve from moving along the elastic band. We process the second sleeve in the same way.
For the waist drawstring, we will cut out a rectangular blank with a width of 2.5-3.0 cm + 2 cm (allowances) and a length equal to the length of the waist, measured along the dress + 2 cm (allowances). We sew the drawstring along the wrong side onto the waist seam, closing it. At the same time, we tuck the edges of the drawstring.
We attach a drawstring along the front side, sewing a line into the seam of the skirt and bodice. Along the wrong side we sew the upper edge of the drawstring, leaving a small open area for threading the elastic. Iron the seams.
Determine the desired length of the elastic for the sleeves, rollout and waist. We thread it through the drawstrings. We sew up the open areas by hand using a blind stitch.
Fold and stitch the bottom edge of the dress. We can make a belt upon request. Iron the product.
Taking measurements
To create a pattern for a women's knitted dress, you will need to take several measurements. This must be done carefully, since the result of your work depends on the correctness of the measurements taken.
Next we will tell you how and what measurements need to be taken.
Basic measurements
- SSH – half neck circumference.
- SG2 - 2nd half chest girth (the measuring tape runs along the convexity of the shoulder blades through the armpits to the most convex points of the chest).
- ШГ1 – 1st width across the chest (the tape runs horizontally above the base of the chest, between the front corners of the armpits).
- ШГ2 – 2nd chest width, half the value is recorded. The tape runs along the bulges of the chest between mentally drawn vertical lines from the front corners of the armpits.
- CT – half waist circumference.
- SB – half the volume of the hips (the tape goes along the most convex points of the buttocks and abdomen).
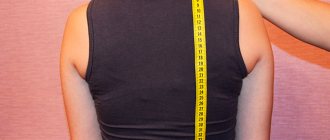
- ШС – back width (measure along the shoulder blades from one armpit to the other).
- Dts – back length to waist level (the distance is measured from the waist level along the back up to the highest level of the neckline at the base of the neck, taking into account the convexity of the shoulder blades).
- Dtp - the length of the front part of the product to waist level (similar to the back, measured from the highest point of the neckline past the highest point of the chest - we mark its position as VG - then parallel to the midline to waist level).
- VG – height (hereinafter – height) of the chest.
Additional measurements
- Vprz – high. armholes at the back (we measure the gap between the highest mark of the neckline on the back to the back corners of the armpits, taking into account the convexity of the shoulder blades).
- Vpk – oblique high. shoulder (measure the shortest distance from the intersection of the spine with the level of the waist of the back to the end mark of the shoulder).
- Шп – shoulder width (measurement is carried out from the highest level of the neckline, at the base of the neck, along the middle of the slope of the shoulder to the final level of the shoulder).
- Dr – sleeve length (measurement is taken from the shoulder mark down the arm to the selected length).
- Op – shoulder circumference (measurement is carried out with the arm lowered, the tape is positioned horizontally, its upper edge touches the back corner of the armpit, the tape closes on the outside of the shoulder).
- Di – length of the product (measurement is taken from the highest point of the neckline at the base of the neck in front through the center of the chest).
- CG - center of the chest (the measuring tape goes horizontally between the centers of each chest, divide the measurement in half and write down this value).
- Oz – volume at the wrist (place the measuring tape horizontally, the wrist is measured at the narrowest point).
- Vpkp – high. shoulder oblique to the front of the product (measure the gap between the highest chest mark and the shoulder mark along the front).
Dress "Peasant Woman" without a pattern
You can sew a dress without a pattern by cutting out the details directly on the fabric. A dress diagram for sizes 44 - 56 is proposed.
The total width of the product is 1.4 m. The sleeve length can be adjusted as desired.
To sew such a dress, you need to prepare a piece of fabric with a length equal to the length of the dress plus the sleeve length. If you want to sew a flared version of the model, you must first make a dress pattern on paper.
Then mark the cutting lines.
We cut the pattern and spread it to the required size.
Simple dress with straps for plus size people
To sew a simple dress of a simple cut with straps for full women, make a pattern on paper, and then transfer it to the fabric. At the same time, it is important not to forget to transfer the darts from the pattern to the front of the product, stitch them, and go over them well with an iron. It is best to use linen fabrics for sewing.
You might be interested in How and from what fabric to sew potholders: simple patterns
For sewing, you can use the pattern of a regular fashionable sundress with a strap. The main thing is to correctly calculate the dimensions of the future product and remember the importance of leaving seam allowances. Strips of fabric intended for creating straps need to be made wider than when sewing a product for thin women.
Product with straps for overweight people
A-line dress with sleeves
To cut such a dress, you will need to measure only a few parameters - chest volume, product length, sleeve length.
The finished pattern for an a-line dress with sleeves is presented below. You can adjust it if necessary by changing some dimensions.
Some tips for creating a dress pattern
That's all, your dress pattern is ready. You can transfer the shelf and back onto separate sheets of paper, now it is no longer necessary with millimeter markings. Don’t forget to leave allowances of 1.5-2 cm for now and start cutting the dress from inexpensive fabric. After several fittings, you will correct your pattern and then transfer it to thick paper (cardboard) or oilcloth or film.
And most importantly, do not think that the more meticulously you create a dress pattern, the more accurately it will convey the features of your figure. Remember that this pattern is just a sketch, which needs to be finalized individually during the first fitting and subsequent fittings, the number of which depends on the characteristics of your figure. Feel free to make the required changes, stick with tape or cut off some sections of the pattern until you achieve that the dress you sew will fit your figure perfectly.
There is a separate article on the site about how to build a one-piece sleeve for a dress.
Dress with bell sleeves
Ready-made fashionable patterns are available in several sizes. You can determine whether your parameters match the chosen size by checking the measurements given above.
Then you need to make a life-size pattern according to the proposed diagrams.
Dress with straight sleeves
The model is made with a flared skirt, folded into soft pleats. A cut-off fitted bodice, narrow straight sleeves combined with a flaring skirt create a slender silhouette. It is recommended to sew the dress from thin knitted fabrics that drape well. Clothes of this style are suitable for young women of different body types.
Ready-made fashionable patterns are available in several sizes.
Building a basic dress pattern grid
Start creating a dress pattern by creating a grid containing the lines of the chest, waist, hips, etc.
Label the first point that you should put in the upper left corner of the sheet of paper with the letter A. From it, step back to the right the measurement of Half chest girth II + 4 cm.
Now let's draw a waist line W. To do this, from point A, set down a segment equal to the Back Length measurement + 0.5 cm.
About the point (W), set down 21 - 22 cm and mark it with the letter H (hips).
The letter L denotes the bottom line of the dress. To do this, you need to set the skirt length measurement down from the waist line (W).
Now all that remains is to find the chest line B. To do this, you need to add 0.5 cm to the armhole height at the back measurement and set this segment aside from the top line AA1.
Now draw a vertical line from point A1 down. Draw horizontal lines from points: A, B, W, H, L to the right. Place the points at the intersection of the lines: A1, B1, W1, H1, L1. Now the mesh is ready for constructing the dress pattern in detail.
Determining the position of the armhole on a dress pattern
BB2 = Half of the “Back Width” measurement + 0.5 cm. Now, from point B2, draw a perpendicular upward and place point A2.
B1B3 = (Half of the “Chest Width” measurement + 4 cm) + (Half Bust II - Half Bust I). From point B3, draw a perpendicular upward and place point A3.
Pattern of the back half of the dress
AA4 = (1/2 of the “Neck Circumference” measurement divided by 3) + 0.5 cm. Divide the segment AA4 by 3 and get the value AA5.
Please note that creating a dart on the back half of the dress is not necessary, especially if the dress is made from stretchable knitted fabrics.
Now take a compass and draw an arc from point A4 with the radius of the “Arm Length” measurement. Immediately after this, set the radius on the compass equal to the measurement “Height of the shoulder from the back along an oblique line” + 0.5 and place its sharp leg at point W. At the intersection of the two arcs, mark point A6. From point A6, move a perpendicular to the left. Place point A7 at the intersection with line A2B2. Using the new point (A7), you can find point B5 using the formula: B2B5 = B2A7 divide by 3 and add 2 cm.
Do another calculation. Divide B2B3 into two equal parts and place point B4 in the center.
Please note that the construction of your dress pattern may not visually coincide with my pattern. This dress pattern is made for a standard figure with no deviations.
Pattern of the front half of the dress
First, we determine the position of point A8 using the formula: B1A8 = “Front length to waist” + 0.5 cm.
From point A8, set aside the section: A8A9 = AA4B and place point A9. Next, lay down the segment A8A10 = 9 - 10 cm from point A8.
B1B8 = 1/2 of the “Chest Height” measurement (from the top of the chest to the neck). Place point B9. From the new point B9 in the direction of line AA1 (slightly to the left of point A9), draw an arc with the radius of the “Chest Height” measurement (from the top of the chest to the neck).
Now you need to make a more complex calculation: (2 x (Half chest circumference II - Half chest circumference I)) + 2 cm. The resulting result will be the radius of the arc drawn from point A9 in the direction of the previously made arc, and place point A11.
Reflect on the pattern the segment B3A12 = B2A7 (from the back) - 1 cm. Now, using a compass, you need to make an arc from point B3 towards the shoulder line. The radius of the arc is equal to the segment B3A12. At the same time, make an arc from point A11 to form a shoulder segment A11A13. The radius of the compass is equal to the “Arm Length” measure. Place point A13.
Line segment B3A12 now needs to be divided by 3 and point B10 placed. From this new point (B10), draw a straight line to point A13. Next, draw a smooth line for the armhole, as shown in my drawing.