Layout and cutting of trouser patterns on fabric
1. After constructing a drawing of the trousers, it is checked for coincidence of the control lines: bottom, knee, step, hip, waist. Check the measurements of SB and ST, taking into account their loose fit. Check the DPR measurement.
2. Before cutting begins, the fabric is decanted and only from the wrong side. Moreover, each type of fabric has its own processing method, since the shrinkage of different materials is not the same.
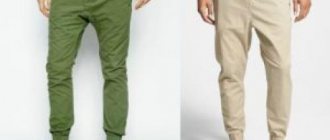
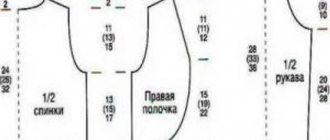
3. When cutting trousers, lay out the main parts of the front half of the trousers and the back half of the trousers on the main fabric, folded in half, face inward, so that the grain along the ironing line is preserved, and to save fabric, lay out the parts in a jack. The exception is fleecy fabrics.
After this, additional parts with shared threads are placed in the gaps as indicated in the modeling: yokes, valances, facings, flaps, belts.
4. To make sure that the direction of the grain thread of the main parts coincides with the pressing line, it is necessary to measure the distance from the edges of the fabric to the pressing line on the pattern in two or more places. By combining these points with a soap line, we get an ironing line on the fabric. If the fabric has a checkered stripe, then the ironing line is aligned with the selected stripe.
5. For fleecy fabrics (velvet, corduroy), the parts are laid out in one direction only. Most often, the pile goes from top to bottom, although the bright color is lost. Therefore, when placing the pile, you need to look at the fabric and the model.
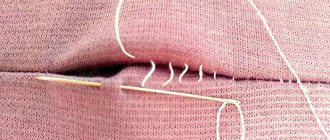
6. The details of the patterns are pinned, outlined with soap, all control lines are marked and, having removed the pattern, they are drawn. After cutting, these lines are marked with spacer stitches or notches. The ironing line can be marked by ironing.
7. All allowances for parts when cutting are given as indicated in the diagram. An allowance of 2-3 cm along the seat line in the waist area is usually given in men's trousers, and in women's trousers when the pattern has not been adjusted and checked.
8. Baste and stitch the waist darts on the back half of the trousers and iron them towards the seat line.
9. Perform wet heat treatment
Correct fabric cutting
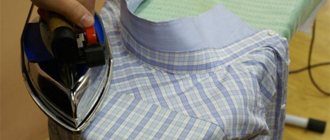
Before attaching the pattern to the fabric and making the first cut, it is necessary to decatenate the material. Whatever fabric you choose for sewing trousers, before cutting you need to perform a wet-heat treatment, i.e. The material must be washed, dried and ironed, or the fabric must be thoroughly steamed with an iron. This will avoid possible shrinkage and natural shedding. The method of decating depends on the type of fabric. The lining fabric also needs to be properly prepared for cutting. To do this, it is pre-soaked in water, wrung out quite a bit and dried slightly, ironing while still damp.
Now you can fold the fabric right side inward and lay out the pattern pieces for future trousers on the reverse side. Be sure to follow the direction of the grain thread: it should run parallel to the middle line of the parts.
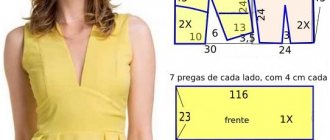
The patterns are laid out along the edge of the fabric, retreating 1 cm from the edge of the material (upper cut). If you are planning a one-piece belt (part of the trouser leg), then to this centimeter you still need to add double the estimated width of the belt (4-8 cm). For the side seam, 1–1.5 cm is laid. To do this, the patterns are shifted away from the edge to the required distance. Using chalk or a fabric marker, the outline of the pattern is transferred to the fabric.
The patterns need to be placed in such a way that the front part with the side cut is located closer to the edge of the fabric, and the back half of the trousers is positioned in a mirror manner, making sure to immediately take into account the seam allowances.
For more economical cutting, the back half can be placed upside down: since this model tapers towards the bottom, there is more space at the bottom. But such an arrangement of patterns is not possible in all cases. If the selected fabric has a fleecy surface, the pattern, front and back pattern pieces should be laid in the same direction.
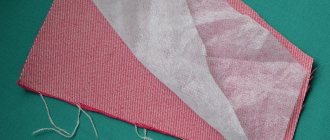
After the outline of the pattern is transferred to the fabric, it is necessary to mark the seam allowances and cut out the parts. After this, you can begin assembling and sewing. Since our fabric was initially folded in half, we immediately get all the necessary parts for future trousers: two front parts and two back parts.
We have prepared for you a detailed video course “Sewing Basics”
Get it now for free!
get a course
Wet heat treatment of trousers (WHT)
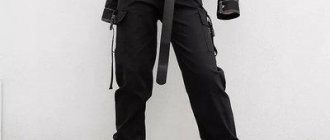
By wet heat treatment we mean pulling and ironing individual sections of trousers to give them a shape that matches the contour of the body. As a result of the OBE under the buttocks and below the knees, the trousers become ironed and their length is reduced. In the area of the calf muscle, the trousers, on the contrary, are pulled back and lengthened.
For skinny trousers, WTO is necessary to a greater extent than for loose-fitting trousers. It is better not to subject fabrics with stripes or checks to WTO, since ironing and pulling the fabric will disrupt the pattern. The arrow line along the front half of the trousers is ironed from the waist to the bottom, and along the back half of the trousers from the hip line to the bottom. WTO can be avoided on wide and short trousers (it is enough to iron the crease), as well as when using fabric made of cotton, silk, or viscose.
To make the fabric easy to iron and stretch, you can soak the ironing iron in different solutions:
- 0.5 liters of water + 2 tablespoons of ammonia + 1 tablespoon of vinegar essence or 3 tablespoons of vinegar + you can add 1-2 teaspoons of PVA;
- 0.5 liters of water + 1 tablespoon of vinegar essence or 3 tablespoons of vinegar;
- 0.5 liters of water + 1 tablespoon of PVA.
Note. Any of the solutions must first be checked on a piece of fabric to see if it is fading.
If there are darts in the trousers, then before the WTO, first sew them up, iron them well and iron them in the stops.
Wet heat treatment of the front half of the trousers
1) Lightly iron the arrows of the left and right halves or mark with loose interfacing stitches.
2) Place the halves together face to face, pin together, aligning the control lines, darts and arrow lines.
3) Place the halves of the trousers on the table with the right or left up, but so that the side seams are laid towards themselves, and the waist is to the left or to the right.
4) The pull starts with side cuts in the area of the popliteal part (middle of the calf) from the knee line down. The bulge of tissue formed in the area of the calf muscle is tightened.
5) Unfold the front half of the trousers in incremental cuts and pull and tighten the area of the calf muscle in the same way.
6) The bulge in the hip area is slightly pressed only for stretchy fabric and steep hips. This stitching can be replaced with machine stitching along the seam allowance. If the fabric does not stretch or the thigh is flat, then the stitching is not done. If the thigh is very convex, then a pull is performed along the ironing line in the step area. The larger the thigh, the greater the draw.
7) If the fabric stretches and when cutting there is a wave along the bow line, then stitch in this area using a machine stitch.
8) Both halves of the trousers are turned to the other side and all operations:
- or repeat (for poorly stretchable fabric);
- or complement (for WTO average fabrics);
- or they don’t (for obedient fabrics).
9) After removing the pins, each front half of the trousers is folded separately along the fold with the wrong side inward, aligning all the reference lines.
10) Place one of the halves on the table with the cuts facing you and first lightly iron the ironing line.
11) The step and side cuts are aligned in the knee area so that there is no broken line. You can remove it by lightly pulling it back or by adjusting the arched line with scissors.
12) The ironing line is further tightened under the knee, and the side and step sections are further stretched. After this, when the final beautiful shape of the trouser leg appears, the ironing line is finally pressed firmly.
13) These operations are performed separately on the right and left halves, trying to make them the same. Then, these halves are finally checked for equality by placing them on top of each other.
Technology of sewing classic trousers
The back half of the trousers is laid out with the wrong side down, and the front half is applied to it face to face. Using tailor's pins, side cuts are combined, as well as internal step cuts. Don’t be confused by the fact that the back half of the pattern is larger than the front, that’s how it should be. Just pull the front half piece slightly closer to the back half and use pins to fasten both pieces together.
The side and step sections are stitched with a straight stitch and then overcast. You can use a zigzag stitch or an overlock stitch. We repeat the same with the second half of the trousers.
Next, one trouser leg is turned inside out.
To quickly and easily connect two halves of trousers, one part is inserted into the other so that both parts are located with their front sides facing each other. The products are joined along the middle cut, basted by hand, and then ground down on a machine.
The edges also need to be finished with an overlock or zigzag stitch.
The cut of the waist line and the bottom line of the product are processed in the same way.
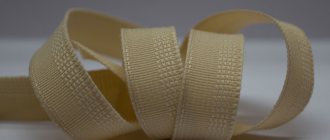
It's time to work on the belt. To do this, the waist section is folded inside out to the width of the belt. The width of the finished belt should be slightly larger than the width of the elastic band. Give a stitch along the overcast stitch or next to it, leaving a small section (2-3 cm) unstitched so that you can then pass the elastic through this hole.
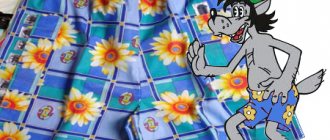
The cut of the bottom of the trousers is folded inside out and stitched on the machine. In knitted sports trousers, the bottom of the product can be finished with elastic cuffs.
Now all that remains is to thread the elastic band into the belt. The most convenient way to do this is with a simple pin, which is pinned to the free end of the elastic and inserted inside, slowly moving in a circle.
After completion, be sure to check that the elastic lies evenly and flat along the entire length of the belt and does not turn over. The ends of the elastic are placed on top of each other and sewn together.
Wet heat treatment of the back half of the trousers
1) Lightly iron the arrows of the left and right halves.
2) Place both halves face to face, pin down all the control lines of the knee, step, and hip.
3) Place the trousers on the table with the right or left side up, but with the cuts facing you.
4) To create a concavity in the area of the calf muscle, the step cuts are tightened, and to create a convexity along the arrows, a pull is performed.
5) The upper part of the step cut (knee area and above) is pulled back and ironed along the arrow.
After tightening the step cut of the back half of the trousers, make sure that its length is equal to the length of the step cut of the front half of the trousers.
6) Pull the seat seam. The guy is such that in the area of the largest recess (the area on which we sit) the seat line lengthens by 1-1.5-2-2.5 cm. It depends on the stretch of the fabric and the size of the pants.
Pulling back the seat line, the iron moves towards the waistline and slightly towards the buttocks, without disturbing the position of the trouser halves.
7) The resulting slack in the area under the gluteal folds is very well tightened, without affecting the bulge of the thigh.
8) Turn the trousers towards you with the side cuts and perform a small pull in the knee area, while simultaneously tightening the resulting slack in the knee area.
9) The area of the calf muscle along the side seam is ironed, then pulled along the ironing line.
10) If a bulge has formed in the area of the hip line, then it is ironed out or simply secured with machine stitching.
11) Both halves of the trousers are turned to the other side and all operations are either repeated, or slightly supplemented, or not performed, and only under the gluteal fold they are pressed as well as on the reverse side.
12) Remove the pins and fold each back half of the trousers along the arrow with the wrong side inward, while strictly aligning the line of the step and the knee.
Note. The pressing line in the back half of the trousers, depending on the drawing, is laid out starting from the knee line up to the waist - as it lies. An exception may be striped or checkered fabrics. Here the arrow follows these lines.
13) A slight pull is made along the ironing line in the area of the calf muscle, and the resulting or remaining slack in the area of the seams is ironed.
14) The knee area is tightened along the arrow, and pulled back at the seams.
15) Once again, press well under the gluteal fold.
16) Check the equality of both back halves of the trousers by placing them on top of each other, making sure to align the reference lines.
17) Finally iron the arrow lines, bringing each half to the desired shape.
Note. After the WTO, be sure to check the control measure of the DPR; it should be equal to the sum of the length of the bow line and the seat line. If a discrepancy occurs and the DPR measurement turns out to be smaller, then strengthen the guy line along the seat line.
10. Take off the trousers, do the first fitting, at which:
- clarify the overall fit of the trousers
- clarify the position of the ironing line
- clarify the position of the waist line, and if the waist needs to be lowered according to modeling, for example, by 1-5 cm, then it is better not to cut off the excess fabric first, but only add new interfacing stitches for sewing in the belt
- clarify the hemline (with shoes)
- location of darts and their depth
- location of pockets
11. After trying on the trousers, sweep out the trousers, if necessary, finally complete the WTO of all halves separately, check their equality and finally iron the ironing line.
12. Use adhesive pads to secure the pocket sewing area, allowances for the zipper, and secure the folds with a dowel.
13. Baste and stitch soft folds.
Note. If the trousers have a lining, then the soft folds and darts are sewn together.
14. Pockets are processed, if patch pockets are sewn, welt pockets are sewn.
15. Overlock the sections of the four halves of the trousers along the contours with the exception of the waist line (if the fabric is very loose, then overlock the waist line as well).
16. Baste the trousers and do a second fitting, at which you will finally clarify the waistline, hemline, general fit of the trousers, and check for any defects. After this, the trousers can be laid out and finishing details can be added.
17. Finish the zipper on the trousers and at the same time sew down the bow line.
18. Place the waist line in each half of the trousers either on a braid (edge), or with a fine stitch, or with an adhesive strip to secure it from stretching.
19. Prepare small parts: belt, valves, belt loops.
20. Adjust and prepare the bottom of the trousers for sewing the crotch and side seams. If you have a regular hem at the bottom, you can immediately glue the inside of the hem and its seam allowance, and if you have a hem with a cuff, you can glue it depending on the type of cuff.
21. Sew the side seams
Sewing straight women's trousers
First, we will lay a snare (copy seam) along the contours of the pattern and mark the ironing line with spacer stitches.
5:377 5:387
Then we sew the darts and folds of the upper cut of the front half of the trousers . At the same time, we sew the folds 4-6 cm from the top, and finish the seam with a double stitch at an angle to the fold.
5:694 5:704
Now we sweep and sew the darts of the upper cut of the back halves of the trousers.
5:840
Lightly moisten the folds and darts, and iron them towards the middle cut or along the style.
5:995 5:1005
Now it's time to process the pockets (if the selected trouser model has them).
5:1152 5:1162
After this, we will treat our trousers with steam, heat and such and such a word 
5:1288 5:1298
6:1806
Scheme for ironing trousers.
6:50 6:60
Fold the front halves right sides up and iron along the ironing lines on both sides.
6:247 6:257
On the contrary, we fold the back halves with the right sides facing inward. On the ironing board, place the folded back halves with step-by-step cuts towards you in an oblique direction to the left. We moisten and move the iron from the knee towards the seat to pull out the step sections. At the same time, the left hand pulls back the upper part of the step cuts, placing them in a straight line.
6:902 6:912
The sections of the seat, with the halves of the trousers in the same position, are slightly pulled back with an iron in the area of the largest notch.
6:1105
Then, using an arcing motion of the iron towards the fold of the part, we iron out all the slack in the fabric that has formed above the buttocks between the upper part of the step cut and the seat cut.
6:1404 6:1414
We repeat the described processing in the same order for another part , with the difference that the step cuts will now be located away from us.
6:1661 6:9
Separate the back halves, and, each separately, fold them along the ironing line with the front side inward, aligning the side and step cuts.
6:274 6:284
Now let's give the rear halves their final shape by ironing the fold of the parts opposite the upper sections of the step sections (under the buttocks), after which it is necessary to let the trouser parts dry.
6:631 6:641
If the fabric you choose contains a large percentage of synthetics, you won’t need to pull or iron it.
6:835 6:845
7:1350 7:1360
Stitching side seams
1) Fold the zipper and the front half of the trousers face to face along the side seams, strictly aligning the control lines of the hip, step, knee and align the snares. Cut the sections not only along the control lines, but also in the spaces between them.
2) Sweep along the back half of the trousers from the knee up and down. The pins are removed and the basting is ironed.
3) It’s better to use a pattern and a ruler to draw a soap line on the side of the front half of the trousers along which the stitching will go. Scribble from the front half of the trousers:
- from the waist to the bottom of the trousers
- from the knee line up and down, pulling the fabric well
4) Iron the seam while pulling it back.
For an adjustment seam , baste along the back half of the trousers, stitch along the front half of the trousers. Press the seam on each side, pulling it apart. Iron both allowances towards the back half of the trousers, check the fabric flow from the face and iron here using an iron. On the front side of the trousers, at a distance of 0.1-0.5-0.7 cm from the inner seam, place a second finishing line, pulling the fabric well, iron.
22. If the trouser belt consists of two halves, then sew them separately to each half of the trousers and iron them. If the belt is cut in one piece, then it is sewn on at the end of sewing the trousers.
23. Stitch the crotch seams.