Currently, tambour embroidery has become popular again, and this is primarily due to the fact that this type of embroidery is quite simple to perform. In addition, using various varieties of this seam, you can embroider not only with a needle, but also with a crochet hook. Let's look at the technique for performing this decorative stitch.
A little history
Tambour embroidery may have appeared simultaneously in different parts of the world. In any case, it was not possible to accurately determine one country that would be the only homeland of this technology. Most likely, at one time, needlewomen in different countries simultaneously invented this type of hand stitch for themselves. Thus, tambour embroidery appeared in the countries of the Middle East, in Ancient Rome, and Greece. The first examples of this type of needlework were discovered two thousand years ago.
And in ancient Rus', needlewomen decorated clothes, wool toys, tablecloths and curtains, and woven tapestries in this way.
Sample of Old Russian tambour embroidery Click to enlarge
Museums in many countries have collections that provide insight into the development of this art form. The State Hermitage collection carefully cares for works of applied art from different European countries: from clothing decorations to room decor of the 16th-20th centuries.
The State Hermitage Museum organizes exhibitions to showcase magnificent examples of embroidered clothing worn by royalty and court nobles, as well as palace decor that dates back 200 years.
These specimens are displayed through thick glass and removed from their storage boxes in a "4-handed" manner, taking special care not to damage the antique fabric.
Exhibit from the State Hermitage collection Click to enlarge
Click to enlarge
Click to enlarge
I would like to say a few words about the title. It is believed that it comes from the word “tambourine” - a small drum. This is exactly what the canvas, tightly tucked into an embroidery hoop, seemed to resemble.
Scope of application of tambour embroidery
Despite its long history of two thousand years, the chain stitch has not lost its popularity today. This is easily explained: it is performed extremely simply and even a novice needlewoman can master it in just a few attempts.
Ease and accessibility of execution
You don’t need any specific patterns - you can embroider patterns of any complexity using chain stitch. The stitch length can be adjusted at your discretion; it does not have to be the same throughout the entire fabric. Thanks to this, you can get complex, bright patterns.
Special equipment is also not required - just an embroidery needle or crochet hook and, of course, a hoop. You can make a chain stitch on any fabric and any type of thread. And most importantly, these chain stitches look very nice and modern.
Where can you find chain stitch?
Today the chain stitch has a very wide application. It can be found in the decor of pillows and bedspreads, on clothes and accessories, decorative rugs, panels, tapestries, and in the decoration of toys. They are used to both design contours in other types of embroidery, as well as complete satin stitch, filling the entire canvas with chain stitches only. It is used to secure edges in products, and in counted seams, and in openwork embroidery.
Pillowcase for decorative pillow (Uzbekistan) Click to enlarge
Chain stitch sewing
Povoinik. Detail. Second half of the 19th century. Novgorod province. Sewing with pearls, mother-of-pearl, metallic sequins and colored glass in nests. Fathom on canvas, the pattern is sewn onto lilac silk fabric. 13x23.5. RT-18630. Acquired in 1975 by ZK GEThe chain stitch has been known in Rus' for a long time and was called “chain stitch,” that is, a chain stitch. In the 19th century, round hoops were introduced for this embroidery. With fabric stretched over them, they resembled the top of a drum, “tambour” in French, which led to the emergence of a new term: “tambour sewing.” This seam consisted of small loops following each other. They were made using a needle or hook according to a pattern applied to the fabric or basted on the left side of the fabric. The embroiderer drew a seam along the contour and then filled the interior space of the ornament, creating a dense surface covered with thread. We could have been content with just one contour drawing. Tambour embroideries were made with various threads: white, colored and metallic. To more clearly identify the pattern, white thread was used more often on thin, translucent fabrics - muslin, cambric, and also on tulle. They embroidered with colored threads on both thin and thick materials. Chain stitch made of gilded thread was used to cover mostly thin fabrics, which, in contrast to gold embroidery, gave chain stitches the appearance of an airy, shiny haze. Sometimes gilded thread was combined with black silk. The black outline made the ornament somewhat heavier, but at the same time made it clearer. Almost all tambour embroideries on light fabrics contain openwork nets made with banners. Graceful openwork patterns of nets gave the embroideries even greater lightness and elegance.
Sewing with gold spun thread using a chain stitch. Veil detail. The end of the 18th - beginning of the 19th century.
In combination with other types of embroidery, the chain stitch was found in both the 18th and 19th centuries. In line work, he emphasized the outline of the pattern. It was used for the same purpose in gold embroidery. But as an independent type of work, the vestibule has become widespread since the end of the 18th century and since that time has hardly gone out of fashion, moving only from one sphere of use to another. The chain stitch is one of the most beautiful and decorative. The craftswoman freely arranged the smooth lines of the patterns. It is difficult to determine which of the three types of chain stitching - metallic, colored or white thread - makes the most impression.
Sewing with wool, silk and metal spun threads using a chain stitch and muslin stitching. Valance detail. 1830s
In sewing with metal thread we see complex plant motifs that have their roots in the ornamentation of the 17th century. Here the chain stitch is sometimes adjacent to sequins and counted stitches. On thin curtains and towels, dissimilar materials such as thin muslin and heavy metal thread are harmoniously combined. Black and gold patterns of Nizhny Novgorod scarves were also sewn onto rather thin fabrics. The seemingly identical designs of scarves in the form of a wide border, bouquets in the corners and small branches in the central field had many variations in the arrangement of details and were never repeated. The embroidery was complemented with sequins. Rich and elegant, these scarves were very popular.
Sewing with paper thread using a chain stitch on tulle. Cape for a woman's dress. 1850 - 1860s
Colored vestibules began to spread in Russia at the turn of the 18th - 19th centuries, being used to decorate palace interiors, small household items, and church items. One of the covers of the first quarter of the 19th century allows you to get acquainted with the sewing of this period. The embroidery is made of colored silk, with small sparkles on the background. Quite large branches of fantastic colors, reminiscent of patterns sewn with metal thread using a chain stitch, are carefully laid slightly obliquely along the side. In the arrangement of the ornament and the method of working with shadow transitions of color, a desire to give the ornament a European character is noticeable.
Sewing with paper thread using a chain stitch on tulle. Cape for a woman's dress. 1850 - 1860s
Quite often, colored vestibule was used to decorate wallets, handbags, pin cushions and even garters. Ornaments in the form of flowers and flowerpots with birds in the traditions of Russian ornamentation of the 18th - early 19th centuries are replaced by European versions of patterns of the first half of the 19th century. The works of this time are characterized by subtlety of design and softness of color.
Veil with large scallops along the edge. First half of the 19th century Nizhny Novgorod province (?). Sewing with gold spun thread using chain stitch, stitching, counted satin stitch and sequins attached to muslin. 99x108. RT-6144. Acquired in 1926
In the second quarter of the 19th century, embroidery with colored vestibules was transferred to urban layers as interior decoration. Brightly colored woolen threads appear in sewing, allowing you to create richly colored patterns. Lush branches with roses and other naturalistic flowers cover the corners of the headscarves. Scenes from city life become decorative patterns. Combining them with folk art motifs—the Sirin bird, peahens, horses, flowering branches and medallions—the craftswomen created complex multi-figure compositions. The most significant monuments of colored vestibule sewing in terms of their artistic merit include the valance, made in the 1820s - 1830s. The valance ornament most clearly expresses the features of this type of sewing, which included features of folk embroidery and sewing used among the nobility.
Head scarf. Detail. The end of the 18th - beginning of the 19th century. Nizhny Novgorod province (?). Sewing with gold spun thread, black silk and white paper threads with a chain stitch and banners, sequins attached to muslin. 112x106. RT-6150. Received in 1931 from the LOOHO Museum of Life
White tambour embroidery, which was common among the people - valances, towels - is close to line sewing. Their main difference from the latter was the dominant importance of tambour embroidery in the ornament. Such embroideries used rich plant motifs in the form of garlands and branches. Embroidery on thin fabrics had a different look. At the turn of the 18th - 19th centuries, when sewing with white vestibule on muslin and cambric became most widespread, craftswomen created fabulous patterns of intertwining flowers and branches, flowerpots and medallions, softly silhouetted against a translucent background. Openwork mesh designs inside the largest flowers and leaves complement the ornament.
Veil. Detail. First third of the 19th century. Embroidery with gold spun and colored silk threads using a chain stitch and metallic sequins attached to brown paper fabric. 84x66. RT-7890. Received in 1930 from the Society of Ancient Writing and Art
Among the items of clothing sewn with white vestibule, items created with a clear imitation of Brussels lace stand out. In the 1840s - 1860s, a fashion for tambour-embroidered capes appeared in the urban environment. Some of them were sewn with a vestibule over tulle, others were complemented with cambric appliqué. Their patterns formed a dense, rich pattern, covering almost the entire background. Embroidery of this type was created in the following way: cambric with a pattern applied to it was placed on thin small tulle. The pattern was sewn with a chain stitch along the contour. The batiste was cut out in the background. All that remained was a pattern of fabric in the form of flowers and leaves, trimmed along the edges with the finest chain stitch. This technique quite closely conveyed the features of Brussels lace with its applied woven ornament of branches with flowers against a background of small tulle. Embroidery on capes was done in most cases using a machine. By the middle of the 19th century, hand-made chain stitching in all major works was replaced by machine sewing. But here, too, the choice of ornament, materials and the execution itself, in which the hand of the craftswoman had a decisive role, introduced a stream of individual creativity into the embroidery.
Handbag on hold. The end of the 18th - beginning of the 19th century. Sewing with colored silk and silver spun threads using a chain stitch on yellow silk fabric. 21x15.6. RT-5205. Received in 1933 from the collection of I. A. Galnbek
In the second half of the 19th century, tambour embroidery was used less frequently. Only at the very end of the century, at the time of the revival of many types of sewing, it appeared as a method of decorating urban costumes and interiors and was revived among the people in the form of colorful works with colored vestibules on towels.
Wallet. First third of the 19th century. Sewing with colored silk threads in a chain stitch on white satin. 13.9x16.5. RT-5268. Received in 1919 from the collection of F. M. Plyushkin
Towel. First half of the 19th century Sewing with colored wool and silver spun threads using a chain stitch, beating, gimp and sequins in attachments on paper fabric. 265x54. RT-17721. Acquired in 1940 by ZK GE
Women's dress. Detail. 1890s Moscow. Workshop of N. Lamanova. Made from beige cloth. Sewing with colored silk threads using chain stitch and metallic sequins attached to cloth. RT-9404. Received in 1924. Comes from the Winter Palace
End of the towel. Mid-19th century Upper Volga region. Sewing with colored wool threads using a chain stitch on paper fabric. Embroidered text: Bird of paradise called Alkonost. The Alkonos bird lives near paradise and hangs out on the Euphrates River, and when it emits glais and singing, it doesn’t even feel itself... The prototype is a popular print. 39.5x85. RT-9029. Acquired in 1922
Decorative embroidery. Mid-19th century Sewing with colored silk and silver spun threads using a chain stitch on shimmery blue silk fabric. The lyrics of the song are embroidered: 'Don't wake me up'. The prototype is a popular print. 64x70. RT-10027. Acquired in 1949 by ZKGE
The end of the towel with the jagged edge. 1840s Sewing with colored wool, silk and metal spun threads using chain stitch, beating, gimp, sequins and beads attached to muslin. 32x43. RT-9108. Acquired in 1919
Head scarf. Detail. First half of the 19th century Nizhny Novgorod province (?). Sewing with colored wool threads using a chain stitch on calico. 112x108. RT-14654. Received in 1941 from GME
Valance with large teeth along the edge. 1830s Sewing with colored wool, silk and metal spun threads using a chain stitch and muslin stitching. 52x195. RT-9107. Acquired in 1919
End of the towel. The end of the 19th - the beginning of the 20th century. Sewing with colored paper and wool threads using a chain stitch on kumach. 236x48. RT-17353. Acquired in 1966 by the GE expedition in the Nikolsky district of the Vologda region
End of the towel. 1854. Novgorod province. Sewing with colored wool threads using a chain stitch and satin stitch on paper fabric. Embroidered text: Whom I love, I give. To express gratitude, 1854 Fe7 44×37. RT-17262. Received in 1941 from GME. Comes from the collection of K. Dalmatov
Towel. The end of the 18th - beginning of the 19th century. Upper Volga region. Sewing with white linen thread using a chain stitch and muslin stitching. Lined with braided lace. 23x44. RT-14022. Acquired in 1919 from the collection of K. Dalmatov
A blanket. Detail. The end of the 18th - beginning of the 19th century. The village of Andreevskoye, Belozersk district, Novgorod province. The work of serf craftswomen. Sewing with white paper thread using a chain stitch and stitching on cambric. RT-14683. Received in 1933 from the collection of I. A. Galnbek
Sleeve of a woman's shirt. Detail. Beginning of the 19th century Upper Volga region. Sewing with white paper thread using a chain stitch and muslin stitching. Sleeve length 65. RT-17255. Received in 1941 from GME
Merchant suit: sundress, shirt. First half of the 19th century The sundress is of bluish-pink silk fabric, trimmed with a silver cord. Shirt made of paper fabric. Sewing with white paper thread using chain stitch and stitching. Shirt length 78. RT-16877, 14973. Sundress purchased in 1961 by ZKGE. The shirt arrived in 1941 from the GME
Cape for a woman's dress. Triangular shape. 1860s Sewing with white paper thread in a chain stitch with cambric appliqué on white tulle. Imitation of Brussels lace. 150x300. RT-8621. Acquired in 1958 by ZKGE
Cape detail
Suzane
The popularity of tambour embroidery is supported by the original traditional embroidery of eastern countries. Tajikistan, Uzbekistan, Iran have preserved their truly ancient traditions in tambour embroidery and use them in the production of hand and machine embroidery, adored by tourists from Europe.
Tajik embroidery - table runner Click to enlarge
Click to enlarge
Craftsmen sell their suzanis, bedspreads, table runners, bags, panels, pillows and bolsters at craft fairs held several times a year in Asian cities.
International Crafts Fair, Almaty, 2021 Click to enlarge
Suzane is translated as “embroidered with a needle.” Which sends us back to the distant past, when embroidery looked like a series of chain stitch loops. Now suzani can be purchased in handmade online stores and at exhibitions and fairs.
Sellers at the craft fair speak fluent English to buyers from different countries, explaining how the work is made.
A napkin purchased at a fair in Almaty. Click to enlarge
For example, this small napkin that I bought at such an exhibition is a work from Tajikistan. It is hand-woven and hand-embroidered. Every line, curl or pattern is a symbol of something. Although, I chose a napkin with a pomegranate, not because it is a symbol of fertility, but because I simply like embroidered pomegranates - they are very beautiful.
It must be said that the threads are also dyed by hand. And they don't shed. Sellers claim that the colors are obtained naturally from pomegranate peels, basma, and walnut shells. I want to believe in it, just as many foreign tourists believe in it. Or maybe this is so, because the craftswoman confidently lists how and from what to get this or that shade.
Be that as it may, this purchase of mine has been lying on my windowsill in the direct rays of the sun for 5 years now, and the colors have remained the same as on the day of purchase
Small cushion cushion, handmade. Click to enlarge
This is a tiny sofa cushion, with a diameter of 10 cm and a length of 29 cm. When I asked the craftswoman what it was for, she simply brought it to her cheek and rested her head on it. Here in Russia it would be a small pillow called “dumka.”
Of course, along with handmade works, you can also find machine embroidered ones using the same chain stitch. It is very easy to distinguish them. From the inside out, these embroideries look completely different.
Machine tambour embroidery Click to enlarge
Machine tambour embroidery - reverse side Click to enlarge
Hand tambour embroidery - reverse side Click to enlarge
Chain stitch with a needle
Chain stitch embroidery is simple; a video or extended instructions on how to make a chain stitch with a needle will help you master the process step by step:
- Fasten the thread and bring it to the right side of the fabric.
- Hold the thread with your left thumb and form a small loop.
- Insert the needle into the starting point, bring it to the wrong side of the work, without pulling too much, holding the loop on the front side.
- Bring the needle through the top of the loop and make a small stitch, securing the loop.
This creates an open or closed pattern from a chain of loops; the direction of the pattern can be arbitrary, as evidenced by photos of the products. This technology is especially popular when the loops are double and they are made in different colors. It is convenient to embroider in this way with thin ribbons, securing them with thread stitches, forming a flower petal or leaf.
How to embroider with a chain stitch? There are many videos on this topic, the sequence of work is simple:
- Having secured the thread, bring it to the front surface of the fabric.
- Form a half ring from the thread, holding it with your left hand, and insert the needle into the original hole.
- Bring the needle to the wrong side, holding the loop on the front side.
- Bring the needle inside the loop at the top, securing it with thread to create a teardrop-shaped stitch.
- Form a new loop that starts at the top of the previous one, making sure that all stitches are the same.
Tambour embroidery on a dress from Coco Chanel
1922
This chain stitch dress by Coco Chanel dates back to 1922. It is curious that in the fall of 1921, Grand Duchess Maria Pavlovna Romanova, fleeing poverty, came to Coco Chanel with an offer to do embroidery for her models. Of course, she was not “poor” in the usual sense, she was simply looking for options to have a means of subsistence.
After completing machine embroidery courses, hiring girls embroiderers (at first she hired only compatriots), she created her own Enterprise “Kitmir”, with which she agreed on cooperation with the owner of the fashion studio Coco Chanel.
It is possible that the embroiderers of the Kitmir house embroidered this splendor.
Tambour embroidery on a dress from Coco Chanel, fragment Click to enlarge
Tambour needle embroidery
There are two main ways to make a chain stitch using a needle. A prerequisite for both is the canvas stretched tightly in the hoop. You can embroider from top to bottom or from left to right, depending on the chosen pattern. To simplify the work, it is better to first transfer the desired ornament onto the canvas.
So, method one
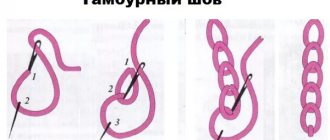
We bring the needle to the front side (in the figure this is point 1). Next, we insert it back into the same point (as you can see, points 1 and 2 in the figure coincide), but the thread is not fully tightened, holding the formed loop with your finger. We bring the needle back onto the face, this time at point 3, thereby pressing the top of the link, and tighten the thread. The first link is ready! The rest are performed in the same way.
Method two
In this case, the embroidery process begins with a regular stitch from point 1 to point 2. Next, we bring the needle from the wrong side to the front side at point 3. We pass the needle and thread under stitch 1-2 and again stitch into point 3. The stitch will hold the chain link at tightening the thread.
In further links, you need to pass the needle not under the stitch, but under the previous link of the chain.
For both methods of execution there are two important rules:
- The stitches should not tighten the main fabric. This is why you need to pull the fabric onto the hoop as tightly as possible.
- At the end of the embroidery, make a locking stitch, otherwise the whole chain will unravel.
Modifications of chain stitch embroidery
The two methods described above are the technique of performing the classic chain stitch. But during its existence, needlewomen managed to invent many options for its modification. Let's look at some of them.
Interlaced seam
A very beautiful finishing seam can be obtained if you initially lay several standard chain stitches side by side, and then, using a contrasting thread, intertwine them together (see diagram).
A tighter seam
In cases where a tighter seam is required, the following techniques can be used:
Place one chain stitch on top of the second (this is pattern No. 6)
Try to “double” the loops by first attaching a small link and then a large one (patterns No. 7 and 8).
To get a “spikelet” ornament in chain embroidery, make the initial attachment not in the form of a stitch, but in the form of a corner, and then make the chain itself upside down, i.e. the top of the link is up.
An ornament in the form of barbed wire is made in a similar way, however, the initial attachment here is made in the shape of a cross, the loop is made with the top of the link facing upward, and its ends are spread in different directions, rather than coming out from one point.
In the form of a twig
A complex ornament in the form of branches with leaves is made by combining open and closed links in embroidery.
How to turn a regular chain stitch into a raised stitch
The convex seam is a “prefabricated” element and is performed in 2 stages. At the first stage, your embroidery will resemble a “ladder”, and at the second stage “steps” will appear on it.
This kind of stitch is ideal for embroidering lupins and delphiniums. But that’s not all they can do. With a convex seam you can also embroider rough tree trunks or beautiful unusual ornaments.
After studying our short lesson, you will be able to embroider products yourself with a convex seam:
- To begin, embroider a ladder of small even stitches with thread and bring the thread to the front side. The photo clearly shows how to do this correctly.
- Then you will need to move the needle to the right, and then pass it under the top “step”. In this case, you must move exclusively in the direction from bottom to top. In the next photo you can see how to do this.
- Pass the needle under the same “step” again. The main thing is to make sure that the thread wraps around the needle;
- Next, you must pull the thread so that the first wrapping stitch in this chain is formed. At this point, the embroidery of the first “step” will be completed and, moving on to the next component of the “ladder”, you can sew further.
If you sew all rows, moving in the same direction, you will get a smooth seam. And if you need texture, then you should alternate rows: sew one upward, and the other, on the contrary, downward.
When your embroidery is finished, you will see the resulting raised pattern.
Tambour embroidery with Luneville crochet
You can embroider chains not only with a needle, but also with a crochet hook. In part, this method is even simpler, especially if you arm yourself with a hook with a sharp head. But there are also some subtleties. For example, you can only crochet basic chain stitches; complex modifications cannot be achieved this way.
The rules about pulling the fabric tightly and the absence of ties” remain relevant for both the hook and the needle.
Luneville embroidery technique
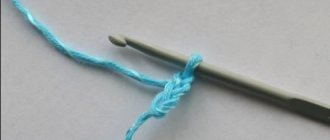
The technique of making a crochet seam is quite simple. Bring the hook out from the front side, hook it on the working thread, pull it out to the wrong side - you have a loop. Insert the hook into the fabric again, hook the thread, and pull it to the wrong side, but through the loop on the hook. Continue embroidery in the same way according to the selected pattern.
The Luneville hook is a special hook for embroidery using French technique. It is named after the place where beads and glass beads were first used in embroidery using a regular chain stitch. This was the city of Lunéville, the residence of the Dukes of Lorraine.
This technique became known as Luneville embroidery and is now used in decorating high fashion models, wedding clothes and evening dresses.
Watch a magical video about the creation of a Haut Couture dress, Christian Dior
Here is a very short demonstration of how to work with the Luneville crochet and how the sequins are delicately fed from the underside of the fabric.
The Luneville hook has a thin hook needle and a handle with a screw that protrudes slightly from the side. This screw secures the needle-hook in the handle, because the hook itself can be changed by choosing the size of the tool. And the protruding screw is on the same side as the “bit” on the hook.
This design helps the embroiderer navigate where the “beard” of the hook is and where to bring the thread to the hook under the stretched fabric.
Click to enlarge
Luneville embroidery is performed on thin, transparent fabrics and the craftswoman sees only the wrong side - the chain stitch itself.
And all the beauty with beads and sequins remains under the stretched fabric and the embroiderer sees it through the thin fabric.
Click to enlarge
Click to enlarge
Click to enlarge
Click to enlarge
Luneville crochet is also used to embroider using the du point de Beauvais (Beauvais point) technique. Here everything is more natural, the embroiderer sees her work right on the top side of the fabric. The difference from the Eastern techniques is in the thickness of the hook, the head of which is equal to the width of the sewing needle. Embroidered on thick fabrics with silk threads.
Tambour embroidery (Beauvais point) -linen
Tambour embroidery (Beauvais point) - chair upholstery
Tambour embroidery (Beauvais point) - chair upholstery - fragment
I took the three previous photos from Sarthe Michel Esquiol's documentary about the workshop in Bourg-le-Roi. In Bourg-le-Roi there is a museum of embroidery using the Point de Beauvais technique, where they also teach embroidery. Three experienced embroiderers take turns training Yvette Berto, Ginette Besnard and Lucien Mondion. The cost of classes is 95 euros for 9 hours.
You can watch this movie too:
film by Sarthe Michel Esquiol about the workshop in Bourg-le-Roi
Chain stitch using a crochet hook
Using a hook, you can embroider some kind of pattern or ornament on a finished product using a chain stitch.
You can also use it to sew in sleeves or finish the edge of a knitted product in order to avoid unwanted stretching in the future.
In order to learn how to decorate knitted items with such an interesting seam, you can watch a short video lesson:
This video clearly shows that the peculiarity of this seam is that during operation the hook is on the front side of the product, and the working thread, on the contrary, runs from the wrong side. In addition, after carefully viewing this short lesson, you may notice that when embroidering with a chain stitch, the master does not always get directly into the loop itself; rather, he simply punches the fabric in the right places.
Thanks to this technique, you can quickly crochet even a large design.
Any knitted clothing will become special and unique after it is decorated with tambour embroidery.
Tatar embroidery
You cannot embrace the immensity, as Kuzma Prutkov used to say. It is also impossible to imagine in one article how the chain stitch lived and developed in the traditions of all peoples.
Tatarstan, Bashkiria, Russia decorated their clothes and home textiles with patterned embroidery, giving importance to every detail.
Everything that the embroiderer saw around her - lilies, cornflowers, tulips, everything was transferred to the fabric, embodying the beauty of nature in silk threads. And each motive hid its own code or symbol. So, for example, a circle is the sun, a wavy line is water, a tree and birds are fertility. Traditional ornaments give us amazing discoveries.
Tambour embroidery, Russian clothing Click to enlarge
Tambour embroidery - Tatar boots Click to enlarge
Two-color and zigzag chain stitch
You have already noticed that sewing with a chain stitch is quite simple. But in order to slightly diversify and decorate our work, we can use not only the usual chain stitch, but also convex, zigzag and even two-color.
If you want to start sewing with a two-color chain stitch, then you first need to choose thread colors that go well with each other. Then you will have to thread two different colored threads into the needle and start working directly.
You perform the first stitch with a thread of only one color at the same time you need to hold the other thread over the tip of the needle. After this, you pull both threads and thereby complete the first stitch. You will need to make the second stitch with a thread of a different color. In this simple way you can embroider a two-color chain stitch.
In order to embroider a pattern with a zigzag chain stitch, you need to mark two parallel lines on a selected area of fabric. It is best to start working from the top point of the left line.
First you must pierce the fabric with a needle so that its tip comes out at a certain point located on the opposite line. Next you will need to pull out the thread and make a chain stitch.
After this, you can make a second stitch, which should also be inclined. But it is worth noting that it will need to be performed in the opposite direction.
By doing this you will get a zigzag chain stitch.
Embroidery made using a “tambour” will look amazing. In addition, its huge advantage is that it is easy to perform and even children can handle it.
Anyone can embroider flowers or a ball of knitting needles.
A drawing depicting a cockerel may seem a little more complex at first glance, but in fact it only seems so at first glance.
Bird lovers can try their hand at creating parrot embroidery.
More complex works include depictions of fish.
Whatever design you choose, in any case, your embroidery will become a real masterpiece, since it will be made “with soul.” The main thing is not to be afraid to experiment, and feel free to start creating new works!
Tambour embroidery by Yumiko Higuchi
Perhaps it would be unfair to talk only about national, traditional embroideries characteristic of a particular area. I think everything is interesting in development, in dynamics.
Yumiko Higuchi is a Japanese embroiderer, designer, born in 1975, graduated from the University of Arts, lives in Tokyo.
She embroiders in many techniques and has the amazing ability to skillfully mix various techniques and create the most beautiful, laconic, elegant designs in which Yumiko’s authorship can be discerned. However, many find that she has an obvious penchant for chain stitch.
These are modern embroidery and modern designs that have won the hearts of embroidery lovers all over the world. Yumiko has published several books in which she offers prints and master classes.
