Knitted bow
Bows are a universal accessory for children and adults.
They are worn as hairpins, ties, or simply as elements of an outfit. And in this master class we will knit a voluminous bow with knitting needles. It knits very quickly and easily. We will tie a beautiful two-color bow. To knit a bow we will need:
- Yellow and lilac yarn;
- Knitting needles;
- Needle.
The bow will be striped.
The main color is lilac, and we also need a little yellow for the stripes. We begin to knit the main element of the bow. And for this we take lilac yarn. We put twenty stitches on the knitting needles and knit our first row. We knit all the loops in it. Then we move on to the second row. And in it we also knit all the loops with facial stitches. That is, we will knit the fabric for the bow using garter stitch. In total, you need to knit twelve rows with lilac yarn. Next, change the thread to yellow. But there is no need to break off the lilac one, since we will still be alternating colors in knitting. We will knit only two rows of yellow yarn. And again we will change the thread to a lilac one. We will also not break the yellow thread. And then we will knit twelve rows again with lilac yarn. Then we knit two rows of yellow. And so we will alternate eight more times. That is, we should have eleven yellow stripes and twelve lilac stripes. We will get a small striped scarf. We fold it in half so that the wrong side is on top and the front side is inside. And we sew it with a needle along the short edge. As if making a snood out of our scarf. You can also sew it not with a needle, but with a single crochet hook. Whichever is more convenient for you. We turn the resulting snood inside out and knit the next piece. It will be completely lilac in color. We cast on ten loops on the knitting needles. And we knit another twenty-eight rows in garter stitch. We need this part to bridge the middle of our main part of the bow. We take our snood and flatten the middle of it a little. You can even walk with a needle and thread. But this is not necessary, since the jumper will hold the middle of the bow well. Cover the middle with a lilac detail. And we sew it at the back. This can also be done with a needle or crochet. The seam will be at the back and therefore will not be visible. Moreover, it will be quite small. This is the bow we made using knitting needles! It can be used as a hairpin if you attach accessories or as a bow tie if you sew on an elastic band. Don't forget to share the link with your friends Tags:
knitted bow bow
Similar knitting and crochet patterns
Add a comment
www.homyak55.ru
Trying to knit a snood
This simplest knitting option will help you understand the pattern in more detail in order to ultimately get a warm snood.
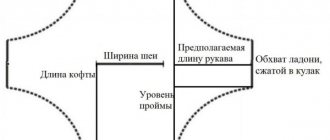
For work you will need the following material:
- yarn - 200 g.
- knitting needles No. 4.5.
- buttons.
Product size - 30*70. Even beginners in this business can cope.
We cast on 52 loops on the knitting needles. We knit the first 2 rows with the front side.
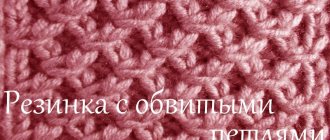
Now let's start forming the butterflies.
1st row: 1 edge, 5 knit stitches, start the thread before knitting, as in the above example, and remove 5 loops. Then knit 5, remove 5, start the thread. This is how we knit the entire row, the last stitch is the edge stitch.
We knit the 2nd row with the wrong side. In the future, we knit each even row inside out.
Related article: How to sew a simple skirt - master class
Using this pattern, we knit 10 rows, resulting in 5 stripes.
11th row: we form a pattern, 1 edge, 5 knits, and then comes the ornament: 2 knits, thread the knitting needle under all the threads and knit with the third loop, knit 2, and so on until the end of the row.
Next, we knit a butterfly at the very beginning, 13th row edge, 5 stitches, start a thread, knit 5, and so on throughout the line. Then the pattern will be arranged like a chessboard.
We knit a scarf of the length you need, depending on what you want. Next, we knit 3 cm in garter stitch, and we will also make parts for the buttons in the form of a loop.
1 edge, 2 knits, 2 close, 13 front, 2 close, so we knit a few more times and finish with the 1st front and edge.
In the future, in subsequent rows, where the loops were closed, we cast on 2 loops and knit another 1.5 cm. And we close off all the knitting.
We sew on the appropriate buttons, and our snood scarf is ready.
Now you know how to knit the bow pattern and you can create original and unusual things yourself.
Knitting with beads (knitting needles)
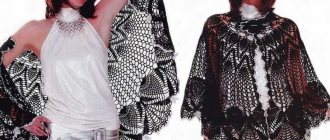
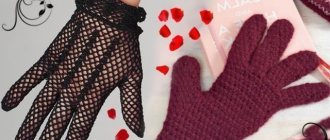
Knitting jewelry with knitting needles is not the most common area of application for this handicraft technique. And knitting with beads is an almost forgotten art. We invite you to revive the tradition of knitting with beads, master this wonderful type of needlework, and at the same time make a simple but cute bow - a brooch for a girl.
The whole highlight of this decoration is in specially selected yarn, thin and fleecy, using thick knitting needles and transparent beads resembling dew drops with a colored line. You don’t need any special skills other than the ability to knit knit and purl stitches on knitting needles to create this decoration.
But having mastered the technique of knitting with beads, you will be able to create amazingly beautiful jewelry, from jewelry to all kinds of phone cases, handbags and clothes.
Returning to our master class, in which we invite you to tie a bow, such an unusual decoration will delight any girl and gracefully decorate her hat, jacket or backpack.
To knit with beads you will need the following materials and tools:
1. Yarn. Since we will use beads, we need thin yarn. We used Nako Mohair Delicate thread, its meter is 500 meters per 100 grams.
2. Knitting needles. Even though the thread is thin, mohair can be knitted with knitting needles whose number is quite large and does not seem to match the thin thread. However, the fabric, knitted from mohair with thick knitting needles, looks voluminous and airy, which is stylistically suitable for our bow. We used knitting needles No. 3.5.
3. Beads. The choice depends on the size of the bead hole. It is necessary that the thread you choose can pass through it freely.
4. Needle. A regular sewing needle will do, provided that the size of the eyelet allows the yarn to pass through it, and the needle itself should pass freely through the hole in the beads.
5. Needle threader. To make it easier to thread our needle.
6. Knitting needle. It is necessary for sewing our bow.
7. Scissors.
Knitting a bow with knitting needles with beads: job description
We cast on 24 loops on the knitting needles.
We knit 25 rows in stockinette stitch
We break the working thread and, using a needle threader, thread its tip into the eye of the sewing needle.
Using a needle, string the beads onto a thread going to a skein of yarn. The amount of beads needed depends on the pattern you plan to knit using beads. For our idea we will need 80 pieces. And it’s okay if you don’t have enough beads strung, you can break the thread again and string more beads. The ends of the thread are hidden at the end of the work.
Now we again attach the thread with beads to our knitting and continue to knit with stockinette stitch, only now, following the intended pattern, we need to knit beads into the fabric. We decided to knit beads every 2 loops.
So, we just knit the first 2 loops with knit stitches without beads. Now we bring one bead to the next loop.
And we also knit it through this loop.
In this case, the bead must be held so that it does not “go” to the wrong side of the product.
We continue to knit further, alternating 2 loops usually, 1 loop with beads, and so on until the end of the row.
In order not to make our bow too heavy, we decided to knit beads infrequently, so we knit the next 3 rows in stockinette stitch without beads. In the next row we knit beads again, but with a shift in one loop, that is, at the beginning of the row we knit not 2, but 3 loops with stockinette stitch, and then we continue alternating through 2 loops until the end of the row.
In this way we knit 5 rows with beads, between which there are 3 rows of stockinette stitch. Our rows of beads form the front side of the bow.
Next we knit 16 rows of stockinette stitch without beads. This will be the central part of our bow.
Then - again 1 row with beads and 3 rows of stockinette stitch (repeat 5 times).
And we finish by knitting again 25 rows of stockinette stitch, which form the back of the bow.
We close all the loops. We cut off the thread, leaving the tip longer, as it will be useful for sewing the accessory.
That's it, the main part of the bow is ready.
Turn it over with the wrong side up and fold it like this.
This is what it looks like from the front.
Thread the remaining tip of the thread into a knitting needle and stitch the needle forward, stitching the bow blank in the center.
This is what our knitted bow looks like from the front side now.
We use this thread to tighten our future bow and wrap it around the seam. Using a needle, firmly fasten the thread from the wrong side. Our bow is almost ready.
All that remains is to design its middle. To do this, knit a strip of 7 loops 7 cm long.
We wrap it around the central part of the bow, sewing the ends on the back side.
The bow is ready.
By varying the number of loops, rows and patterns, you can knit a lot of different things with knitting needles and beads.
Now you should sew a base to the bow - for example, a hair elastic. But we took the basis for the brooch.
Now our bow is removable, and you can fasten it wherever you want. As you can see, knitting with beads is an easy, fun and productive activity.
I wish you creative success!
Marina Vyachkileva (MarinaV) especially for the site Handicraft Master Classes
www.supermasterclass.ru
Knitting Basics
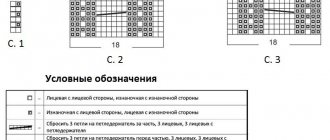
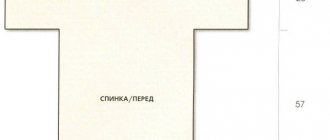
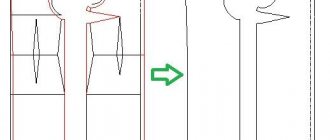
The pattern is knitted with knitting needles and is quite simple; you need to follow the gradual description, and the work will delight you with its result. The number of loops must be a multiple of 10 + 4.
For example, take 24 loops and add 2 edge loops, and continue knitting according to the following pattern.
According to the pattern, we do not knit the first 5 loops of the front row, but simply remove them to another loop. We turn the working thread to the front of the knitting, in front of the removed loops, so we leave it without tightening it.
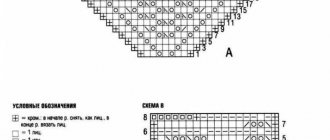
We knit 9 rows as shown in the diagram. This is what we get.
We knit the 10th row with the wrong side - using the right knitting needle we collect 5 threads and transfer them to the left knitting needle.
Then we knit all the threads together with the purl. loop.
This, in fact, is how “butterflies” are tied.
LiveInternetLiveInternet
Quote from Glebova_Elena's message
Read in full In your quotation book or community!
I greet you on the pages of my diary!
I think it’s difficult to imagine a more popular option for decorating anything - from jewelry to gifts :) Yes, of course, this is everyone’s favorite bow! It’s easy to do, it always looks advantageous and festive :) Of course, a bow made of organza or satin ribbon will look strange in the decor of winter clothes, for example - and here knitting comes to our aid. I have selected for you the simplest options for knitting and crocheting bows and bows, and also gave some examples of the use of knitted bows in the decor of clothing and jewelry. I'm sure you will definitely find the selection useful :) Enjoy watching!
And if you use wire instead of thread, you will get a very beautiful decoration!
Well, now let's see how all this beauty is created :)
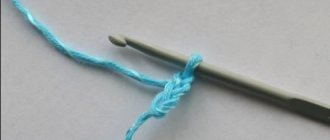
So, the first master class from Jessica Fedive, the author of the very positive handicraft resource Happy Together (happytogethercreates.com). A very simple crochet bow for jewelry for a little fashionista :)
Inside is a drop of hot glueSimple, right?
But today we are considering such simple works :)
So, the next master class is a knitted bow from craftswoman Cameron (cameronhomemade.com)
This cute ring with a bow from Meredith (onesheepishgirl.blogspot.com) was made in a similar way. Very nice job!
For those who are just learning to crochet and for those who like detailed master classes, I would like to present an excellent tutorial on crocheting a bow from Jessica, the author of the resource Craftiness is not Optional (craftinessisnotoptional.com). Everything is clearly visible - sit down and repeat :)
Cute quick crochet bow from Zhedan (gedane.over-blog.com)
And another simple option for making a miniature crochet bow from Emma, author of the Eskimo&Rose resource (eskimorose.blogspot.ru)
A wonderful option, isn't it?
As an advertisement
The individuality, style and character of the interior of your home directly depend on the originality of the furniture in it. Of course, you can purchase branded or exclusive ready-made furniture. But as my personal experience shows, it is much more profitable, oddly enough, to make furniture to order. Moreover, the furniture will fit perfectly into your interior, if only because it will be made to fit the size and architectural features of the room. It is only important to find a professional manufacturer. For Moscow residents, I can recommend paying attention to the Veconika company, which has been successfully manufacturing a wide variety of furniture for 14 years! By the way, on the Veconika website you can see a portfolio of their work. Decent and stylish, I really liked it!
I wish everyone good luck and endless creative inspiration!!
Best Hand Made