What is hem embroidery
The technique of embroidery on thinned fabric - in other words, hemstitching can be called.
The main feature is the precise counting of the number of threads so that the repeating motifs are even and identical. The second feature is the preparation of the canvas depending on what pattern is planned to be made. In the old days, the hemstitch technique was used to decorate clothes and kitchen utensils . At some point it was forgotten, but now it is gradually being revived and gaining fans among young people.
simple motifs, complex and combined patterns in hemstitching . If you use this technique for finishing clothes, it is enough to master 2 - 3 simple patterns, as many complex ones, as well as the possibility of hemstitching when connecting stitches.
Have you tried hemstitch embroidery yet?
Not really
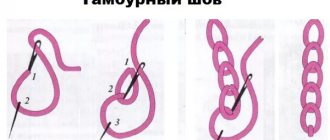
Brush, or single twig (Fig. 1, top)
The basis for the hemstitching was a regular hand stitch used for hemming scars. With the development of folk art of embroidery, the seam changed and turned into a “tassel” or “single twig” hemstitch.
In terms of technique, it is the simplest. Only one side of it is sheathed, thus forming a kind of tassel from fabric threads. Based on the principle of this hemstitch, many others are embroidered, but only in two moves - from the upper and lower sides of the drawn strip of fabric.
Rice. 1. The simplest hems: a tassel on top; in the middle - a simple column; below - split column
To perform hemstitching, we pull out several adjacent threads from the fabric so that we get a strip 3-5 mm wide. We sew the hem from right to left along the upper edge of the drawn strip.
To secure a working thread without a knot, two methods are used.
The easiest way: fold the thread in half, thread the two ends folded together into the eye of the needle, and make a loop at the long end. We grab the number of fabric threads required for one tassel and pull the needle with the working thread through the loop.
But often when sewing women's clothing, it is necessary to embroider the hem in one thread. In this case, to secure the working thread, we insert a needle between the threads of the future tassel and stick it into the fabric, stepping back from the edge by two or three threads (Fig. 2). Then we pick up the required number of free threads of the pulled strip of fabric with a needle, the working thread lies in a loop counterclockwise, we tighten this loop, holding the free tip of the working thread with our left hand.
For strength, a second loop is usually made at this place and the excess tip is cut off. Using the next stitch, we insert the needle into the fabric from the fabric side above the tightened threads of the fabric and bring it to the front side (Fig. 3). Next, picking up the same number of threads on the needle as when fastening, separate the second tassel and tighten it.
Rice. 2. Securing a single thread when starting work
To make a beautiful hemstitch, you need to pick up the same number of fabric threads on the needle each time and make a stitch of the same length and slope throughout the entire embroidery. To do this, you need to stick the needle at a distance of two threads from the edge of the strip and at a distance of one thread from the left border of the tassel. We always pull the needle with the working thread up away from us, and not to the side.
Rice. 3. Performing hemstitching “tassel”
A simple post, or a double twig (Fig. 1, middle)
This hemstitch serves as the basis for all more complex hemstitches, but is often used in its pure form for hemming the edges of products - napkins, tablecloths, sleeves, etc. It is performed in the same way as the previous one. First, we pull the threads on one side of the threaded track of the fabric, forming a “tassel” hem, then we pull the same threads on the opposite side. The result is columns pulled together on both sides.
When performing hemstitching, it should be taken into account that the warp threads are thinner than the weft threads (except for special fabrics or embroidery), therefore, when embroidering hemstitch columns, the warp threads should always be counted one or two more than the weft threads. If we make hestitching along the grain side of the fabric and pull out, for example, five threads, then we take only four threads into a column; if we perform hemstitching across the fabric, then, on the contrary, we take five threads into a column and pull out four.
Preparation for embroidery and necessary supplies
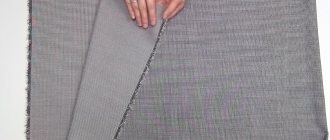
The basis of hemstitch embroidery is fabric. It should have a clear weave .
Embroidery canvas, thick linen, as well as fabrics made from natural fibers, such as hemp or cotton denim, are suitable. Needles can be used with a blunt tip, as there is no need to pierce the canvas. Floss or regular sewing threads are suitable to master the technique.
To trim the warp threads, you will need nail scissors with a straight nose , very sharp.
Editorial Voice
Matryona
Fan of embroidery and sewing
Ask a Question
At the preparation stage, you need to pull out several horizontal threads so that only vertical ones remain. They will need to be counted. Each pattern will necessarily indicate how many threads are needed for the pattern, especially for a complex or combined one.
Proper preparation
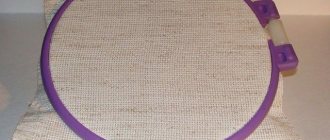
As in any other art, you need to start with the basics and with the right material. So, for example, it is recommended to use plain weave fabric, but for beginners it is better to practice on canvas, since it is very convenient to pull out threads there. You can use any thread, the main thing is that it matches the density of the main fabric; it can be ordinary spool threads, or you can use floss in several folds.
In order to carefully cut the strip for embroidery, you should use well-sharpened scissors or use a blade.
Please note that in order to preserve the beauty of the seam, the width of the hem should not exceed 1.5 cm, and it is convenient to use a needle to pull out the threads.
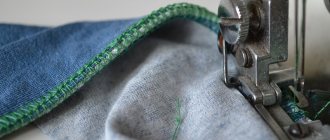
Also, in order to prevent the strip from unraveling, you should process the edges; to do this, you need to lightly overcast them, as shown in the photo.
Read this: Soutache technique: breaking down the basics for beginners
That's it, now you can start embroidering patterns.
Embroidery patterns
To begin with, it is enough to pull out the threads 1 cm in height . To do this, use a needle to pry a horizontal thread and, carefully gathering the fabric, pull it out. For each type of fabric, the number of elongated threads per 1 cm may be different.
Hemstitch embroidery for beginners. Types and description of patterns:
Hemstitch embroidery is an ancient type of needlework. Our great-grandmothers could not imagine a cozy home without textiles decorated in this way. Blouses, dresses, and sundresses were decorated with elegant hemstitching. Hemstitch embroidery looks especially sophisticated and gentle on christening sets for babies.
The ancestor of technology was an ancient type of needlework called “horsework”. Later, embroidery with pulled threads began to be called “by pulling” or “by the middle.” It is believed that this technique marked the beginning of lace making.
Products decorated in this way look elegant. Since the fashion for any type of embroidery has returned, needlewomen should pay attention to hemstitching. It is an openwork embroidery. Before the process begins, a certain number of threads are pulled out of the fabric.
Embroidery fabric
For this type of embroidery, it is important to choose the right fabric. It could be:
- batiste;
- linen;
- silk;
- canvas;
- cotton fabric.
Choose a material with plain weave threads. It is easy to pull out elements from such fabric and it is not at all difficult to work with.
Threads
Threads should be selected taking into account the density of the material. For work you can use:
- bobbin threads No. 10 and No. 120;
- floss;
- threads drawn from fabric.
The color scheme can be any depending on the design. Traditionally, hemstitching is done with threads to match the fabric or with a difference of several tones.
Hemstitching for beginners
Hemstitches are openwork seams. They can be the main part of the pattern or serve as an edging for the design. This type of embroidery refers to counted stitches. Ornaments made using hemstitching are distinguished by their subtlety and grace.
Embroidery always starts with rocking chairs. Let's figure out how to do hestitching. Fasten the thread to the fabric using the “loop” method and then make a rocking chair. It is a vertical column embroidered with 2–5 threads of material and the height required for the design. The “rocking chair” secures the threads of the fabric that will need to be trimmed and pulled out for hestitching.
Rows of hemstitching are done from right to left. The ends of the threads need to be secured in the rockers from the inside out. The element is ready and now you need to trim and pull out the threads. We make half-columns to the end of the row.
Italian hemstitch for embroidery
This hemstitch consists of two half-columns separated by horizontal threads. Again, we start work with rocking chairs. Italian hemstitching consists of two strips of columns separated by horizontal threads (four rows). We embroider the hemstitch: we hug the threads in the lower strip of columns and draw the needle diagonally into the upper strip of columns. We do all this until the end of the row.
Hem "Tassel"
It is also called hemstitch “Prutik” (single). We make a rocking chair and draw a path on the fabric. On one side of the material we tighten the threads. Thus, a “tassel” hem is formed. We do the same on the opposite side. Now the columns will be pulled on both sides.
When working with a shared arrangement of threads and pulling out 5 weaving elements, four of them will go to the tassel. If you are going to make a hemstitch along a transverse weave, then you will need to remove four elements, and five of them will be needed for the “tassel”.
Types of patterns
There are a number of the most popular patterns using the hemstitch technique. These include:
- tassels;
- columns;
- goat;
- flooring.
Bead embroidery also works perfectly with this technique. Skilled craftswomen create complex and sophisticated patterns with beads: beads or glass beads are placed on a thread between the hemstitch elements. This is a complex and amazingly beautiful work that requires real skill.
Caring for products with hemstitch decor
Products with hemstitching require careful handling. Let's start with the fact that such things are not suitable for everyday wear. Textiles with hemstitching are also used on special occasions, since frequent washing and ironing will inevitably lead to deformation and damage to the embroidery.
You can only wash items decorated with hemstitching by hand in not very hot soapy water. The powder is selected according to the composition of the fabric. If you still decide to use machine wash, then choose a delicate cycle without spinning. Spinning products at high speed is strictly prohibited!
Products should be ironed at the lowest temperature. To do this, prepare slightly damp gauze in advance. Don't drive around one place for too long. Try not to stay in one area for more than 1-2 seconds.
Ready-made embroidery kits “Merezhka”
The Ukrainian company of the same name is considered the most popular in the handicraft community today. The “Merezhka” embroidery set from this manufacturer can consist of blanks for decorating products with beads and various embroidery techniques. Manufacturers produce both small products for interior decoration and blanks for tablecloths, dresses, sundresses, and shirts.
It is very convenient to embroider products from a Ukrainian manufacturer - the design is immediately applied to the fabric. The kits include threads, fabric, beads, and a diagram. Some of them are equipped with a frame for decorating embroidered paintings. Some kits also include a guide to hemstitching techniques for beginners.
Airy embroidered shirt in white on white with hemstitching
From time immemorial, Slavic women wore embroidered shirts. As a rule, they were embroidered with black, red or white threads. The last option is considered the most sophisticated and, as they say, “not for everyone.” White embroidered shirts decorated with delicate hems were chosen by modest girls.
White-on-white hemstitch embroidery and decor are traditional for northern countries. It arose there for a reason, but due to the fact that the days there are shorter than in the south, and embroiderers had to work in artificial light.
Since there was little light, and the work had to be neat, the needlewomen came up with the idea of pulling threads from the edges of the products in order to see the boundaries.
Later they noticed that embroidery with openwork inserts looks graceful and unusual.
There is also a region where hemstitching is very popular in Ukraine. This is the village of Reshetilovka in the Poltava region. Here craftswomen have been passing on their knowledge from generation to generation for several centuries. Reshetylivka embroidered shirts and textiles are bought by brides and grooms for themed weddings in folk style. This product is necessarily decorated with delicate hemstitching.
The famous Soviet hemstitch
In the years before World War II, the best craftswomen of the union worked on thematic panels that were supposed to glorify the Union of Republics. The most famous product was called “Moscow - the port of five seas.” There were depicted:
- Kremlin;
- Mausoleum;
- wheat ears.
In 1939, a world exhibition of folk crafts was held in New York, where a tablecloth embroidered by craftsmen from the USSR was presented. The exhibit was called “Constellation”. It depicted 11 stars, corresponding to the number of republics of the huge country. Panels depicting Stalin or the workers’ and peasants’ army were also popular.
Hemstitch embroidery has another name: “hardanger” or through stitch. The best way to learn embroidery is on canvas. It's easier to pull the threads out of it. This type of needlework is a meditative activity. Its implementation brings joy and extraordinary tactile sensations to needlewomen.
Simple hems
Learning the hemstitch technique traditionally begins with simple stitches . Take a thread of floss (can be in a contrasting shade) about 1 m long and divide it into 2 parts. The ends are threaded into a needle, and a loop should be made on the other side. This is necessary to secure the thread without a knot.
Further:
- Fasten the thread on the reverse side by prying two threads on the fabric. Pass the needle through the loop and tighten.
- Move the needle to the front side where all the threads are in place - not pulled out, under the strip.
- Use a needle to circle 4 threads from the back and bring them to the face.
- Circle the back again and bring it to the face under the embroidery through the next 4 threads, tightening the previous stitch.
In this way, go through the entire row. Make the same twists on the reverse side so that the columns match .
A split column is made a little differently: on one side as usual, and on the other you need to count two threads from one column and 2 from the other. You will get triangles.
Twisted posts are made after straight ones are made on the top and bottom sides. The thread is secured with a loop, and then you need to work with two columns:
- The needle is wound under the left (second) column, then on top of the right (first).
- The columns are twisted with a needle that turns 180 degrees.
- The needle is brought out to the front side.
Then the same thing is done with the next two columns.
Unusual hemstitch
Let's try to find out the essential rules applied to fittings to create hemstitch and hardanger techniques.
First of all, when performing the hemstitch and hardanger method, an important agreement is thread counting; for this, you will need fabric with a clear and pronounced weave. Before you start the lessons and master class on the hemstitch and hardanger techniques, you need to make an undercut and pull out a certain number of threads to create a seam. The thread that will be used to make the hemstitch seam in embroidery should be strong and slightly twisted. And also be of the correct thickness in relation to the fabric with which the embroidery master class will be held.
With a needle this work is relatively simple. You need a regular embroidery needle, which even novice needlework enthusiasts have.
Read
Schemes of bead patterns for embroidery on various products
You will need an auxiliary tool that will be useful to repeat the lessons and master class, these are scissors with pointed and thin ends.
Before starting work, you need to remember how to do knotless thread fastening. When using long threads, use the option of attaching loops, which can be seen in cross stitch. Using one thread in the hemstitch method, it is necessary to make a stitch towards the thread of the main fabric, which has the appearance of a column, and reinforce it, using a looped seam, near the foundation of the column.
Having calculated the point at which the strip for the hemstitch technique will be created, you need to secure its end in an interesting “rocking” way. We make stitches one on one in a horizontal position, grabbing one or two vertically lying threads of the base. The width of the strip of this hemstitch depends on our “rocking chair”. We take pointed scissors and carefully cut the horizontally located threads with them, and you can pull them out using a needle. This is how a strip is created, which includes vertical threads, with a hemstitch made on it.
The simplicity of execution lies in the fact that the hemstitching, at the same time, looks significant and festive. Reminiscent of ethereal lace. It can be used to decorate even the simplest textile fabric.
The simplest hemstitch embroidery stitch, which even a beginner can master, is the “single twig” or “tassel” technique.
Let's try one master class to practice doing embroidery using the hemstitch technique.
Each stitch is done from the beginning on the left, moving to the right side. We start the seam by inserting a needle and thread from the front side, the left corner located at the bottom, one thread below the stitches. Grab a bunch of vertical threads from the back. Then, we insert the needle from below, on the right side of the first bunch made, and pull it out to the front side. Do these manipulations for the entire length of the hemstitch, and you will get the first tier of vertical columns at the bottom.
Read
Everything you need to know about embroidery accessories
If you make such a hem on the top of the strip, doing everything in the opposite direction, you will form a hem with the so-called “double twig”.
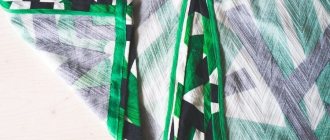
Methods and examples of the hemstitch technique can be viewed in the presented photos, consisting of several combinations.
You can gain your first skills in the hemstitch technique by reading a master class or lessons. But in order to consolidate the material, it is better to look at photos and videos that provide a clear example. For those who want to master more complex options using the hemstitch method, such as “panka” and “lyakhovka”, it is necessary to take lessons from a master of this craft. You can practice using video material.
Complex hems
A complex hemstitch differs from a simple one in that the embroidery occurs on several elongated strips without horizontal threads . There is more room for creativity here, but first you need to master simpler motifs.
The threads must be pulled out in a certain order. For example:
- Remove 3, leave 2.
- Remove 4, leave 3.
One of the patterns that can be made based on simple columns:
- Prepare the fabric according to the algorithm as described above, choosing yourself how many threads to remove.
- Sew all rows with columns (twigs).
- Take a thread of a different color, perhaps thicker than the one used to make the stitches.
- Connect 2 twigs across a row.
- Sew another row of posts
The “ Lyakhovka ” pattern is performed as follows:
- Remove 2 horizontal threads and stitch in stitches.
- The next 4 threads need to be skipped and 8 horizontal ones removed.
- Make a bias stitch highlighting 2 columns of 4 threads.
- Pass the needle through the next 8 threads so that the working thread is on top.
- Pull 8 threads, bring the needle from top to bottom, leaving the working thread on the right.
- Insert the needle under the thread. Continue in the same way until the end of the row.
- Pull 8 threads, skip 4 and pull 2 more. Pull 8 threads to the left.
- Pass the needle from above and inject from the side. Insert the needle down the hemstitch and select the next 4 threads.
- Work 4 more threads and stitch to the end of the row. Make the bottom row of columns and call it a day.
The " Flashlight " hem is a difficult pattern to perform. To implement it, the canvas is prepared as follows:
- Pull out 7 - 8 threads, leave 3 threads in the middle and then remove 7 - 8 threads again. One-sided twigs (tassels) are sewn in each gap.
- One flashlight requires three ready-made twigs.
- When the fastened thread is on the front side, you need to skip the first twig and insert the needle under the next 2, pull the needle to the front side.
- Make a loop from the working thread and pass the needle under three twigs, tighten the thread in the center.
- Turn the embroidery over and pull the thread under the three threads in the center of the embroidery and tighten it.
- Repeat with the next three twigs. And so on until the end of the row. After turning in the opposite direction, make symmetrical stitches in the opposite direction.
What is hemstitching
Hemstitching is openwork embroidery in the form of a strip, which is performed along the threaded fabric. To perform hemstitching, threads are pulled out of the fabric in only one direction - along the warp or along the weft. The loose (remaining) threads of the fabric are combined into bundles. Depending on the nature of the arrangement of the beams and the method of securing them, the hemlines are called simple, complex, narrow, wide and multi-row.
Types of hemstitches
Simple ones include a tassel, a post, a split, a panka, a sheaf in two or three columns, a spider, flooring, etc., and the complex ones include warp hems. Let's look at how some types of hemstitching are done...
Hemstitch tassel
A tassel hem is usually used to hem the edge of embroidered items or combine it with others in multi-row hems. In terms of technique, tassel hemstitching is the simplest.
Loose threads are collected into bundles on one side only. To do this, from two to five threads are removed from the fabric at the edge of the scar prepared for hemming the product. Then, having secured the thread at the edge to be hemmed, from left to right they grab several free threads in the pulled strip and, wrapping them around them from right to left, tighten them with a loop.
Having secured the loop, pass the working thread through 2-3 threads of the edge being hemmed, and reinsert the needle into the pulled strip to capture the next free threads. The progress of the working thread is repeated.
Now we'll see everything. I took a small piece of white fabric. For hem I pulled out 6 threads. I take a needle and a bright thread for clarity. In general, more often the working thread is taken to match the color of the fabric.
To ensure that no knots are visible in our embroidery when tightening the first hem stitch, we need to make a double knot of the working thread. And I start embroidering.
Hemstitch column
The hem stitch is done in the same way as the tassels, only bundles of fabric threads are wrapped around both sides, forming posts.
For a narrow hem stitch, no more than 3-4 threads of fabric are collected into bunches.
Colored hemstitch is used to make a regular hemstitch more elegant. Using a skein of colored threads, make a stitch up along the column and, going back down, tightly wrap it around it along with the stitch. To move to the next column, make a horizontal stitch along the bottom edge of the hem from the wrong side. Then the course of the working thread is repeated.
Merezhka split
One edge of the pulled strip is gathered into bunches in the same way as when hemming a tassel, but always with an even number of threads of fabric: four, six, etc.
When sheathing the other edge, 2-3 threads of the previous column and 2-3 threads of the next one are pulled into bundles, as shown in the figure. Thus, each column is split in half.
Merezhka sheaf
First, make an ordinary hem stitch. Then, at the beginning of the hem, having secured the working thread on the fabric, with the seam forward, the needle is grabbed from left to right by two columns and pulled together with a loop, as shown in the figure.
To ensure that the thread does not move and lies exactly in the center of the sheaf, two knots are made. In this way you can tighten two, three, four columns. However, when pulling together several columns, the width of the pulled strip should be larger so that the fabric does not deform when pulled together.
When receiving sheaves of three columns, first two are grabbed with a needle, and the third lies on the working thread. Then, from left to right, grab three columns with a needle, make a loop and tie it with a knot. To avoid the appearance of a horizontal thread in the center of the hem, the working thread from the knot of the resulting sheaf is pulled downwards along the wrong side, secured to the fabric at the edge of the hem and again raised to the middle along the adjacent column.
Merezhka leno
First, we hem the column, then cross them in pairs, first grabbing the second column with a needle, then the first, and swapping them.
Merezhka goat
As in previous cases, the hemstitching is performed first. Then they begin to combine two columns together into two rows. To perform such a hemstitch, two adjacent columns are tied together with a working thread at the top, as shown in the figure. After this, the working thread is lowered down and two more columns are combined with a knot, one being taken from the previous bundle, and the other from a nearby free column (see figure).
As a result of double combining of columns, a pattern is obtained in the form of a narrow lattice with diamond-shaped links.
Merezhka spider
The spider hem is a sheaf hem in three columns. A special feature is a wicker disk - a spider, located in the center of each sheaf. A spider is obtained by alternately moving the working thread above and below the posts around the tightening knot, as shown in the figure.
The spider is finished with stitches from the wrong side and then the working thread is led to the next group of stitches.
Merezhka flooring
The flooring is also hemmed in the same way as a column, only wider; a wider strip of 10-12 threads of fabric is pulled through.
The pattern is laid out in a certain order in the form of rhombuses, squares, zigzags.
This is done like this: with a soft thread, white or colored, the adjacent columns are intertwined with a darning stitch. To do this, the working thread is led from left to right, picking up one stitch on the needle, the other under the needle. When the working thread is reversed, the stitches are threaded onto the needle in the reverse order. Each new row of stitches is pressed against the previous one, resulting in a dense ribbed surface.
Hemstitch in attachment
This hemstitch is based on the same column. A white or colored working thread is loosely laid over 5-8 columns. When it moves back, attach the free-lying section to the hemstitch posts. Then the course of the working thread is repeated. The result is a white or colored square, rectangle or rhombus with small gaps.
Patterned cuts in the flooring and in the attachment can be used in single hems, but you can combine them with a light pattern, such as hemstitch sheaf, goat, split, etc.
Sometimes the edge of the hemline can be emphasized with a wide raised white or colored stripe, for example, a pigtail.
Punk hem
The tassels of two adjacent hemstitches are simultaneously pulled together with punk - one at the top and the other at the bottom.
Panka is made as follows: a working thread is secured between two strips of threaded fabric, then the remaining threads of the fabric are covered with a working thread from the bottom up. After this, the needle passes down to the right diagonally, goes up, tightening the bun, and again goes to the wrong side, as shown in the figure.
After this, the working thread is led up diagonally from left to right, first wrapping around a group of threads from the top row. To proceed to the formation of the next cells, the working thread is drawn from top to bottom diagonally from left to right, while wrapping around the remaining strip of fabric. Then the stroke of the working thread is repeated.
Panka is used in multi-row hems for covering the edges of wide hems. Multi-row hems consist of a number of narrow and wide hems, the combination of which depends on the nature and purpose of the item: tablecloth, curtains, towels, blouse or nightgown.
Combining several types of hemstitches
Patterned cuts of hemstitches combine them into a single decorative composition. In accordance with the intended composition, first pull out the threads from the fabric (for narrow ones 2-3 threads, for wide ones 7-9). Then the loose threads of the fabric are separated into bundles, as is usually done in hemstitching. However, if two hemstitches lie close enough, you can pull together bundles of their threads using punkka.
The edges delimiting multi-row hems can be finished with decorative seams. A thick colored working thread is secured at a distance of 6 threads from the drawn strip. After this, retreating 4 threads to the left, the needle is inserted into the threaded strip and, grabbing 8 threads from below, it is returned to the place of fastening, tightly tightening the bundle.
To get the second stitch of hemstitch, the working thread is passed along the wrong side parallel to the edge and through 8 threads it is brought out to the front side of the fabric, etc. When all the hemstitchings are disassembled into posts, cuts are applied with white or colored threads, dense patterns from the flooring and fastening are combined here with lungs such as spider, goat, sheaf, etc.
Very often, hemstitching is combined with various decorative seams. And it turns out to be such beauty.