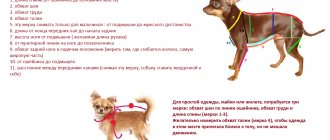
A knitted vest is an integral part of the wardrobe of every girl or woman. Some fashionistas have a lot of sleeveless vests in their collections, which allows you to create great combinations of clothes, combining them with different blouses, skirts and trousers. Sleeveless vests can be worn not only in winter and autumn.
They are also worn in spring and summer if they are knitted from cotton or other light threads. If in the cool season vests serve for insulation, then in the summer they complement the image and create a clothing style. Not so long ago, various models of vests that have an unusual shape or are shaped in an unusual way became popular, and today are at the peak of fashion. This is the so-called transforming vest. In this article we will try to look at some models of transformer vests, their diagrams and patterns. In addition, we will look at the technique of knitting them.
Vest "Shifter" with openwork edge
This vest does not have a specific top. It can be worn with the openwork edge down or up.
This is what this transformer looks like when unfolded. It is absolutely simple, and all its charm lies in the beautiful decoration with leaves.
It is classified as transformable because it can be worn upside down or upside down, or pinned in different places, at the waist or chest. This is a model that you can experiment with. This product must be knitted with very thick yarn. Otherwise, the sleeveless vest will not fit well:
Read
Simple knitting patterns for button-down blouses
A dense thread is especially important for knitting leaf edging. It must be rigid and voluminous to have an ideal appearance. This transformer must be performed across the canvas. One edge is edged with the “Rice” pattern.
On the second side a pattern of leaves is knitted. The thick yarn makes the item heavy. It is quite rigid, so it holds its shape well. The entire central zone is knitted in the Garter Stitch pattern. Holes for the hands are made in the right places.
Changeling vests can be knitted in different knitting patterns and with different edge designs. Here is another photo of MK knitting such a vest:
Felting a transformable vest. Part 2
I bring to your attention a master class on making a transformable vest. In the first part, I went into detail about the construction of the pattern and the materials that I use when felting.
This block will be entirely devoted to laying out the wool and felting the product itself.
I always start the layout from the back. This allows me to decide on the number of layers and the colors of wool needed, without being distracted by the decor. First, use a spray bottle to spray the surface of the pattern with plain water. This will fix the viscose fibers and prevent them from moving.
The fibers should extend beyond the edges of the template. While laying out the viscose, I wet the surface of the template several times, directing a stream of water from the spray bottle upward so that drops of water freely fall down and crush the clouds.
Let's start laying out the wool. After experimenting with the direction of the fibers, I came to the conclusion that the best method would be one in which the top layer (front, finishing) has a vertical direction or is evenly laid out like a ladder (parquet layout). With a horizontal finishing layer in the finished product, we can get a not entirely aesthetic effect when one shelf is darker than the other. The same effect is observed with a vertical layout if the direction of the fibers is changed in some part. For example, we laid out wool, placing the thin ends of the strands at the bottom, overlapping each subsequent row, the thin ends always remained on top, and the thick part of the strand went up. Gradually moving along the pattern, we laid out part of the template like this. And then it’s uncomfortable, the hand can’t reach well. Standing on the other side of the table, we continue the layout that is convenient for us. Now this part seems to go towards the previously posted one. With this approach, in the finished product we will see a clear line of different refractions of light. And if we don’t need such an effect, we will have to find a way to lay out the wool in one direction.
Since the vertical finishing layer looks the best in the finished product, and for uniform shrinkage the number of layers of wool should be even, the very first, the back layer of wool should be horizontal. Strands of wool extend beyond the edge of the template, just like rayon.
The second is the vertical layer. We lay out both of these layers from finer wool. This vest will be thin, so we can get by with two back and two front layers of wool. And between them is a layer of viscose.
We again treat the surface with water from a spray bottle and prepare the field for viscose.
And now, attention! We planned to make a belt as well. And it should hold its shape well, be resistant to creasing and twisting, and should not stretch, that is, it should be thicker than the main fabric. I'm posting it below.
In place of the proposed belt, I additionally lay out 2 layers (horizontal and vertical) of wool.
And I cover it with a layer of viscose (only the belt).
Now it's time for the front layers. I really wanted to get an interesting surface. So that a darker layer of wool evenly appears from under the top layer to obtain a melange effect. That's why I used plum carding. It is darker than the main color of the product, but fits well into the chosen berry color scheme. Carding can be laid out in different ways: layered into thin layers, or in the same way as we use wool in a ribbon - we pull out thin strands. I love the second method. It allows you to distribute the material evenly, and the strands are simply weightless (this is an additional plus for those who have difficulty with fine layout).
And finally - the finishing (final) layer, which I laid out from thin Australian wool in the color of red onion.
Cover with a mesh, saturate the wool with soapy water (see preparation in Part 1), rub well so that all layers are saturated and carefully remove the mesh.
Cover with film and press it against the wool so that all air bubbles come out, but the layers of wool do not move. And we begin to work with the vibratory sander carefully, pressing the wool pointwise, rearranging the sole of the machine in steps, slightly overlapping the previous step.
We remove the film and go through the entire template with the same step-by-step movements. You need to work carefully, staying in one place for several seconds (I count to 5). This is how we carry out the primary adhesion of the wool to the surface. If you leave a running machine in one place for a long time, it will pull nearby layers of wool under its sole, forming unnecessary compaction in the place of work and holes along the edges. Having stabilized the top layer, we can apply smoothing movements with a machine (like an iron). The goal of this stage is to evenly wet all layers of wool and adhere the top layer. The entire stage of working with the machine should take no more than 5 minutes. This is only a preliminary stage. We will process the canvas longer later, when we lay out all the parts of the template.
Turn the template over to the other side. Now we have to work with the shelves, and the back will lie below.
If we remove the pattern, we will see the inside of our vest. At this stage, you can also add viscose if it is not enough, and take this into account when laying out the shelves. Please note that at this stage we do not fold the edges of the back onto the template if we want to get a beautiful back.
Similarly, lay out viscose, 2 layers of wool and again viscose for the shelf. But we go beyond the edges of the template only where there is no back (part of the shelf with fringe, sewn part of the template). Where the shelf connects to the back (part of the top, the entire side and part of the bottom) viscose and wool are laid out strictly along the border of the template. We don't need any thickening. And only after this stage do we wrap the protruding parts of the back onto the template. The corner can be cut off so that the final thickness of the canvas in this place is uniform.
In this photo you can clearly see the part of the shelf on which the back is wrapped, and the free part. We lay out the belt and the next layers, but without going beyond the template, but lay the wool to the level of the folded edge. In general, we carry out all the stages up to turning over part of the template. But now we will cover part of the pattern with an additional piece of film so that the parts of our pattern do not fall apart against each other.
We turn over part of the template and carry out all the necessary steps.
Let's start decorating. I decided to place a leaf pattern on the right shelf (the one that will be the top one when the product smells). Natural silk is best suited for these purposes. A sparse one falls easier than a denser one. I don't overlap the edges of the silk with strands of wool; I like the design to have a clear outline. The most important thing at this stage is to correctly determine the position of the pattern, because the belt and fringe will still be cut off.
Here I tried to indicate the approximate location of the belt and fringe. Having laid the pattern, we once again cover everything with the mesh and rub the silk through it. Then - with a machine through film and without film.
After all our torment, we have a template, wrapped in wool on all sides, opening like a book. Now let's move on to the main stage of machine felting. I “iron” the entire template from different sides and in different directions for about 30 minutes. I bring it to a semi-felt state. All the fibers and the pattern are carefully attached to each other and no longer move apart. I never use excessive force when working with the machine. The pressure is only what the VSM itself has. If something doesn’t want to fall down (suddenly the silk turned out to be not natural, or natural, but very dense), I baste it with thread, which I remove after finishing the work. This significantly saves time, nerves and the service life of the machine.
A very important stage has arrived - removing the vest from the template.
We make a cut along the top line, along the bottom line and along the line where the fringe combines (2 horizontal cuts and 1 vertical).
Using some caution, we remove the vest from the template and check the reverse side for holes and unsightly fibers.
The picture shows the fold. At this stage, you can still felt viscose or wool fibers in the right places. Again we go through the entire vest with the machine from the inside out. Right before your eyes, the fibers will be attracted to each other and shrinkage of the fabric will immediately become noticeable.
Now it’s the turn of the belt to become an independent detail.
For now, let's put it aside and work on the fringe. Fold the vest so that the panels are aligned with the wrong sides facing each other. We simultaneously cut both shelves into strips approximately 1-1.3 cm thick and 10 cm long, and roll each into flagella on the mat.
Then I felt by lightly tossing and rubbing the fabric between my hands. At the same time we eliminate any holes that appear.
You can remove such a defect with your hands, rubbing the canvas between your palms. Or with a machine - we put the machine down and, without lifting it from the canvas, let it run for 20 seconds.
The machine is very convenient for aligning the edges of the product or, as in this case, the distance between individual flagella. On the left is the untreated part, on the right (more soapy) is after the machine has been running.
Sections require additional processing. To do this, we place the machine at an angle and, as it were, run over the edge, forcing it to align and compact.
I used arrows to show the direction of movement of the machine.
Then we felt the canvas until ready in a way convenient for you. You can roll it on a tube or without it, or throw it up. For this stage, it is important to constantly monitor the degree of readiness of the canvas. Light will be our best helper.
Hold the canvas up to the light and see where extra effort is needed. High-quality felt is characterized by uniform transmission of light rays.
I continue the felting process until a characteristic pattern appears on the surface. From time to time I try it on a mannequin.
This hanging part in front is the future collar.
When we have felted the fabric to the desired size, it is time to cut out the armholes.
For convenience, we tighten the collar with an elastic band so that the front shelves fit into the wrapper. I draw the outline of the future armhole directly on the mannequin. We remove the vest from the mannequin, fold it so that our design is on top and cut out the armhole. If there is no mannequin, then to mark the armhole you need to measure the width of the back and, based on this measurement, mark the location of the cut. Do not immediately make a large hole, it already tends to stretch.
The cut should be rolled between your palms or on a mat so that there are no protruding hairs and the edge is formed into a clear line. At this stage, you can stop rolling the product and leave it as a rectangular sheet. But according to reviews, few people wear a vest “upside down,” and they rarely even wear it with the wrong side up. Therefore, I suggest additional fitting of the vest in the neck and shoulder area. This will, of course, reduce the number of possible wearing options, but will significantly improve the fit. I roll the vest so that I can roll up the small area between the edge of the collar and the armhole.
With a few movements we will mark the shoulder line. This will prevent the vest from slipping and will improve its appearance from the back. Sometimes additional fit along the chest line is required. To prevent the armhole from becoming too puffy, you can reduce its size by gathering and rubbing the edge, and slightly stretch the shelf in the chest area.
Of the water procedures, I use only 2: I wash off all the soap solution with a shower head and rinse the product with fabric softener. At the same time, I don’t throw the product, but I’m not too delicate with it either. The item should be easy to use. Water is at a comfortable temperature for the body or a little hotter. I'm good at twisting.
And then I put the vest on the mannequin, add the scent, rub it in again, and adjust the area of the shoulders and neck.
If there is no mannequin, outside help is needed, because It is very difficult to sit back on yourself on your own. The vest remains in this form until completely dry. Then - ironing with a steamer. At this stage it is important to achieve symmetry of the shelves. We even out the length of the fringe with scissors. Using an iron, remove the wavy edges on all sides except the collar. After additional shrinking, the edge of the collar should be wider.
And here we have a finished vest. If you look closely, you can see lines of carding breaking through the thin, lighter wool.
I’ll tell you how to finish the belt and make a brooch in the next part.
Gray transformable vest
This vest has such an unusual design that it can be worn in three different ways. At the same time, it always looks great, even if worn inside out or upside down. If the first photo represents a general view of the transformer with knitting needles, then in the second photo you can take a closer look at its design:
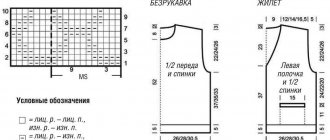
In this image you can see that in the shoulder area there is a slope that forms exactly the line of the shoulders. The armhole line is decorated and tied with another relief, garter stitch. The armhole is very deep and just short of the waist. This vest is made in one continuous piece. It starts from a vertical stripe on the front shelf and continues like a scarf. On one side the binding is knitted with the Rice pattern, and on the other side the “Chess” pattern is knitted, and then the binding. As for the pattern of this model, it is a rectangle. The peculiarity of knitting is to make short rows near the armhole, which will narrow the product at the waist, and narrow the collar near the shoulders:
The presented diagrams show exactly how to perform shortened rows with knitting needles:
Stylish model in gray color
This vest will look especially beautiful if it is made from natural cashmere yarn. Since the model has no seams, it can easily be transformed into a warm, voluminous scarf if desired.
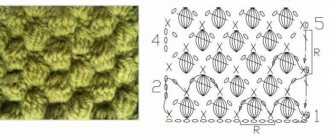
For knitting we will use this pattern:
We begin the simple manufacturing process. We will need knitting needles number 3.5-4 mm. We cast on one hundred and forty loops (for the largest size according to the pattern).
We knit the first row with purl loops, in the next row we distribute them as follows: 20 garter stitches, two purl, eight garter stitches, 2 purl stitches, 8 garter stitches again, 10 braid loops “A”, forty garter loops, 10 braid loops “B”, 8 scarf stitches, purl 2, again 8 scarf stitches. and purl 2, 20 stitches in garter stitch.
Having knitted about 46 centimeters or 189 rows with a pattern, we move on to knitting the armholes. To do this, cut 12 loops on each side once, then gradually make nine cuts one loop at a time. In order for the cuts to fit organically into the pattern of the fabric, we knit two loops together with a slant to the left on the right side, and on the left - with a slant to the right.
Next we knit another 94 rows (about 23cm), slip the remaining loops onto an additional knitting needle.
For the shelves we cast on 90 loops. 1st row – purl. Next, we knit the pattern according to the description: 20 stitches using the garter stitch method, 2 purl stitches, 8 garter stitch stitches, 2 purl stitches again. and eight scarf stitches, 10 “A” braid loops and forty scarf stitches. We shorten the loops in the same way as on the back, knitting 23 cm, and remove them onto a separate knitting needle. An important point: on the right shelf we perform the braid according to pattern “B”, and on the left - according to pattern “A”, so that the pattern is symmetrical.
Article on the topic: Crochet summer cardigans for obese women with patterns and descriptions
Let's start knitting the hood. To do this, on the back and shelf we separate 30 loops from the outer edge and, combining them, close them. On the knitting needles we cast on 38 loops from the back, one loop of the shoulder seam and 39 loops from the left front panel. Then we knit 174 rows with garter stitches.
For the second half of the hood, take 40 loops from the right front and 38 loops from the back fabric, knitting a fabric 42.5 centimeters long. The last row is to tie the halves of the hood, closing the loops. At the end, we connect the side seams and knit a belt with a “braid” pattern. Its length is 1 m 60 cm. The universal vest is ready!
The simplest knitted transformable vest
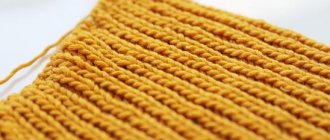
This original transformable vest is knitted according to a pattern that is an irregular polygon. The model will look most advantageous and interesting if knitted from wavy fantasy yarn. In the photo you can see the pattern with a large elastic band, and this knitting looks great.
Read
Knitting openwork and jacquard pattern Snowflake
Another model is also very easy to knit. To work, you will need cotton and polyester yarn in any color you like, as well as number eight knitting needles. Garter stitch is performed as follows: purlwise. and persons Only faces should be knitted in rows. loops. The knitted density of the product is 15 p. per 28 r. equal to 10 by 10 cm.
For the back, cast on eighteen links and knit 38 cm in garter stitch, and then bind off the buttonholes. For the front part you need to cast on 55 stitches and also knit the pattern described above. After six centimeters for the holes, you need to close from 34 sts to 41 sts. And in the new strip, instead of these that were closed, dial new sts. After forty cm, you can close all the remaining links.
For the right sleeve with a visual scarf, cast on 36 sts and knit 150 cm with a garter pattern. After this, finish knitting. All that remains is to assemble the transformer vest. The back should be sewn to the front of the product. Do the same with the scarf; it is also sewn on. Eventually you will see holes forming for your arms.
Another vest has a very unusual style. It is made with the simplest knitting of thin threads:
The original model consists of three separate parts, the pattern of which is shown in the photo:
Dimensions in the drawing are in inches. To calculate the dimensions of the pattern in centimeters, you need to multiply these numbers by 2.5.
Knitted vest for women, models from the site knitka.ru
Knitted women's vest from Svetlana Shevchenko
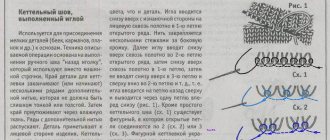
Pure wool vest, size 50-52. Fastening with knitted buttons arranged in two rows on a wide placket, knitted with 1x1 elastic. The neckline and sleeve armholes are also made with 1x1 elastic and are attached to the product with a kettel stitch. Pattern diagram for
Read more…
Knitted vest from Svetlana Shevchenko
Vest with dropped armhole, size 46, knitted with a “squares” pattern from sectional yarn in the color of baked milk. The pattern is double sided. The strips are made with 2x2 elastic. Pattern diagram
Read more…
Vest Bright turquoise from Elena Petrova
Model “Bright turquoise” (BAMBINO 25% wool, 75% acrylic, 130 m, 50 g. (9014 BLUE TURQUOISE). In this order, I tried to embody an already known idea, adding my own touches: such as an openwork elastic band along the contour
Read more…
Fashionable long vest, knitted
The fashion for elongated models prefers soft, flowing shapes. This vest with a voluminous collar can be perfectly combined with any items and always allows you to look fashionable and modern. Size: S-XXL.
Read more…
Knitting patterns for a vest from Valeria
Good day to all. I had a sweater like this, but unfortunately, I grew out of it. I didn’t feel sad and gave the threads a second life. The threads are p/w, warm and not “prickly”. I took knitting needles No. 7 (according to
Read more…
Knitted sleeveless shirt from Svetlana Shevchenko
Pure wool vest with the addition of angora, size 40-42, made with a relief Aran pattern. The back is plain, also knitted with a relief “sand” pattern. The strips are made with 2x2 elastic and attached with a kettel stitch. Description of the “sand” pattern: Row 1: *K1, P1*, repeat from *
Read more…
Knitted vest with pins from TatVen
It took exactly 4 skeins of Alize Midi. At 100 degrees, 170 meters. This is the kind of plump yarn that should be used for this wonderful vest. Since it is knitted with an ordinary elastic band 2*2.
Read more knitting patterns...
Knitted vest from Irina Stilnik
My last related work this year. I used Alize Superlana Tig yarn, 25% wool, 100g/570m. Knitted in 2 threads, knitting needles 3.5. Size 52-54, yarn consumption 500g (a few meters left). The vest is too big for the mannequin, it fits on the customer
Read more knitting patterns...
Knitted vest with openwork pattern, corner fabric
A one-color vest model in which openwork and dense stripes and the “corner fabric” technique are used. For the work we used bleached hand-spun wool 300m/100g, yarn consumption about 300g, knitting needles 2.5 and 1.5. Corner neck, no shoulder seams, armhole
Read more diagrams...
Knitting patterns for a yellow vest
Vest size: 38/40 (42/44). Materials Gedifra Top Soft yellow yarn 400 (450) g, lilac, apricot, blue and pink colors, pair of knitting needles No. 5.5, sock knitting needles No. 5, 5, hook No. 5. Types of knitting: stockinette stitch, mimosa pattern (knitted on number
Read more…
Knitted vest with eye-catching pattern
Size: 38. For knitting you will need: yarn (50% wool, 50% acrylic, 250 m/100 g) – 350 g gray, circular and straight knitting needles No. 3. Rib 1×2: knit knit 1 alternately. p. and 2 p.p. Density
Read more…
Knitted vest using patchwork technique
Patterns knitted using the patchwork technique usually consist of geometric shapes of different shapes. In this case, these are long stripes. They are knitted separately from each other and joined together during the process of assembling the vest. Patchwork – original
Read more diagrams...
Blue vest for women knitted with patterns
Vest sizes: 36/38-40/42-44/46. For knitting you will need: Sublime Organic Merino Wool dk yarn (100% wool, 105 m/50 g) -350-450-450 g blue, knitting needles No. 3 and 4, 1 button. Knitting density
Read more…
Knitted vest with voluminous collar
Sizes: 36/38 (P1), 40/42 (P2), 44/46 (RZ). You will need: Lena Grossa yarn 8/9/10 skeins Carezza (45% silk, 30% alpaca, 25% merino wool, 140 m/50 g) gray; straight knitting needles No. 5.5 and No. 7; circular knitting needles
Read more…
Transformable vest made of knitted scarf
A very interesting transformer model, which is made up of a back knitted according to a pattern, as well as a beautiful scarf. The scarf is knitted with a beautiful twisted pattern. Its width should be 108+10 centimeters (cm):
You can knit it by following the master class:
Read
Detailed description of knitting raglan sleeves from the bottom and top with knitting needles
Knitted men's vest
Men's sleeveless vest with knitting needles from Svetlana Shevchenko
Gray men's vest, size 54-56, knitted with an “arana” pattern, which turns into a decorative rib at the bottom. The armhole and neck trims are made with 1x1 elastic. The vest is knitted according to a pattern from the Internet. Start working from the bottom with a 2x2 elastic band, alternating with “braids” of 3x3 loops.
Read more diagrams...
Knitted vest for a boy
Vest size: 6 years. For knitting you will need: 250g of blue yarn Mondial Cometa (100% cotton, 125 m/50 g); knitting needles No. 3 5 and No. 4 and 2 auxiliary knitting needles No. 4; detachable zipper 44 cm long. Double
Read more…
Vest for a boy from Irina Stilnik
The baby vest is knitted for a 12-18 month old baby, size 86. I used “Yarnart baby” yarn, 50g/150m, 3.0 knitting needles. Thread consumption 150 g. Good luck and good mood, thank you for stopping by... Vest knitting patterns and pattern:
Read more…
Knitted spring vest for a boy
Spring vest for a 3-year-old boy – Anastasia’s work. Medium thickness yarn (50% wool, 50% acrylic). Description of the vest: Before: cast on 93 loops on the knitting needles and knit with an elastic band of 5-7 cm. Continue knitting with large pearls 8-10 cm, and then
Read more…
Knitted vest with patterns
Vest size: 56. To knit a vest you will need: 450 g of blue wool yarn (100% wool) and 8 matching buttons. Knitting needles No. 4.5. Res. 2x2: elm. alternately knit 2, purl 2. Out. R. elm. By
Read more diagrams...
Knitted children's vest from Irina Stilnik
A vest with a Teddy Bear is knitted as a gift for a two-year-old child, knitted from “Kartopu Race” threads, 100 g/300 m, using 3.5 knitting needles. Yarn consumption up to 130 g. Description of work: I started knitting the back and front with a 1x1 rib, cast on 61 stitches, then evenly,
Read more diagrams...
Knitted vest with diamonds for boys
Vest size: for 2 years. You will need: 100 g of blue yarn and 50 g of white and blue yarn Mondial Delicata (100% merino wool, 215 m/50 g); knitting needles No. 2.5, No. 3. Double elastic: knit 1. P.,
Read more…
Classic vest with unisex knitting needles
Classic vests with clear embossed patterns made of soft sheep's wool are very comfortable and functional. They can be worn both for special occasions and for everyday events. The vest can be knitted for a boy or a girl. Dimensions: 110/116 (122/128) 134/140. To knit a vest you will need: 200
Read more…
Knitted red sleeveless vest
Vest size: 1-1.5 years. To knit a vest you will need: medium thickness yarn (100% acrylic): 100 g red, 30 g blue-green. Knitting needles No. 3,5 and 4. PATTERNS Elastic band 1 x 1, purl stitch (purl stitch). Fantasy pattern: by
Read more…
Vest with braids knitted
Age 12 years. You will need: 300 g of yarn (100% acrylic) of medium thickness green. Knitting needles No. 5 and 5.5. PATTERNS Rib 1×1: knit alternately 1 knit, 1 purl. Out. R. knit according to the pattern. Knit stitch (knit stitch): knit.
Read more…
Rectangular transformable vest
This rectangular transformable sleeveless vest will appeal to many fashionistas. It is very useful when putting together different sets of clothes. This detail is very functional in any wardrobe. She will add a new touch to the classic style of clothing. This vest is knitted using a simple garter stitch pattern. Here you will need to combine two colors of yarn at your discretion. You can put on a sleeveless vest in two different ways, that is, with the light side up, or the dark side up. The combination of two contrasting shades will emphasize the beauty and unusualness of this model. If you lay out the transformable vest on a horizontal surface, you will see that it has the shape of a rectangle with two holes for the arms, that is, with armholes:
DIY transformable vest
You can knit a transforming vest with knitting needles yourself, and the description of the work progress presented in this article will help you with this. This thing is very original, unusual, and most importantly comfortable and functional. When creating a transforming vest, you have the opportunity to show your imagination.
The photo shows a model of a transforming vest, which we will study in this article.
Photo instructions with descriptions for knitting unusual transformer vests
Watch the video
This innovation will allow us to publish diagrams from emerging magazines without delay, simultaneously with the appearance of the magazine for sale on newsstands, and not with a delay of several months, as is now the case. Postcards is a reborn catalog of postcards for all occasions. I am a photographer - a plugin for publishing photos in the user’s diary. You can cast on any number of loops so that the width of the product matches the circumference of your hips, and the middle part can be made to any length sufficient to wear the vest in different ways. A rectangular transformable vest is a functional and undoubtedly useful item for your wardrobe. Left edge - from the broach we knit one knit stitch, then three garter stitch stitches and an edge. The conflitto transformable vest from filato is knitted very simply using stockinette stitch from section-dyed yarn, and looks modern and interesting.