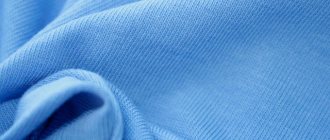
A turtleneck is a basic item in the wardrobe of not only adults, but also children. With this element you can keep warm by wearing it under a cardigan, shirt or sweater. Turtlenecks look beautiful worn under a vest or overalls. Women often wear them with a sundress. This product is comfortable and practical to wear. In the off-season and changeable weather, it is more difficult to catch a cold in your throat in a turtleneck, because it is covered with a high, tight-fitting neckline. Sewing a turtleneck with your own hands is not difficult.
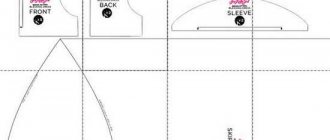
Turtleneck pattern
In order to draw a pattern, you will need measurements:
- Bust
- Waist circumference
- Shoulder length
- Neck circumference
- Back length to waist (from the 7th vertebra to the waist line)
- Hip girth
- Wrist circumference
- The length of the sleeve
- Length of the product
The height of the stand is arbitrary.
The knit turtleneck pattern below is suitable for sizes 48-50. (Or build to your own standards). If a smaller size is needed, you need to reduce the armhole line by 0.5 cm, and the side line and sleeve by 1 cm on each side.
You will need a rectangle for the neck separately. It is 0.5-2 cm less than the length of the neck. This must be done so that the neck is well covered. The width is double, since the part will be folded in half.
Allowances - they are not necessary if the fabric stretches well.
Men's turtleneck
We are sewing a men's turtleneck from fleece, it is possible not only from fleece, but we will consider an example from this fabric.
Technical drawing of a men's turtleneck
Technical drawing
Men's turtleneck made of fleece with a double neck, with a set-in single-seam sleeve. The bottom of the turtleneck and the bottom of the sleeves are finished with a hem.
Turtleneck pattern
We build the turtleneck pattern based on the free long-sleeve T-shirt pattern using the Muller and Son method. We use automatic construction. To do this, go to the “Long Sleeve T-shirt Drawing” page, indicate your measurements, and create a pattern. For more information on working with patterns, see the video.
Checking the pattern
To avoid mistakes and doubts about loose-fitting allowances, we check the pattern according to the main dimensions. I recommend checking: product length, sleeve length, chest circumference, shoulder seam length.
Constructing a collar-neck pattern.
We measure the neck of the shelf and back. To do this, place a measuring tape on the edge. The neck height is 10-12 cm. We build a pattern in accordance with the drawing below.
Head collar pattern
Decatation of fabric
You can read about different methods of decating in the article Decating fabric. Well, if you are too lazy to read, just push the fabric into the washing machine and wash it in the appropriate mode (for fleece, the “synthetic” mode).
Turtleneck cut
Let me remind you that the pattern is given without seam allowances. I stitched the parts of the turtleneck with an overlocker, so I made a seam allowance of 0.5 cm. If you use a sewing machine to sew with a knitted seam or a zigzag stitch, I recommend making a seam allowance of 1 cm and then cutting off the excess. Fleece does not fray, so it is not necessary to process the cuts. The hem allowance for the bottom is 2cm, but I recommend making it 3cm. After completing the seam, cut off the excess (it will take a long time to explain - you can take a piece of fabric to try and choose which option you like best).
I recommend marking the hem allowances before taking the scissors. This is necessary in order to avoid mistakes when cutting (for example, the mode is 0.5 cm from the line, we go to the bottom of the sleeve - the mode is further and Oh! %?&# we immediately need to step back 2 cm... it was).
Turtleneck cut
Assembling the product
7.1 Sew the back and front of the turtleneck along the shoulder seam.
We connect the front and back parts along the shoulder seam. To prevent the seam from stretching during wear, it is necessary to insert a lobe (a piece of fabric cut along the lobe thread) into the shoulder seam. We put a dolevik on the front part.
Turtleneck shoulder seam
7.2 We hem the bottom of the sleeve.
Fold in the hem allowance and secure with stitching. Here I would like to dwell on this line in more detail. In the original, the stitching is done with a special double needle for knitwear, but my machine (Janome w23u) sews with such needles with gaps. Or rather, cotton fabric sews normally, but knitwear and fleece have gaps. After numerous experiments with a household sewing machine, for hemming fleece products, I chose line No. 17, let's call it that (see photo).
Double needles for knitwear
Decorative stitch 17
This elastic stitching looks great on fleecy fleece.
Hem hem
7.3 Sew in the sleeve.
We sew the sleeve into the open armhole. At the same time, we take into account that on the pattern the shoulder seam is shifted 1 cm forward. Therefore, we shift the top of the sleeve cap by 1 cm towards the back.
We sew in the sleeve
7.4 Sew along the sides and sleeve.
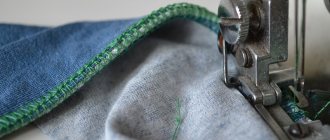
We combine the side seam and the sleeve seam and sew with one line. If you use an overlocker, use the advice on how to secure the overlock stitch.
7.5 We sew in the collar-neck.
We sew the neck detail along the side seam. We fold our “ring” into two and sew it into the neck. At the same time, combining the side seam of the collar with the left shoulder seam (asymmetry in clothing is usually performed on the left side).
7.6 Hem the bottom.
We bend the bottom (for details, see paragraph 7.2 of this article). This is the black turtleneck or men's sweater I got.
In conclusion, I can add the following: fleece retains heat well, at the same time it “breathes” well, is soft and elastic, the product does not stretch during use and does not wrinkle, so this product is comfortable to wear.
Cutting turtleneck details and allowances
The pattern is built without seam allowances, so after downloading the pattern for the turtleneck parts, you need to copy it onto another paper to add allowances.
The width of the allowances depends on the stitch width of your equipment, here you act independently. Cut out the parts in the quantity indicated on the pattern details.
Do not duplicate.
How to make a turtleneck pattern
The pattern of this convenient model is elementary and uncomplicated. Many craftswomen cut without it, making the necessary calculations and markings on the fabric. If you plan to repeatedly sew similar products for yourself or for a child in the future, then it is more convenient to have a paper pattern on hand. Then you won’t have to do calculations and drawings every time.
What measurements are needed
To build a children's or women's turtleneck, you will need to take the appropriate measurements.
- Semi-circumferences: waist, chest, hips.
- Circumferences: neck, wrist.
- Height: hips, barrel.
- Length: product, shoulder, back to waist, sleeves.
- Sleeve width (forearm circumference).
Creating a pattern for a women's turtleneck
The pattern of the back and front front is built inside a rectangle in a mirror image.
Back and front
- First you need to identify all the main levels. Measure 2 cm down from the top and draw a horizontal line. This will be the shoulder line.
- Measure down 20 cm from it, this will be the level of the armhole.
- Again, from this line you need to set aside the length of the back to the waist (approximately 42 cm) and draw a waist line.
- From the waist down we set aside the height of the hips, this will be the level of the hips.
Important! The hip line can match the length of the product or be higher. It all comes down to personal preference as to where you want your turtleneck to end.
- From the waist up, we set aside the height of the barrel minus 2–2.5 cm (approximately 22-2 = 20 cm) for the freedom of the armhole, and draw a horizontal line for the armhole.
- At chest level, along the back and the shelf from the folds, measure the half-circumference of the chest, divided into two plus allowances.
- We do the same with the waist and hips. Allowances should be 2–3 cm for a loose fit.
- Connect all the resulting points smoothly. This will create the side line of the front and back. (The diagram shows a sharper transition; this is not necessary for the pattern).
- From the top point on the left and right of the rectangle you need to mark the neck, measure 6 cm.
- Place 2 cm down on the back and 5 cm on the front. Connect the dots with smooth lines.
- Now you need to measure the shoulder measurement from the neckline to the sides at 12 cm and mark it with a dot.
- From there, lower the shoulder 1.5 cm down and connect it to the neck.
- From the shoulder point, draw a perpendicular down to the armhole level and connect to the side line. The result is an armhole line, but you need to mark this line more smoothly by cutting off a right angle.
Construction of the sleeve
- Draw a vertical line in the middle of the sheet. From the top edge we set the height of the rim down. It can be calculated using the formula: divide the length of the armhole by 3.14 . The armhole can be measured with a measuring tape (back + front). It is approximately 47 cm, so the height of the rim is 15 cm (47/3.14).
- Down from the very top, measure the height of the sleeve 15 cm and the length of the sleeve 65 cm. From the point of height of the sleeve, you need to measure to the left and right the width of the sleeve, divided by 2. Design the sleeve with a smooth line.
- Measure your wrist below. For example, if it is 18 cm, then 4.5 cm to the left and to the right. Connect the bottom and top of the sleeve.
Collar
The collar is cut in the form of a rectangle with sides 18 and 38 cm. Where 18 is the height multiplied by 2, and 38 is the neck circumference.
We sew a women's turtleneck from knitwear
First, we’ll deal with cutting out the main parts, and then we’ll move on directly to sewing; its principle is the same for a women’s sweater, a children’s sweater, and a men’s sweater.
Seam allowances
- Side, shoulder and sleeve seams - 0.5 cm.
- At the armhole - 0.5 cm.
- Along the sleeve hem - 0.5 cm.
- Neck sections are cut without seam allowances.
- Hem - 2-3 cm.
Uncover
- The back is solid without a middle seam.
- The shelf is solid with a bend.
- Sleeves - 2 parts.
- Collar - 1 piece.
You will also need an edge tape that matches the shoulder measurement on the pattern.
Sewing
Let's prepare the edge braid. Where can I get it? No, I won't say what you have to buy. They don’t sell it by the meter, but as far as I understand, there is no point in purchasing it in bulk. There is a solution, cook it yourself.
Any material is suitable for this, preferably, of course, cotton and not very dense. Every fabric has a selvage, which we all often throw away, but if you cut it before work, a full-fledged selvage tape will come out.
The trimmed edge, of course, is free-flowing, it is what will go under the stitching, but the secured edge remains open. This is how everything is solved without problems. Now that the edge is there, we begin sewing the shoulder seams. I grind everything down.
We connect the shoulders facing inward so that the shelf is on the bottom and the back is on top, and lay out the third layer of edge braid. To avoid shifting, pin everything across and in front of the paw and slowly remove them.
Under no circumstances should the edges be pulled. Correctly focus on the cut tape.
After stitching, press the seams a little and press them back.
We measure the armhole, trim the neck
Fold the product in half, strictly matching the seams and all cuts, carefully pinning it together, measure the armhole. The data obtained is necessary for constructing the sleeves. To take a measurement correctly, take a centimeter, place it on the edge, step back from the edge by 0.5 centimeters and take a measurement.
Three measurements will be needed:
- The length of the entire armhole is from side seam to side seam.
- On the back.
- On the shelf.
Write down the data and save it.
Now let's look at the neck. No matter how carefully you try to do the work, the machine will still stretch the seam a little, which is why the round shape is lost. It is advisable to correct this place with soap and trim it.
Cutting the sleeves
It is useful to learn how to build them, after they are cut out we are engaged in their manufacture. Don’t forget to put reference marks on the hem and armhole for more correct alignment.
Processing the bottom of the sleeves
First, overcast the bottom of the sleeve, and then bend it to the required amount and iron it. We will not mark the fold line, baste it, or iron it. Let's cut out a small template from cardboard. A simple stripe the same width as the hem.
You apply one side of it to the overcast edge, and fold it along with the template and iron it.
It’s not a complicated procedure at all, but it saves a lot of time. This treatment can be performed both before and after sewing in the sleeve.
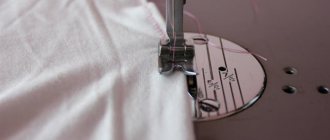
Let's start laying the finishing stitch. If you have a cover maker, then everything is great. If not, then use a double needle for a regular household machine or use a small zigzag or other elastic seam.
Sew in the sleeves
To do this, it is important to clearly align the shoulder seam and the edging point, the control notches, as well as the side seams.
We place the product under the foot so that the armhole is on top and the sleeve is at the bottom, then the machine will fit itself, because it will come out small. During the sewing process, do not pull anything, just hold it with your hands.
Sew the side seam
Before sewing the side edge, first of all we connect all the sections with the wrong side up. We clearly control the alignment of the stitching on the sleeves, as well as the seam - they must match perfectly. We cut and stitch on an overlocker.
We go over the seam with an iron, removing all elongated places, and then iron it to the back.
Fold the bottom
The principle of ironing the hem is similar to the sleeves, only this time everything will happen in a circle. It is important that the width of the allowance is the same everywhere.
All that remains is to do the finishing stitch. We must lay it from the front side.
Let's mark the neck
In order to easily sew the stand, you need to mark it. To do this, fold the product, matching the seams, divide the cutout in half and put marks.
The next step is to fold them towards each other, and mark two additional points on the folds. We will put similar markings on the collar, but a little later.
Cutting out the collar
Before you start drawing it, you need to measure the neck and then build a rectangle equal to the resulting one. Don't set aside seam allowances for now as we will need to make some minor adjustments.
Let's decide on the height. I won’t indicate a specific number, because everyone’s neck height is different, we’ll just measure it. Take a centimeter and find the jugular cavity. Measure the distance from it to your chin. Example: height - 7 cm.
Now think about what kind of stand you want, with or without a lapel. In the first case, the height that we determined is multiplied by four.
7 x 4 = 28 + 1 = 29
— height with lapel -28 centimeters and one for seams of 0.5 on both sides.
In the second case, we multiply the height by two.
7 x 2 = 17 + 1 = 18
— height without lapel is 17 centimeters and one for the seams.
We draw and cut, but that's not all. If you sew it in this form, it will end up wide on your neck, to prevent this from happening, do this. Bend the material heightwise and wrap it around your head, stretching it. Imagine that you are taking a thing over your head and it should go through. Where the fabric joins, draw lines with chalk - there is a seam.
Adjust it on the table and add 0.5 cm of allowance on each side. Now we cut everything out.
Sewing the product
Lay out the pattern so that the fabric stretches in width. Then you can achieve a good fit of the product.
Cut without allowances except for the gap for hems of sleeves and hem. If in doubt, make it, cut it out, baste the product and try it on. Transfer all the shortcomings to the drawing, correcting it.
- Sew shoulder seams.
- Sew the sleeves to the armhole, aligning the top point of the collar with the seam on the shoulder.
- Align the line of the bottom of the front and back and use one seam to sew the side seams from the bottom of the product to the bottom of the sleeve.
It is better to sew with a zigzag overlock stitch or directly on an overlocker. If you use a straight seam, it may burst under tension.
- Fold the bottom of the sleeves and the product and hem it on the cover stitch. Or a three-step zigzag if you don’t have the necessary equipment.
- The length of the collar must be folded inside out. Pin along the neck line, stretching it slightly. Sew on an overlocker or machine using an overlock stitch.
The turtleneck is ready. Can be worn.
The resulting base is universal. It also produces a pattern for a turtleneck dress. Simply increase the length and/or widen the hips a little. And if you attach the panties pattern, you get a combodress.
How to sew a women's turtleneck using a ready-made pattern
Overlay pocket. Apply braid to the mesh pocket piece along the upper side and machine stitch it. Place the pocket on the front of the product according to the markings and stitch without bending the edges, stepping back from the edges of the pocket by 0.5 cm.
Back. Sew a knitted braid onto the back (along the middle line). Sew the back and front along the shoulder and side seams. Place keeper tape in the shoulder seams when stitching (to prevent the seams from pulling out).
Collar. Sew the collar along the longitudinal side, fold it in half with the seam inward. Align the collar seam with the center of the back neckline and sew the collar into the neckline, stretching slightly with a four-thread overlock stitch.
Sleeves. Sew the sleeves at the seams. Cut 2 pieces of braid, each 11 cm long. Baste one end of the braid along the marking to the front side along the bottom of the sleeve so that the front side of the braid is directed upward. Fold the allowances at the bottom of the sleeves along the Sleeve Hem Line mark and stitch them on a cover machine (or on a regular machine with a double needle), slightly stretching the edge of the hem (at the same time you sew one end of the braid to the sleeve). Bend the sleeve cuffs upward according to the markings, hem the upper end of the braid to the cuff from the inside by hand.
Turtleneck "June". Instructions for sewing and printing patterns
JUNE TURTLENICK
INSTRUCTIONS FOR SEWING AND PRINTING PATTERNS
Pattern sizes: 36 to 64. Each size comes in four height ranges for the best fit.
Constructive additions:
- to chest circumference 2 cm;
- to waist circumference 8.5 cm;
- to hip circumference 0 cm.
Constructive allowances characterize the degree (freedom) of the product’s fit to the figure. This value is already included in the design and is given for a better representation of the silhouette shape.
Equipment:
- Cover stitch machine or universal sewing machine (machine needles for knitwear),
- Overlock,
- Iron with steam (steam generator),
- Ironing table,
- Hand needle for estimating work,
- Threads contrasting to the main fabric (for basting) - 1 spool.
Material recommendations:
Main material: jersey of moderate elasticity, medium density, soft, stretchable, opaque. The fiber composition can be natural (cotton, viscose, wool), mixed (cotton + elastane, viscose + elastane, wool + elastane) or synthetic (polyester + elastane). Type of material: rubik knitwear, noodle knitwear, smooth knitted jersey. Tensile coefficient from 0.4 to 0.6 (Kr = Length of the segment before stretching / Length of the segment after stretching). In the product in the photo Kr = 0.5.
The average consumption of material depends on its width, as well as on the size and height of the pattern and varies from 110 to 160 cm, with a fabric width of 125 cm.
You will also need:
- thread in the color of the main material - 4 spools.
When ordering a pattern you receive 3 pdf files:
- A file with instructions for printing a pattern, containing a control square;
- File with pattern in A4 format, for printing on a regular printer;
- A file with a pattern on one large sheet - for printing on a plotter.
Pattern sample:
* PRINTING ON A4 FORMAT PRINTER:
When printing patterns in A4 format, open Adobe Reader and check the “Actual size” checkbox (or uncheck “Fit to page size”) in the print settings. Note the test square (or grid) on the pattern sheet. Its size is exactly 10 by 10 cm. It is needed in order to understand whether the printing scale is set correctly on your printer. Before printing the entire pattern, print out a sheet with a red square and measure it. 10cm sides? This means you can print the remaining sheets of the pattern. If the sides are more or less than 10 cm, you need to adjust the print scale of your printer. Otherwise, the pattern will not print correctly. After printing all the pattern pages, glue them together in the order shown: the letters (A/B/C+) indicate the column, and the numbers (01/02/03+) indicate the row. The first (top left) pattern sheet will have the number A01.
* PRINTING ON A PLOTTER:
When printing a pattern on a plotter, open the pattern file in Adobe Reader (or Foxit Reader). Click on the "File" menu item, then select "Print". Select the Poster print mode under Page Sizing and Handling. Make sure the Segment Scale field is set to 100%. Check the boxes for Cutting Marks, Shortcuts, and Split Large Pages Only.
The following designations are used on the pattern:
Parts Specification:
- Back - 1 piece;
- Front - 1 piece;
- Sleeve - 2 parts.
Layout diagram of parts on the material:
TECHNOLOGICAL SEQUENCE OF SEWING
| 1. Stitch the front and elbow sections of the sleeve. Fold the right side inward, aligning the overcast edges. Pin and sweep. Stitch with a seam width of 8 mm to the cut mark. Press and release. | |
| 2. Overcast the front and back shoulder sections. Fold the front and back pieces right sides together, aligning the shoulder and side edges. Chip it, sweep it away. Stitch with a seam width of 8 mm (stitch the side sections to the cut). Press and release. | |
| Side seam type | |
| 3. Thread the sleeve into the armhole. Sew in, seam width 8 mm. Seal the cuts. Iron it. | |
| 4. Baste the neckline seam allowance to the wrong side. Iron it. | |
| 5. Overcast the edges of the cuts to 14 mm. Stitch with a seam width of 11-13 mm from the fold. Iron it. | |
| 6. Sweep the bottom of the sleeve and the product to 14 mm. Stitch as shown in the photo (here we used a flat stitch). | |
| 7. Remove the basting threads and overcast the neckline. Hand-tie the collar allowance to the shoulder allowance. | |
| 8. Finish the product: remove all temporary threads, clean the product from chalk lines. Carry out final WHT (wet heat treatment) of the product. The June sweater is ready! |