How to sew a snood from knitwear: patterns for women, sizes, master classes
A scarf that has neither beginning nor end, a collar, a pipe - whatever they call a snood, which is closed in a ring and made of fabric or yarn. It can be worn as a scarf, headdress, it is warm and comfortable. Even a novice seamstress can sew a snood from knitwear with her own hands, its pattern and execution technique are so simple.
Features of sewing a snood from knitwear
To make a scarf-collar, an experienced seamstress will need less than an hour. A novice needlewoman, armed with a measuring tape, scissors, thread and a sewing machine, can do it in two hours.
The most important thing is that your head fits into such a scarf, so you need to be careful when taking measurements.
In terms of technique, the snood is not at all complicated; in fact, it is an ordinary rectangular scarf that is sewn into a ring. The product must be sewn with a hidden seam so as not to spoil the appearance. You can also make a snood with buttons or snaps.
The choice of fabric depends on the season, and the model depends on the personal preferences of the future owner and its purpose. Snood can be one-sided, two-sided, one or two turns.
In addition, there is a very comfortable snood hood model for wearing on the head.
What fabric are snoods made from?
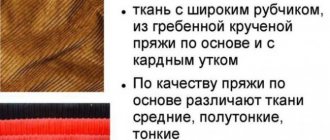
For snood, it is very important to choose the right material. Since the product is worn over the head and twisted, it is better to give preference to soft and elastic fabric. You can sew a tube scarf for the cold season from the following types of knitted fabric:
- Kulirka is a fabric that stretches perfectly, the thinnest of knitted fabrics.
- Interlock is a pleasant and soft double-sided fabric.
- Ribana is a fairly thick fabric with an elastic pattern.
- Kashkorse is a knitted fabric with an elastic pattern.
- Fur is a knitted fabric with pile.
- Fleece is the best material for children's accessories, a warm and soft fabric.
- Footer is a soft, insulated fabric, brushed on one side.
An old jacket or sweater is also suitable for sewing a pipe scarf.
Important! All knitted fabrics, except fleece, have edges that unravel or fray. Therefore, it must be carefully processed.
Knitted snood patterns for women
Sewing a snood scarf is quite simple if you use a pattern and know the standard sizes.
Patterns for a tube scarf are quite simple, since in most cases it is a rectangle, the length of the sides depends on the parameters and wishes of the future owner. Below are the finished products and their corresponding patterns:
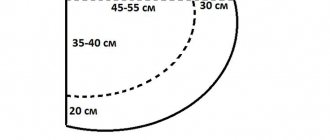
- One turn. Usually such a snood is sewn from fleece according to the pattern below:
Classic model, easy to implement
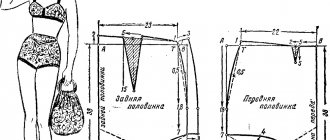
- In two turns. Pattern for the product:
The product has an impressive length
- Two-turn snood with insert.
Product pattern: Openwork insert in the snood adds romanticism to the image - Kapor - snood.
Product pattern: The product can be worn not only around the neck, but also on the head
Standard sizes for such products can be found in the table:
How to sew a snood scarf with your own hands
To sew a snood with your own hands, you need to choose a fabric, a model, as well as stock up on imagination and, of course, the desire to create. The proposed detailed master classes, patterns, tips and videos will help the novice seamstress create a stylish accessory without much difficulty.
Hood-snudili snood-hood
It is comfortable and warm, and quite easy to sew. For making it, it is better to choose a thick fabric (wool is possible), then you will not need to make a lining.
If the fabric is not warm enough, you can make the snood hood double. Fleece is most often used for insulation.
This snood model will complement any woman's wardrobe
You will need two pieces of fabric of harmonizing colors, scissors, paper or cardboard for the pattern, thread, and a sewing machine.
Work algorithm:
- Draw a pattern for a hood scarf on the prepared paper in accordance with the size of the head and the length of the future product.
Cut out 4 identical parts, 2 of each color. Important! In order for the hood to sit a little loosely, we must not forget about the seams; it is necessary to make allowances. - Place the right sides of the pieces together and stitch on a sewing machine. We ended up with 2 identical pieces that need to be joined together using machine stitching.
- Stitch the remaining parts using a sewing machine and turn the product inside out.
- Sew the ends of the scarf, the product is ready.
A fur-lined hood can be sewn using this pattern using this video tutorial:
Snood transformer
This scarf can be anything you want, a hat, a headband, or just to keep your neck warm.
Important! This model can be made from any knitted fabric. Fleece is not suitable for this model.
- You can make a transformer using the following pattern:
- Tools and materials: knitted fabric, scissors, measuring tape, sewing machine, thread.
- Step by step process:
- Take head measurements: head circumference and height.
- Build a pattern. Rectangle width = OG, length = 2 heights + seam allowances.
- Cut out a rectangle from fabric.
- Fold the future snood in half along the front side and sew with an invisible seam on a sewing machine.
- Turn the resulting pipe inside out, fold it in half, inside out, twisting one side.
- Sew the edges with a blind seam.
- The product is ready.
Snood made of knitted fabric
- It is very easy and quick to sew a beautiful snood in two turns from knitted fabric; the work will take about an hour.
- You will need: knitted fabric, measuring tape, scissors, needle, sewing machine.
- Algorithm:
- Cut out a rectangle with sides 160 and 70 cm (the dimensions can be adjusted at your discretion). If the scarf is double, then the sides of the rectangle are 160 and 140 cm.
- Fold the rectangle in half, with the right side inside. Mark the future seam with safety pins.
- Stitch the marked edge using an overlocker or sewing machine.
- Turn the product inside out and join the edges, leaving a small hole.
- Sew up the hole by hand using a needle.
- The product is ready.
Snood with fur
- If you use your imagination and use various materials, you will get an exclusive snood model.
- You will need: an old sweater, a piece of fabric, knitted fur, a measuring tape, scissors, a needle and thread, a sewing machine.
- Step by step process:
- Cut off the top of the sweater, just below the armhole (the width can be adjusted as desired). The result is a stitched pipe with a raw edge.
- Using regular fabric using a pattern, make exactly the same piece.
- As a result, you get two identical pipe blanks from different materials and a piece of knitted fur.
- Bend the fur, dividing the width in half.
- Place it between the knitted and fabric blank.
- Carefully sweep everything away using a needle and thread.
- Sew the basted edge using a sewing machine.
- Turn the future snood right side out
- Sew the lining to the knitted piece.
Knitted hat-sock
Young girls fell in love with this model for its convenience, plasticity and the ability to give the headdress different shapes. The pattern is the simplest: in the form of a rectangle with a semi-oval at the top.
Next steps:
- Fold the fabric in half.
- Lay out the drawing and outline with chalk, adding seam allowances of approximately 1-2 cm.
- Cut with scissors.
- Cut a triangle at the top of each piece.
- Sew the cut area.
- Place both pattern pieces right sides together.
- Sew the details along the edges, then carefully fold the bottom of the product.
- Iron.
How to sew a snood with your own hands at home
Rating: No rating
Do you want to add a fashionable snood scarf to your wardrobe, which will be a good addition to a classic coat or sports jacket and will add charm to any casual outfit?
Such an original handmade accessory will not only delight you, but will also make you stand out from the crowd, because you will end up with an exclusive item. In this article we will tell you how to learn how to sew a snood from different fabrics for children and adult girls.
How to sew a snood and a hat from knitwear for a child
To warm up little princesses in the cool season, we will sew a knitted set for them: snood + hat. They will be double-sided: it is better to make one side bright and colorful, and the second monochromatic, matching the first.
Fabrics suitable for this set:
- ribana (dense, stretches well);
- fleece footer (has the property of stretching only in one direction);
- cooler (thin and stretches very well).
When cutting out, it is necessary to take into account the properties of the fabrics. Let's get started.
- We transfer the pattern with the dimensions as in the photo onto the fabric and cut one for each type of fabric (plain and colored).
- Having folded the cut out parts with the right sides inward, we sew the two sides together at the top and bottom on the wrong side.
- We sew the snood into a ring. To do this, we sew from the side along the wrong side, leaving about 5 cm unstitched, so that later we can turn the product through it to the right side.
- Turn it inside out and sew up the remaining 5 cm of the seam with a blind stitch.
- Our children's double-sided snood is ready.
- We cut out two parts of the future knitted hat from the fabric (size approximately 1-3 years) and cut out the parts.
- We sew the parts along the wrong side, stretching the fabric a little and ironing the seam.
- We sew in grooves on both halves. Their depth is 5 cm and width 3 cm (1.5 cm from the fold).
- We sew the parts of the hat along the wrong side, leaving 5 cm unsewn in order to turn them inside out.
- Turn the cap inside out.
- Carefully sew up the hole with a hidden seam, and our hat is ready.
Don’t throw away the remaining pieces of fabric, please your child and sew clothes for dolls.
How to sew a snood and a hat from knitwear for a child 4-8 years old
These are patterns for older girls, but how to sew a hat and snood, see the previous diagram.
There are a lot of models of hats that you can sew yourself. These can be knitted hats with a pompom, fleece with ears or ties, or you can sew a beret with your own hands using a pattern.
How to sew a snood from knitwear with your own hands
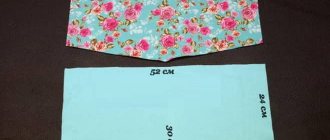
- Use this pattern to make a snood scarf from knitwear (see diagram). This is a rectangle approximately 1 m long and about 50-60 cm wide.
- Fold the fabric inside out and sew the edges together using a machine. Leave a hole in one seam to turn the product right side out.
- Twist the workpiece in a figure eight and connect the edges with a neat blind seam.
- If the snood is made of a plain fabric, it can be decorated with a ribbon with pom-poms.
Did you know? To prevent the edge of the braid from being visible, first sew the finishing tape to the workpiece, and then connect the edges.
How to sew a fleece snood for a child
How to sew a fleece snood for a child
A sewn rectangle in the shape of a tube is what a fleece snood usually looks like. All seams in such a rectangle are sealed inside.
- Calculate the length of the fleece snood so that it can be pulled over your head.
- The edges of the fleece do not fray or fray, so there is no need for additional processing - with an overlocker for home sewing.
- Sew all edges together using a sewing machine, leaving only an opening for turning the product inside out. Then sew it up discreetly by hand.
The fleece snood model can be easily transformed into a hat. To do this, immediately provide a line for the drawstring and pull in the lace with the lock.
- Double-sided snood with fleece is very warm, soft and cozy.
How to sew an original snood scarf with your own hands
Sewing from old items can add something stylish and fashionable to your wardrobe. We will remake an old jacket into a warm, stylish snood scarf with a button closure. For this we need:
- a jacket you don't wear;
- scissors;
- needle;
- matching threads;
- sewing machine.
Let's get started:
- Cut off the top part of the jacket just below the armhole.
- We process the cut with a zigzag seam or overlock.
- After processing, we turn the edge inside out and hem it by machine.
- The original snood is ready!
How to quietly sew a knitted snood
To sew the edges of the snood, it is better to use the same thread as when knitting the product. The length of the thread for stitching should not exceed 46 cm, otherwise it may break due to friction. Pull the thread evenly, it should lie tightly, but not tightly so that the seam does not wrinkle. — How to sew knitted parts —:
- Steam the seamed edges and pin them together.
- Before final stitching, make a basting mark.
- Try on the product. If everything is in order, we sew it with this seam (see picture).
For more details on how to sew a knitted snood, watch the video.
How to sew a snood knitted with garter or stocking stitch with an invisible horizontal seam, watch in this video. Very accessible and understandable step-by-step explanation.
We crochet the edges of a knitted snood and get a perfect machine seam. How to do this, watch the video.
Sewing the set: hat plus snood made of jersey. What measurements are needed to create a pattern. Step-by-step modeling and sewing.
As you have already seen, there is nothing complicated in sewing a snood scarf. A little desire, free time, imagination and skill, and you will get an ultra-fashionable and practical thing. Share with us what and how you did it.
Source: https://www.joxin.club/rukodelie/krojka-i-shite/snud.html
Snood scarf made of knitwear in 15 minutes!
Details Category: Sewing Kosshechka
Usually the snood scarf is made long and wrapped several times around the neck. This option is not very convenient for children, so narrow scarves are made for them.
To sew children's snood, it is better to use natural knitted fabrics. I use 210 weight interlock heart fabric and red rib for the second layer.
Creating a snood scarf pattern for a child
Make the snood width 1-2 cm less than the head circumference. The knitwear stretches, so there will be no problems with putting it on and the throat will not be too open.
We make the height of the snood 25-30 cm. The front can be lengthened a little. In my case, the height is 25 cm and there is a 5 cm extension in the front.
Step-by-step process of sewing a knitted snood
Fold 2 layers of fabric with right sides inward and stitch along the lines marked in light green. In the process, stretch the fabric a little.
Turn it inside out and iron it.
Now we connect the snood into a ring. To do this, join at the points marked in blue and sew in a circle starting from the inside, then the front side, and again to the inside. Leave a small hole of about 5 cm and turn it inside out.
The hole can be sewn up by hand using a blind stitch. Or if you don’t like to sew by hand, then sew it on a machine, although it doesn’t look very neat)
On the front part I made a heart applique and decorated it with thermal rhinestones. I would like to write separately about rhinestones. It's no secret that girls love everything shiny. But rhinestones in our store cost a lot of money and are sold individually.
Therefore, I order them on the Aliexpress website, with delivery of a package of 200 pieces costing 50 rubles! They can be glued with an iron, but it is better to buy a soldering iron for rhinestones; it costs about 400-600 rubles, if you take it from the same Ali Express. I also received a jar for sorting rhinestones as a gift for my purchase.
It turned out to be just an aliexpress advertising page)
You can sew a knitted hat to go with your snood scarf using one of the suggested methods.
Knitted hat included with snood
- If you liked this material, tell your friends about it on social networks.
Source: https://www.mamin-sekret.ru/rukodelie/190-sharf-snud-iz-trikotazha-za-15-minut
Flirty beret
Berets give the image something mysterious, which attracts the attention of men.
Knitted beret pattern
Sizes must be selected individually for each person.
We sew step by step:
- Duplicate the side with double tape, bend it lengthwise and iron it.
- Sew the edges together to make a ring. Fold the seams and iron them.
- Sew the 2 side pieces together.
- Sew the bottom to the side pieces.
- Sew the sides with the resulting beret parts.
- Fold the side and sew it by hand.
Warm scarves and snoods without yarn, knitting needles or crochet: 5 master classes - Master classes on BurdaStyle.ru
Fleece, flannel, faux fur - scarves and snoods don’t have to be knitted, you can even sew them!
Author of the master class
Natalya_Pyhova
Soft and pleasant to the touch, fleece is a good material for a sports-style snood. By the way, for the outer part of the snood you can take a more elegant and impressive material, which is also elastic, for example, warm knitwear, and use fleece for the inner part. This master class contains 3 patterns for one-turn snoods of different sizes: for babies, older children and adults.
You will need:
- — fleece in two colors (option — fleece + other material);
- - scissors;
- - sewing machine and threads;
- - needle for hand sewing.
Step 1
Make the pattern (allowances are already included). Cut out two identical parts from different materials.
Step 2
Place the pieces right sides together and sew along the long sides.
Step 3
Turn the snood inside out halfway, as shown in the photo, and sew the short sides, leaving an opening for turning.
Step 4
Turn the snood inside out and sew the hole by hand using a blind stitch. Ready!
Photo and source: applegreencottage.com
Snood of two scarves: master class
Using the same principle as in the master class above, you can sew a snood not from fleece, but from two scarves - or from one, but long one (but then the snood will not be double-sided).
You will need:
- - two scarves (or one long one) - follow the size diagram from the previous master class;
- - scissors;
- - sewing machine and threads;
- - needle for hand sewing.
Sequence of work:
- Follow the pattern described in the master class above: first sew the long sides, then the short ones, leaving a hole, then turn them inside out and sew the hole.
- Photo and source: rosyscription.com
Flannel snood scarf with snap fastening: master class
If you want to sew a snood from a non-elastic material, for example, from a cozy and soft flannel, you should provide a clasp on it. For example, buttons on leather straps, like in this model. If you make the snood long enough, it can be worn as a scarf.
You will need:
- - flannel;
- — natural rather dense leather;
- — buttons and device for their installation;
- - scissors;
- — roller blade and mat-backing;
- - Ruler and pencil;
- - pins;
- - clamps;
- - sewing machine and threads;
- - needle for hand sewing.
Step 1
Decide on the length and width of the snood you need and create a pattern. This snood is made of two or three turns, so it should be quite long. The width is at your discretion, taking into account the fact that the flannel will be folded in half.
Step 2
Sew and fold the pieces as shown in the diagram.
Step 3
Cut out 2 identical plank parts from leather. The length of each is equal to the width of the short side of the finished snood, the width is about 3 cm.
Step 4
Pin the snood folded in half lengthwise with pins. Place the leather strips inside between the layers and secure with clips.
Step 5
Sew the snood according to the diagram, leaving a hole for turning it inside out.
Step 6
Cut off the corners.
Step 7
Turn the snood inside out and sew the hole by hand using a blind stitch.
Step 8
Mark the locations for the buttons and install them. Ready!
Photo and source: deliacreates.com
Faux fur scarf: master class
This scarf can be worn tied or with one end threaded through a hole in the other.
You will need:
- - artificial fur;
- - tape measure;
- - scissors;
- - pins;
- - thread and needle for hand sewing.
Step 1
Determine the length and width of the future scarf and cut out two identical parts, adding seam allowances.
Step 2
Place the pieces with the wrong sides facing in and carefully hand stitch the long sides of the pieces over the edge.
Step 3
Trim the short sides and sew.
Step 4
Make a slit through both layers of fur and stitch around the opening. Ready.
Photo and source: lovemaegan.com
Simple flannel scarf: master class
Simple, but very impressive: a voluminous, cozy flannel scarf with fringe.
You will need:
- - flannel;
- - scissors;
- - iron;
- - sewing machine and thread.