Fleece hat pattern
When sewing various models, a basic fleece hat pattern is used. It is adjusted based on your own measurements.
To determine your size, you need to take two measurements: the first is the circumference of the head, the second is the depth of the hat. How to correctly take head measurements is shown in the photo below.
The main part is one-piece, or is divided into an upper part - the crown and a lower part, which covers the ears.
By the way, there are models with elongated “ears” that turn into ties, and there are others without them at all. In this case, this part of the pattern is simply removed.
This is interesting: Children's hat pattern (from 3 to 10 years old)
Children's options
The most important advantage of this form of headdress is convenience and comfort while wearing. The child is reliably protected from cold and wind. A fleece hat pattern for a baby can consist of only two parts: a side element, which is made in duplicate, and a back part. The edging of the face is done in the form of a hem, but you can also use a separately cut strip. If you create some kind of original model, you will need additional details in the form of ears, eyes, etc. It’s easier, of course, to use a ready-made pattern, but you can build everything according to the sample or instructions yourself according to your dimensions.
Size chart for newborn hats
It's good when you can measure a newborn's head, but this is not always possible. What if you are just expecting a baby, or need to knit a hat as a gift? Then a table of general sizes will come to your aid: height, clothing and hat sizes. Remember, of course, that some babies are born big, and some are born tiny. The table shows the average values.
If you are interested in the question of what size a newborn is, then it is, on average, 34-37 cm. How to measure your baby's head? You should use a measuring tape to measure the length around the forehead and back of the head.
Average size chart for babies from 0 to 12 months
How to sew a fleece hat with elongated ears
This master class will show in detail the steps of sewing a fleece hat.
- Lengthen the “ears”, divide the patterns in half.
- The outer part is cut in separate parts, according to a template, and the lining is one-piece.
- Fold the triangles in pairs and sew one side. Then fold them together and sew the top edge with one line. The result is a hemisphere - the upper part of the headdress.
- Sew the back seam at the bottom part, connect it to the hemisphere - the outer half is ready.
- It is easier to assemble the lining, since it is one-piece - sew the triangles and the back seam with a machine stitch.
- Place the outer and inner parts facing each other and sew, leaving an opening for turning inside out.
- Turn the product inside out, stitch along the bottom edge, and sew on Velcro.
We sew a fleece hat
By following simple instructions, you can independently recreate almost any style you like. We will look at some of the simplest, most common options that you can sew with your own hands.
For an adult
The most popular headdress, suitable for any gender, is currently a stocking cap, which is also called a “beanie”.
To sew one yourself, you need to stock up on: fleece, scissors, a ruler, fabric chalk, pins, thread, a sewing machine, a pattern. You can build it on paper using a model yourself. This will be the first stage of work.
Pattern
Important! The larger the height parameter, the more voluminous the hat will look.
For those with a narrow triangular face, it is better to take this value lower . The rectangular shape of the chin, on the contrary, is combined with voluminous headdresses.
Transferring the pattern to fabric
Take the fabric, fold it in half from the bottom up, so that the front, more fleecy part is on the inside. And then in half again, this time from left to right.
After this, place the pattern on top of the piece of fabric so that the folds of the fabric coincide with the bottom and side edges of the paper.
Pin the template to the fleece and carefully trace the outline with a special chalk. To do this more accurately, you can use a ruler.
Take the same pattern and turn it over, as if mirroring it. And attach it to the outline outlined on the material so that the right line drawn in chalk coincides with the left edge of the paper. Pin and trace the template again.
Cutting the workpiece
Remove the pattern; you won't need it anymore. Take scissors and carefully cut out the resulting shape from the fabric. Then unfold the matter completely.
Sewing a hat
Rotate the piece 90 degrees and fold it in half again, so that the front of the fleece is inside. There will be a fold of fabric at the bottom. And at the top there will be an edge along which you need to sew the first seam. It will subsequently become the rear one. The third and fourth seams, similar to the first, must be made in the lower part of the pattern, on its curved sections.
Let's sew the last seam.
Turn the workpiece right side out. Then fold it in half so that the part that is supposed to be on the outside is still on the inside. In this case, the back seam should be located at the back, at the bottom of the future hat, strictly in the center.
Bring the unstitched edges together at the top and carefully pin them to each other. And sew along the contour of the last seam.
And the women's fleece beanie hat is ready! All that remains is to turn it right side out.
With strings
Another popular model is a headpiece with ties that covers the ears.
It is an elegant and comfortable solution for all ages. A hat of this style is made as follows.
Constructing a pattern
To do this, you will need to measure the circumference of the head and its height from the bottom of the jaw to the top of the head.
Important! To make the correct pattern, you should add 2-3 cm to all the obtained dimensions. This is the allowance for the seams so that the fleece hat fits well.
Completing of the work
Once you've created your pattern on paper, it's time to transfer it to fabric. To do this, take the selected material and fold it in half. The front part should be inside. Align the fold of the fabric with the left edge of the paper template. Then circle it and cut out the outline of the future hat along the resulting line.
Now you need to sew the workpiece along the right edge - this will be the back seam of your headdress. On the left, it is also necessary to make a seam in the place where the contour of the product follows an arc. It's time to think about laces. They are sewn at the bottom of the “ears” of the hat.
Turn the product over so that the back seam is on the bottom, strictly in the center of the workpiece. Carefully align the top edge of the hat, pin it together, and machine stitch it.
All that remains is to turn your creation right side out.
Important! Single-layer fleece hats are rare. Taking into account the peculiarities of our climate, hats are often made with a one- or even two-layer lining.
In this case, each layer is made according to the same pattern, following the above procedure.
Hat with ears for a child
Based on the model with ties that cover the ears, a huge number of funny children's variations are made.
The main difference from the more “adult” version of this children’s hat is the decorative elements of the ears, antennae, eyes, and mustache. What is your imagination enough for? It is recommended to add these elements at the last, third, stage of sewing the hat, before sewing the final seam.
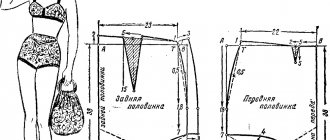
Hat-helmet for a child
This wardrobe element, covering the head on all sides, is very suitable for girls and boys.
This children's hat is easy to sew by following the instructions.
Constructing a pattern
First, you need to draw a pattern on paper, taking into account the circumference of the head and the height from the bottom of the jaw to the top of the head.
Please note that at the top of the pattern you need to cut a wedge, marked in the picture with a dotted line. And then glue the paper template together as if this triangle did not exist.
Cutting the workpiece
The same procedure applies as in the cases already considered. The fleece must be folded in half so that the fold is on the left. Then place the pattern on it so that the left edges of the fabric and paper blank coincide. Trace the pattern along the outline and cut out the resulting shape from the fabric.
Sewing
Now you need to sew the main seam that holds the right edges of the product together.
The most technically challenging task is stitching the top edges of the hat. Do this very carefully, connecting the edges of the wedges to each other in pairs.
After this, the finished hat can be turned right side out. It is appropriate to decorate a children's item with pom-poms or appliqué - do not be afraid to give free rein to your imagination in this matter.
Children's hat with decorative ears and muzzle
It’s not at all difficult to sew a cheerful children’s hat. The most important thing is to make sure that the circumference of the baby’s head and the pattern match. This pattern is suitable for a child with a head circumference of 48 - 50 cm.
Algorithm of actions
- Cut out the necessary parts, adding 1 - 1.5 cm for allowances. If you are planning a double hat, then cut out an additional lining. The lining for a fleece hat can be knitted or made of basic material.
- Cut out the ears; they consist of four parts.
- Make an applique for the muzzle. The nose is sewn on by hand or with a frequent zigzag. Eyes and antennae - embroider with hand stitches.
- Sew the ears, turn them inside out and attach them to the gap marked with the letters AC, approximately in the middle of the segment.
- Connect the darts, first the frontal and occipital, marked with the letters D and G. Next, using a common line, sew the dart with the ears. Assemble the lining in the same way.
- Prepare the ties: cut strips approximately 1 cm wide. Since fleece does not fray, the edges do not need to be processed. Sew them on with a few stitches.
- Assembling the hat. Place the outer and lining halves facing each other and pin together with needles. Go through machine stitching. Leave a hole on the back side, approximately 5–6 cm long, for turning inside out.
- Turn the product inside out and sew the hole inconspicuously by hand.
This fleece hat looks very good when paired with a scarf and mittens. How to sew mittens is described in the article: Fleece mittens - quickly and easily with your own hands.
The hats presented below are made according to the same principle. Only the frontal-occipital dart is closed, and the top is stitched in a straight line.
Children's hat
Fleece is very good because it does not require processing of the edges, and, accordingly, is easy to cut and sew. A pattern for a children's fleece hat can be made using the template presented below. It is also suitable for other materials, for example, knitwear, from which it is good to make an “inner helmet” that is worn under the main hat. If you use stretch material, then the side part of the hat, of which there should be two, can be cut out as one, so as not to make unnecessary fasteners on the neck.
As for the fleece, the rightmost piece needs to be cut in one copy, and the other two - in pairs, although the narrow strip of the face edging can be made of a single, but longer length. When you sew the side elements to the central one, it is good to decorate the hat with additional details that need to be sewn into the seam. This method is usually used to make the ears of various animals so that the hat resembles the head of a particular animal. This detail is easy to make simply in the form of a triangle. Accordingly, to make a pair of ears, you will need to cut out four pieces of the same color or two of different ones, for example, from dark brown fleece for the outer side of the ear and from light or pale pink for the inner side. For the convenience of further work, you can make blanks taking into account seam allowances.
Fleece beret
A warm beret is perfect for both little girls and women. For kids, a model that covers the ears is more desirable.
The pattern is constructed as follows:
The lower element is taken from the main template, and the upper one is a circle with a diameter of 35 - 40 cm. The lining is ordinary - one-piece.
Sequencing
- Connect the back seam at the rim.
- Gather the edge of the circle or fold it into folds. They are evenly distributed, bringing the circumference of the circle to the size of the head circumference.
- Sew the circle to the rim.
- Sew the lining and insert it into the upper part. Stitch, turn inside out, and decorate with fabric flowers if desired.
This is interesting: Children's hat pattern (size 37-55)
Fleece hat - in 15 minutes
The simplest hats can be sewn in literally 15 minutes.
You will need a piece of fleece with the width: 1. Option - cap depth + lapel width + 2 allowances (2 cm) 2. Option - cap depth + lapel width + bubo width + 2 allowances (2 cm)
Pattern of a simple fleece hat
Cut out and sew the side seam. Then turn 5-7 cm inside out and stitch to the edge. All that remains is to assemble the top of the cap. In the first option, we collect the fabric and sew it by hand. You can additionally wrap the button with a piece of fabric and sew it on top. You can also simply stitch the top edge from the wrong side. The result will be something like a “Cockerel” hat. The corners can be left or hidden inside.
In the second option, we collect the fabric and tie it with a ribbon (ribbon, string), as if we were making a ponytail. It can be cut into strips of 1.5 - 2 cm. You will get a real bubo. If you wish, you can decorate the hat with a fashionable iron-on sticker.
Required materials and tools
The main thing in sewing a children's hat is the choice of high-quality material with spectacular colors.
For one headdress you will need only 25 cm of knitwear and the following accessories:
- sewing threads matching the color;
- tailor's needles with a round eye;
- chalk or pencil for cutting;
- scissors;
- needle;
- sewing machine.
When choosing knitwear, you can pay attention to the following recommendations:
- If you use a simple sewing machine, you should choose denser fabrics. For example, fleece, ribana, footer with lycra or fleece.
- For sewing on a cover machine, you can use thin fabrics (kulirka or interlock).
- For the manufacture of children's products, fabric from unnecessary knitted T-shirts and jumpers is suitable;
Fleece balaclava
The balaclava perfectly protects the face from the cold piercing wind. Another undeniable plus is that it is easy to sew yourself.
The size of the window on the template is adjustable as desired, depending on which part of the face should be open.
- Fold the material in half, trace the pattern, then cut out the elements, not forgetting the allowances.
- To process the window, a piece of fabric is cut out that is larger than the future hole. Pin it to the front side.
- Sew along the outline from the wrong side.
- Cut a hole close to the seam, approximately 2 - 3 mm.
- Turn the square through the hole to the wrong side and pin it together with pins. Sew, retreating 5-7 mm from the edge.
- Further sewing is carried out according to the principle described above.
- Process the bottom cut by folding the edge, then stitch with a zigzag.
Useful tips for sewing fleece hats
- To create a truly comfortable and beautiful thing, you must always carefully think through the sewing process before starting work.
- Select materials and threads to match the color, think over the style, and carefully draw out the pattern. And then you are doomed to success.
- Fleece is relatively easy to work with. It is easy to cut, does not crumble, does not require special threads or complex sewing machine settings. A regular seam with a stitch length of 3-3.5 mm will work fine.
- Since this type of fabric has good elasticity, the edges must be pinned together before sewing them on a machine.
- Experienced craftswomen sometimes advise finishing all the seams with an overlocker. Then they will turn out more accurate.
A smart fleece hat will come in handy in any wardrobe.
Mink hats 2021: fashion trends
Short fur coat - what is it (photo)
This is interesting: Pattern Shorts made of knitted fabric – pattern + master class
Winter fleece hat
In order to get a particularly warm headdress, a layer of insulation is inserted between the outer and inner layers.
Attention: when using insulation, the parts increase additionally on all sides by 1 - 1.5 cm. Otherwise, the hat will turn out to be small.
The ear areas are reinforced with a piece of jacket fabric, this will prevent blowing.
This manipulation is carried out as follows:
- Cut two circles from a piece of raincoat fabric, about 7 cm in diameter.
- Place the circle to the ear area between the layers of the cap and secure them with running stitches.
- Sew in circles.
An interesting video will show you how to sew a men's hat with your own hands.
Rules for taking measurements
A knitted hat for a child is sewn according to 2 main measurements. This is the circumference of the head and the depth (or height) of the product. For a hat with ties that covers the ears, you also need to know the measurements for the side depth of the hat.
The main measurements and measurement technology are given in the following table:
| Measurement name | How to measure |
| Head volume | Place the measuring tape above the ears at the level of the eyebrows, at the back - along the most convex part of the back of the head. |
| Cap depth | Measure the distance up to the forehead from the crown to the point between the eyebrows, back to the base of the skull and along the sides to the edge of the earlobe. |
| Rear Width | Measure the distance from your earlobe to the posterior center line at the base of the skull. |
To create a hat pattern, take any pattern from a sewing magazine as a basis or print out a ready-made pattern. You can also trace the outline of another baby hat and add seam allowances.
Adorable children's fleece hats: patterns, ideas, master class
Which hat to choose for your baby? Of course, soft, warm and comfortable. It’s even better if, in addition to all of the above, the baby’s hat is fashionable, bright and different from others. And where can I get such a hat? We invite you to sew a fun and bright children's hat from fleece with your own hands. After all, fleece best meets all our requirements. This is a lightweight, soft, pleasant to the touch, anti-allergenic material, synthetic “wool” made from polyester. Fleece does not absorb moisture, but passes it well. Children do not sweat in clothes made from this fabric; fleece “breathes” and retains heat perfectly.
How to sew a baby fleece hat
Based on just one pattern, you can design and sew many different children's fleece hats, both for boys and girls.
Ideas for children's fleece hats
Let's look at how to sew a children's hat from fleece
For our children's hat you will need:
- Hat pattern;
- Gray fleece;
- Pink fleece;
- Fleece in blue or light blue;
- Threads are black, gray, pink and blue.
We cut it from gray and black fleece, we get two parts, gray on the top of the cap and black on the inside.
Sew the front seam on the gray piece
Now we draw on paper and cut out the details of the “Face” of the bear cub on the fabric. The ears will be pink in front and gray in the back. Therefore, we cut out two pink and two gray ears.
Take a pink oval and a blue nose, pin them together and sew them together
Sew the resulting part onto the top of the hat.
Sew on the eyes
Then we start creating the Bear's ears. To do this, take the gray part and put it on the pink one, sew it together
We turn the resulting ear inside out and grind it down to 0.5 centimeters. We got two ears like this
We sew the back seam from the top 5 centimeters, insert the ears into the top seam, pin it so that they do not run away and sew the seam
We sew a pink patch near the right ear and make decorative black seams. Sew up the back seam. The top part of the hat is ready. All that remains is to make the inside and ties. Take the black piece of the hat, sew the front and back seams, and then the top seam. Now we cut out rectangles measuring 20*3 centimeters.
Fold them in half, sew them together and turn them inside out. We got ties. We sew the black and gray parts together, not forgetting to insert the ties and leave a small slit for turning inside out. They sewed it, turned it inside out, and sewed up the opening. The result is a hat.
Older children or teenagers will really like this hat. I saw this hat with ears on the Etsy website.
Unfortunately, I couldn’t find a pattern for this hat, but there is a diagram. If you wish, you can carefully examine the caps and repeat. Please note that the ears on the hat are one-piece with the back of the hat, and are not sewn in, as in the example above.
How to sew a baby fleece hat
As a basis for a hat with ears, you can take a pattern like this:
Simple version of the product
It is recommended to iron the fabric before cutting. If the knitwear has a pattern, it is necessary to position the pattern so that the objects are placed centrally or symmetrically around the center line.
A knitted hat for a child, the pattern of which can be created in just 10 minutes, can be single-layered or with a lining.
First you need to decide on the size of the hat: measure the volume of your head and choose the desired height of the product.
Next, to create a pattern you need:
- Divide the head circumference measurement by 4 and make a deduction for the stretch of the product (for dense fabrics, subtract 0.5 cm, for thinner and more elastic ones - 1 cm).
- On a sheet of paper, construct a rectangle with the following parameters: the width is equal to a quarter of the circumference of the head, taking into account the necessary deductions, the length is the height of the hat with an increase of 5 cm for the lapel (optional).
- On the left side, move 2.5 cm from the corner to the left, and down ¼ of the height of the cap. Connect the dots to get a dart.
- Round the upper left corner of the rectangle.
- The resulting part is ¼ of the cap.
Knitted hat for a child, a simple pattern. - To create half of the hat pattern, attach the resulting piece to a sheet of folded paper so that the side line with the dart coincides with the fold line, trace the template and cut it out.
Preparing fabric for cutting
The length of the fabric cut for the hat depends on how it will be cut:
- If the product is single-layer, then a fabric size equal to 1 cap length plus an increase for the lapel will be sufficient.
- For a two-layer model without a seam on the bottom fold, you will need double the length of fabric.
- If the hat is double-sided, made of knitwear of different colors, you need to take 2 pieces of fabric, equal in length to one size of the length of the hat.
Sequencing
The main characteristic of knitted fabric is its elasticity. It can stretch in one direction or in two. When cutting products, you should pay attention to the main direction of stretching and place the pattern strictly perpendicular to the direction of the stretching line.
For correct cutting you need:
- Fold the piece of fabric across the stretch line with the right side facing inward.
- Attach the hat pattern, trace it with chalk or pencil and cut out the resulting parts, leaving a 1 cm seam allowance.
- When cutting out two-layer products, the fabric needs to be folded across and separately cut out 2 parts with a fold at the bottom.
- To sew a hat with a lining, cut out 4 identical parts or 2 parts with a side fold.
You can't stop sewing beautifully!
Video, Master class
Hello, friends!
Any mother wants her child to be dressed not only warmly, but also beautifully in cool weather. It’s easier for a mother who knows how to sew. For example, she can easily sew a hat for a child or a teenager herself.
Today we will look at a master class on sewing an unusual headdress for a child and answer the question - How to sew a children's hat with ears . They are sometimes called animal caps.
Among the many models of similar hats, there is one of a very simple cut. Sews easily and quickly.
Let's look at the cut and sewing of a hat with ears in detail. If you have any suggestions for other models, write in the comments or by email.
For those who like to watch and listen to the voice, MK in video format is waiting for you at the end of the publication.
So, let's start sewing a children's hat with ears.
You will need:
- A piece of material approx. length. 55 cm;
- Threads matching the color;
- Chalk/soap for marking;
- Tape measure;
- Ruler;
- Pins;
- Scissors;
- Sewing machine;
- Iron;
- 30-40 minutes of free time.
What material is suitable for sewing a hat?
To prevent the hat from causing discomfort when worn, make it from stretchable material. Thin or medium-weight knitwear is perfect, for example, footer, ribana, children's knitwear, fleece, etc.
You can sew a hat from a suitable knitted T-shirt or jumper that has served its intended purpose, if the child has grown up and the item is still in good condition. You can give a second life. Just pre-wash and iron.
Note: It is advisable to make a pattern, taking into account the stretch coefficient of the selected fabric. I'll tell you how below.
Hat pattern and required measurements
The model is very simple, so any child’s hat can serve as a pattern.
If it turns out that there are no hats of the required size, take two measurements:
- Head circumference Og (1);
- Cap depth Gsh (2).
Please note that measurements are taken and recorded in the whole size, not in half, as is often the case when taking other measurements from a figure.
What is the elongation coefficient for and how to find it
To draw a pattern taking into account the properties of the selected material and the size of the child, we determine the stretch coefficient of the fabric.
To do this, place marks on the canvas between a 10 cm section.
And stretch the material.
Record the resulting stretch value.
Let's say that from the original 10 cm the stretch was 2.5 cm = 12.5 cm.
Divide 10 by 12.5 = 0.8
0.8 – tensile coefficient for this fabric.
IMPORTANT! We stretch without fanaticism. Remember - the harder you pull the fabric, the tighter the hat will fit and squeeze the child’s head. We don't need discomfort!
Multiply the resulting measurement of head circumference by 0.8
For example, Og - 56 x 0.8 = 44.8
Round up to 45 cm.
Next, when constructing a pattern, we apply the resulting value.
Helpful information:
For more information on how to determine the elongation coefficient, see the video.
Draw a pattern and cut a hat with ears
When cutting, I recommend adding 1.0 - 1.5 cm to the allowance for the width of the hat - to refine the pattern.
On a piece of paper, draw a rectangle, with one side equal to 1/2 the measurement of the head circumference (taking into account the coefficient), and the other side equal to the measurement of 1/2 the depth of the cap.
Then round the corners as shown.
Note: If you are in doubt about the measurements and calculations, you can cut out the workpiece, try it on, make clarifications and cut it on the main fabric.
Hat pattern first:
Next, I changed the pattern a little after trying on the hat.
Refined pattern
I specially divided it into sections so that the difference could be seen. I narrowed it a little at the top, it’s more comfortable and beautiful.
Life hack To make the hat pattern piece even on both sides:
- First, trace the pattern in full size;
- Mark the middle of the part;
- Fold half of the pattern exactly along the line;
- Trace along the contour of the other half;
- Cut out the pattern.
We will sew a hat with ears. Therefore, we cut out additional details.
Which animal do you like best - Cat, Teddy Bear, Fox, Wolf? We select and draw the “ears” of the desired animal. You will get an unusual “animal” hat. Can be decorated with suitable applique or embroidery.
My hat has cat ears. Meow…
The result is a hat pattern:
The base of the hat is 1 piece with a fold;
“Ears” - 4 parts.
Uncover
Fold the material in two layers - the hat will be denser, warmer, and the seam will be hidden inside. Don’t forget to mark the location points for the “ear” parts.
For a cap with a lapel, step back from the fold at the bottom by the desired amount, approximately 2.5 - 3.5 cm.
Note: We will consider cutting and sewing an interesting model of a cap with a lapel in the next issues. I recommend subscribing to blog updates so as not to miss new publications.
Looking ahead, I’ll show you a photo of the resulting hat.
If you change the design a little, it will suit even a teenager.
—
Next, we lay the main part of the pattern on the canvas, as shown, and outline it along the contours. In a mirror image we continue the contour of the part.
We outline the fold line. You can add a basting stitch.
After cutting, an oval-shaped workpiece is obtained.
Note: I use a self-disappearing marker for marking. Convenient tool. The drawn line disappears after a few hours. Typically, such markers or pencils are sold in “handicraft” stores or sewing equipment stores.
It lasts a long time - mine is 3 years old, it’s like new. The main thing is not to heat the markings, otherwise they will remain for a long time.
Sewing a hat
Sewing a hat is very simple:
- Checking the evenness of the cutting;
- We fold the parts of the “ears” face to face, grind along the contour, turn them inside out;
- According to the markings, we lay out the parts of the “ears”, baste or pin them;
- We chop off or baste the parts along the contour, leaving an open area for turning.
- We sew a line along the cuts using a sewing machine or overlocker (if you have one).
Note: You can find recommendations for working with knitwear, selecting needles and stitches on the pages of the project “You Can’t Forbid Sewing Beautifully!” Enter the query in Search - “ Working with knitwear” or simply “Knitwear”
In this case, I use a special needle with a rounded tip (so as not to tear the fibers) and an elastic stitch for knitwear. A zigzag stitch works well, and even a straight stitch if you set them to a minimum pitch.
- After stitching the parts, carefully iron along the seam.
- Cut off excess allowances.
- Turn it inside out.
- We sew up the open area by hand using blind stitches or using a sewing machine.
- By placing one part of the part into the other, we form a cap.
The hat is ready. If there is any material left, make a scarf.
You can decorate the model with applique or paint the hat with special paints or markers.
Helpful information:
How to sew and wear a fleece scarf.
The resulting model is demonstrated by my son Ivan.
- Well, okay, mom, even though it’s a child’s hat, it’s a cool color...
Helpful information:
How to sew a hat for a baby
We sew a fashionable cap
MK video “How to sew a children’s hat with ears”
I wish you beautiful sewing projects and good luck in all your endeavors! Elena Krasovskaya
This is interesting:
- How to sew a fashionable beanie hat with lining...
- How to quickly sew a spectacular evening...
- We sew a transformable skirt. Preparing for...
- Typical processing sequence...
- How to sew a cape, pareo, skirt or kilt...
- We sew a pareo for the beach ourselves.…
Sewing
A knitted hat for a child has a simple pattern that even an inexperienced craftswoman can handle. Sewing a hat takes no more than 30 minutes.
To complete the work you need:
- Place the cut pieces right sides facing each other and pin the edges together with sewing pins.
- Sew the edges on a machine and overcast them with an overlocker or a special machine stitch.
- To ensure even seams, iron the product with an iron.
- Sew the darts in one line. Carefully align the previously stitched seams to create a beautiful intersection of lines on the front side.
- Finish the edges of the dart with an overlocker.
- Sew the bottom of the hat with an overlock stitch and fold it inward by 2-2.5 cm. Pin the hem and sew the edge on a machine, departing 1.5 cm from the fold.
Video tutorials on knitting hats with ears
Hat with ears for a girl, part 1
Recommended yarn for beginners – Vita Brilliant 1 skein 100g, knit in 2 threads. I knitted blue melange from Slonim yarn in 4 threads - the hat turned out to be larger. For a hat for 1 year, knit an elastic band of 3 cm, for 2 years - 4 cm, for a child 3-5 years old, at least 5 cm.
If, like me, you knit from Slonim yarn, cast on loops on two knitting needles or one, but larger, because... the yarn doesn't stretch. If you knit from elastic yarn, then you don’t need to do this, otherwise the elastic will be weak, cast on one needle No. 2.5 and use them to knit the elastic further.
The video should load here, please wait or refresh the page.
Knitted hat with ears, part 2
The video should load here, please wait or refresh the page.
Baby hat with knitted ears
You will need circular knitting needles with #4 fishing line because... cap without seams. Also stocking needles, yarn Pekhorka Children's Caprice, Alize Lanagold 800. Size 6-12 months, but can be knitted for any other age.
The video should load here, please wait or refresh the page.
Women's hat with ears knitted, part 1
The video should load here, please wait or refresh the page.
Women's hat with ears, part 2 – practical
The video should load here, please wait or refresh the page.
Knitted hat with earflaps for women and children
A hat with a visor, knitted for spring. For the winter version you need to make a lining. Hat with visor. Krokha yarn from the Trinity factory, 135m/50g, 20% wool, 80% acrylic. When washing, the yarn does not pill or stretch. You will need 1.5 skeins and number 3 knitting needles on fishing line.
The video should load here, please wait or refresh the page.
Beanie
To make a hat with a flip at the top of the head, you only need to sew 3 seams. Job completion time: 10 minutes. To cut a hat, you need to place the fabric in front of you and set aside along the stretch line a size equal to the circumference of your head and subtract 4 cm for tension. Measure 55 cm in height and cut out the part.
The nuances of making a beanie hat:
- First you need to fold the rectangle in half, perpendicular to the stretch line, align the side cuts and pin them together with pins.
- Next, lay a straight machine stitch along the edge, leaving a hole (5 cm long) in the seam for subsequent turning of the product.
- The next step allows you to create a curl at the top of the head. To do this, you need to place the stitched part in front of you vertically, take the upper right corner and align it with the lower left corner of the rectangle. Then take the top left corner and align it with the bottom right corner.
- The bottom cut produces 4 layers of fabric. The middle 2 layers need to be moved slightly inward and the 2 outer layers need to be pinned together.
- Next you need to start sewing the chipped sections together using a machine. Having reached the opposite edge, you need to do the following: gradually begin to straighten the folded edges and continue sewing in a circle. As a result, the machine stitch will be laid along the entire lower circumference.
- After stitching, the product must be turned inside out. The hole must be sewn up on the front side with a hidden seam or machine stitched.
DIY knitted hat with ears: patterns
Hats with long ears are an excellent option for headwear during the off-season. In such a hat, a girl will certainly attract attention.
We will sew an exquisite hat with long ears. The cap model is universal. It is suitable for both a little girl and a teenage girl.
Hat with long ears
In order to sew a hat, you will need: plain knitwear and a small piece of fleece (we will sew the lining from it). The fleece lining makes the hat warm, soft and cozy.
Necessary materials
Follow the step-by-step instructions of the master class and you will easily cope with a seemingly impossible task.
What to prepare:
- Knitwear. In the photo the cap is light gray, but you can choose a different color of fabric. The only condition is that it must be darker than the lining.
- Fleece. Choose a piece of light shade.
- The cord is 60-65 cm long. The color of the cord does not play a big role.
- Threads matching the color of the hat.
- Sharp scissors.
- A small piece of dark knitwear. We will make a cord edging out of it.
- It is advisable to also have a sewing machine. but if you don’t have one, then prepare a thin needle.
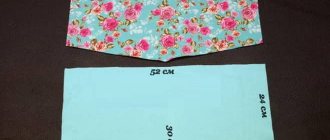
The circumference of our hat will be 51-52 cm , and the height, taking into account the lower edge of the ear, will be 24.5 cm.
Pattern, part 1
Pattern: part 2
Pattern: part 3
- We will sew according to this pattern, which should be adjusted to the desired size. To do this, measure the circumference of your head with a centimeter.
- Let's decide how tall our hat should be. Fold a piece of knitwear in half.
- Let's attach the pattern to it and pin it. After this, we cut out the parts, leaving seam allowances (0.7-0.9 mm).
Cut with a seam allowance of 0.7-0.9 mm
We figured out the pattern. Let's get started:
- Transfer the pattern to paper. Cut out the details of the hat from knitwear. We do the same with fleece, but leave seam allowances larger than when cutting knitted fabric (0.5-0.7 cm longer).
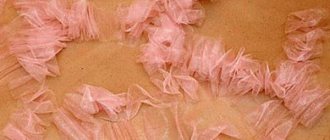
- Next you need to sweep out the fleece edging. How to do this can be seen in the photo.
You need to sweep out the piping from the fleece, as in this photo
- We take dark knitwear. We need to make 2 strips of it for ties, 3 cm wide.
2 strips for ties
Place the cord inside the strip
- Cut a piece of cord 47.5 cm long and fold it in half. We fold the strips of knitwear in half and sew them together. After that, turn the strips right out. We insert the cord inside the future tie.
- Sew the side seams. After all the seams are sewn, iron them. The shortest seam should be in front.
Sew the side seam
Ironing
Sewing the seams of the hat
Ironing the seams
The shortest seam is in front
Sew the lining
- We do the same with the fleece lining. Now we apply a fleece lining and a knitted blank (the front side of the fleece is applied to the front side of the main fabric). We fix the parts with pins.
- We determine where we will have the ties and mark them with chalk. We connect the lining and the main fabric together.
- Don't forget about the ties. They need to be placed between the lining and the main fabric. We leave a small section unstitched so that we can then turn the product right side out.
- Now all that remains is to turn the cap right side out and sew the space left for turning the product inside out using hidden stitches. We sweep out the edging or simply iron it.
We pin the lining and main fabric with pins
Sew the main and lining together, inserting the ties
This hat is sewn using the same principle.
From the video below you will learn how to sew a knitted hat and snood.
Lined
A lined hat is made from a knitted outer material and lining fabric. If you plan to wear a hat with a lapel, then the color of the lining should be chosen so that it is in harmony with the main color of the hat. To sew, you need to create a pattern or use a ready-made printed pattern. A lined hat can have a classic cut, a beanie shape, or a model with triangular ears.
To sew a hat with a lining, you need to do the following:
- Cut out 2 pieces from the main and lining fabric.
- Turn the hat base blank inside out and sew the back seam and darts.
- On the lining piece, sew a back seam and a front dart. Leave the middle undercuts unsewn.
- Place the lining piece into the base blank. The front sides of both parts should be facing each other.
- Sew the bottom edges with an overlock stitch.
- Turn the hat right side out through the hole in the lining. Sew the hole closed with a blind stitch.
Double sided
A knitted hat for a child (the pattern and cutting diagram are presented later in the article) can be sewn from one piece of material and look exactly the same inside and out. Before sewing, you need to create a pattern.
To do this you need:
- Take a sheet folded in half and set aside from the fold an amount equal to ¼ of the length of the head circumference, and at the top measure the length of the cap and build a rectangle from the resulting points.
- From the top, retreat 2.5 cm from the fold line, and down a distance equal to ¼ of the length of the cap. Connect the resulting points and cut the corner along the line.
- On the other side, smoothly round the corner of the rectangle.
The resulting part is a pattern for half of the hat. When cut from the bottom and left, it will have folds.
To cut and sew a hat, you need to do the following:
- Fold the fabric so that the fold lines on the fabric coincide with the fold lines on the pattern, and cut out 1 solid piece of the hat with undercuts and seam allowances.
- Sew the middle undercuts using a machine.
- Fold the piece in half with the right side inward and sew with a continuous stitch in a circle. For turning inside out, leave an unstitched space of 4-5 cm long.
- Turn the hat inside out through the hole left and sew it with a hidden seam.
In addition, you can sew a simple scarf from the same fabric with a button closure. To do this, sew a rectangle of the desired length (so that it fits freely around the neck) from the inside out around the perimeter using an overlocker. Sew a fabric loop on one narrow side. Next, turn the product inside out through the hole left and sew on a button.