What is it and its purpose
A vent is an open fold with or without a cut. The primary functional purpose is to ensure comfortable wearing. After all, very often a straight skirt made of thick fabric restricts movement. And thanks to the presence of splines, the step becomes wider and freer. In addition, decorative design plays an important role. For example, a pencil skirt with a slit acquires rigor, sophistication and sophistication. Especially suitable for business looks.
The vent is found in both men's and women's wardrobes. Regardless of the item of clothing, it requires the same execution. This element is located strictly in the seams at the bottom of the product.
Regarding the skirt, there are some distinctive characteristics worth mentioning. Most often, one slot is used, located in the central seam of the back of the item. You can rarely find skirts with a front vent. In this case, the location can be either a central or a relief seam. It is also possible to use two slots.
Purpose and characteristics
A vent is an open fold that may or may not have a cut. Its main purpose is to provide comfort while wearing the product. After all, a classic straight-cut skirt often hinders movement. Due to the presence of this detail, the step turns out to be much wider.
In addition, such a detail performs a decorative function. If present, a pencil skirt looks more sophisticated, sophisticated and moderately strict. This type of clothing fits perfectly into a business style.
This element is placed strictly in the seams along the bottom of the product. As a rule, there is only one on the skirt. The most common models are those with a rear slot. True, there are options of a different cut. Not so popular, but still there are products with a front slot. It can be located in the area of the central and even relief seam. Sometimes they even resort to using two such parts at once.
Basic pattern of a skirt with a vent
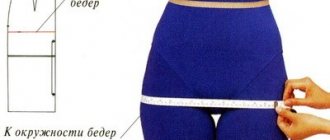
The vent is performed mainly on products made of dense fabrics. Before creating a pattern for a straight skirt with a vent, you should measure the length, as well as the waist and hip circumference in half size. After taking measurements, the resulting figure should be divided by two. Then one centimeter is added to the values so that the skirt does not turn out to be tight. Length is measured from the waist to the desired point.
To create a pattern, novice craftsmen are recommended to use special graph paper. Then the drawing will be as accurate as possible. The length of the product vertically and half the circumference of the hips horizontally are applied to the paper grid in two copies. One is for the front, the second is for the back. An indent of 20-22 cm is made from the top of the resulting rectangles to determine the hip line. The base of the template depicting a straight skirt with a vent is ready.
Next, the top point of the vertical line is designated by the letter T. The segments in both directions are divided in half and marked. Lines of darts in a vertical direction are drawn down from each point. For the front part, it is about 15 cm long and about 3 cm wide at the top, for the back it is 10-12 cm and 2 cm, respectively.
The next stage is building a sloping waist line. From point T, a smooth line is drawn for the front with a descent of 1.5 cm, for the back - 1 cm. Then a bevel is drawn from the waist to the hips. To do this, the sum of half the waist circumference and an increase of 1 cm is subtracted from half the hip circumference plus one centimeter. Then 5 cm (front plus back dart) is subtracted from the result obtained. The result is divided by two. The resulting value is plotted from point T in both directions and is designated T1, T2.
Finally, a slot is applied to the drawing. The location can be different: front, side or back. The main thing is the presence of a seam, which serves as the basis for creating a fold.
Take measurements
Prepare a drawing on graph paper
Make a pattern
Mark the location of the splines on the drawing
How to build a drawing of an element
To create a spline drawing, you should decide in advance on some subtleties. First of all, it is necessary to clearly indicate its location. One or two slots can be used. Their number affects the tailoring of the product.
An important parameter is the depth of the element. It directly depends on the density of the fabric. For thin material - about 4-5 cm, for dense material - 6-7 cm.
The depth of the front fold of the relief seam is created towards the far side of the skirt. In the central seam you can make a slot turned in any direction. The direction doesn't matter much. If two splines are planned, then they are located symmetrically, regardless of location. On the front side they look like folds turned in different directions. But from the wrong side - the depths of the folds are directed towards.
The next indicator is the length. The main condition is the obligatory distance from the upper edge of the fold to the hip line of at least 15 cm. On average, the height of the vent is about 22 cm. The longer the skirt, the longer the part in question.
The required values are transferred to the pattern, taking into account all the above conditions. In this case, hatching is used for marking to separate the slot from the main template. Most professional craftswomen who know how to sew a vent on a skirt do not highlight it on the pattern at all. However, novice seamstresses are advised not to neglect the preliminary image of the element.
Mark the location of the splines
Determine element depth
Select length
Transfer details to skirt pattern
Nuances of cutting the product
The cutting of fabric for a skirt with a vent is carried out taking into account certain nuances. For beginners, it is recommended to first study the master class, which describes all the subtleties. The first thing you need to do is mark the front and back sides of the fabric. It should be remembered that the template is transferred to the wrong side. Next, the fabric is laid out on a hard surface, taking into account the direction of the grain thread, along which the fabric is folded in half. The drawing is also taken into account.
For example, a pencil skirt pattern is placed on the fabric and secured with pins. The first outline is carried out strictly along the contour. Then 1-2 cm is added for the seams and the second contour is drawn. After this, the pattern is cut along the second contour line. It is important to remember that the pattern in the form of stripes and checks, if there is one, must match at the seams. A large print should be placed in a visible area of the product.
A slot not provided for by the template can be drawn directly on the fabric. To do this, 5-7 cm in width and about 22-30 cm in height are added to the sections of the planned location. In this case, the top line runs at an angle of 45°.
In order for the vent on the skirt to look decent and not diverge on the finished product, certain nuances should be taken into account. The depth at the bottom of the fold should be reduced by 1 cm relative to the original value. But in the upper part it should be increased by 0.5 cm. Only after this are seam allowances added.
We study a detailed description of the construction of a pencil skirt pattern
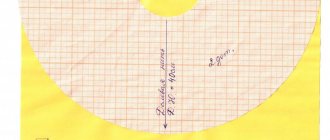
Based on the basic pattern of a classic straight skirt, it is easy to create a pattern diagram for a pencil skirt. To implement this idea, it is enough to narrow the panels of the skirt downwards in the area of the side seams and create a slot on the back panel of the pattern to ensure a certain freedom of movement and increase the length of the step.
The diagram is shown very clearly in the attached photo:
The estimated narrowing can be from 1 to 3 cm.
Modeling a fashionable pencil skirt:
The posterior incision can be made in several ways:
- The simplest thing is to build an inverted triangular cutout by tucking the edges of the back cut inside the product and finishing them well.
- Make a slot in the back section.
To do this, an additional allowance of 8 cm wide is made on the pattern. The back panel is cut out from two halves. They are connected using a back seam. We make a slot on the right half of the back panel: fold the fabric allowance in half, getting a fold measuring 4 cm. We bend the slit on the left side of the product inward, and process the seams.
There are many sites on the Internet offering to download ready-made patterns for pencil skirts of any size. Suitable patterns can be found by both slender girls with a figure size 44 and women of average shape. Size 46 is considered especially popular.
Ladies with curvy figures also have a wide choice. In the photo shown, the pattern has been modified and specially adjusted to fit a female figure size 54:
A narrow skirt will favorably emphasize rounded assets and skillfully disguise annoying flaws of a non-standard figure if it is made correctly and in size. Therefore, the accuracy of the patterns cannot be neglected.
Processing technology
The next stage in creating a straight skirt with a vent is the actual processing. There are two classic options, which differ in the presence or absence of lining.
Lined
The following instructions, which demonstrate the process of processing the vents on the skirt step by step, assume the presence of one fold in the middle seam of the back part:
- Initially, the middle seams of the skirt itself and its lining are ground down exactly to the marking of the location of the vent;
- using an iron, the allowances on the skirt are smoothed, one of which is notched;
- the middle seam of the product is marked on the slot, which helps to understand how to process the element correctly;
- an even seam allowance for the lining is ironed;
- the skirt and lining are connected to each other by the wrong sides;
- the lining is folded back, its left allowance is attached to the vent allowance;
- the angle of the allowance on the slot in the lining is notched, the upper part of the allowance is connected to the skirt;
- the right lining allowance is added to the hem allowance for the vents;
- Next, you should process the slot with a stitch until the notch at the top;
- the lining bends down;
- the top allowance is fixed with the skirt allowance;
- The lining and skirt allowances are joined with a vertical seam.
After all the procedures performed, it is recommended to lift the lining and smooth out all seams with an iron. This is necessary to give the product a beautiful appearance. In addition, there will be no feeling of discomfort while wearing it. The product with lining is ready.
Pattern
Sew the middle seams of the skirt and its lining
Smooth out the seam allowances, notch one of them
Mark the middle seam on the slot
Iron the lining seam allowance
Connect the skirt and lining with the wrong sides
Fold back the lining, stitch the left seam allowance to the seam allowance
Notch the angle of the allowance on the slot in the lining, connect the upper part of the allowance to the skirt
Fold the right lining allowance with the hem allowance for the vents
Finish the slot with a stitch until the notch at the top
Fold back the lining, connect the top allowance with the skirt allowance
Sew the lining and skirt allowances with a vertical seam
Raise the lining and press the seams with an iron.
Ready product
Unlined
This step-by-step instruction for processing vents on an unlined skirt assumes that there is one vent in the middle seam of the back of the skirt:
- when sewing such models, it is recommended to treat the vent with an adhesive gasket, especially if thin material is used;
- on one side of the skirt the vent itself is glued, and on the other - its allowance;
- seam allowances are ironed inside out;
- The two parts of the skirt are folded right sides together and stitched along the entire length of the middle seam, including the top edge of the vent.
Finally, you should smooth out the seam allowances. Do the same with the slot, but be sure to take into account the direction - to the left side of the product. All that remains is to bend the bottom.
Hello, friends!
The past couple of weeks have been just terrible. At some point, I even managed to have the thought “what if my head breaks into pieces from information intoxication?” Thank heavens, everything worked out well, that is, victory is ours, of course with a small loss of time, in the form of a double redoing of posts. My head is in place, which means I will share with you another tutorial “How to sew a straight skirt with a vent.”
How to sew a straight skirt with a vent?
What we need:
- Fabric 1m (at your discretion, in my case, this is ordinary suiting fabric);
- Concealed zipper 18-20 cm – 1 piece;
- *Dublerin 30 cm;
- Threads to match;
- Tracing paper;
- Thin felt-tip pen, pen or pencil, ruler;
- Measuring tape, scissors, needle, sewing machine;
*Doublerin – available in different colors, the standard set is white, gray and black. It is also recommended to decate it before use. Soak in warm water for 1-2 hours, then dry without squeezing so that the adhesive layer is not damaged. To make gluing more accurate, lightly wet the surface of the fabric first. Glued under high temperature.
Drawing a straight skirt
the method by which I built a drawing of a straight skirt with a vent in the video below (by the way, an example of construction is also here and here):
I liked the video because of the detailed explanations, and also because the author shared additional information about darts along the way.
have a pattern of a straight skirt and a belt in your hands In general, as you have already seen, each author constructs patterns using his own method, the construction principle is the same, but each has its own nuances. Constructing a drawing of a straight skirt with a vent is quite simple, as it turns out.
Let's move on to transferring the skirt pattern onto fabric. I hope you have previously rinsed the fabric in cold water, dried it and ironed it. By the way, I didn’t include allowances in the paper pattern.
We make allowances of 1 cm in the indicated places, as in the drawing. Sorry, the right half in the drawing turned out to be a little wider than the left, naturally they should be identical, except for the width of the slot, on one half it will be 7 cm, on the other 4 cm + an increase.
Lay out the patterns on the fabric lengthwise. We place the front part of the skirt on the fold of the fabric, it will turn out to be solid. And in the intervals we lay out the parts of the belt, the front part of the belt will be solid, and for the back part of the skirt you should get 2 parts.
We trace all the details according to the patterns, then we trace them again with allowances of 1 cm. For the parts of the belt we make allowances of 1 cm, for the parts for the front on the side and along the long edges, and for the parts for the back of the skirt on all 4 sides.
I traced 1 pattern, the one with a 7 cm slot, then on one of the halves I simply cut off the excess to the desired size, leaving + 1 cm for processing. Cut out the details of the skirt, except for the parts for the belt. We will cut them out at the end, when the skirt already has the desired fit.
While the parts are folded, we make small notches on the upper edge of the skirt in order to transfer the darts to the other half, you can stick a needle at the end of the dart, and on the other side, mark a point and connect it with straight lines to the notch points.
The darts have been transferred, we begin to process the cuts on all the parts. I processed them with a zig-zag stitch. I don’t know, maybe everything gets in the way of a bad dancer :), but to be honest, processing the edges with a zig-zag pattern without being able to adjust its width is just some kind of horror, accordingly, it greatly affects the appearance of the product from the inside out.
After you have processed all the outer edges of the skirt parts, I think you don’t have to process the bottom of the product if you plan to fold it twice, i.e. first iron it 0.5 cm, then bend it 3 cm, then the cut is not visible, but with an overlocker everything is simpler, you can overlock the cut of the bottom of the skirt and not fold it twice. Let's get down to the darts. We do not sew them in a straight line, but with a slight convexity. I first laid a line with long stitches, and then, making sure that everything lay well and did not puff up, I laid the next line with smaller stitches.
We do this procedure with all 4 darts. Then we take up the iron. Iron the darts towards the middle. Professionals advise that in order to work well with the product and to reduce errors, it is necessary to iron the product, preferably after each operation.
Next, we begin processing the splines. We cut out 2 pieces from dublerin, it is advisable to cut them along the same length as the skirt. One piece will be 7 cm, the other 4, although I reduced them a little later when I adjusted the slot. So that after folding it, the doubler material is not visible. I have it in white because the store didn't have gray.
By the way, I don’t know how this actually happens, can someone tell me if he knows whether the doubler tape is glued to the entire length or not? When I hemmed the bottom, I realized that I shouldn’t have glued it the entire length, because it thickens in the “corners.”
Below I offer an excellent video (not mine) on how to make such a corner. In the photo below, I made the future “corner” by marking it so that I could see where to bend, remove, etc.
Now you can join the two back parts. We make a basting, leaving room for a hidden zipper. Leave 1 cm from the top edge of the skirt, i.e. The “dog” on the zipper should be 1 cm below the top edge of the skirt. Next, you need to iron the allowances under the zipper, and then iron them. Open the zipper and baste it to the edges of the allowances. How to do this correctly, see the video below.
Hope you coped with the lightning! It's not an easy matter, as it turns out. The next step will be another fitting. That is, I did the fitting after I had basted the zipper, and after making sure that everything fits well at the waist, nothing was too tight or puffy anywhere, I finally and irrevocably sewed the zipper to the skirt. Then, on the outside of the back of the skirt, in the place where the vent ends (at the top), not reaching 1-1.5 cm, pin it with a pin so that the lower joints lie flat and try it on to make sure that the vent does not “run away” anywhere. .
I bring to your attention another video on how to properly process the bottom of a skirt.
We decide on the final length of the skirt, make a basting, iron the side seams, turn in the bottom edge of the skirt by 3 cm, and then sew a stitch along the entire perimeter of the bottom edge of the skirt 0.5 mm from the top edge in a folded state.
Now you can start working on the details of the belt, more precisely, they are called hemming. So you look and I’ll learn all the terms. We cut out and process the sections using zig-zag or overlock.
Then, I adjusted the pieces by placing them (right side to front) to the top edge of the skirt along the entire perimeter. We adjust the parts so that when connecting the facing parts together, the side seams are identical to the side seams of the skirt.
Sew the parts together and iron the seam allowances. Next, we cut out the parts from dublerin and glue them onto the entire facing from the wrong side.
Do not pay attention to the stains, these are from water, they were not yet dry at the time of taking the photo.
Now we will sew the hem to the top edge of the skirt. We apply the facing side to the front side of the skirt and carefully pin it along the entire perimeter. Starting from the center of the front of the skirt and gradually moving towards the zipper.
When you reach the zipper, you will have “tails” approximately 1 cm wide, so leave them. At the end we will fold and sew them.
1 cm from the top cut we lay a stitch along the entire edge, and then, perpendicular to the stitch, we make notches, not reaching it 1-2 mm.
The next step, along the outside of the facing, as close as possible to the seam, we lay another line, while bending the 1 cm allowance left inside with notches under the facing. We do this so that in the future the facing will not “pop out” on the belt. Iron the entire skirt.
Voila, the straight skirt with a vent is ready!