We sew a tablecloth in 1 evening: a master class for beginners
There are several ways to sew tablecloths, because the corners and side cuts of the fabric can be processed in different ways. In this material we have described a traditional and basic method, having mastered which you will be able to sew with your own hands not only festive or everyday tablecloths, but also kitchen napkins, towels and runners with neat corners and edges.
To sew a tablecloth with your own hands you will need:
- A piece of suitable fabric needs to be the right size (from what material is best to sew a tablecloth, read the article “Choosing a tablecloth in 6 steps”; in this master class, the tablecloth was made from linen);
- Threads to match the fabric and decorative trim;
- Sewing machine;
- Sewing supplies: tailor's scissors, ruler, measuring tape, pins, thimble, thread threader, chalk or marker;
- Decor if desired (this could be: sewing, border, fringe, lace, braid, etc.);
- Iron.
How to cut strips of fabric for edging
The strips for edging the blanket should be between 4 and 5 cm wide. It is very convenient to use a long wooden or metal ruler (meter) to mark the stripes.
You can cut strips for bias tape from fabric scraps, and then join them together into one long strip.
The bias tape strips must be cut at an angle of 45 degrees relative to the weft or grain thread. The very name “bias binding” reflects this feature. See also: Processing the neckline and armholes of a dress with bias tape.
How to beautifully hem a rectangular tablecloth
To work you need to prepare:
- piece of fabric;
- matching threads;
- sewing supplies.
Description
We measure the length and width of the tabletop, add two overhang lengths (usually from 20 cm to 40 cm) and two hem lengths (usually 5 cm per side).
It is advisable to wash and iron the fabric first so that shrinkage is minimal when used. The second way is to immediately increase the size by 10-15 cm when determining the length. This is especially important for natural fabrics.
With a hem allowance of 5 cm taken into account, its size in the finished product will be 4 cm.
Cut out a rectangle of the required size.
Place the fabric on a horizontal surface, wrong side up. We turn the cuts to the wrong side by 1 cm and secure them with pins.
Iron around the perimeter.
Then from each corner we measure in both directions an amount twice the size of the hem for the finished product. For example, if our final hem is 4 cm wide, then we measure 8 cm. We connect the resulting points on the fold lines with a straight line.
How to Level a Vinyl Tablecloth
Vinyl oilcloth looks stylish and successfully imitates fabric. When using it, it is difficult to wrinkle, but before the first use the material is usually wrinkled. To smooth it, use an iron and a cotton cloth soaked in water.
Vinyl coating does not withstand strong heat; you should not use the iron at maximum power or stay in one place for a long time. This may ruin the canvas.
By moistening the coating with warm water, get rid of creases and wrinkled places. Water is drawn into a spacious basin or bathtub and a tablecloth is lowered into it. The wet oilcloth is hung in a vertical position and waited until it dries.
How to properly hem a wide edge of a tablecloth
As in the previous master class, first we need to decide on the size of the tablecloth. We add two overhang lengths to the dimensions of the tabletop. For example, if the table measures 80 by 120 cm, then adding 50 cm to each size (25 cm for each overhang) we get 130 by 170 cm.
Before cutting, the fabric must be decatted so that shrinkage is minimal during the first wash.
The edging will be 10 cm wide per side. This means that the dimensions of the main part of the tablecloth will be 110 by 150 cm. Add seam allowances and get the final size of the central part 112 by 152 cm.
We will hem the tablecloth with a double edging, respectively, the width of each piece for it is 10 cm x 2 + seam allowances = 22 cm.
The length of the edging blank strips should be equal to the width and length of the finished tablecloth plus seam allowances. We cut out two strips of 132 cm (= 130 cm + 2 cm) and two strips of 172 cm (= 170 cm + 2 cm). For your own peace of mind, you can increase the allowance slightly.
We bend the cut strips in half and iron them. We get a strip 11 cm wide.
Take one of the strips, step back from the edge 11 cm (= strip width plus allowance), leaving a free end.
Along the remaining length we pin the strip to the wrong side of the tablecloth.
We retreat from the edge a distance equal to the width of the foot, and sew the strip to the tablecloth. In this case, we do not reach the edge of the side by an amount equal to the width of the foot.
In the next photo this moment is clearly visible.
We attach the remaining three strips in the same way. See the next photo for how the corners will look.
Fold the corner inside out, aligning the edging strips.
We apply a ruler to the edge of the fold, draw a line on the edge that is a continuation of the fold line.
Trim off the excess fabric, leaving a 1 cm allowance.
Unfold the edging strip. It turns out to be cut at an angle. We pin strips together.
We carry out the line according to the markings.
We straighten the edging to the sides, ironing the seam allowances.
We turn the seam allowances for stitching the edging and tablecloth to the side of the edging and iron them.
Turn the edging right side out and straighten the corners.
We turn the edges of the edging on the front side of the tablecloth inward so that the edge of the fold covers the stitching seam.
We fix the hem with needles along the entire perimeter.
We sew the line, retreating 0.5 mm from the edge.
What the seam looks like from the wrong side - see the next photo.
We remove thread debris and steam the tablecloth.
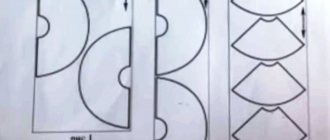
Processing tablecloth corners
Processing the corners of a tablecloth with a double hem, in our opinion, is the most difficult, labor-intensive operation that requires precision and accuracy. First, turn the double-hemmed fabric (pinned) from the wrong side (bottom side) to the right side. We turn away the second hem and leave the first one folded as in the photo in a circle (Fig. 22
).
Our task is to fold the corner with the wrong side out (right side in) as in Fig. 23
in this case, the ends of the edges should be laid strictly parallel, and the corner should be even.
Note: the evenness of the folded corner and the matching width of the hem can also be checked by fastening it with a needle along the seam of the second hem. If the needle on one and the other side hits exactly the fold of the second hem, then you have a perfectly even hem and corner. If not, then most likely your hem width is different.
Fold the corner of the tablecloth and fasten it with a pin (Fig. 24
).
Next, we carefully look at the folds of the fabric, we need to draw a square from the fold of the corner along the groove of the second hem, the sides of which are equal to the width of the second hem, in our case it is 2 cm (Fig. 25
).
Armed with a pencil (you can use chalk or soap on colored fabric), we draw our square (Fig.
26
- feel free to draw, these marks will be sewn inside the corner and hem, they will not be visible).
In Fig.
27
- shows a diagram of a square; the essence of drawing a figure is to find the diagonal along which the seam and cut will run, and along the seam the outer bend of the corner of the tablecloth.
Along the drawn diagonal we fasten the fabric with a pin and, retreating 4-6 mm, cut off a corner (Fig.
28
).
We have a corner; we make the other three by analogy (Fig.
29
—
30
).
Armed with a sewing machine, thread in the color of the tablecloth and, if available, an assistant (in our case it’s a cat :))), we begin sewing the corner (Fig. 31
). You need to stitch the corners, turn them inside out, then stitch all the edges of the tablecloth along the edge of the hem.
First we sew a corner. We select the tightest stitch, sew carefully, slowly and evenly along the drawn line (Fig. 32
).
Attention: make sure that the edges of the fold do not separate and are parallel.
You can sew with 1 line, but we used reverse sewing and in the end we ended up with 3 lines, which in our opinion is more reliable (Fig. 33
).
Having sewn the corner, remove the pins and straighten the edges (Fig.
34
). Excess fabric after the seam can either be cut off or smoothed on the sides using an iron. We cut it off.
By the way: if you cut off the excess fabric, there will be a groove in the corner to the touch; if you spread the excess fabric to the sides and iron it with an iron, then the corner will feel even to the touch.
Carefully straighten the corner, turning it inside out with your finger and straightening the margins (Fig. 35
).
We get the finished corner (Fig. 36
). By analogy, we process the remaining 3 corners of the tablecloth.
The tablecloth blank is ready for stitching the finished hem (Fig. 37
).
How to make perfect “envelope” corners: 2 ways
Neat corners are an important part of great looking table napkins, towels or tablecloths. How to make corners perfectly: 2 options.
This master class is about how to carefully process corners in rectangular products or parts.
First of all, these are home textiles - rectangular tablecloths, towels, napkins, sheets, bedspreads, aprons and so on.
The first processing option is a little simpler, the second is a little more difficult, but it gives a more durable corner. Durability is important for products that are frequently washed and used extensively, such as kitchen towels or table napkins. Another plus of the second option: it is good for working with dense or voluminous fabrics and for hems of large width.
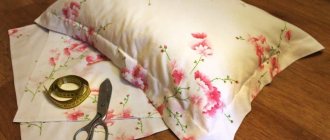
Life hack: how to sew a perfectly fitting pillowcase
For both options, in addition to the cut fabric, you will need:
- marker or pencil for fabric;
- fabric scissors;
- sewing machine and thread.
Sewing stitches: training for beginners
Option 1
Step 1
Divide the width of the allowances left for finishing the edges in half. Fold edges half the width of the seam allowance to the wrong side and iron.
Step 2
Fold the edge the second time to the same width and press again.
Step 3
Unfold the corner. Find the square formed in the middle and draw a line diagonally through its opposite corners.
Step 4
Step 5
Fold the corner over to the wrong side as shown in the photo and align the folds (marked in blue).
Step 6
Press the edges inward again.
Step 7
All that remains is to lay a line.
Option 2
Step 1
Divide the width of the allowance for processing the edges into 2 values. In this case, these can be either 2 identical values (for example, the total width of the allowance is 2 cm, divide into 2 equal parts, 1 cm and 1 cm), or 2 different values (for example, the total width of the allowance is 3 cm, divide by 1 cm for the first hem and 2 cm for the second). The second method may be better suited when working with dense, bulky materials and/or large seam allowances.
Turn the edge over to the wrong side to the desired width (the first part of the total width of the seam allowance) and press.
Step 2
Fold the edge over again (the second part of the total width of the seam allowance) and press.
Step 3
Turn over one fold and align the folds (marked in blue). Iron this corner.
Step-by-step instructions for hemming a corner of a tablecloth
To hem a tablecloth with a corner, you need to perform several steps in sequence.
Forming an angle
- We cut out the required size flap from the fabric, taking into account the indentations for the seam.
- Next, you need to iron the seam : bend the fabric with an indentation of 5 centimeters and run a hot iron on all four sides .
ADVICE . This can be done using a piece of cardboard or marking a fold line with chalk (marker).
- The main thing is that the line is visible on the fabric and washes well. If you are not sure how the dye will behave on the fabric, test it in advance on a small piece so as not to spoil the finished product .
- Once again we bend the fabric inward with an indentation of 5 cm and make an arrow with an iron. This results in a hem of 10 centimeters inside the tablecloth. This distance is quite enough for the edge to be neat and at the same time not massive. If desired, you can thread pins around the entire perimeter of the future seam. This will be especially useful if the piece of matter is large enough.
- Carefully iron the corners so that the line is clearly visible when unfolded..
- We draw a diagonal in the resulting squares and lay a very even line from corner to corner. Carefully cut off the resulting corner at a distance of 1 cm.
- Iron and turn the corner.
Interior Master class Sewing A beautiful corner on the tablecloth is just Fabric
Good day, dear craftswomen! As always, I desperately needed a gift. What to give to a person whom you not only practically don’t know, but also have no time to choose? Functional gifts are always desirable, at least that’s how I like them. My husband suggested the most ideal gift - money in an envelope. eww. what a bore! I offered another option - a tablecloth of my own design! Yesterday I rushed to curtain stores, looked for a rag and today I’m sharing it with you. When I worked in a curtain salon, they taught me how to make such a corner on tablecloths and napkins, and at one time I did them a lot. My daughter needed cute tablecloths and napkins for her room to create coziness and warmth. And they flew off like seeds. And today I sat down and... stuck! I do not remember! Oppa! Well, it’s okay, I sat there, twirled it, shook the dust off the roller balls and finally remembered! I knew it was easy. Well, I tell and show everything in very detail and meticulously.))))
The first step is the most tedious. I use this help: I cut out a strip of cardboard 5 cm wide. The strip is quite long, 15-20 centimeters. This will be the pattern on which I will iron the hem. It is important! In order for the angle to be perfect, you need to work hard with the iron. Well, yes, it’s boring and dreary, but what to do? And for whom is it easy?!)))
Let's get started. I lay out the pattern and bend the fabric along it, and iron it, and with steam, slowly and without haste, so that the arrow is even and strong. This can be done using another method - draw lines on the fabric and iron along them. But I like it better this way and there’s less fuss, and they did it that way in the workshop, and they know better!
We folded and ironed once, and then tucked and ironed again. The result is a hem of 10 cm or two times of 5 cm. This is just right for a tablecloth! The edge is smooth and heavy, it holds its shape perfectly.
Here you can see how it turns out at the corners. We iron the corners to death! Letting the iron sit as it should. We will need those lines that are formed. We do everything very smoothly and carefully. Let's take our time. Then a perfect edge and a smooth, beautiful angle will be guaranteed!
Here I have it already ironed. It’s already beautiful!))) Iron the hem around the entire perimeter of the tablecloth.
During the ironing process, I pin along the entire hem. Since when sewing a corner I will be twisting and turning the tablecloth, I don’t want my efforts to go to waste. I remove the pins during the stitching process, but for now let them hold on!
This is what should happen after we have ironed everything so carefully. Such neat cells. We need a diagonal which I marked with a red line. I fold the fabric along this line, carefully matching the lines on both sides so that all the lines and angles match. It is important.
Here I have already folded it and pinned it with needles along the diagonals. I marked with a red arrow the line where the line will run. If suddenly in this place the lines are not very clearly visible, then you can complete them with a pencil using a ruler. We are finishing drawing this cell, I marked it pink. The sides of the cage are 5 cm.
Here you can see how I drew with a pencil. The pencil will not be visible - everything will go inside. We're scribbling. It is important that the line lies exactly from corner to corner! And so that the angles on both sides coincide. It’s better to double-check than to flog later!
Stitched. Trim off the excess. And cut off a small corner to the line. The photo shows where and what I cut. We no longer need this now.
We spread the seam allowance with our fingers and smooth it out slightly, so that when we turn it inside out, everything will lie neatly and beautifully. Let's turn it inside out! Turn it inside out and place allowances along the ironed lines. It is not difficult. It is important that all seam allowances are laid out neatly and evenly at the corner itself. We straighten the corner itself with a needle.
Voila! The corner is ready! Let's admire and praise ourselves! Well, I’m so smart and beautiful, and my hands stick out. Well, it doesn’t matter where they stick out from, the main thing is that they’re gold))))
Step three is as easy as shelling pears! Now all that remains is to sew the hem, not forgetting to pull out the pins from under the foot in time. Although even if you don’t have time to pull it out, as a rule it’s not a big deal, but sometimes the needle breaks, it’s rare, but it does happen.
Oppa! All is ready. Urrrraaaaaaaaaaaaaaaaa Ole-ole-ole! It took a couple of hours to do everything, including cutting out the tablecloth itself. By the way, I forgot to say. I cut such things when there is a huge flap, and I had 2.8x2.0, but I needed 1.6x2.2 very simply, although tediously. I make a notch on the fabric in the right place and begin to pull out the thread. I pulled it out, how much it twitched, it turned out to be a mark, I cut along it, then I pull it again and cut it again. If the fabric itself is not skewed, there are some that are, then the result is a perfectly even cut. No distortions. This was also taught in the curtain salon.))))
I also want to show how you can decorate a bedspread using this angle. This is a blanket for a sofa made of tapestry. I wanted to “put” him on a thermal stitch. In the atelier, the craftswoman who sewed bedspreads had two methods for decorating the edge, this is one of them. First I did everything as on a tablecloth, stitched the corners, turned them inside out, and then laid the blanket on the floor (I don’t have a large table) and inserted a thermal stitch under the allowances, cut exactly according to the bedspread; it wouldn’t be scary if it was even a little smaller in size. Then I swept it all along the perimeter, drew lines along which I later quilted on a machine. I didn’t make very small cells; there was no such need. And voila! The bedspread is ready. There will be a birthday present for my dear one on his favorite sofa, otherwise there is such fear and horror lying there. And he also resists, you see, it suits him. Men are sometimes completely incomprehensible in their masculine logic.
Step by step how to beautifully sew lace
Depending on the position on the panel, as well as on the nature of the lace itself, the work will differ:
Crochet
If you know how to knit and are not afraid of monotonous work, then the crocheted model is for you.
Here are the possible options:
1. The tablecloth is hemmed around the perimeter with a wide zigzag stitch, then along the resulting loops we begin to knit the pattern we like.
2. First we knit the fabric, then sew it to the edge of the tablecloth:
- We calculate how much crocheted lace we need. The fabric must be moistened and ironed before measuring.
- Choosing a knitting motif.
- We knit a finished valance.
- We bend the edge of the tablecloth.
- Iron it.
- We sew it in a convenient way.
- We apply our knitting to the front side.
- Let's baste.
- Sew with machine stitch.
- Iron through a damp cloth.
If you are tying a product, then make corner elements. If you sew ready-made knitted strips, then we do not sew the corner elements.
We create a tablecloth from motifs
Sequence of work:
We determine how much area the openwork inserts will occupy.
We make them (we cut them out, knit them or weave them).
We cut out blanks of the main fabric of the tablecloth.
We bend the edges and sew a machine zigzag stitch. If desired, you can do this manually using an edge seam.
We connect the openwork and linen elements using air loops and crocheted connecting posts.
We crochet the resulting product along the edge with several rows of double crochets or any openwork pattern.
Steam.
Decor with braid
We trim with ready-made openwork stripes:
- We measure out the required amount of braid, taking into account the corners.
- If the fabric is rough, then you don’t need to tuck it, but just overlay the edges.
- We pin the braid and leave a “loop” at the corners. We start from one corner.
- We hide the excess fabric of the corners in a fold on the underside of the braid. There should be a straight line across the face.
- We reach the place where it all began.
- We hide the end of the braid in a fold at the corner.
- We machine stitch, if necessary, pre-baste.
- You can make a double line, but this is optional.
- Iron the product.
Whatever the style of the interior of your home, there will always be a place for a lace tablecloth.
We sew a tablecloth in 1 evening: a master class for beginners
There are several ways to sew tablecloths, because the corners and side cuts of the fabric can be processed in different ways. In this material we have described a traditional and basic method, having mastered which you will be able to sew with your own hands not only festive or everyday tablecloths, but also kitchen napkins, towels and runners with neat corners and edges.
To sew a tablecloth with your own hands you will need:
- A piece of suitable fabric needs to be the right size (from what material is best to sew a tablecloth, read the article “Choosing a tablecloth in 6 steps”; in this master class, the tablecloth was made from linen);
- Threads to match the fabric and decorative trim;
- Sewing machine;
- Sewing supplies: tailor's scissors, ruler, measuring tape, pins, thimble, thread threader, chalk or marker;
- Decor if desired (this could be: sewing, border, fringe, lace, braid, etc.);
- Iron.
Finishing a blanket with bias tape
Now you can start edging the blanket.
To make it easier to sew on the edging, you should first prepare the edges of the blanket. Pin or baste the top of the quilt with the lining.
After this, you need to lay a connecting stitch, departing from the edge of the blanket no more than 1 cm, so that this seam is subsequently hidden by the stitched binding.
Choosing fabric for a tablecloth
The tablecloth on the dining table should be pleasant, pleasing to the eye and setting you up to enjoy dining. In addition to the aesthetic side, do not forget that the dining table is the place where there will definitely be crumbs, drops of tea and stains from sauces, so the material from which the table covering is made should be quickly wiped off or washed and easily ironed.
A beautiful tablecloth - comfort in the house
When choosing fabric for a tablecloth, you should consider the following parameters:
- Purpose (dining, guest or holiday).
- Form.
- Room interior.
Interior in one style
- Quality of the material.
- Material cost.
For a dining table that will be used daily, linen and cotton in non-marking shades are suitable; these fabrics are traditional and elegant. Silk, satin, textured or smooth look perfect on the festive table; these fabrics are very elegant. It is very convenient to use modern fabrics for sewing:
- Mati, its composition includes 60% cotton and 40% polyester, which makes it wear-resistant and durable. In addition, mati is treated with an oil-repellent substance and greasy stains are removed from it easily and quickly.
Important! This fabric has a fire hazard class 1, it ignites quickly.
- The crane consists of cotton fibers with polyesters. It is treated with agents that repel grease and dirt.
Beauty from a crane
These fabrics are suitable for sewing tablecloths for restaurants and for the home.
Note! When choosing fabric for a tablecloth, you should not buy a smooth and slippery fabric; it will slide off the table and wrinkle under your hands.
There is also a huge selection of Teflon-impregnated textiles - soft, durable, easy to wash, these fabrics have a wide range of colors and textures.
Required materials and tools
To sew a product with your own hands, you will need a minimum set of materials and tools:
- First of all, this is, of course, fabric, thread and needle.
- Sewing machine for smooth and neat seams.
- Scissors (ideally for fabric).
- Tape measure.
- Ruler.
- Tailor's pins to avoid basting the fabric by hand.
- Pattern if the product will have a round or oval shape.
- Chalk or soap for applying patterns to fabric.
You might be interested in: How to properly sew dresses at home yourself
Only basic tools required
Here, perhaps, is the entire list of necessary tools for sewing a tablecloth at home.