Finishing seam allowances with bias tape: 3 easy ways
Finishing seam allowances with tape is a great technique to not only make the backing look neat, but also to give the item individuality and show your attention to what you are doing. Such processing can be in tone or contrasting - in the latter case it also becomes a decorative detail.
Such processing may be visible if it is performed, for example, on an unlined jacket and worn unbuttoned, or it may not be visible if it is performed on a dress. But in any case, a beautiful and neat reverse side gives the product completeness and completeness. In our electronic catalog you will find patterns for sheath dresses, in which you can apply processing of seam allowances with bias tape, and patterns for jackets.
And here you will find other ways to process bias tape:
How to sew bias tape: 3 ways
You will need:
— ready-made bias binding or material and equipment for its manufacture;
- tailor's scissors;
- tailor's pins;
— iron and ironing board;
- sewing machine and thread.
Method 1
This is one of the most common methods, usually called the Hong Kong seam. It gives a beautiful and even finish if you try to make all the seams evenly. This method is better suited for processing straight or not too curved seams. If the seams of your product are curved, try using silk or other thin plastic material for the bias tape.
Step 1
Prepare a bias tape 2.5-3 cm wide. Read and watch the video here to learn how to make a bias tape:
What is bias tape
Step 2
Press seam allowances.
Step 3
Place the binding over the seam allowance and align the left edge of the binding with the edge of the left seam allowance. Secure the binding with tailor's pins.
Sew the binding with an allowance of 0.5-0.7 cm. The width of the allowance depends on how thick and loose the material from which the product is made is. On products made of thin fabric that is not prone to fraying, you can also trim allowances, for example, to 0.3-0.4 cm. Try to lay the stitching as evenly as possible: the appearance of the treatment depends on this.
Step 4
Unscrew the binding from the seam allowance and iron it.
Wrap the seam allowance with binding, hiding the raw edge of the seam allowance. Iron the binding. Before this, you can secure the trim with tailor's pins. The bottom edge of the binding does not turn up: it will be hidden by the seam allowance and will not fray, since the binding is cut on the bias.
Step 5
Sew a stitch that covers only the seam allowance and the binding. Sew along the front side and place the stitch exactly in the seam. Ready.
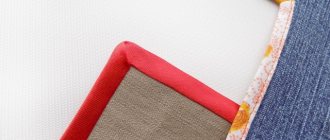
From the inside it will look like this:
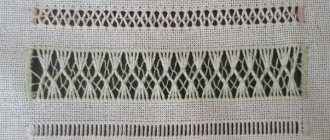
How to quickly and beautifully process seam allowances in a lace product
Method 2
This is the fastest method, but it is primarily suitable for processing straight seams and may cause some errors. For this, it’s good to use ready-made, folded and ironed bias tape, this will speed up the process.
Step 1
Prepare the bias tape, fold and iron it. If you are using pre-made tape, skip this step.
Step 2
Press seam allowances.
Step 3
Now you need to kind of put the binding on the seam allowance. Finished binding usually has one side slightly wider than the other. Position the binding so that the shorter edge is on top.
Wrap the seam allowance with binding and secure with tailor's pins. check that the edge of the seam allowance lies evenly inside the binding, touching its central fold.
Step 4
Sew a stitch, securing both sides of the binding at once. As mentioned, this method may cause errors, especially on the wrong side:
But he is the fastest of the three. If you want a more accurate result, try the method below or the first method.
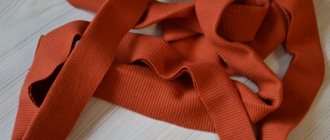
Processing product sections with finished bias tape
Method 3
This method is essentially a cross between the first and second. For this, as for the second method, you can use ready-made bias tape - this speeds up the work. At the same time, there are fewer errors with it, because the binding is stitched not with one, but with two lines. Another advantage is that the binding allowance at the bottom does not remain unfinished.
Step 1
Prepare the binding (including folding and ironing) or use ready-made bias binding.
Step 2
Press seam allowances.
Step 3
Turn the seam allowance away from the product, as shown in the photo, and pin the unfolded tape to the wrong side of the seam allowance, with the right side facing the seam allowance, aligning the edges.
Step 4
Stitch the binding to the seam allowance, stitching exactly into the fold of the binding.
Step 5
Fold the binding over so that it hides the raw edge of the seam allowance.
Sew along the right side, stitching the top side of the binding.
Photo and source: closetcorepatterns.com
Processing short seam allowances with bias tape
MK. Finishing the edge with bias tape.
A very useful master class on how to edge edges without special tapes. The original is here.
“Probably, many of the needlewomen understand the feelings that the assortment of bias tape evokes in our sewing stores. Usually only satin synthetic trim is available. It is narrow, suitable only for edging the thin edge of clothing, it is glued at the joints, and melts from a slightly overheated iron. And finally, it just doesn’t look nice with cotton items. If you find cotton tape on sale, it will definitely be narrow, unlined, the wrong width, or some dirty gray color. And how we want products made with such love to have a beautiful edging! For many years I have been using the method that my mother once taught me. Although this method is often difficult to implement in our conditions for a simple reason - it is not always possible to buy fabric of a suitable color for making trim. But that's another topic... I call this edging method "Lazy Bias Trim" or "Double Bias Trim". In this way, you can edge the edges of products with both straight and bias tape. Bias tape is good for items with curved edges and rounded corners, while straight tape is suitable for edging rectangular items. Irina Lukashenko"
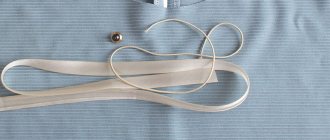
1.
For clarity, I prepared two potholders for processing the edges.
A.
They are cut from ready-made fabric, lined with two layers of terry cloth, quilted and stitched along the edges.
All that remains is to edge them. b.
The photo shows that the corner of one potholder is rounded.
V.
The second tack is prepared with right angles. Accordingly, such corners need to be processed differently.
2.
First, let's figure out how to edge a product whose edges have curvature (in this case, rounded corners).
In this case, the edging must be done only with bias tape. We will prepare everything for its production. A.
Cut the fabric into strips at an angle of 45 degrees to the direction of the grain thread.
I recommend choosing the width of the strip in advance, depending on how wide the edging you want to get and how thick the product you are edging is. In this case, I cut strips 4 cm wide. The thickness of the potholder was not very large - two layers of terry cloth and two layers of “top” and “back”. The final width of the edging is about 0.6 cm. b.
V. If the length of the cut strip for edging is not enough, then the strips need to be connected, as shown in photos
b
and
c.
3.
Fold the prepared binding in half lengthwise and align its open edges with the edges of the product. I do not iron the binding, but only match its edges, because when turning it inside out, the fold forms as if on its own. I stick basting pins across the seam.
4.
Having prepared the facing in this way, you can begin machine stitching.
A.
Pay attention to the angle.
The pins here need to be inserted more often, distributing the resulting folds between them. b.
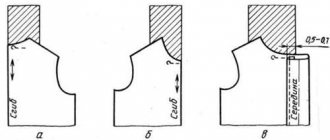
Attach the binding to the product at a distance of 0.5 cm from the edge.
If the technology requires a wider edging, accordingly, the distance from the edge is taken greater (but do not forget to then change the width of the prepared strip!). V.
We turn the binding over to the wrong side and baste it.
I basted directly into the seam, but you can also baste directly along the top of the binding. In principle, I haven’t basted for a long time, but I showed it this way for those who will be doing edging this way for the first time. After the first or second time, you will get the hang of folding the edging right as you stitch. d.
This is what the edging looks like from the inside out at this stage.
5.
Attach the binding and remove the basting.
We sew along the face, and at the same time sew on the fold of the binding on the reverse side. A small nuance.
I really like to stitch not along the edge of the binding, but into the seam. This is a long-term habit. My mother once advised me to hide, if possible, those lines whose quality was in doubt. And since then I almost always do the edging this way - I stitch almost directly into the stitching seam. When you then smooth out the edging on the seam a little, it’s practically invisible from your face! I think this is noticeable in the photo. But if you are confident in the steadiness of your hand, or finishing stitching is necessary, then simply stitch close to the edge along the top of the edging. I hope that we have figured out the bias binding and everything is clear to you.
6.
Now we have another task - edging the product with straight edges and corners.
We cut the strip for the workpiece in the same way as described in paragraph 2
, but not along the oblique, but in the direction of the longitudinal or transverse thread. We also fold the prepared strip in half and align the open edges with the edges of the product. I think that after mastering the method of edging with double bias tape, you will not have any difficulty doing the same with a straight line.
7.
But processing the corner will require a different approach.
A.
Exactly align the apex point of the corner of the product with the fold line of the strip.
b.
Align the fold line of the edging strip with the edge of the product. They must match exactly. The dotted line shows the fold that is formed during folding, but it is not visible in the photo. The preparatory stage is over.
8.
Now let's work on the sewing machine.
We sew the facing with the product, laying a line at a distance of 0.5 cm from the edge. A.
Not reaching 0.5 cm from the edge of the product, stop the machine and, without removing the needle, raise the presser foot.
b.
Rotate the product 90 degrees, using the needle as an axis of rotation.
V.
Trying not to move the product, carefully raise the needle to the upper position, and with your right hand slightly pull the thread out of the needle.
With the left hand we fix the product in place. d.
With the needle raised, carefully shift the corner to the other side and lower the needle, trying to hit the same point. Usually, if you have not moved the product, the needle will hit this point automatically. And then we continue the line to the next corner.
9.
To finish the edging beautifully, let’s prepare the corners a little.
A.
Place folds on each corner in one direction.
b.
This photo clearly shows the angle after grinding.
The point around which we turned the product lies exactly on the fold line of the binding, which was not visible to us before (see photo 7b
).
V.
And here you can clearly see why you need to pull the thread out of the needle a little when passing a corner: to allow this corner to be shifted.
10.
And the final stage.
A.
We fold the edging over to the back side of the product and sweep it.
Gently hold the corner with your fingers, it will turn out automatically. b.
This is the view from the inside out.
V.
Having formed the same corner on the wrong side as on the face, we baste it too.
d.
This is what the corner looks like from the inside, ready for the finishing line. I’ll repeat again, I haven’t done this basting for a long time, I just fix the fold in the corners with a pin, but for the first time I advise you to baste the binding to get a feel for the work.
11.
We are finishing the processing of our product.
A.
Place a stitch close to the stitching seam.
b.
This is what the finished edging looks like from the inside out.
12.
Compare the two options.
On the left is the edging completed with a stitch into the stitching seam, and on the right is the edging completed with a finishing outer stitch. I personally like the first option. And you can do whatever you want, as long as it’s beautiful and you like it! Note!
In the same way, you can edge the edges of large products (quilts, panels), only the width of the edging is naturally wider, and the folds in the corners are usually sewn up with a hidden seam (and not left free, as in our case).
This method of edging is convenient because you don’t need any equipment to make bias binding; you can always prepare it yourself. Advice.
If you are going to edge a small item with a narrow strip, then choose a thinner fabric (by the way, chintz and thin calico of poor quality, which are sold in our stores, are very suitable). If you are edging a quilt or panel, then you need to use thick fabric for edging.