Crochet women's hat in 3 hours
A master class on knitting a simple hat was prepared by Elizaveta Dranichnikova.
Necessary materials:
1. Yarn (acrylic or wool) – 1 skein (100g/150m). 2. Hook No. 3. 3. Pompom (can be taken from any old hat).
Loops used for the pattern: - air loop; - single crochet; - half double crochet; - connecting loop.
So, take some yarn. If your yarn is too thin (such as acrylic), then it is better to knit in two threads. It all depends on what season you will wear the hat: spring or winter. Now we will knit an elastic band. Crochet a chain of 12 chain stitches.
Now we make one air loop for lifting and knit a row with single crochets behind the back wall. Having knitted a row, we turn the product over and again pick up one air loop for lifting and also knit with single crochets behind the back wall.
We continue knitting until the length of the elastic is exactly the same as the circumference of your head. I got about 62 rows.
Next, fold the elastic in half and connect the edges of the elastic. We knit them together with connecting loops.
After the edges of the elastic are connected, we knit 1 row along the entire length of the circumference with single crochets. It turns out one loop in one row. When the row is completed, we begin the next one by making one air loop for lifting. We begin to knit the main pattern. In the second loop of the previous row we knit a single crochet, then two air loops and again a single crochet in the same loop. Next, we skip one stitch of the previous row and knit into the next loop in exactly the same way: single crochet, two chain loops, single crochet….. In the second row we continue knitting according to the main pattern, only now we knit double stitches under two chain loops of the previous row.
• DO NOT FORGET TO DO 2 CHAIN LOOPES AT THE BEGINNING OF THE ROW FOR LIFTING.
Using this pattern we knit the main height of the hat (this is approximately 15 rows of the main pattern).
In the 16th row we begin to decrease: to do this, again cast on two air loops for lifting at the beginning of the row. Then we continue knitting in the same way as the previous rows, only now we make one air loop between the stitches instead of two. That is: we skip one loop, in the next 1 single crochet, 1 air loop, 1 single crochet. We knit the 17th row exactly like 16th.
In the 18th and 19th rows we continue decreasing. Exactly the same pattern, only without any air loops between the columns.
Row 20: knit with single crochets through one loop: single crochet, skip a loop and again single crochet in the next one. Row 21: same as row 20. Row 22: decrease in every 6 stitches. We knit 5 single crochet stitches, from the sixth stitch we simply pull out a loop without knitting. We knit it in the seventh column. Row 23: similar to row 22, only decrease through 4 stitches. Row 24: Decrease through 3 stitches. Row 25: Decrease through 2 stitches.
Tighten the crown with a connecting loop.
Sew on the pompom. Unscrew the rubber band.
Our women's hat is ready!
Wool cap
A cap-shaped beret will look very interesting and not outdated. It knits very easily, but it will add some zest to the image. Take 100 g of wool and knitting needles sizes 3 and 5.
Our cap will consist of three parts - two sides and a bottom. Each part is knitted separately, then sewn together using a hook. All details are knitted in stockinette stitch. The height of the cap is approximately 9 cm, its semicircle depends on the size of your head. When the parts of the cap crocheted using the pattern are ready, baste the side parts so that the seams are on the front side of the work, then crochet it. Now fold the bottom in half lengthwise and press the fold harder. Baste the bottom to the side parts with the seam facing out and tie the fold and bottom of the cap with one row of single crochets.
Lush hat with a “Bumps” pattern
The main headdress has been the hat for many years. You can buy it in a store, or you can knit it yourself. And in this master class by Anna we will crochet a hat using the “Bumps” pattern.
To knit a hat we will need:
- Yarn (white, purple);
- Hook;
- Pompon;
- Needle.
First we need to prepare the base for knitting the cap pattern. To do this, we measure the head and select the number of loops required to circumference the head. The number of loops must be a multiple of two, since the pattern repeat is two loops.
When the required number of loops has been cast, we connect the end and beginning of the chain with a connecting stitch.
We do the first three lifting loops. We will do them in each new row.
And now we knit a row with double crochets. One column per loop.
Let's move on to knitting the pattern. At the beginning of the row we make three loops and yarn over. Insert the hook between the posts and pull the working thread through, catching it with the hook.
We won't knit it. Let's repeat this action three more times.
Now we will knit all the loops on the hook, including the yarn overs with one loop. And we’ll make one aerial one.
We have our first bump.
Now we will skip one loop at the base of the hat and, having made a yarn over, insert the hook into the second loop. Grab the thread and pull it out. Let's repeat this action four more times. That is, each cone should have five undone double crochets.
And again we will knit all the loops on the hook together and make an air stitch.
And so we knit until the end of the row in a circle.
We will knit the next row in exactly the same way, only we will knit the cones between the cones of the previous row.
We knit four or five rows. And then add purple yarn. Now we will knit a little differently.
We also knit cones and the cones of the new row will also be located between the cones of the previous row.
But now each bump will consist of two undone double crochets, because now we are knitting in two threads.
Next we knit all the rows in the same way. We try on a hat from time to time. We need to knit until we knit up from the ear about ten centimeters. And then we will need to reduce the knitting, narrow it.
And we will reduce it like this.
To decrease one cone, we will knit one undone double crochet between the cones of the previous row, and we will make the second one between the next two cones.
And we'll knit them together.
In each row we will make six decreases until the hole at the top becomes very small. Then we'll just pull it off. Reductions can be made anywhere.
After the hole in the hat is closed, we will sew a pompom to it. You can take a white pompom, or you can take a purple one.
This is how you make a crochet hat!
White winter hat with lapel and openwork scarf
White is always a relevant color for winter
It’s good when the hat is warm, but if there is also a lapel, then in winter it will be even warmer. And an openwork scarf will look chic over a jacket, fur coat, or down jacket. Let's look at a knitting pattern for a warm winter hat with a lapel, crocheted. But only those who know how to crochet and knit can knit it.
Size 56 cm You will need: – 450 g of yarn with parameters 190m/100g; – knitting needles No. 3.5; – hook No. 3.5. Density: 23 p. = 10 cm
Scheme for making a women's hat:
- Cast on 96 stitches on the knitting needles and knit 23 cm in stockinette stitch in the round (all stitches are knit).
- For the crown of the hat, knit every second r. All loops are two together. Pull and fasten the remaining 24 stitches.
- At the bottom of the cap for an openwork lapel, crochet 10-12 cm of the pattern according to the pattern. Fold the lapel twice, laying out a beautiful openwork pattern.
- For a scarf, dial 51 air stitches. and knit 180 cm with a pattern according to the pattern (= 12 repeats and 3 stitches for symmetry). Make 46 tassels (23 per edge) by cutting 8 30 cm long threads for each tassel.
Crochet blue hat with pompom for girl
Crochet a bright hat for winter weather and you will immediately feel warmer. The stripe effect is created by the sectional dyeing thread.
For a head circumference of 50-54 cm. You will need: - yarn with characteristics 250m/100g with color changes - 100 grams; – hook No. 4. Pattern for the hat: double crochets in a spiral without connecting stitches.
Blue color for blue winter
How to crochet a hat? Work starts from the top of the cap.
- Cast on 10 chain stitches, join in a circle and work 10 treble crochets.
- Second row: double the number of loops, inserting the hook twice in each gap (=20 stitches).
- In the third r. increase every 1 p. (=30p.), in the fourth - after 2p. (=40p.), 5 and 6 rubles. – no increase, 7 rubles. – add after 1 p. (=60p.), at 8 p. double every 6th stitch (=70 stitches).
- Then continue without increments until the height is 22 cm.
- Finish with one p. Art. b/n.
- Make a pompom from the leftover threads and sew it to the hat.
Source: Little Diana magazine
Pink hat with leaves pattern
The time for beautiful warm hats continues, so today we will knit a hat with the “Leaves” pattern. Due to the pattern, the hat will be very dense and warm. Description of the work step by step and pattern diagram from Anna.
For knitting we will need:
- Pink yarn;
- Hook 3 mm;
- Scissors.
We will knit the hat from the bottom, so we will start with the elastic. We need to cast on a chain of air loops, the number of which will be a multiple of 8. We try it on the head and equate it to a number that will be divisible by 8.
So, we dialed the chain.
We knit a row of dcs.
Now we will knit an elastic band from concave (ВССН) and convex (ВП.ССН) columns.
Concave double crochet (BCSN)
Convex double crochet (VYP.SSN)
At the beginning of the row we make 3 VPs and in the next loop we knit 1 convex stitch. In the next loop we will make a concave column. So we will alternate until the end of the row.
We knit several such rows. It depends on the desired height of the elastic band of the cap.
In the new row we will begin to knit leaves.
We make 3 VP at the beginning of the row.
In the next 6 loops we knit 1 dc.
And we knit into a new loop like this: 1 Dc, VP, 1 Dc here.
Next, in 7 loops we knit 1 Dc, and in the 8th loop we knit 1 Dc, VP and another Dc. So we knit until the end. 7 dc, then 1 dc, VP and 1 dc.
This is our pattern report.
Knitted to the end, connected in 3 VPs. We made 3 PP and made 2 concave double crochets (BCCH).
And then we perform 1 convex double crochet (VYP.Dc)
Then again 3 BCCH.
We have reached our slingshot.
We knit 1 ISS.Dc. Then under the VP of the bottom row we knit 1 Dc, VP And 1 more Dc. And another 1 EX.Dc in the second part of the slingshot.
So knitting continues until the end. We are expanding our leaves.
The next rows will be no different. We will also expand our leaves, and between them we will knit 3 BCDC, 1 DR.DC, 3 BCDC.
Only in each row the number of OUT.DCS on the leaves will increase by 2 times. Under the VP we always knit 1 dc, 1 ch and another 1 dc.
We knit this way until the leaf consists of 8 ISS.Dc.
So, now the leaf needs to be narrowed. To do this, as usual, we knit 3 BC, 1 DR.DC, 3 BC.
But now we are knitting 1 YO.Dc, but we are knitting only the yarn over. Leave 2 loops on the hook. Next, we knit another 1 ISS.Dc not completely. Leave 3 loops on the hook.
Now we knit all the loops on the hook, pulling the working thread through them.
Next, we knit according to the pattern up to the last 2 ISS.DCS of the leaf. We knit them, just like the first 2.
Then everything is repeated.
In the next rows the knitting will be similar. We knit 3 BC, 1 DR.DC, 3 BC. We knit the first 2 and last 2 columns of leaves together in each row. We knit this way until the leaf consists of 1 ISS.Dc.
Next we knit 1 row according to the pattern.
Now in the new row we need to start forming leaves, but they will now be in the place where we knitted a single SCH in each row.
That is, we knit 3 BCCH at the beginning of row. And then we knit 1 OUT.Dc, 1 VP and 1 more OUT.Dc here.
Next, 3 BCCH, 1 OUT.DCC in the place where the leaves were in the previous rows. Next 3 BCCH and again 1 OUT.CCH, 1 VP and 1 OUT.CCH.
We knit like this until the end of this row.
Next we knit in the same way as we knitted the first leaves. That is, all rows up to this row need to be repeated.
Don’t forget, when the top of the sheets consists of 1 OUT.Dc, you need to knit 1 row according to the pattern.
Now we will narrow the cap.
To do this, at the beginning of the row we perform 2 VP. Then we knit 1 BCDC only in the 2nd BCDC of the previous row. That is, we simply skip columns 1 and 3. Next we knit 1 ISS.DC. And again we skip 1 and 3 BCCH of the previous row and knit only in the 2nd. So until the end.
There are 2 VPs in the new row. Next, we knit only in OUT.DCS, 1 OUT.DCS.
We knit 1 row of EX.DC.
Now leave the thread straight and cut it. Pass the thread under the loops and pull off the cap. We bring the tail to the left side and secure it.
A beautiful warm hat is ready!
Crochet hat, ideas from our website
Crochet a hat with earflaps
Ushanka hat size: 57. Materials for knitting earflap hats: cherry-colored yarn (70% wool, 30% acrylic, 300 m/100 g) 100 g, for finishing yarn of the same quality, green color 10 g, hook No. 2.
Read more…
Crochet a hat with a STAR pattern
Before you start knitting a hat with a star pattern, you need to select a thin wool blend yarn, preferably with a small mohair content, because The star pattern is very dense. We recommend using Alize Angora Gold yarn 550m/100g, 20% mohair, 80% acrylic. Or another
Read more…
Crochet hat. Work by Irina Promashkova
Crocheted hat, knitted for myself. Yarn Alize Superlana Klasik 100 g. 280 m (75% acrylic, 25% wool). Hook No. 3.5. The set of loops was made using an elastic set of loops. I got 69 stitches, closed the loops in a circle. The hat is made according to
Read more…
Set of bactus and crochet hat. Svetlana's work
Bactus + hat set. Knitted from Yarn Art Jeans yarn (50% cotton, 50% acrylic), powder color. Yarn consumption is 9 skeins. The hat is double, the top is crocheted, the inside is knitted. The hat is knitted with embossed columns for this reason
Read more…
Crochet beanie hat
Author of the WhiteTesh model. Hats in the now fashionable beanie-cockerel style. I've been looking at this model for a long time, but everything was knitted with knitting needles and I'm too lazy to knit with them. But I really wanted a hat, so I had to take a hook and thread and try it. Yes, threads
Read more…
Crochet hats with 3D pattern. Anna's works
Spring hats crocheted with a 3D pattern Knitted from “Alize Superlana TIG” yarn, 570m per 100g, 3.5mm hook, 2-ply thread. The design is voluminous, lush, light, openwork and airy. Therefore, a lilac hat with a lining,
Read more…
Crochet hat WavyCat (Wavy cat)
Happy holidays to everyone! I want to wish you the warmest and most positive emotions, goodness and peace! And of course I don’t come to you empty-handed! In this post I want to show my new creation, a crochet hat WavyCat
Read more…
Crochet Viking hat. Ksenia's work
On the eve of the New Year holidays, I want to please my family and friends with an unusual gift, made by myself and with practical application. A Viking hat is perfect for solving this problem - it’s creative, warm, and connected.
Read more…
Crocheted hat. Work by Anna Chernova
Hat size: 54-55 cm. Materials: Yarn: YarnArt, SHETLAND, 45% VIRGINWOOL, 55% ACRYLIC Hook No. 5. Basic knitting: convex and concave stitches with 1 crochet (inc 1n, inc 1n) Legend: Chain loop – ch Single crochet - sc Double crochet - d1 Convex double crochet
Read more…
Crochet hat. Work by Anna Chernova
The hat is crocheted from Vita Unity Light yarn 100g/200m with a crocodile skin pattern. Yarn consumption 130g. Size 54-55 cm. Hook No. 4. The pattern has long attracted the attention of needlewomen and does not seem “hackneyed”. The pattern looks especially beautiful when
Read more…
Crochet owl hat. Work by Olga Arikainen
Owl hat is knitted from mohair ANGORA GOLD yarn (10% mohair, 10% wool, 80% acrylic), 550 m, 100 g. Knitting in two threads, hook 3 mm. The eyes are an incomplete circle of concave and convex columns with
Read more…
Crochet hat and snood. Roxana's works
A warm set for a girl consisting of a hat and a snood, knitted from Alize Burcum Nokta+ Kartopu Firenze Tiftik. It took almost 3 skeins of Alize acrylic, a little more than one skein of Kartopu mohair. Crocheted 3 mm. Beanie hat with
Read more…
Warm crochet hat. Work by Maria Casanova
Dear needlewomen, I want to show you a hat that I came up with as a gift for the New Year. It knits quite quickly because the threads are quite thick at 100g/100m, I used hook No. 7. First, tie a ribbon lace according to the volume of the head (I
Read more…
Hat and scarf for a girl - the work of Marina Stoyakina
Set for a girl or girl “Rainbow”! Autumn is just around the corner. Simple to implement, accessible even for beginners, but incredibly positive and convenient!!! The stocking cap is knitted with a double stitch (one third longer than a regular hat) according to any of the proposed patterns,
Read more…
Crochet hat and snood. Works by Nina Kolotilo
A set consisting of a beanie hat and a snood is crocheted from Alize Lana Gold Fine yarn 100g/390m in 2 threads. Yarn composition: 49% wool, 51% acrylic. In total, the set took 3 skeins. The lining of the cap is knitted from another
Read more…
Spring crochet hat - the work of Efimiya Andreevskikh
Hat size: 54-56. Knitted to order with crochet No. 2 from wool blend yarn 340m x 100g. in two threads. Consumption about 50 g. If you add a lining to it, you can wear it in winter. I already knit and wear this pattern
Read more…
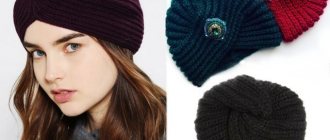
How to crochet a BERET hat for women, a selection of patterns
According to the dictionary, a beret is not just a hat without a visor, but a stylish accessory that does not go out of fashion. There are many types of berets, they can be thin and dense, glamorous and casual, colorful and plain, striped.
Read more…
Learn to crochet great HATS - BEANIES for the whole family
The beanie hat has long been popular for its versatility: it is suitable for boys and girls, men and women, and even kids. _postrf The beanie hat has long been popular for its versatility: it suits both boys and girls and
Read more…
We knit a cat hat with a crochet hook, a selection of descriptions and master classes
For spring or winter, we suggest you knit unusual and bright cat hats. Such hats are worn by both adults and children/ _postrf Our article contains 12 patterns, using each of them you can easily knit a new accessory. Start
Read more…
Blue hat with elastic band
Before the cold weather, many begin to warm themselves: hats, mittens and other accessories and clothing are purchased first. And if you know how to crochet, then you can knit a hat yourself, for example, something like this, which will please both yourself and those around you. This model is universal and, depending on the color, can become a women's, men's, or children's accessory.
To create such a knitted hat you need:
- a ball of wool blend yarn (wool, acrylic, thickness of at least 250 m per 100 grams);
- hook;
- scissors.
As you can see, nothing special. We will start with an elastic band, and the elastic band will be crocheted across, so at first glance it will be a little difficult to distinguish it from an elastic band with knitting needles. However, this elastic band has less stretch and is a little tighter than knitting.
So, we knit the first row of 15 chain stitches using single crochets. Then we turn the knitting over and knit it back, also in single crochets, but we knit it behind the column itself, with a raised concave column. Each time we alternate rows with simple and embossed columns and get a finished elastic band:
Wrong side:
We connect both ends with a hook (you can also use a needle) with connecting columns:
After this, you can proceed to the pattern itself. Making a chain loop and a single crochet:
Then an air loop and another column (in the hole between the elastic columns):
We continue like this until the end of the row. In the next row we knit a column under the arch of the air loop, and in place of the column we knit an air loop. The pattern is very simple but effective:
We knit to the desired height, and then proceed to shortening the loops. They are also simple to perform. First, between every 9th and 10th stitch, an air loop is not knitted:
In the next row we get rid of the air loops between the 7th and 8th columns, then between the 5th and 6th:
And so on until only single crochets remain. After which you need to knit a few more rows, shortening the stitches (knit 2 stitches with one top):
The remaining 10-12 columns can simply be tied together with a thread:
and pull the end inside out.
The hat is ready:
If desired, it can be supplemented with a pompom.
Crochet hats
Beginning knitters should be immediately warned that this is not the product with which to begin learning. If you are just learning, then practice on napkins, circular motifs, first you can knit a light summer beret, and only after that start crocheting a hat; video lessons will tell you about the features of this product and the patterns of the selected patterns.
You can knit a winter hat to match any style of clothing, be it a stylish casual jacket or a sports overall for outdoor activities; you can easily choose both the threads and the model to get the right accessory. You also have a wide selection of yarn colors that you can choose for the product. This can be the most common black or gray yarn for a versatile everyday pattern, you can choose a thread with lurex or kauni yarn with bright color transitions.
You can choose any model: a hat with braids or arans and with a pompom on the top, a warm product with a fleece lining and “ears”, a demi-season thin hat and others. You will definitely choose a model that will fit into your wardrobe; after all, no one is stopping you from knitting several hats: one for a sports down jacket for outdoor activities, the other for a stylish coat for walking around the city.
Crocheting hats for women has its own characteristics, which begin with the choice of yarn. But for children, they often choose a product on which various additional elements are sewn, for example, ears, nose, eyes, to create a “mask” of some cute animal or fairy-tale character. This can make a panda or cat hat, or you can knit a Hello Kitty hat.
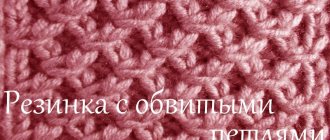
Warm pink hat
When knitting a hat with a beautiful pattern, several types of stitches are used. The main fabric is knitted with embossed purl columns, and lush columns create vertical decorative lines. The band is knitted with single crochets, the last row is knitted in a crawfish step.
Materials and tools:
The bulky yarn used for this work is 50% wool, 50% acrylic. Hook No. 3.5 for the main work and a thin hook for tying the tails. Scissors.
Abbreviations used in the text:
VP – air loop;
runway – air lift loop;
PS – lush column;
RLS – single crochet;
Dc - double crochet.
We start knitting the product from the center. Making an amigurumi ring . It was invented by Japanese knitters for small knitted amigurumi toys. We call it a sliding or magic ring : we lay the thread so that the end of the thread is in the palm of our hand, and we wrap the working thread around the index finger (away from ourselves), insert the hook into the resulting ring, pick up the working thread and, pulling out a loop into the ring, knit an air loop. The ring is fixed and work can begin.
1 row. We begin to knit lush columns into the resulting ring. For the first lush column we knit 2 runways. Then we make a yarn over and insert the hook into the ring. We pick up the thread and pull the loop to the height of the first two lifting air loops. Yarn over the hook again, insert the hook into the ring and pull out another loop. And once again we make a yarn over and pull out a loop. On the hook, in addition to the second lifting loop, three yarn overs and three loops were formed, pulled out from the ring. We knit them all together in one step. We fix the lush column 1 VP.
We begin to knit the next lush column,** pulling a loop out of the ring, then yarn over** and repeat this technique three more times. There should be 3 yarn overs and 4 loops on the hook. We knit them in one step. You need to knit 8 puffy stitches on the ring. Between them we knit one air loop. We close the row with a connecting loop into the second lifting air loop. Tighten the ring by pulling the free end.
2nd row. Using a connecting loop, we pass to the top of the lush column of the previous row. Pull a loop on the hook from the top and make a yarn over. We repeat this technique until 4 loops and three yarn overs are formed on the hook. We knit them in one step, knit 1 VP and from the same top we knit another lush column.
Between pairs of lush stitches we knit one regular double crochet. Next, from the top of the next lush column we knit two lush columns. We close the row with a connecting loop at the top of the first lush column. 8 pairs of lush columns formed in the row. One DC is knitted between pairs.
We complete the row with a connecting loop from the beginning of the row to the top of the fluffy column.
3rd row . Using a connecting loop, we go into the distance between two lush columns knitted from one PS. From this point we knit two lush columns. Next, on one double crochet of the previous row, we knit two purl relief stitches, they are also called concave in contrast to the front convex ones. We do it this way: yarn over, insert the hook from the wrong side to the right of the DC.
Place the hook in front of the post and pick up the working thread to the left of the hook. We stretch the thread in front of the column, bring it to the wrong side and knit a dc.
Next we knit **2 PS and two purl relief stitches**. Repeat the pattern until the end of the row. We complete the row with a connecting loop from the beginning of the row to the top of the fluffy column.
4 row . Using a connecting loop, we go into the distance between two lush columns. We knit two PS over the PS of the previous row.
On two embossed columns we knit three embossed purl columns. On the first stitch we knit one purl stitch, on the second we knit two embossed stitches. Eight wedges are already clearly visible.
In each wedge we add one column, which means 8 columns are added in a row.
5 row . Using a connecting loop, we go into the distance between two lush columns. We knit two PS over the PS of the previous row. In the previous row we knitted three embossed purl stitches. In the fifth row we knit two purl relief stitches on the third stitch.
One column is added to each wedge. We complete the row with a connecting loop at the top of the fluffy column.
6 row . Add one purl relief stitch around the last purl relief stitch in each wedge, for a row of 8 stitches. Thus, we knit to the desired size of the bottom.
7th row. You can determine the diameter of the bottom by dividing the head size by 3.14. From the resulting value we subtract 1.5 - 2 cm, taking into account the stretchability of the knitted fabric. The diameter of the bottom for a baby hat is 15 cm. For size 57, the diameter can be 18-19 cm. You need to take into account the volume of yarn and the thickness of the hook.
8 row. In this row I got the desired bottom diameter size.
In each wedge I knitted seven purl relief stitches.
We knit the height of the cap without any additions.
We knit another 9 rows or as many as you want.
Having received the required height, we begin to knit the band with single crochets.
We knit 7 sc above the embossed columns and two sc above the fluffy columns. Having knitted sc 3-4 rows, we knit the final row in a crawfish step.
The hat is ready.
The master class was prepared by Svetlana Chalkina.
Crocheted hats, ideas from the Internet
Crochet hat Murano paints
.
Hat size: head circumference 54 cm.
You will need:
- Kid Royal Missisipi yarn (62% kid mohair, 38% polyamide, 500 m/50 g) -100 g section-dyed,
- hook No. 1.5,
- brooch clasp.
Attention! Crochet the hat with thread in 2 folds.
Cast on a chain of 6 chains. p., close it in a ring. Next, knit according to pattern 1 to the desired depth of the hat. Then tie the bottom edge of the hat according to pattern 2. Using patterns 3, 4 and 5, tie 3 flowers and connect them together. Sew a brooch clasp to the flower. Attach the flower to the hat.
Crochet hat patterns
Crochet lapel hat
It has long been known that you can knit a simple hat with a lapel in garter stitch using knitting needles. You can also knit such a hat with a lapel diagonally. You can also take advantage of interesting ideas from designer Martina Böhm and start knitting a hat with a lapel
Read more…
Crochet elastic hat for men
Do you want to please your beloved man? Knit him a hat. My man, after such a gift, now wears only hand-knitted hats.
You will need: yarn - PEKHORKA Crossbrand Brazil; 100gr - 500m; 50% merino wool, 50% acrylic. Hook - No. 2. Size (OG) - 58cm. Knitting duration: 2 pm.
Hat - crochet hat
Work by tiklim from the Country of Mothers.
The hat is knitted from Turkish yarn “Alize” superlana klasik 280m in 100g, 75% acrylic and 25% wool, in 2 threads. Yarn consumption -106g. I used hooks size 3 and 3.5.
The fit is perfect, because... There are certain “tricks” when knitting this “Simple” model. I am sure that in a strong wind it will not fly off your head and will even insulate your neck and back of the head. And it also turns out to be suitable for young and older girls! The hat is knitted for size 52-54.
Just a men's hat, crocheted
This hat is actually crocheted and this online is created to introduce you to the technique of knitting such hats. Before you start knitting, I suggest you take a closer look at the pattern. Simple but cute, very reminiscent of 1x1 ribbed knitting needles.
1x1 elastic band is crocheted.
Winter double crochet hat for girls
The task was to combine colors suitable for overalls in one hat, while making something original. This is how this hat was born. It's double, there's no other way.
Crocheted 3.5. Russian yarn, wool mixture. I don’t remember the name, because the essence was in the color and there was nothing suitable in Turkish yarn.
Pattern diagram for a crochet hat
Step-by-step description of a crochet hat
Crochet hat for Minecraft fans
The hat is crocheted using the Tunisian technique, but with a SHORT crochet!
The threads are Turkish, for the lining Alize Puffy Fine is black, for the top Alize Baby Wool is green and black.
Both yarns contain a viscose component, and viscose threads, as is known, stretch during use. And besides, the wool that makes up Baby Wool is apparently treated to prevent shrinkage.
Fabrics made from Turkish wool threads treated with superwash also stretch during the washing process.
This must be taken into account when calculating density and knitting.
Hooks are short 2.5mm for the lining, 3.5mm for the top of the hat.
Step-by-step description of the header
Crochet hat with a relief pattern and just a scarf
Yarn Gazzal Baby Wool. The hat is crocheted with a relief pattern based on a blanket in three threads using 4.5 crochet, it took 153 g.
The scarf is the simplest, I knitted it in one thread with a 2.5 crochet hook, it took 123 g, but I could knit another 25 g, because... my scarf is about 1 meter, not long, under clothes.
If someone likes the hat, I’ll help you knit it according to the MK motif with some changes.
I'm attaching the diagram.
More detailed description of knitting
Crochet beanie hat from Polina Kuts (original description)
In this example, the yarn is 240 m 100 g, the hook is 5 mm. Vertically 45 loops. Horizontally 72 rows, multiples of 6. That is, in each section I have 12 rows: 10 shortened rows (from 35 to 44 sc in a row) and 2 more full rows (45 sc).
Two crochet hats
Two more interesting and simple hats were previously free on Polina Kuts’ blog. Whoever managed to do so tied it up. I have my first hat. And whoever didn’t have time can buy the description on the author’s blog.
Warm crochet women's hat
I knitted the hat using my favorite leaf pattern. And then the scarf came up.
I crocheted the hat with number 3 and the scarf with number 4. Yarn “Naco Bambino Marvel” 50g/130m.
Pattern diagram for a crochet hat
See more details
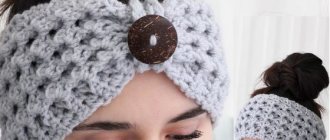
Warm hat - crochet beret for women with “bumps”
Crochet hat for women in green tones
Any soft yarn for the beret, no more than 300m/100g. Hook 4.5-5. The knitting density is average. The beret is knitted with half double crochets and raised stitches. The basic calculation (general principle) of adding and forming the beret itself in the diagram:
With a chess pattern (squares)
In this master class we will knit a hat with a three-dimensional “chess” pattern.
This method of knitting does not take much time and does not require special skills. Even a beginner knitter can handle it.
For knitting we need:
- Brown and white yarn;
- Hook;
- Scissors.
Our hat will be a single color, but it can be made in 2 colors. This way the pattern will be more pronounced.
We will knit from top to bottom.
Let's make a sliding loop and knit 8 half double crochets into it. Tighten the sliding loop.
We connect the part into a ring with a connecting loop.
In the new row we will increase the number of our loops. To do this, we will knit with an increase in each loop of the ring.
Next 1 row with an increase through 1 loop.
1 more row with an increase every 2 loops.
Next, we knit as many rows with an increase as needed in size. We make increases simply: in each row we move the place of increase by 1 loop. That is, if last time we added every 2 loops, then in the new row we will add every 3 loops.
And in the next row after 4 and so on.
As a result, we will get a circle like this.
Now we make 2 VPs and knit 2 RLS (embossed front stitch), 1 in each loop.
Then we knit 2 RICE (relief purl stitch)
Next again 2 radars, 2 fig. So we alternate until the end of the row.
Make 2 VPs and repeat the entire previous row 2 more times.
The new series will be different, but not much.
We do 2 VP.
And now we start the row with 2 figs. That is, where we have 2 radars, we knit 2 RICE in this row.
Then we knit 3 radars into 3 rices of the bottom row.
Then we alternate until the end.
That is, now, where we had LRS, we knit RICE and vice versa.
We knit the row to the end.
Repeat the previous row 2 more times.
And then we knit the first 3 rows again. That is, we start again with the LRS.
So we will alternate these 6 rows of 3 identical ones until the cap reaches the desired length.
The hat is ready. All we have to do is make the binding. You can take yarn of any color that will go with brown. In this case, white thread was used.
We join from behind with a white thread and cast on 3 VP. Next we knit 2 or more rows of CC1H.
Our hat is ready!
Hat with flower
Natalya Vereziy's story on how to crochet a women's hat (with a flower):
“I want to share my experience of crocheting a women’s hat. I bought two types of thread, one angora and the other cotton.
So, let's start knitting a hat. For me, it’s better to start knitting a hat from the headband; to do this, I cast on a chain with a length equal to the circumference of the head. Next, I connect the chain into a ring, while making sure that the chain does not twist. Having connected the chain, we continue to knit in a circle with single crochets until the headband of the hat reaches approximately 8 - 10 centimeters in width. Next we proceed to knitting the pattern, which we knit according to the following pattern.
We knit according to the pattern until the hat reaches the desired height. I determined the height by regular fitting. Having put on the hat, we try to connect its edges on the top of the head; if everything is connected, then the height is sufficient.
The result of the work is like this.
Next, turn the hat inside out and sew its edges together in the shape of a star, as seen in the photo.
When the hat is turned right side out, the seam will look like the following photo.
The hat is ready, all that remains is to decorate it a little, you can sew on buttons or decorate it with stones, I decided to knit a flower.
Flower diagram.
In the pattern, you need to take into account that the sixth row is knitted in the second layer, tying from the wrong side to the third row. As a result, the flower turns out to be voluminous.
Using a needle, sew the flower to the hat.
This is how I crocheted a hat with a flower. It turned out to be a very budget option.
See also:
Spring-autumn crochet hats
In order not to forget the page address and share with friends, add it to your social network:
More interesting:
Tags: Knitted hats, DIY hats
Attention! It is better to write urgent questions in the comments on the website (form at the bottom of the page) or, better yet, directly by email. There are no notifications about comments from the VKontakte form! This form is more for feedback. 
Discussion: 5 comments
- Lydia:
January 15, 2015 at 2:25 pmOnce upon a time I crocheted, I’ll try to remember, maybe I can knit a hat for my daughter, thank you.
Answer
- Tatiana:
January 15, 2015 at 6:46 pm
What a gorgeous flower!!! Very beautiful. I also really love hats with large flowers on the side.