- 82096
- 13-10-2020
- Author: Mysekret Team
- 2
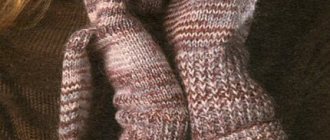
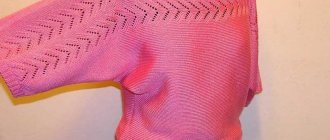
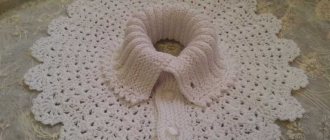
A turban hat or turban is a headdress that came to us from Eastern culture, and which has long established itself in the global fashion industry. But in order not to spend a lot of money on a designer item, you can easily create a turban with your own hands, taking into account personal preferences and characteristics. Knitting needles, yarn and knitting patterns will help with this.
Solid colors
Black, white, gray, wine, emerald, delicate powdery shades, sand, purple and fuchsia.
Among fabric versions, those based on natural fabrics, cotton and knitwear will be especially successful.Knitted options are not whimsical in material, what is more important is how they are made. The “top” will include English and raised elastic, rice and stocking stitch. Purchased or homemade - it doesn't matter.
Here you can find several popular patterns for free, help in choosing the right color and shape.
Knitted turban - what types are there?
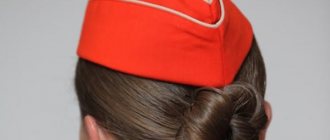
A turban is a cloth twisted in the forehead area. Brooches, jewelry made of beads or pearls, precious stones are attached there, and you can find knitted colored compositions. It is considered a universal headdress, common in Muslim countries where it is worn by both men and women. The differences are often only in shape, color and material. In other countries, such a cap is found mainly among girls.
For fashionistas of the twenty-first century, two things have been invented that are reminiscent of the oriental original:
- Wide bandage.
- Turban hat.
Even a very young girl can master the first of the above, so this type is considered an excellent choice for beginners. Let's look at it step by step: a long fabric of suitable width and with an interesting pattern is knitted, carefully placed on the head, twisted in the forehead area and fixed in the back. We'll talk about this in more detail later. This bandage is worn in relatively warm seasons - spring or autumn.
Note!
How to crochet a mouse and a rat: video master class on crocheting the 2020 symbol
How to knit a warm hat with ears for a newborn boy and girl - video tutorials with patterns, instructions for beginners
How to crochet a beautiful scarf: video master class on creating unusual, beautiful, simple scarves for boys, girls, men and women
For severe winter frosts, a hat that visually resembles a turban is more suitable. It is difficult to perform, but has a number of knitting options, from the simplest to those that only the hands of experienced needlewomen can master.
Knitted turban
The turban is knitted with a pattern of relief stripes from 100 g of fluffy yarn. The thickness of this yarn is equal to 8 threads of yarn No. 32/2. Knitting needles 3 mm. The scarf is made of 30 g yarn with 4 mm knitting needles. Pattern "relief stripes": to complete the pattern, cast on any number of loops. Rows 1, 4, 6, 8: purl all stitches. Rows 2, 3, 5 and 7: knit all stitches. The odd rows of the record are the front side, the even rows are the back side.
The shape of the hat is created by knitting in short rows. Having knitted the number of loops indicated in the entry, do not knit the remaining loops of the row, but turn the knitting to the other side (front or back). To avoid holes in the knitted fabric, when turning, wrap the working thread around the adjacent loop. When knitting the next row, knit the entwined thread together with the loop (see Fig. 6).
Turban cap
Cast on 96 stitches and knit the hat as written.
- I lane.
- 1st r. - 96 p. (1st rib).
- 2nd r. — 96 persons.
- 3rd r. - K91, underknit 5 stitches, i.e. leave 5 stitches unknitted at the end of the row and turn the knitting to the wrong side.
- 4th r. - P86, underwork 5 sts at the end of the purl row.
- 5th r. - Knit 80, knit 6 stitches (there will be 11 in total).
- 6th r. - P74, under-knit 6 stitches (11 in total).
- 7th r. - 85 knits, i.e. knit the row to the end.
- 8th r, - 96 purl.
- II lane.
- 9th r. - 96 p. (2nd rib).
- 10th r. — 96 persons.
- 11th r. - Knit 43, leave the remaining stitches unknitted, turn the knitting to the wrong side.
- 12th r. - 37 p.. underknit 6 sts.
- 13th r. - K34, turn knitting.
- 14th r. - P29, underknit another 5 stitches (11 in total).
- 15th r. — 33 persons.
- For the slot (loop), fasten 8 stitches without tightening, and knit another 38 stitches, leaving 6 stitches unknitted at the end of the row.
- 16th r. - 35 p., turn Knitting.
- 17th day - 30 persons.
- 18th r. - 27 p.
- 19th r. — 38 persons. (to end).
- 20th r. - knit 44 purls. p., 8 air. p. and another 44 p.
- III lane.
- 21st r. - 96 p. (3rd rib).
- 22nd r. — 96 persons.
- 23rd r. — 46 persons.
- 24th r. - 41 p.
- 25th r. — 38 persons.
- 26th r. - 33 p.
- 27th r. - K81, knit 5 stitches to the end.
- 28th r. - 41 p.
- 29th r. — 36 persons.
- 30th r. -33 p.
- 31st r. — 43 persons. (to end).
- 32nd r. - 96 p.
- IV stripe.
- 33rd r. - 96 p. (4th rib).
- 34th r. — 96 persons.
- 35th r. — 46 persons.
- 36th r. - 41 p.
- 37th r. —38 persons.
- 38th row - 33 p.
- 39th r. —81 persons.
- 40th row - 41 p.
- 41st district - 36 persons.
- 42nd r. - 33 p.
- 43rd r. — 43 persons. (to end).
- 44th r. - 96 p.
- Turn the knitting to the front side, count 48 stitches from left to right and put them on pin I. On a separate auxiliary needle from the other ball, cast on 48 stitches (as when casting on the initial row).
- V stripe.
- 45th row - knit 48 purls on the main needle. p. (5th rib), then from an auxiliary needle, purl 48 cast-on loops. When repeating knitting on strips VI and VII in this row, knit 96 purls. P.
- 46th p.—96 persons.
- 47th p.—46 persons.
- 48th r. - 41 p.
- 49th r. — 38 persons.
- 50th row - 33 p.
- 51st r. — 81 persons.
- 52nd r. - 41 p.
- 53rd district - 36 persons.
- 54th r. - 33 p.
- 55th r. — 43 persons. (to end).
- 56th r. - 96 p.
Knit VI and VII stripes like V, i.e. repeat rows 45-56 twice.
- VIII lane.
- 81st row - 96 p. (8th rib).
- 82nd r. — 96 persons.
- 83rd r. — 91 persons.
- 84th r. - 41 p.
- 85th r. —36 persons.
- 86th row - 33 p.
- 87th r. — 43 persons. (to end).
- 88th r. - 48 p.
- Tear off the working thread and place the remaining loops (48 stitches) on pin II. Thread the upper left part of the cap into the loop slot, as indicated by the arrow in Fig. 4 A.
Sew the open loops of the cap along the marks using a knitted seam (see Fig. 3), and the closed edges using a vertical stitch (see Fig. 9). To maintain the shape of the interception, knit a rectangle with stocking stitch 5 cm long and 2.5 cm wide and hem it on the wrong side of the first strip of the cap (this place is indicated by a dotted line in the drawing).
Place the folds of the turban and attach with a thin thread on the wrong side. Place slightly damp gauze in several layers on the appropriate form, put a cap on it, giving it the desired shape, and leave it like that for several hours.
Along the length of the scarf (70 cm), cast on 100 stitches and knit 5 rows. purl stitch (1st r. purl stitch, 2nd r. knit stitch). 5 rub. stocking room, 5 rub. purl, 30 rub. stocking, 5 rows of purl, 5 r. stocking and 5 r. purl. Crochet a fringe at the ends of the scarf.
Insert the hook into the edge of the scarf and pull out a small loop (2 mm). Grab the working thread and pull a long loop of fringe (about 1.5 cm) through the small loop. Without removing the loops from the hook, reinsert the hook into the edge of the scarf, pull out a small loop and through it a long loop of fringe, etc.
Patterns
There are several standard ornaments that are used in the manufacture of the product. Depending on the pattern, it will be lush or smooth, with an abundance of details or stripes, this will determine its final appearance. Some are quite simple, while others will require attentiveness and skill to implement. Let's consider several popular options with a diagram and description.
Stockinet
The simplest option is to knit even rows with knit stitches and odd rows with purl stitches. The edges of this knit are usually rolled up, resembling cinnamon sticks.
English script
Voluminous and elegant, stretches well. The easiest way to knit it is using a template.
Pearl pattern
Aka rice knitting. It is knitted alternatingly: the first row is knit 1, purl 1, the second row is reverse, that is, where the wrong side used to be, now it’s a face.
Note!
How to knit a hat with a lapel using knitting needles or an elastic band: step-by-step instructions for beginners
How to crochet a winter hat: 95 photos of new models of warm, fashionable, original knitted hats with a lapel and a beautiful pattern
- How to knit a beanie hat correctly with knitting needles: video master classes, patterns, knitting patterns for fashionable models
Crochet
A turban made with crochet is a wonderful option for winter and autumn. It can be combined with clothes of different styles. The most harmonious version of such a headdress is knitted from thick yarn, crochet number 4. Depending on the chosen pattern, you can create several original hats.
Easy scheme
The chosen thread should be thick. The fabric is knitted from it like a scarf. Initially, you need to cast on a certain number of air loops. Standard set – chain 90 cm.
Legend:
- 1 tbsp - one single crochet;
- 1 tbsp s/n – one double crochet;
- 1 air p under – one air lifting loop.
How to crochet:
- 1st r: 1 dc under, 1 dc in each loop;
- 2nd row: 2 chains under, embossed double crochets;
- 3rd row: 2 chain stitches, raised double crochet stitches.
Then, for 12 cm, the second and third rows alternate. Afterwards, knit two rows with single crochets. Close knitting.
The product is sewn according to the pattern.
In the video there is a master class on crocheting a turban:
Openwork
Crocheted openwork patterns look very impressive and presentable. Their use is a modern version of winter clothing. The following guidelines should be followed when creating an original copy:
- Choice of threads, knitting needles. The yarn is selected to be of medium thickness. The hook will fit #4.
- The number of required loops is calculated.
- The air loops are crocheted.
- Knitting according to the pattern.
- After repeating the pattern, you should get a canvas 40-45 cm long.
- Then the knitting is divided into two parts with an equal number of loops. Work continues. The same pattern is knitted on each half.
- The product must be assembled. The crossed halves should be carefully sewn together at the edges. From the wrong side, use an invisible seam to grab them at the very base and fasten them together.
Crochet pattern:
Tips for choosing a style/color
The color of the future hat depends on the type of appearance of the woman, her preferences and fashion trends for the current year. A well-chosen one will highlight natural beauty, but a poorly chosen one will reveal flaws. Let's look at the possible types before moving on to step-by-step knitting tutorials.
- Dark-skinned young ladies with fair skin will look good in red - from light to deep.
- Brown hair color and peach skin indicate soft pink and orange palettes.
- Tanned, dark skin and shades of light brown (from ash to hazel) are combined with beige, marsh, and olive yarns.
- Sunny red-haired ladies will be able to decorate themselves with warm notes - brown and yellow.
Ladies with an oval or triangular face can choose any model they like; the square one looks good with voluminous products with draperies, the chubby - elongated without folds, and the thin - small and rounded.
Unusual image
Another simple pattern that compares favorably with conventional headbands and presented handicrafts.
Take 200 grams of yarn and knitting needles No. 6. Cast on 31 loops and knit a long elastic band 3 by 3 according to the principle: 3 knit + 3 purl to the end of the row. The total length of the resulting scarf should be about a meter. We close the loops in one row and sew tightly according to the “loop to loop” principle.
Then we roll the resulting product into a figure eight and sew the inner sides together at the top. We can assume that our clothing is already ready, all that remains is to arrange it correctly. If desired, it is sewn or secured to the head.
We bring different designs into reality
Bandage
One of the simplest options for a knitted turban for girls in this style.
You can knit it from any threads in the way you like.
One of the most interesting patterns is pearl.
After determining the width of the product and calculating the required loops, you can begin to work.
It is better to use circular knitting needles. This will reduce knitting time, as the process will be much more convenient.
The fabric is knitted in a circle of the required length.
After closing the loops, twist the product in the middle, sew with a needle, or crochet.
The bandage is ready.
The video describes in detail how to knit a turban-shaped headband.
Curvy shape
For a fluffy turban knitted, thick yarn with an additional mohair thread is best suited. Needles will be number 5. Knitting the main fabric is done with an elastic band according to the following pattern:
- Cast on the required number of loops. Knit 56 cm (approximately 100-110 rows). Bind off the loops, leaving a large thread. It will be needed to fix the product.
- Connect the resulting rectangle. It needs to be sewn in the middle. The elastic should not stretch.
- Sew the product with a neat seam at the top.
- Using a separate thread, collect the front of the turban. This will form a decorative knot.
- In order to assemble the edge of the hat, you need to use a needle and thread to sew a regular seam around the entire perimeter. Then tighten the thread.
Before assembling the fabric into a single product, it is steamed. Thanks to this, the edges are clearly visible, and the hat is especially fluffy.
With pattern
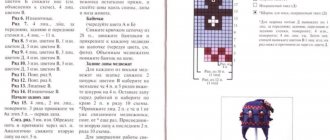
For a beautiful pattern, thin two-color threads are suitable: 45% wool, 55% acrylic. Paired knitting needles No. 5. The hat will be made of several shades of gray. Their alternation in a herringbone pattern creates an original headdress.
Picture describing the creation of a knitted turban:
How to knit:
- Row 1: cr, l, i, l, *knit in a pattern of 20 stitches*, l, i, l, i, cr.
- 2nd r: cr, i, l, i, *knit according to the pattern*, i, l, i, l, cr.
Then repeat rows 1-2 for about 50 cm. Remove the first color, add the second. Continue knitting. Once the required length is reached, the loops can be closed. To obtain the finished product, one part of the canvas is folded in half. The second is threaded inside the formed ring. Both ends are sewn together. The result is a spectacular version with a pattern.
For autumn weather
A women's oriental hat is suitable for autumn, when the cold has not yet set in, but you want to hide your ears from the piercing wind. She leaves her head open, so she won’t spoil her hairstyle, and she looks very cute and feminine. Needlewomen advise using rice or pearl knitting. Any yarn will do, it all depends on preferences and weather conditions in your region.
As last time, a scarf is knitted depending on the size, but this time it should be narrow and small enough to simply wrap around the head and cover the ears. It is twisted and the ends are sewn together.
Advice from a needlewoman! If you take circular knitting needles, it will work without stitching. The appearance of the product will improve slightly.
Varieties of turban
How to make a knitted turban? For this purpose, detailed diagrams and patterns were developed that will decorate the finished product. Recently, models made in the style of minimalism have been in particular demand. The simple pattern will be complemented by a beautiful brooch with inlaid crystals.
The main advantage of a homemade accessory is that it has a perfect fit and corresponds to the specified dimensions. As a result, it can be easily removed and put on.
A knitted turban can look different. The following types of woolen clothing are distinguished:
- classic look;
- Oriental;
- bandage;
- retro.
For each type, a specific pattern and description for knitting a turban is offered. They can be visually distinguished only by the number of knitted folds and the front part. Despite the minimal differences, this headdress has similarities between the models in terms of the knitting method.
For example, the oriental type is knitted in the form of a long fabric. Other types of headdress are knitted in the shape of a fan. After this, all parts are carefully sewn together. We offer a turban knitting pattern for beginners. Here is a detailed description of the workflow.
Crochet turban hat
To crochet a turban, you need to take thick yarn, as the following is a description of a warm winter hat. We advise you to take one that contains the same amount of grams in 100 meters. Carefully read the description on the label - it will indicate the appropriate hook size, this will make the process easier. Our yarn has hook number 6, if you took a different thread, select the hook yourself. Don’t forget, to knit a hat we need measurements - the depth of the hat and the circumference of the head.
Below you can see a master class on knitting, it will allow even the most inexperienced to see the result and understand the process.
This type of knitting has its advantages: an unusual appearance due to the segmentation of the pattern, relative ease of work and a strict appearance. There are a lot of schemes by which you can create a turban for yourself, so we suggest that you familiarize yourself with some of them.
Patterns for knitting a turban with knitting needles
If you still haven’t decided what pattern you would like to knit your turban with, pay attention to several options below.
Option one
To work, you need to dial the number of loops, the number of which is divisible by 6, and do not forget about the edge ones.
- 1st row - *Knit 3, remove 3 stitches for additional stitches. knitting needle and leave it in front of the fabric, knit 3., knit 3. with additional knitting needles*, remove 3 loops for extra. knitting needle and leave it in front of the fabric, knit 3., knit 3. with additional knitting needles
- Row 2 and all even rows - all stitches are knitted inside out.
- Row 3 - all stitches are knitted.
- Row 5 - *Knit 3, remove 3 stitches for additional stitches. knitting needle and leave behind the fabric, knit 3., knit 3. with additional knitting needles*, remove 3 loops for extra. knitting needle and leave behind the fabric, knit 3., knit 3. with additional knitting needles
- 7th row - all loops are knitted identically to the 3rd row.
- Row 9 is identical to row 1.
Knitted turban: photos of new beautiful models
Please repost
0